Properly protecting insulation in a cold attic preserves its properties for decades. Let's explore how and with what to properly seal mineral wool or other insulation to keep it dry and effective.
- Three reasons to cover insulation securely
- Problems arising when using insulation materials:
- Selecting a membrane
- Comparison table of materials
- Vapor barrier or membrane: which film goes where?
- Vapor barrier: installed from below
- Membrane: laid on top
- Practice: How to seal insulation in three steps
- Step 1. Preparing the insulation: the basics
- Step 2. Installing the protective membrane: tightness first
- Step 3: Creating a Ventilation Gap: The Final Touch
- What to do if the attic is planned to be used for storage?
- Common installation mistakes and how to avoid them
- The most critical mistakes made when insulating a cold attic:
- Frequently asked questions
- Is it necessary to cover the insulation if the attic is completely cold and not used?
- What happens if you mix up the vapor barrier and the membrane?
- Can regular plastic film be used for protection?
- How to check if the attic ventilation is sufficient after installation?
- Is the membrane alone enough, without the bottom vapor barrier?
- What is the service life of a properly installed protection?
- Proper insulation protection: results that will save you heat and money
Three reasons to cover insulation securely
Laying insulation between the beams is only half the job. Exposed insulation is vulnerable to the elements, and mistakes at this stage will ruin all your insulation efforts. Incorrect or absent protection leads to material saturating, a sudden loss of insulating properties, and structural failure.
Problems arising when using insulation materials:

Selecting a membrane
In addition to the solutions already mentioned, there are several types of film materials on the market. To help you make an informed choice based on characteristics and budget, we've prepared a visual chart.
Comparison table of materials
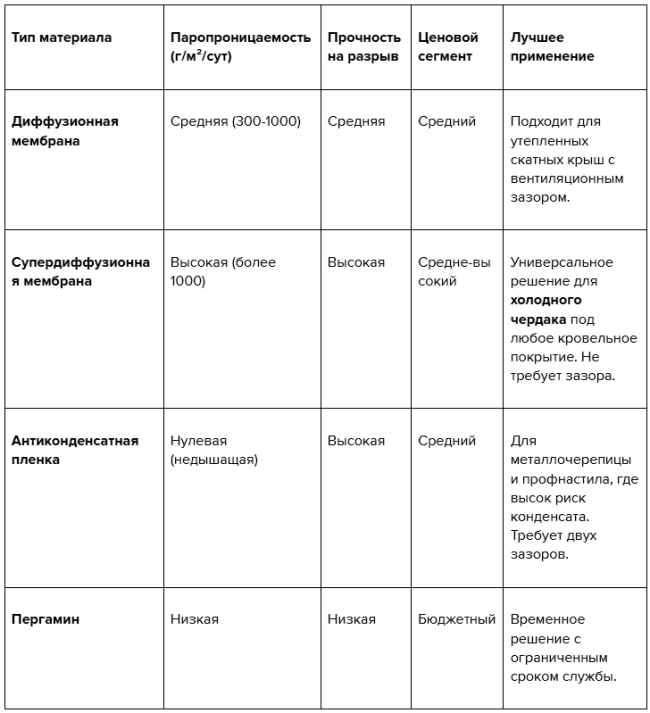
How to read this table? For a cold attic, high vapor permeability is a priority to prevent moisture from being retained in the insulation. This is why a superdiffusion membrane is considered the optimal choice—it combines effective vapor removal with reliable weather protection.
Vapor barrier or membrane: which film goes where?
Different materials are used for different purposes. Their main difference is vapor permeability. Confusion about these materials is the most common mistake, leading to wet insulation and damage to the rafter system. To understand the logic behind protection, imagine the movement of vapor: warm air from the room rises, and our task is to prevent it from damaging the insulation.
Vapor barrier: installed from below
A vapor barrier film is installed on the living space side, directly under the insulation. Its purpose is to create a sealed vapor barrier, preventing it from entering the insulation. For example, KNAUF vapor barrier ensures complete impermeability of this layer when installed correctly.
Membrane: laid on top
A super-diffusion membrane is needed over the insulation in a cold attic. It works on a different principle: it releases any remaining vapor that may have gotten into the insulation, but blocks external moisture and wind. These "breathable" properties are found in KNAUF windproof membrane.
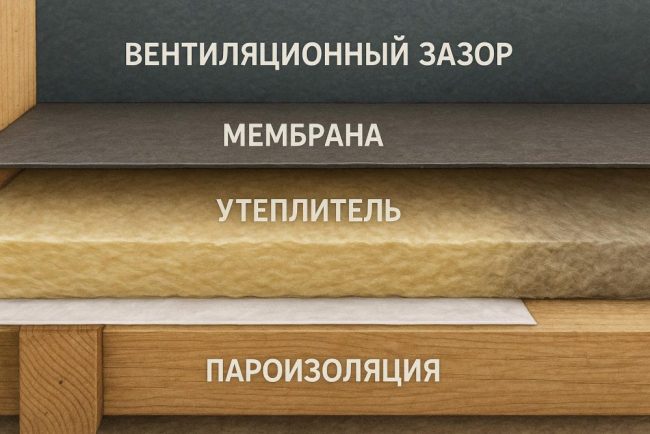
Together, these two layers work as an intelligent system: the vapor barrier blocks the main flow of vapor, and the membrane provides an “escape route” for residual moisture, keeping the insulation dry in any season.
Practice: How to seal insulation in three steps
Before starting work, ensure all wooden structures have been treated with a preservative and the insulation is completely dry. Installation should be carried out in warm, dry weather.
Step 1. Preparing the insulation: the basics
Before covering the insulation, carefully check its installation. The mats should fit tightly, tightly between the joists, with no gaps. A common mistake is leaving even small gaps of 1-2 cm, which become cold bridges. All such gaps must be filled with insulation scraps. The layer thickness must be uniform across the entire surface.
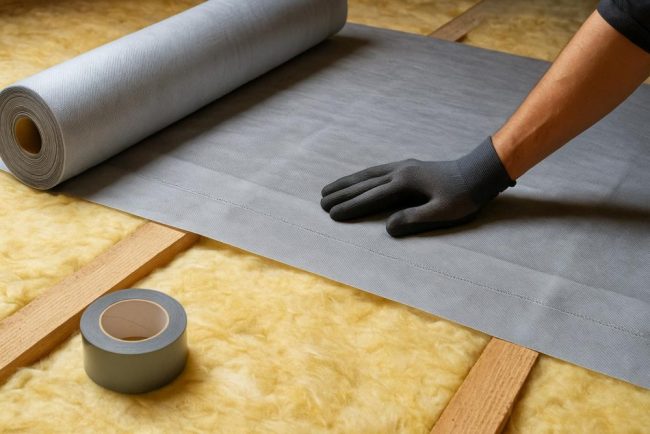
Step 2. Installing the protective membrane: tightness first
The roll is rolled out across the beams, starting from the eaves. The key is to lay the material with the correct side up (usually logos or colored stripes should be facing up). The overlap of the panels should be exactly 15-20 cm.
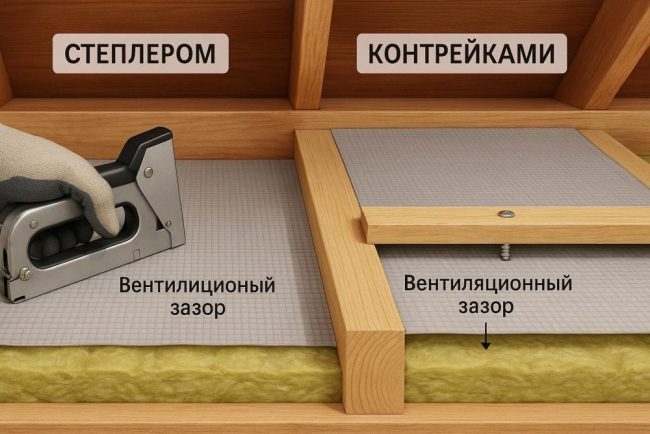
Mounting methods:
- A construction stapler is a quick option for attics where foot traffic is not expected.
- Counter battens - press the membrane to the beams with self-tapping screws, creating a ventilation gap and a base for the future flooring
After fixing, all joints and punctures must be sealed with special vapor-permeable mounting tape. Regular duct tape won't work—it will peel off.
This approach ensures that the membrane will be securely fastened and retain its protective properties regardless of the chosen installation method.
Step 3: Creating a Ventilation Gap: The Final Touch
The presence of a membrane doesn't eliminate, but rather enhances, the need for ventilation. An important rule: the total area of the vents should be approximately 1/300-1/500 of the attic area.
Practical solution: If eaves vents weren't installed during roof installation, no problem. 50mm diameter plastic ventilation grilles can be installed into the finished eaves lining at intervals of 1-1.5 meters.
Air must flow freely through these vents and, after passing under the entire roof surface, exit unimpeded through the ridge vents. The lack of this throughflow is the main cause of dampness and icing, even if all the previous steps are followed correctly.
This approach allows you to correct installation defects and ensure proper air exchange even in a finished structure.
What to do if the attic is planned to be used for storage?
If you want to use the cold attic space for storage, you need to create a durable and safe subfloor. The key is to do this without damaging the existing insulation or impairing its ventilation.
Floor installation technology:
- Counter-batten installation. Wooden blocks (e.g., 50x50 mm) are nailed or screwed across the load-bearing beams, over the installed and glued membrane. This solution solves two problems: it creates the necessary ventilation gap above the membrane and serves as a base for the future decking.
- Roofing. Sheet materials—OSB boards or plywood at least 18-22 mm thick—are laid on the prepared sheathing. The sheets are fastened with screws to the counter battens.
Important: Do not attach the decking directly to the beams through the insulation by pressing it down too hard. This will cause the insulation to collapse, reduce its thickness, and, consequently, reduce its heat-saving properties. This approach allows for a convenient storage area while maintaining the effectiveness of the entire insulation system.
Common installation mistakes and how to avoid them
Knowing the typical mistakes will save you time, money and nerves.
The most critical mistakes made when insulating a cold attic:

Read more:
Fatal confusion: vapor barrier instead of membrane.
- Mistake: Laying a vapor barrier over the insulation. This will trap the vapor and cause the insulation to become damp.
- Solution: Remember this: on the bottom, on the house side, there's a vapor barrier. On top, on the roof side, there's a breathable membrane.
False economy: incorrect gluing of joints.
- Mistake: Using regular or packing tape that peels off after a few months.
- Solution: Use only specialized mounting tapes recommended by the manufacturer. For example, for a reliable seal, you can use Knauf accessories to ensure the integrity of the contour.
Invisible membrane: installed the wrong way round.
- Mistake: Installing the membrane with the impermeable side facing the insulation. This blocks the escape of vapor.
- Solution: Carefully read the instructions and markings on the canvas itself. Typically, the logo or colored stripe should face outward.
Attic Suffocation: Blocked Ventilation.
- Error: Insulation or membrane covers the eaves vents, no gap is left at the ridge.
- Solution: Before laying the membrane, install boxes in the ventilation ducts, and after installation, check that the air path from the eaves to the ridge is clear.
Illusion of protection: lack of ventilation gap.
- Error: Tight laying of the membrane on the insulation without sagging, which leaves no space for ventilation.
- Solution: The membrane should be attached with a slight sag (1-2 cm). This ensures that even with the inevitable deformation of the structure, a gap for air movement will be maintained.
Frequently asked questions
Is it necessary to cover the insulation if the attic is completely cold and not used?
Yes, absolutely. The main threat isn't the cold, but rather moisture from living spaces and the blowing of fibers. Without protection, the insulation quickly loses its properties, and you'll end up heating the outside.
What happens if you mix up the vapor barrier and the membrane?
This is the most critical mistake. If you place a vapor barrier on top, the vapor will be trapped, and the insulation will become damp. If you place the membrane underneath, it won't be able to retain the vapor, and moisture will freely penetrate the insulation. In both cases, it will deteriorate.
Can regular plastic film be used for protection?
No. Polyethylene doesn't "breathe" and will create a greenhouse effect by blocking the vapor escape. This will lead to moisture condensation inside the insulation. Use only specialized materials.
How to check if the attic ventilation is sufficient after installation?
A simple test is to touch the inside of the roofing on a hot, sunny day. If it's very hot and there's no condensation on the structural elements, the ventilation is working. Another sign of good ventilation is the absence of a musty odor.
Is the membrane alone enough, without the bottom vapor barrier?
No, this is not a complete replacement. The vapor barrier underneath blocks the main flow of vapor (up to 95%), and the membrane on top serves as a "backup" to remove residual moisture. They work in tandem.
What is the service life of a properly installed protection?
High-quality vapor barrier films and membranes, such as Knauf, when properly installed, last for decades without losing their properties, ensuring the longevity of the entire thermal insulation system.
Proper insulation protection: results that will save you heat and money
A properly selected and installed membrane is a mandatory final step in attic insulation. It protects the material from moisture and blowing air, ensuring the longevity of the entire insulation system. Neglecting this step or using unsuitable materials negates the effectiveness of even the most expensive insulation, leading to significant heat loss and possible freezing of the structure.