Plastering a house's façade is an important stage of exterior finishing, not only giving the building an aesthetically pleasing appearance but also providing additional protection against moisture, temperature fluctuations, and mechanical damage. This process requires precision, technical know-how, and the right choice of materials. In this article, we'll discuss how to properly plaster a house yourself or under the supervision of a contractor to ensure a durable finish that complies with building codes.
- Why do you need to plaster the facade of your house?
- Types of plaster for facades
- Preparing walls for plastering
- Necessary tools and materials
- Step-by-step instructions for plastering a facade
- Step 1: Installing Beacons
- Step 2: Preparing the solution
- Step 3: Applying the base coat
- Step 4: Alignment
- Step 5: Apply a second coat (if necessary)
- Step 6: Grouting
- Step 7: Removing Beacons
- Mistakes to Avoid
- Drying time and further finishing
- Helpful tips
- Conclusion
Why do you need to plaster the facade of your house?
Plastering external walls solves several problems at once:
- Protectionfrom atmospheric influences: moisture, wind, ultraviolet;
- Insulation(when using appropriate mixtures);
- Surface levelingwalls;
- Improving appearancefacade;
- Preparation for decorative finishing(for example, painting or applying textured plaster).
Plastered walls last longer, wear out more slowly and require less maintenance.
Types of plaster for facades
Various types of plaster mixes are used for exterior work. Here are the most common:
- Cement-sand plaster
A classic composition of cement, sand, and water. It is highly durable, moisture-resistant, and resistant to mechanical damage.
- Lime-cement plaster
It is more flexible, fits well on walls, has antibacterial properties, but is inferior to cement in strength.
- Acrylic
A ready-to-use decorative mixture with high elasticity and crack resistance. It is primarily used for finishing.
- Mineral
A mixture based on cement and mineral fillers, has excellent vapor permeability.
- Silicone
An expensive but durable plaster. It is highly stain-resistant and impervious to moisture and UV rays.
The choice of plaster type depends on climatic conditions, the condition of the walls and the budget.
Preparing walls for plastering
Plastering is impossible without proper surface preparation. The preparation process is as follows:
- Surface cleaning
The walls must be completely cleaned of dust, dirt, grease stains, and any remaining old finishes. Use a wire brush, putty knife, and a construction vacuum cleaner.
- Removing weak areas
Old coverings that are no longer adherent to the wall must be removed. Concrete and brick foundations must be checked for strength.
- Antiseptic treatment
In the case of wooden or porous surfaces (e.g. aerated concrete), be sure to treat the surface with an antiseptic.
- Installation of reinforcing mesh
To improve adhesion and prevent cracking, metal or plastic plaster mesh is attached to the walls. This is especially important when applying thick layers.
- Padding
A deep-penetrating primer is used to enhance adhesion. Apply with a roller or brush in 1–2 coats.
Necessary tools and materials
For plastering you will need:
- Construction mixer or drill with a mortar mixing attachment;
- Trowel, spatula, rule, float, level;
- Containers for solution and water;
- Reinforcing mesh;
- Primer, plaster mix, additives (if necessary);
- Scaffolding or scaffolding (when working at height).
Step-by-step instructions for plastering a facade
Step 1: Installing Beacons
Beacons are guides used to level the plaster layer. They are installed strictly vertically using a level, spaced approximately 1.5 meters apart. They are attached to the mortar, which is then allowed to harden.
Step 2: Preparing the solution
Prepare the plaster strictly according to the package instructions. When mixing the cement-sand mixture yourself, use the following proportions: 1 part cement to 3-4 parts sand, with water added to achieve the desired consistency. Mix thoroughly.
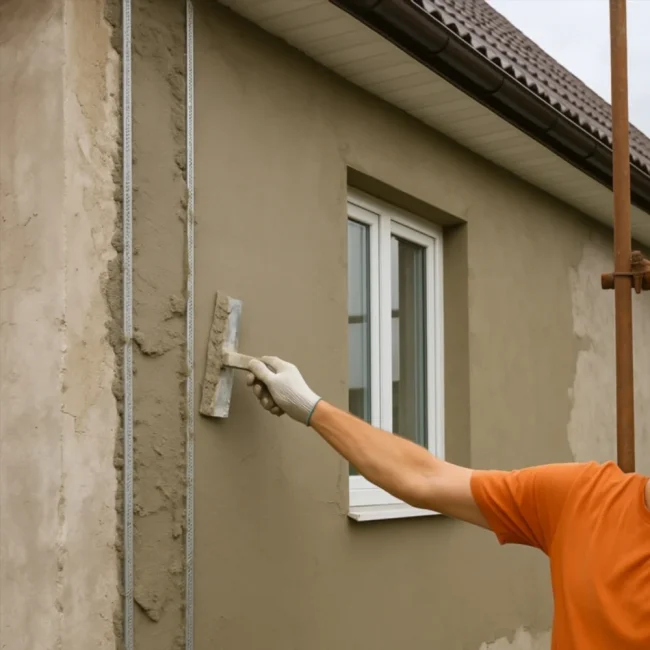
Step 3: Applying the base coat
The mortar is applied to the wall between the beacons using a trowel. It is then leveled with a leveling float, moving from the bottom up. The layer thickness should not exceed 15–20 mm at a time.
Step 4: Alignment
After applying the bulk of the plaster, the surface is leveled using a straightedge along the guides. Excess mortar is removed, and any uneven areas are smoothed out.
Step 5: Apply a second coat (if necessary)
If a thicker layer is required (for example, when leveling severely curved walls), the first layer is allowed to dry for 1–2 days, then the second is applied.
Step 6: Grouting
After 2–4 hours from the application of the last layer, the surface is rubbed in a circle with a float to smooth out minor defects.
Step 7: Removing Beacons
After the plaster has completely set, the beacons are carefully removed, the remaining grooves are filled with mortar and rubbed down.
Mistakes to Avoid
- Applying plaster to unprimed walls results in poor adhesion.
- Working in hot or sub-zero temperatures may result in cracking and peeling.
- A thick layer of plaster in one pass increases the risk of slipping and cracking.
- Refusal of beacons - uneven surface.
- Poor mixing of the solution will reduce the strength of the coating.
Drying time and further finishing
Cement-sand plaster dries within 7-10 days at a temperature of +20°C and normal humidity. It's important to allow the plaster to dry completely before painting or applying decorative coatings. Avoid drafts, excessive heat, and direct sunlight.
The finishing can be done:
- Facade paint;
- Decorative plaster;
- Facing bricks or facade panels (after preparing the base).
Helpful tips
- Use plastic corners on the outer corners of walls to give them strength and aesthetics.
- When working in the sun, be sure to wet the wall with water - this will prevent the moisture from evaporating quickly from the solution.
- Use a facade mesh over the entire surface when plastering foam blocks or aerated concrete.
- It is better to plaster in dry, but not hot weather, at temperatures from +10 to +25 °C.
Conclusion
Plastering a facade is a labor-intensive but affordable process, provided all the necessary technical details are followed. Properly selected materials and careful preparation and application guarantee a smooth, durable, and long-lasting surface. This facade will not only be beautiful but will also reliably protect your home from external influences for years to come.