Making efficient use of the meter or meter and a half above the washing machine is a great idea, especially in a compact bathroom. Modern "lily pads" (flat sinks with an offset drain) seem designed for this purpose: water drains backwards, and the machine doesn't interfere with access or connection.
If you decide to entrust the installation to professionals, technicians at service centers like these can handle the selection of components, careful tiling, and watertight connections. But if you prefer to do it yourself, below we'll discuss how to avoid common mistakes and install a sink over a sink without any surprises.
- Selecting a sink and preparing the space
- What is important to consider before installation
- Tools and materials
- What to buy and prepare in advance
- Marking and installation of brackets
- We make the fastening even and secure
- Connecting water and drainage: step by step
- Assembly diagram to prevent leaks
- Common mistakes, safety and care
- What to avoid and how to extend the service life
Selecting a sink and preparing the space
What is important to consider before installation
Before buying a sink, measure the niche and dimensions of the washing machine. There needs to be at least 20–30 mm of clearance from the lid of the machine to the bottom of the sink—the machine vibrates slightly during the spin cycle, and we don't want contact with plastic or metal. Leave at least 10 mm of clearance on each side to allow the machine to breathe and prevent vibration from transferring to the walls and cabinet.
A lily-shaped sink, 10–15 cm deep, with the drain offset to the back wall, is ideal. This shape prevents water from splashing onto the machine, and the drain trap drains directly to the wall. Make sure the sink includes an overflow (to prevent accidental overflows) and a suitable faucet location—either a hole in the bowl or a wall-mounted faucet, if the walls allow.
Height. Most washing machines are 82–85 cm high. Ideally, the top of the sink should be 88–95 cm from the floor. Too low and it's difficult to wash your hands and increases the risk of bumping into the machine; too high and it's fine for an adult, but too high for a child.
Wall. It's best to mount the sink on a solid wall or partition of sufficient strength. Tiles aren't a problem if you choose the right drill bit and anchors. If the wall is loose (drywall without a backing strip), install a backing strip or metal backing strip—the sink can't be supported on drywall alone.
Utilities. A 50mm drain point in the wall is the gold standard. If you have a 40mm drain point, use a transition and don't restrict the passage in the trap area. A drain outlet with a stopcock (or a drain outlet on the sink trap with a nozzle) is required for the washing machine. For water, two ball valves are required (one for the cold supply for the washing machine and one for the faucet). Electrical: a grounded socket, a 30mA RCD, and a protection rating of at least IP44, located outside the "wet zone."
Tools and materials
What to buy and prepare in advance
To avoid running to the store mid-installation, assemble your kit in advance. Most of the parts can be found at any hardware store.
- A water lily sink with an offset drain and overflow.
- A flat or bottle siphon with a branch for a washing machine (19–22 mm pipe) and a check valve or air duct (preferably).
- Flexible hoses for the mixer, a water supply hose for the washing machine (if the old one is “tired”), 25–32 mm drain clamps.
- Brackets and fasteners for your sink: anchors/dowels depending on the wall type (for solid brick and concrete - expansion anchors; for hollow brick - chemical anchors or special dowels).
- Mixer (wall-mounted or built-in), eccentrics, reflectors.
- Neutral sanitary sealant (not vinegar-based), preferably transparent or white.
- A drill/hammer drill with a non-impact mode for tiles, a carbide or diamond drill bit for porcelain stoneware, then a drill bit for concrete.
- Level (60 cm or laser), marker/pencil, masking tape, tape measure.
- Adjustable/open-end wrenches, screwdrivers, knife, rags, gloves.
- Transitions to the sewer: 50/40 cuffs, 45° and 87° angles, if you need to reverse the drain.
- Anti-vibration pads for washing machine feet.
A useful addition is a vacuum valve (aerator) for the sewer system in the trap area. It prevents the water seal from being pulled out during a powerful flush from the washing machine and eliminates odors. If the bathroom has poor riser ventilation, the valve is a great help.
Before starting, turn off the water by checking the shut-off valves, and unplug the outlet where the equipment will be plugged. Apply strips of masking tape to the tiles where you'll be marking them to prevent the marker from rubbing off and the drill bit from slipping.
Marking and installation of brackets
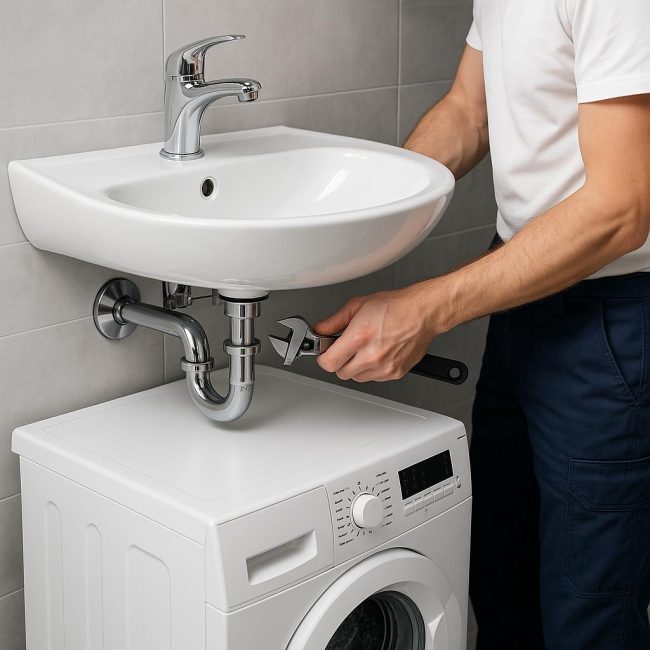
We make the fastening even and secure
First, determine the final height of the sink rim. Place the washing machine in place, level it, adjust the feet, and ensure there's at least 2-3 cm of clearance above the intended sink bottom. Try the sink on "roughly" to ensure the drain trap doesn't hit an outlet, pipe, or box.
Next comes the markings. Mark the horizontal line of the sink's top edge, and transfer the bracket mounting points using a template (if available) or the sink itself. Keep an eye on the level—any unevenness will be visible and noticeable during use, and water will drain in the wrong direction. Apply tape to the tiles and mark the hole centers on the tape with a pencil.
Begin drilling the tiles without impact, at low speed, using a diamond drill bit or a special drill bit for porcelain tile. Once through the tiles, switch to a concrete drill bit and carefully drill deeper under the dowel. It's best to blow dust out of the holes with a blower or vacuum cleaner—this will ensure a tighter fastening.
Install the dowels/anchors and screw in the brackets. Check the horizontal level and the overhang to ensure the sink doesn't hit the wall, creating an unnecessary gap. Hang the sink on the brackets and test the drain trap: the drain pipe should fit smoothly and without any bending. If all is well, remove the sink, run a thin, even bead of sealant along the wall where it meets the sink, hang it back up, and tighten the fasteners. Remove any excess sealant with a damp finger or a putty knife—this will ensure a neat seam and prevent water from pooling.
Do not rest the sink on the lid of the machine, even if it “almost fits” - the appliance should operate freely, and the sink should be held only by the brackets and the sealed fit.
Connecting water and drainage: step by step
Assembly diagram to prevent leaks
Below is a sequence that is convenient to follow:
1) Assemble the trap "on the table." A dry fitting will prevent any surprises. Install the overflow, check the gaskets, and seal the threaded connections with a gentle layer of sanitary sealant (be careful not to overdo it—excess sealant will restrict the passage).
2) Connect the trap to the sink. Tighten it by hand, then tighten it a quarter turn with a wrench—be careful not to overtighten it, to avoid stripping the threads or cutting the gasket.
3) Connect the trap outlet to the sewer. If the wall has a 50 mm tee, install a 50/40 sleeve and a gentle 45° elbow. Try to maintain a slight slope toward the riser (2–3 cm per meter). Avoid "elbows of elbows"—one gentle elbow is better than a series of sharp bends.
4) Connect the washing machine drain. Ideally, connect it to the side outlet of the sink's drain trap. Push the hose in as far as it will go and secure it with a worm-drive clamp. Make a high loop in the hose at the bottom of the sink to prevent the drain from draining and backflow from the bowl into the machine. If the outlet doesn't have a check valve, install an external check valve of the appropriate diameter.
5) Faucet. If the faucet is wall-mounted, align the eccentrics, apply flax/PTFE thread sealant, install decorative cups, and assemble the faucet. If the faucet is on a sink, insert it, tighten the pressure nut, and connect the flexible hoses.
6) Water. Install ball valves with strainers on the supply line (or a separate fine filter before the washing machine). Connect the hose to the washing machine, check the mesh gasket, and tighten it securely.
7) Electrical. A grounded outlet, a 30 mA RCD, and a circuit breaker of the appropriate type are required. Avoid placing the outlet under a trap or near an overflow. If the wiring is old, have an electrician upgrade the line.
8) Test. Turn on the water and check all connections one by one: first the faucet (cold/hot), then filling the bowl with the overflow, then draining the sink and washing machine simultaneously (turn on the drain mode or use the service mode). Wipe all components with a dry cloth and make sure there are no drips.
9) Anti-vibration. Place rubber pads under the machine's feet and adjust the supports. Make sure the machine body doesn't touch the siphon or pipes—otherwise, you'll hear an unpleasant "orchestra" sound during the spin cycle.
If your sewer line has poor draft and the water trap occasionally leaks, install a vacuum valve in the vertical section before the riser. It takes up minimal space, but the effect is immediately noticeable: odors disappear, and gurgling stops.
Common mistakes, safety and care
What to avoid and how to extend the service life
Many problems arise from "little things" that later result in leaks and unnecessary noise. Check your own checklist:
- Incorrect height. If the sink hangs almost on the lid of the machine, vibration will impact the trap and bowl. Maintain a clearance of at least 2–3 cm.
- Poor markings and weak fasteners. The tiles are slippery, and without tape, the drill bit slips, making oval holes and the anchor won't hold. The result is a loose sink and cracks along the grout.
- Sharp bends in drain pipes. The sharper the bend, the higher the chance of clogging. Adjust the bends to smooth angles and maintain the slope.
- The washing machine drain hose is long. Extending it by 2–3 meters increases the load on the pump. Try to keep it to the standard length, and don't wrap the excess hose in loops—make a neat loop.
- Lack of a check valve/high loop. Without them, water from the sink can back up into the drum, and unpleasant odors can enter the bathroom.
- Sealant is a "haphazard" affair. Thick layers, dried snot, and cracks quickly darken and allow moisture to pass through. Apply thinly and evenly, using a soap solution to form the seam.
Safety. Water and electricity are bad bedfellows. Move the outlet away from under the sink, and secure the cord and hoses with clips to keep them out of the way. If possible, install a leak protection system: sensors under the machine and under the trap, plus electric faucets. A 30 mA RCD is a mandatory minimum for wet areas.
Maintenance. Flush the siphon every 3-6 months: turn off the water, remove the bowl, clean out any hair or grease deposits, and rinse with warm water. Check the clamp on the washing machine drain and the tightness of the union nuts. Replace flexible hoses every 5 years, even if everything looks fine—the rubber ages.
Finally, if your washing machine is "jumping," it's not always the sink. Check the shipping bolts (they should be removed), the drum balance, and the load distribution. Place the machine on a firm, level surface, without any rugs or carpets underneath.
By following these steps and a few simple life hacks, you'll neatly position your sink over your washing machine, saving space and creating a comfortable work area free from soot, splashes, and rattling.