Stretch ceilings have become a fixture in the interiors of modern apartments, offices, and commercial spaces. Ease of maintenance, visual lightness, a wide range of colors, and the ability to conceal uneven surfaces have made this type of finish incredibly popular. However, behind this apparent simplicity lie technical subtleties, especially when it comes to installing additional elements, such as lighting, into the ceiling. This is where details such as thermal ring — a small but extremely important device that is often underestimated.
- Why is installing light fixtures in a suspended ceiling not so simple?
- What is a thermal ring and why is it needed?
- Common mistakes when installing lighting fixtures
- Lack of thermal ring
- Incorrect ring diameter
- Poor quality of material
- Incorrect installation of the lamp
- Incorrect choice of lamps
- How to use thermal rings correctly
- What else should you pay attention to when installing lighting fixtures?
- What happens if you neglect the thermal ring?
- Let's sum it up
Why is installing light fixtures in a suspended ceiling not so simple?
Many people believe that installing a light fixture into a stretch ceiling is a simple task. In reality, this is far from the case. Stretch ceiling fabric, especially PVC, is extremely sensitive to temperature fluctuations and mechanical stress. Any error during installation of lighting fixtures can lead to deformation, cracking, sagging, or even complete rupture of the material.
Even a high-quality panel, installed according to all the rules, can be damaged by improper luminaire installation. Excessive heat from the lamps, an unsuitable cutout, or a poorly secured platform—these are all risks that can be avoided by using the right mounting components. One such component is a thermal ring, which serves as a protective and stabilizing element during installation.
What is a thermal ring and why is it needed?
Thermal ring A ring made of heat-resistant plastic or another durable polymer is glued to the stretch ceiling fabric at the location of the future cutout. Its purpose is to reinforce the edge of the opening, prevent stretching of the material, and protect it from overheating caused by the lighting fixture. Despite its simple shape, this ring performs several important functions:
- Fixation - prevents deformation of the canvas around the cutout.
- Thermal insulation - protects PVC from overheating and subsequent destruction.
- Marking the boundaries of the cutout - facilitates neat and precise work.
- Structural stability — enhances the adhesion of the canvas to the mounting platform of the lamp.
Without a thermal ring, the fabric can literally "creep" under the weight of the fixture or due to heat from the lamp. This is especially true for fixtures with halogen or even poorly selected LED bulbs.
Common mistakes when installing lighting fixtures
Errors when installing and connecting light fixtures often lead to costly repairs. Let's look at the most common mistakes that can and should be avoided:
Lack of thermal ring
Some "experts" simply cut a hole and install the light fixture the old-fashioned way, without any additional protective elements. As a result, within a few weeks or months, the edge can crack or tear due to temperature or vibration.
Incorrect ring diameter
A ring that's too small or too large won't do the job. The former won't cover the required protection area, while the latter won't provide the necessary rigidity. The thermal ring should be selected precisely to the size of the future luminaire, leaving a small amount of extra space.
Poor quality of material
Cheap rings made of brittle plastic or low-quality adhesive tear, deform, and don't provide the necessary strength. It's better to choose products from reputable manufacturers with a heat-resistant adhesive.
Incorrect installation of the lamp
Even with a thermal ring, an incorrect installation of the platform itself can compromise the structure. The platform must be installed strictly level, without distortion, and must not overheat.
Incorrect choice of lamps
Lamps with a wattage exceeding the permitted wattage for a given ceiling type and fixture are often installed. This leads to overheating, which the thermal ring may no longer be able to withstand.
How to use thermal rings correctly
For the thermal ring to truly perform its function, it must be installed correctly. Here's a step-by-step guide:
- MarkupDetermine the exact location for installing the light fixture. Make sure a mounting platform is already installed underneath it.
- DegreasingBe sure to treat the surface of the canvas where you'll be applying the sticker. This will ensure a strong bond.
- Fastening the thermal ringRemove the protective film from the adhesive side and carefully press the ring onto the canvas. The alignment must be extremely precise—the ring cannot be re-glued.
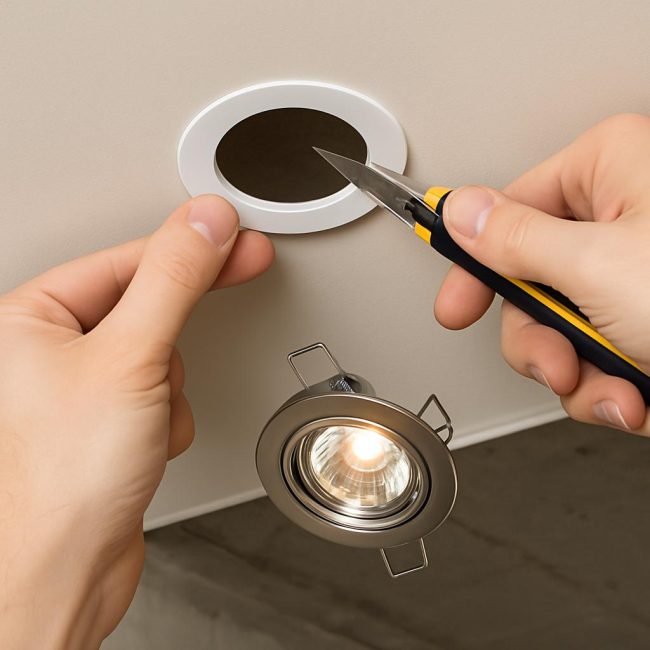
- Cutting a holeOnce the ring is completely glued in place, you can cut a hole inside it. This should be done with a sharp utility knife along the inside edge of the ring.
- Mounting the lampInstall the device into the prepared hole, connecting it to the platform and electrical wiring.
Important! Some installers prefer to attach the thermal ring after cutting the hole rather than before. This method is less reliable, as the adhesive may not cover the edges perfectly. It's better to use the first method.
What else should you pay attention to when installing lighting fixtures?
In addition to installing the thermal ring, it is important to follow a few more rules:
- Temperature conditionsPVC fabric does not tolerate overheating. Avoid using incandescent or halogen lamps without additional thermal insulation.
- Selection of lighting fixturesUse only models designed for installation in suspended ceilings. They have a special housing design that prevents overheating.
- LocationLighting fixtures should not be positioned too close to the edge of the canvas or to the walls. This can cause deformation.
- Altitude coordinationThe mounting platforms of the luminaires must be level with the height of the canvas, otherwise the fixture will "hang" or, conversely, pull the canvas upward.
What happens if you neglect the thermal ring?
Many don't pay attention to this detail until they face the consequences. Here are just a few:
- Tears and sagging of the canvas - especially in places where the lights are often turned on.
- Yellow spots and darkening around the lamp — the result of overheating.
- Refusal of warranty from the installation company — if lamps are installed without thermal rings, this may be considered a violation of operating rules.
- Unsightly appearance - without a ring, the edges of the cutout may be uneven and frayed.
Let's sum it up
Installing light fixtures in a suspended ceiling requires attention to detail. One such unnoticeable yet crucial element is the thermal ring. It prevents the ceiling from warping, protects it from overheating, and ensures the structure's reliability. Ignoring this detail means risking not only the ceiling's appearance but also its longevity.
Therefore, if you plan to install lighting fixtures in your suspended ceiling—whether spotlights, chandeliers, or ventilation grilles—don't skimp on thermal rings. This small investment will keep your ceiling looking great for years to come.
If you're entrusting the installation to professionals, check if they use thermal rings. And if you're installing it yourself, include them in the list of required components. It's a smart move.