Hydronic underfloor heating is becoming an increasingly popular solution for heating private homes, cottages, and even apartments. This system not only provides a comfortable indoor climate but also allows for energy efficiency. However, for underfloor heating to function reliably and for a long time, it's essential to properly construct the so-called "pie"—the multilayer structure on which the heating circuit is installed. In this article, we'll take a detailed look at the layers of the pie for hydronic underfloor heating, the materials used, the installation procedure, and the mistakes to avoid.
- What is a "pie" under a heated floor?
- General structure of the pie
- Base
- Waterproofing
- Thermal insulation
- Reflective backing (optional)
- Reinforcing mesh
- Underfloor heating pipes
- coupler
- Finish coating
- Variations of pie execution
- Common mistakes when making a pie
- Recommendations for the selection of materials
- Conclusion
What is a "pie" under a heated floor?
The "layer structure" of a hydronic underfloor heating system refers to the sequence of layers laid beneath the floor covering. These layers perform important functions: thermal insulation, waterproofing, heat distribution, pipe protection, and, of course, ensuring the strength of the entire structure. The structure must take into account the loads, operating conditions, and technical requirements for the installation of utility systems.
General structure of the pie
A typical pie for a water-heated floor includes the following layers (from bottom to top):
- Foundation (soil or concrete slab)
- Waterproofing
- Thermal insulation
- Reflective backing or film (optional)
- Reinforcing mesh (if necessary)
- Water heated floor pipes
- Screed (cement-sand, semi-dry or self-leveling)
- Finishing coating (tiles, laminate, parquet, etc.)
Each of these layers has its own specific characteristics and may differ depending on the type of foundation, climatic conditions, number of floors, required heat transfer and the materials selected.
Base
The foundation most often used is either compacted soil (for ground-up construction) or a concrete floor slab. The main requirements are strength and stability. The foundation must be level, without large differences in level, cracks, or loose areas. If the underfloor heating is installed on the ground, a backfill of crushed stone and sand must be applied and compacted before laying subsequent layers.
Waterproofing
A waterproofing layer protects the structure from moisture that may penetrate from below. Waterproofing is especially important when installing the system on the ground or in areas with high humidity (bathrooms, basements). Roll or liquid materials are used:
- Polyethylene film with a thickness of 150 microns
- roofing felt
- Bituminous mastic
- PVC membranes
The film is laid overlapping the walls, and the joints are sealed with a special tape.
Thermal insulation
One of the most important layers. It prevents heat loss downward and directs it into the room. High-quality thermal insulation increases the system's efficiency and reduces heating costs. Options:
- Polystyrene foam (extruded): high strength and low thermal conductivity
- Foam plastic (less reliable, but cheaper)
- Polyurethane foam (usually applied by spraying)
- Mineral wool (only in combination with moisture protection)
Recommended insulation thickness:
- First floor: 50–100 mm
- Interfloor overlap: 20–50 mm
Reflective backing (optional)
Additionally, reflective foil film can be placed between the thermal insulation and the pipes. This directs heat upward and improves heat flow distribution. However, in systems with cement screeds, its effectiveness is minimal, as the foil loses its properties when exposed to moisture.
Reinforcing mesh
A metal or plastic reinforcing mesh is needed to increase the strength of the screed and ensure more even heat distribution. It also makes it easy to secure pipes with clamps or clips. The optimal mesh size is 100x100 mm or 150x150 mm, with a wire diameter of 3 to 5 mm.
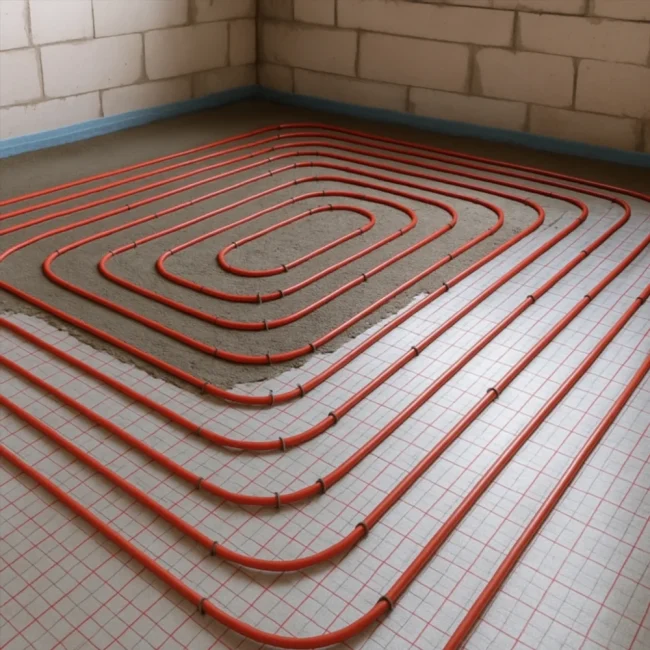
Underfloor heating pipes
Selecting pipes is a key step. The most commonly used are:
- PEX (cross-linked polyethylene)
- PERT
- Metal-plastic pipes
- Copper pipes (less common, due to cost)
The pipes are laid in a "snake" or "spiral" pattern with a spacing of 10-30 cm. The spacing depends on the room's heat loss and the required power. The pipes are attached to a mesh or special slabs with bosses (so-called mats). Expansion joints and thermal damping tape around the perimeter must be provided.
coupler
A cement-sand or semi-dry screed serves as the base for the final coating. It protects the pipes and distributes heat evenly. Requirements for the screed:
- Thickness: not less than 5 cm
- Solution grade: M300 and above
- Reinforcement: if necessary
- Additives: fiber fiber, plasticizers, accelerators
It's important to maintain a temperature pause after pouring—at least 28 days—to allow the system to gain strength. After this, the system is started: initially at 25–30°C, gradually increasing.
Finish coating
The following can be laid on the finished screed:
- Ceramic tiles are the best option for underfloor heating.
- Laminate marked "for underfloor heating"
- Parquet (strictly with resistant species)
- Vinyl flooring
- Carpet (limited)
The use of coverings with low thermal conductivity or unstable geometry is not permitted. Before laying, it is important to ensure that the screed is completely dry and the surface is heated evenly.
Variations of pie execution
On the ground:
- Compacted soil
- Crushed stone
- Sand cushion
- Waterproofing
- Expanded polystyrene 100 mm
- Mesh + pipes
- CPS screed 50 mm
On a concrete floor:
- Waterproofing
- Thermal insulation 30–50 mm
- Mesh with pipes
- coupler
Without screed (dry installation):
Systems with metal plates in plywood or OSB modules are used, suitable for wooden floors.
Common mistakes when making a pie
- Lack of or insufficient thermal insulation— leads to heat loss and uneven heating.
- Incorrect screed thickness- too thin may crack, too thick will impair heat transfer.
- Poor waterproofing- risk of mold formation and destruction of the foundation.
- Errors in pipe laying- incorrect step, intersections, bends.
- Premature activation of the system— the screed does not have time to dry and becomes deformed.
Recommendations for the selection of materials
- Don't skimp on insulation—it will pay for itself through reduced heating costs.
- Use only certified pipes and fittings.
- When pouring the screed, be sure to install a damper tape.
- To control the system, provide thermostats, manifolds with flow meters and pump-mixing units.
Conclusion
Proper installation of a hydronic underfloor heating system is the key to the comfort, durability, and efficiency of the entire system. Each layer has its own purpose, and details cannot be neglected. By following the technology and using high-quality materials, you will have a reliable and economical heating system that will last for decades without repairs or additional costs.