Proper irrigation at your garden plot is a crucial aspect of caring for your vegetable garden, flower beds, and orchard. This is especially important during the hot summer months, when plants require regular, measured watering. Being on site all the time isn't always possible, and manual watering is time-consuming and labor-intensive. The solution is to build an automated or semi-automated irrigation system yourself. In this article, we'll explain in detail the different types of systems available, what's required for installation, and how to calculate and assemble everything.
- Why do you need an irrigation system at your dacha?
- Types of irrigation systems
- Drip irrigation
- Sprinkler irrigation
- Underground irrigation
- Combined systems
- Planning: What to Consider?
- Drawing up a site plan
- Determination of water consumption
- Pipeline marking
- Selecting a water supply method
- Necessary materials and tools
- DIY drip irrigation installation
- Step 1. Preparation
- Step 2: Installing the filter
- Step 3. Connecting drip tapes
- Step 4. Checking the system
- Installation of a sprinkler system
- Marking irrigation zones
- Pipe laying
- Installation of sprayers
- Automation
- A budget option is a system made from plastic bottles.
- How to automate an irrigation system?
- Care and maintenance
- Common mistakes when setting up a system
- An example of a simple irrigation system at a summer house
- Conclusion
Why do you need an irrigation system at your dacha?
An automated or simply centralized irrigation system allows you to:
- save time and effort;
- increase crop yields through uniform soil moisture;
- avoid over-drying or over-watering;
- reduce water consumption;
- provide watering in your absence (for example, on vacation);
- maintain the health of lawns, shrubs and garden trees.
Types of irrigation systems
Before starting the design, it's important to determine which system is optimal for your specific site. There are several common types:
Drip irrigation
Suitable for beds, greenhouses and plantings where it is important to water only the root zone, rather than the entire area.
Advantages:
- water saving;
- minimum evaporation;
- ideal for automation.
Sprinkler irrigation
Simulates natural rainfall. Suitable for lawns, flower beds, and berry patches.
Pros:
- uniform moisturizing;
- visual simplicity.
Underground irrigation
Pipes with holes are laid in the ground, water is supplied directly to the roots.
Specifications:
- effective, but difficult to install;
- does not spoil the appearance of the site;
- reduces evaporation.
Combined systems
On large plots, combined systems are often used: for example, drip irrigation for garden beds and sprinkler irrigation for lawns.
Planning: What to Consider?
To ensure a truly user-friendly and trouble-free system, careful planning is essential. Key steps:
Drawing up a site plan
- Draw a diagram of the site indicating all zones: garden beds, greenhouse, lawn, trees, flower beds.
- Identify water sources: well, borehole, tank, water supply.
Determination of water consumption
- Calculate the approximate daily volume of water required by plants.
- Consider the capacity of the pipes and the diameter of the connections.
Pipeline marking
- Consider how the main and distribution lines will run.
- Avoid sharp corners - they reduce pressure.
Selecting a water supply method
- Gravity (from a tank on an elevated surface);
- Pumping (from a well/borehole using a pumping station);
- Central water supply (if available).
Necessary materials and tools
For a simple irrigation system you will need:
- Polyethylene pipes (usually HDPE 16–32 mm);
- Drip tape or drip hoses;
- Fittings, tees, taps, plugs;
- Pump (if required);
- Filter (required when using a drip system);
- Electronic timer (for automation);
- Pegs, clamps, perforated scissors;
- An awl or a soldering iron (for making holes in the tape).
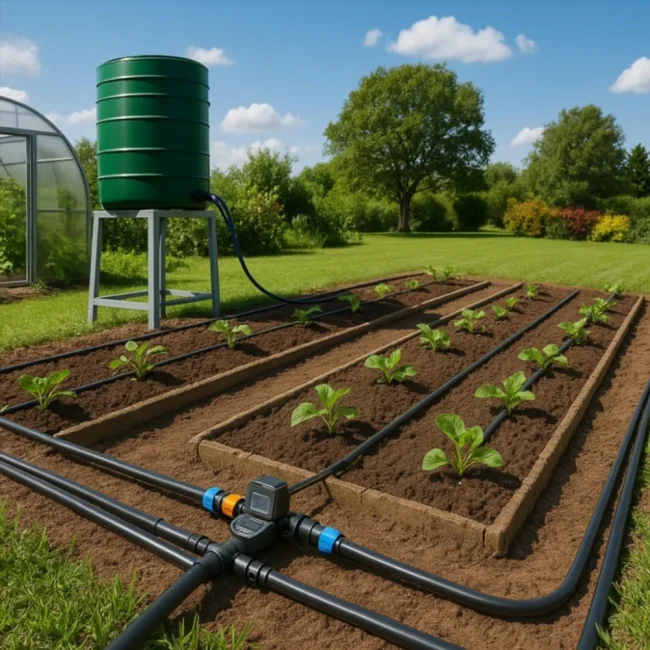
DIY drip irrigation installation
Step 1. Preparation
- Install the tank or connect the pump;
- Lay the main pipe from the water source.
Step 2: Installing the filter
- Before introducing water into the system, be sure to install a coarse or fine filter to prevent clogging.
Step 3. Connecting drip tapes
- Make holes in the pipe with an awl;
- Insert starter connectors and connect drip tapes;
- Place them along the rows of plants;
- Close the ends with caps.
Step 4. Checking the system
- Turn on the water;
- Check the tightness of the connections and the uniformity of the moisture supply.
Installation of a sprinkler system
Marking irrigation zones
- Place sprinklers at the corners of the lawn and along the long sides;
- Make sure that the watering zones overlap (this will ensure uniformity).
Pipe laying
- Use HDPE or PVC pipes;
- Place them in the ground to a depth of 20–30 cm;
- Make all connections using fittings.
Installation of sprayers
- Choose models with the ability to adjust the sector and range;
- Connect solenoid valves if necessary.
Automation
- Connect a controller with a programmable schedule;
- Set up days of the week, start time, and watering duration.
A budget option is a system made from plastic bottles.
For a very simple solution, you can use regular plastic bottles:
- Make holes in the lid;
- The bottle is buried upside down next to the plant;
- The water flows out slowly, moistening the soil.
This method does not require any expenses, but is only suitable for a small number of plants.
How to automate an irrigation system?
Automation can be either complete or partial:
The simplest solutions:
- Watering timers with mechanical or electronic control;
- Using humidity sensors;
- Solar controllers.
Advanced systems:
- Smart controllers with Wi-Fi;
- Control from your phone;
- Integration with weather sensors (do not water if it rains).
Care and maintenance
The system requires regular attention:
- Wash the filter at least once a week;
- In the fall, it is essential to drain the water to avoid pipes bursting due to freezing;
- Check the condition of drip tapes and sprayers for blockages;
- In the spring, inspect all connections.
Common mistakes when setting up a system
- Lack of water filtration (clogged drippers);
- Drip lines are too long (pressure drops);
- Cross-watering (over-watering);
- Incorrect timer setting;
- Use of cheap, low-quality components.
An example of a simple irrigation system at a summer house
Initial data:
- Plot of 6 acres;
- There is a 200 liter tank at a height of 1.5 m;
- Beds in 3 rows of 10 m;
- Drip tape with a step of 30 cm is used.
Solution:
- A 25 mm main pipe extends from the tank;
- Drip tapes are connected in rows through tees;
- A filter is installed at the outlet of the tank;
- The timer works according to the schedule: 6:00 and 19:00 for 30 minutes.
Conclusion
Building a DIY irrigation system for your dacha is a feasible task for any gardener. It doesn't require complex technical skills, but it does require a careful approach to design and component selection. A well-assembled system will not only save time and water but also provide plants with everything they need to grow and bear fruit. You can start with the simplest solutions, and over time, upgrade the system by adding automation and expanding it to cover the entire property.