Properly finished roof overhangs are not only a matter of aesthetics but also an important element in protecting the walls, insulation, and foundation of the house from adverse weather conditions. One of the most popular and time-tested materials for covering overhangs is clapboard. Due to its versatility, affordability, and attractive appearance, it is used in both wood and brick, frame, and other types of buildings. In this article, we'll discuss what roof overhangs are, why they need to be covered, why clapboard is the best choice, and we'll also detail the installation process, including recommendations for material selection and maintenance.
- What is a roof overhang and why is it needed?
- Why choose clapboard: the advantages of the material
- Types of lining for overhangs
- Preparation for installation: tools and materials
- Step-by-step instructions for installing overhangs made of clapboard
- Preparing the base
- Installation of lathing
- Cutting the lining
- Fastening the lining
- End treatment and ventilation
- Painting and protection
- Methods of hemming eaves: end and gable
- Features of caring for overhangs made of lining
- Common mistakes when hemming overhangs
- Alternatives to clapboard for overhang lining
- Conclusion
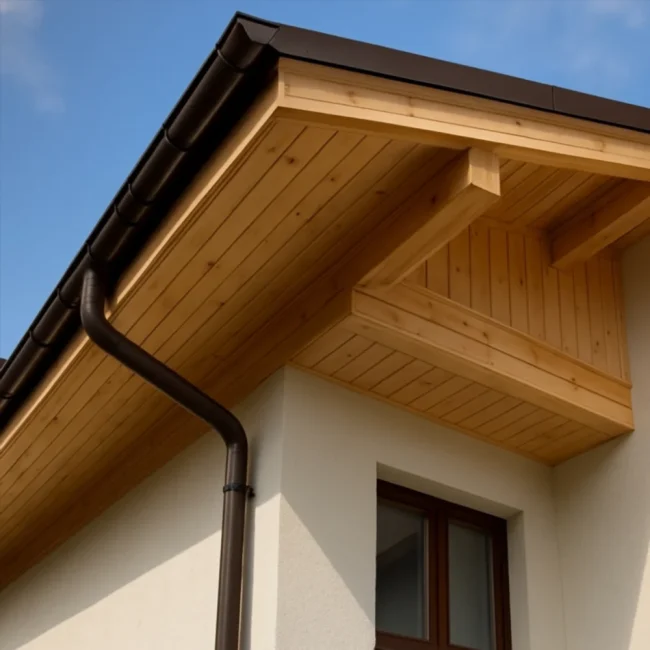
What is a roof overhang and why is it needed?
A roof overhang is the extension of the roof beyond the exterior wall of a house. It typically ranges from 40 to 70 cm, but can vary depending on climate conditions and architectural design. The main functions of an overhang are:
- Protecting walls from rain, snow and sun.Without an overhang, the walls quickly become damp, and the paint and plaster deteriorate.
- Maintaining thermal insulation.The overhang prevents moisture from entering the under-roof space, which is especially important for attics.
- Preventing foundation erosion.By directing water away from the house, the overhang protects the plinth and foundation.
- Decorative function.Hemmed overhangs give the house a finished and neat appearance.
Why choose clapboard: the advantages of the material
Lining is a thin, edged board, processed and profiled for tongue-and-groove jointing. It is often used indoors, but is equally successful for exterior applications, including eaves lining.
Advantages of lining:
- Environmentally friendly.Natural wood is safe, “breathes”, and does not emit harmful substances.
- Easy installation.The tongue and groove fastening system facilitates installation and eliminates gaps.
- Durability.If properly treated, it will last for decades.
- Availability.The market offers a wide selection of prices, quality and wood species.
- Decorativeness.The aesthetic appearance emphasizes the architecture of the house.
Types of lining for overhangs
When choosing siding, it's important to consider its grade, type of finish, and wood species. The most popular options are:
- Pine and spruce.Inexpensive, easy to process, but require treatment to prevent rotting.
- Larch.Durable, moisture-resistant, suitable for external hemming without additional protection.
- Alder, aspen.They tolerate temperature changes well, look beautiful, but are more expensive.
According to quality class, lining is divided into:
- Class A (Extra).No knots, cracks, perfectly smooth.
- Class B.Minor defects are allowed.
- Class C.The cheapest, requires puttying, painting or tinting.
Preparation for installation: tools and materials
Before you start lining the overhangs with clapboard, you need to prepare:
Tools:
- A screwdriver or a drill,
- Jigsaw or miter saw,
- Level,
- Tape measure and pencil,
- Scaffolding or a sturdy stepladder.
Materials:
- Lining (in the required volume with a reserve of 10-15%),
- Lathing bars (usually 40×40 mm),
- Self-tapping screws or nails with anti-corrosion coating,
- Vapor and waterproofing film (if necessary),
- Impregnations and varnish/paint for wood.
Step-by-step instructions for installing overhangs made of clapboard
Preparing the base
First, it's necessary to inspect the condition of the roof structure: the wall plate, rafters, and board ends. They should be level, dry, and treated with a preservative. Damage and rot should be repaired if necessary.
Installation of lathing
The lathing is installed along the entire length of the overhang, perpendicular to the direction of the future lining. The spacing between the lathing pieces is 40–50 cm. All lathing elements must be strictly aligned to avoid distortion during installation.
Cutting the lining
Depending on the type of sheathing, the areas between the rafters or along the entire overhang are measured. The boards are cut to size. The ends of the boards can be treated with a preservative and sanded for a better seal and appearance.
Fastening the lining
The lining is attached to the sheathing using screws or finishing nails. For aesthetic purposes, concealed installation is used: the fasteners are recessed into the groove or at the end. Each subsequent board fits into the groove of the previous one, ensuring a tight, gap-free connection.
End treatment and ventilation
It's important to provide ventilation gaps, otherwise moisture can accumulate inside. Perforated panels can be used in certain areas or ventilation grilles can be installed.
Painting and protection
After installation, the paneling should be treated with an antiseptic and a finishing coat applied—varnish or exterior paint. This will protect the wood from UV radiation, fungus, and moisture.
Methods of hemming eaves: end and gable
There are two main types of overhangs:
- Cornice (horizontal).Simple to implement, the lining is attached perpendicular to the wall, parallel to the ground.
- Pediment (sloping).It is laid at an angle along the roof slope and requires precise measurements and adjustment of the elements.
Combined lining is also common, especially in houses with complex roofs, bay windows, and attics.
Features of caring for overhangs made of lining
Despite its durability, wood requires regular maintenance. Recommendations:
- Every 2–3 years, check the integrity of the coating and, if necessary, renew the varnish or paint.
- Monitor the condition of ventilation gaps.
- Inspect the fasteners and tighten them if they are loose.
- Remove dirt and mold stains with a soft brush and soapy water.
Common mistakes when hemming overhangs
- Lack of ventilation.This can lead to roof fogging and wood rot.
- Fastening without taking into account seasonal expansion.The lining should have a small amount of play to compensate for temperature changes.
- Incorrect choice of material.Using low-quality wood without processing leads to rapid destruction.
- Uneven lathing.Even a slight distortion of the lathing will manifest itself in the curved surface of the lining.
Alternatives to clapboard for overhang lining
Although clapboard remains the classic solution, there are alternatives on the market:
- Soffits made of PVC or aluminum.Easy to care for, resistant to moisture and sunlight.
- Profiled sheet.Durable, but less decorative.
- Plywood and OSB.Require subsequent finishing and protection.
However, the lining wins due to its naturalness, comfort and universal design.
Conclusion
Roof overhangs made of clapboard are a proven and practical solution that combines functionality and aesthetics. This type of roofing protects the structure of the house, improves energy efficiency, and enhances its appearance. The key is to choose the right material, follow the installation procedure, and ensure proper maintenance. Whether you install the roof overhang yourself or hire a professional, you'll have a durable and beautiful roof finish that will last for decades.