To get a bigger harvest, you don't need to install a greenhouse; a small hotbed will suffice. It won't take up much space and will be much cheaper.
An excellent solution in this situation is to build a greenhouse from a profile pipe yourself. You'll find the dimensions and drawings in this article. This reliable and durable structure will allow you to harvest crops earlier.
We also suggest you read the step-by-step instructions - How to build a greenhouse from polypropylene pipes yourself.
- Advantages of a greenhouse made of profile pipes
- Selecting the type of construction
- How to make a drawing yourself
- Tools and materials
- Step-by-step instructions for building a greenhouse
- Preparing the area
- Foundation
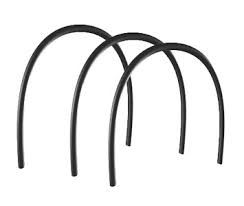
- Making greenhouse arches from profile pipes – 2 ways to bend profile pipes
- Installation of arches
- Selecting the material for cladding
- We attach it to the frame
Advantages of a greenhouse made of profile pipes
The frame plays a key role in a greenhouse, so it must be durable and have stiffening ribs that will maintain its shape and withstand various loads. Profiled metal pipes are the ideal material for the frame.
They have a number of advantages:
- ease of processing;
- the ability to create structures of various shapes;
- long service life - metal profile buildings serve up to 15 years, and as practice shows, even much longer;
- do not require care and protection from pests;
- affordable;
- compatible with any material.
In addition, compared to a wooden structure, a building made from profiled tubular materials is more compact, so placing it on a site will not be difficult.
The only drawback of this structure is the longer construction time.
Selecting the type of construction
Before you begin building a greenhouse from profile pipes yourself, you need to decide on the design and sketch out a drawing. After all, the angle of refraction of sunlight depends on the shape of the structure.
The main types of greenhouses made from this material:
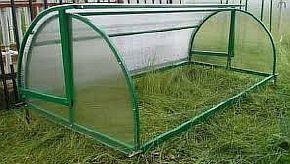
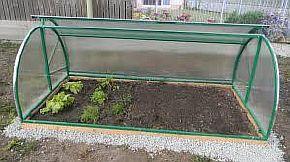
- Arched greenhouses require specialized equipment to create their shape. Otherwise, with the right-sized curved parts and a blueprint, assembling one yourself is relatively easy. The arched structure provides uniform lighting, regardless of the sun's position.
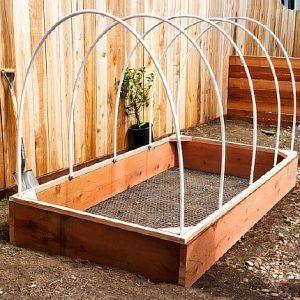
The downside of this model is its limited functionality, as tall crops cannot grow along the walls.
- A single-pitched roof is a simple option that can be mounted to the walls of residential or outbuildings. This compact design saves not only space but also building materials.
- A gable or hipped roof is a separate structure. This type of structure provides better lighting for crops than a single-pitched roof.
Tent-roofed — a simple design with no curved elements. Therefore, gardeners often install it themselves. Furthermore, a greenhouse with a gable roof has the advantage of being able to plant crops of varying heights.
It is worth noting that a hipped roof will cost more than an arched roof, since more material, both base and covering, is required to install the frame.
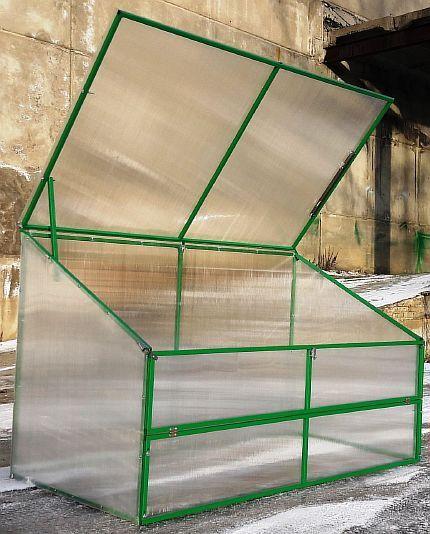
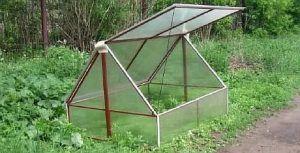
- The Fedorov greenhouse, popularly known as a "breadbox," is easy to build yourself using a pre-designed blueprint. It's suitable for growing seedlings, flowers, and vegetables, but its only drawback is that it's not suitable for tall crops. The design is simple and includes a lid that allows access for plant maintenance.
How to make a drawing yourself
When constructing a greenhouse from rolled profile material, you can use either an above-ground or a shallow-depth greenhouse. Above-ground greenhouses are convenient because they completely eliminate shading and are designed for construction in temperate and southern latitudes. A shallow-depth greenhouse draws heat from the ground. However, shaded areas near the walls can form, which negatively impacts plant growth.
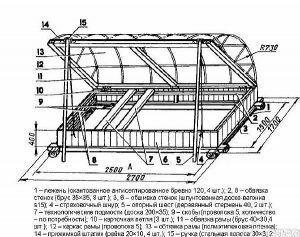
When drawing up a greenhouse design using profile pipes, it's important to consider removable upper sections to ensure adequate ventilation. Additionally, to ensure the frame's strength, special elements should be included along the walls.
A profile with a cross-section of 40x20 mm or 40x40 mm is best suited for the frame, as it offers high strength. The optimal wall thickness is 2 mm or more. For horizontal ties, a profile with a wall thickness of 1-1.5 mm can be used.
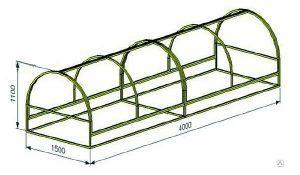
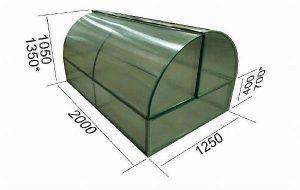
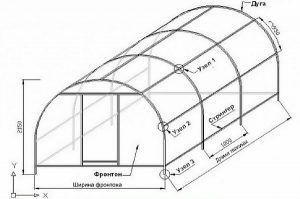
The drawing must indicate the exact dimensions—width, length, and height. Additionally, the connection points of the main and guide parts must be indicated.
Below are drawings with dimensions for different types of greenhouses.
Based on the greenhouse drawing, which specifies the dimensions, construction costs are calculated and a cost estimate is prepared. When calculating, a 10% allowance should be added to cover damage during transportation or installation.
Tools and materials
To make the greenhouse installation process easier, in addition to the drawing, you should stock up on the necessary tools you'll need for the job:
- a shovel - it is needed to level the soil;
- with a drill - to install the frame posts;
- grinder - you will need it to cut profile pipes;
- screwdriver - necessary for screwing in screws;
- pliers and a hammer - an indispensable tool in any construction work;
- measuring accessories - a square, a building level and a tape measure;
- welding machine - if you are going to weld parts;
- with a hacksaw - if you plan to lay polycarbonate.
Important to know! You can't cut polycarbonate with a grinder because it melts. You need a hand tool for cutting metal with fine teeth.
You will also need wooden pegs and rope.
The correct choice of material plays a major role in the construction of our structure. To calculate the required amount of profile, it's important to remember that the standard length of rolled tubing sold in stores is 6.05 meters. Based on this measurement, a greenhouse design is created using the required size profile tubing.
To accurately calculate the required amount of material, the structural features and geometric parameters of the building must be taken into account. The lengths of all frame components are added together, then the resulting number is divided by the standard length of the profile pipe. This value will determine the required number of meters of profile.
Step-by-step instructions for building a greenhouse
Before you begin building a homemade greenhouse from rolled profile pipes, you should decide on a site and prepare the space.
Preparing the area
When building a greenhouse from profile pipes yourself, you should begin by determining the location for its installation. Soil type is also important. It's best to place the structure on sandy, dry soil that prevents moisture accumulation.
Furthermore, the greenhouse's orientation relative to the cardinal directions is crucial for achieving a good harvest. It's best if the long side faces south, allowing the plants to receive more sunlight. The greenhouse's structural features should also be considered:
- single-pitched - the slope is inclined to the south;
- gable and arched - the longitudinal axis of their structure is directed from north to south, the permissible deviation is 15 - 20 degrees.
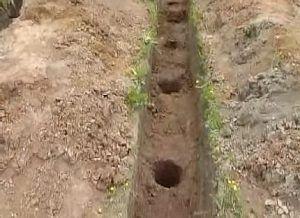
Once the site has been selected, the area needs to be prepared. First, the perimeter of the future structure is marked with driven-in wooden pegs and strung with rope. Regardless of the chosen design, a trapezoidal trench should be dug for the biofuel, which, as it decomposes, helps warm the soil.
Foundation
A greenhouse made from rolled steel profile pipes is a fairly sturdy structure that is resistant to deformation. To install the greenhouse, simply build a columnar foundation using asbestos-cement pipes.
It is done as follows:
- wells are drilled in the ground at the same distance from each other, their diameter is made larger than the size of the pipes themselves;
- asbestos pipes are installed in these pits;
- the space between the pipe and the ground is filled and compacted with a sand and gravel mixture;
- cement mortar is poured into the pipe so that there are no voids;
- A metal plate or piece of reinforcement is immersed in the concrete mixture; they will serve as a connecting link between the foundation and the frame.
It might be possible to make a strip foundation or a lightweight bulk foundation to protect the greenhouse from cold air getting inside.
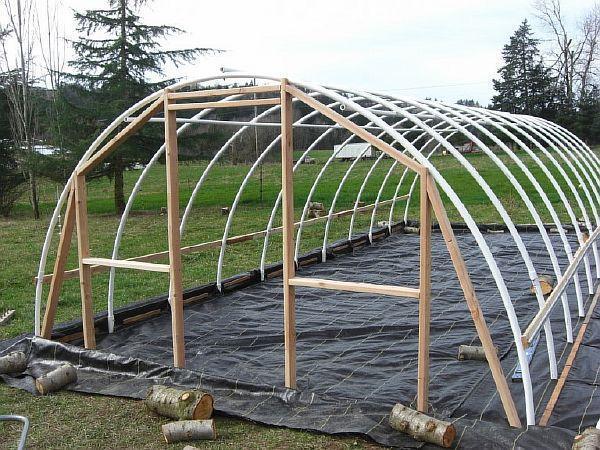
Making greenhouse arches from profile pipes – 2 ways to bend profile pipes
To create an arched greenhouse structure yourself from pre-cut profile tubing, you need to bend it into a rigid arch. This can be done by a company that specializes in such work; they can bend the profile using specialized equipment. If you plan to do it yourself, there are two methods you can use.
- How to cold bend a profile pipe? There are two options for bending a profile using this method: with and without internal filling:
- If a profile pipe with a thickness of up to 10 mm is used, then the process can be carried out without filler.
- If you use a thicker profile, you'll need a filler: sand or rosin. In winter, you can pour water inside the pipe and wait for it to freeze.
A thick spring is used as a cold bending aid, but its diameter must be large enough to fit inside the pipe. This material has excellent spring properties, allowing for easy bending without changing the profile cross-section.
Additionally, to create an arched shape, bending plates can be used. Rods are inserted into the holes in the plates to act as a stop during bending. The pipe is placed between two rods, spaced at a distance equal to the bending angle. The profile is bent by sliding the piece from the center to the edge. This "cold" bending method is very labor-intensive.
You can use special factory-made pipe benders, manual or stationary.
- Preheat bending technique. This bending technique is recommended for thicker profile pipes. This method is suitable for use at any time of year. The process is as follows:
- Two wooden plugs are made for each end of the pipe. The length of the plug is 10 times longer than the width of its base. The wide side of the plug should be twice the size of the hole in the pipe.
- After this, it is necessary to make grooves in one plug to allow the accumulated gas to escape during heating.
- Now you need to heat up the part of the profile being processed.
- Sift and dry river sand. Then heat it on a metal sheet at 150 degrees Celsius until all the moisture has evaporated.
- Install a wooden plug without grooves on one end of the pipe.
- Pour heated sand into the mold through the other end. Tap the sides of the mold constantly to ensure the sand is compacted.
- When the pipe is completely filled with sand, install the second plug.
- Mark the bending point on the profile with chalk.
- Securely fix the pipe in a vice, placing it on the template.
- Then heat the metal until it turns red. At this point, it becomes softer and can be shaped into the desired form. This is done with a smooth and precise motion.
- After the profile has cooled, the blank is compared to the required template. If everything is correct, the plug can be removed and the sand shaken out.
Important! Profiles with welds should be bent so that the connecting line is located on the side. Bending along the weld is not recommended.
It's best if all hot bending work is completed in one go. Overheating the metal will result in a loss of strength.
Installation of arches
If you plan to build a collapsible greenhouse yourself, you can connect the arches and vertical posts with bolts. Opening doors, for example, if you choose a butterfly model, are also attached to these bolts. For a permanent structure, welding is better.
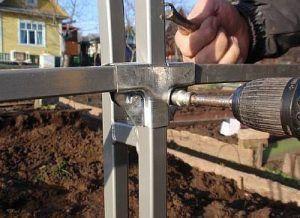
The posts to which the arcs will be attached must be cut. Longitudinal strips will be required to connect the arcs inserted into the post. The joints are also secured with crab screws or welded.
Important! After welding, it is recommended to prime the seams to improve the reliability of the connections.
The manufactured frame is installed on the foundation and attached to the reinforcement that is fixed in it.
The easiest option is to place the arches directly on the reinforcement protruding from the foundation.
Selecting the material for cladding
A crucial step when constructing a greenhouse from profile pipes is choosing the covering material. It determines not only the greenhouse's appearance but also the quality of the future harvest.
There are several main types of material:
- Glass has excellent protective properties. A greenhouse covered with glass protects seedlings from frost, retains heat well, and allows sunlight to pass through. All these qualities create excellent growing conditions for many crops (peppers, cucumbers, tomatoes). However, there are also disadvantages: cost, difficulty of installation, and fragility. Therefore, this material is rarely used for greenhouses in garden beds.
- Polyethylene film is an inexpensive material, but it is not very durable and is susceptible to damage from direct sunlight, so its service life is short.
- Non-woven fabric allows sunlight and water to pass through perfectly, while protecting plants from adverse weather conditions. While inexpensive, this material is not durable, lasting no more than 5 years. Furthermore, it is not strong and can be damaged by strong gusts of wind.
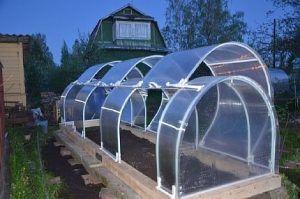
- Cellular polycarbonate is a rigid polymer that is lightweight and highly durable. It effectively diffuses sunlight, which improves thermal insulation inside the structure. Today, it is often used to build DIY greenhouses from profiles, as working with this material is easy if you correctly calculate the required dimensions.
We attach it to the frame
Let's look at assembling a greenhouse frame from profiled products using polycarbonate, the most optimal covering material, as an example. It's important to consider polycarbonate's expansion properties. This coefficient differs from that of metal, so it's necessary to insert a damper gasket, preferably rubber-based, into the gaps.
The fasteners should be spaced 10-15 cm apart to ensure a tighter connection. The polycarbonate sheet is laid so that the sun protection film is on the outside of the greenhouse. The contact points between the frame and the sheet should be sealed with tape or sealant.
The holes should be drilled with a low-speed drill; their diameter should be approximately 10 mm. They are secured with bolts at all corners of the sheet. To prevent corner chipping, leave a few centimeters indented from the corner.
If the polycarbonate sheet is wider than the space between the structure's studs, it must be trimmed. It's important that the joint be exactly in the middle of the pipe.
If desired, polycarbonate can be secured using a special profile. In this case, the fasteners are screwed onto the frame. Only then are the sheets installed into the existing openings. Each subsequent sheet must be laid flush with the one already attached. The gaps should also be sealed. This method is reliable and significantly reduces the installation time.
Once the polycarbonate is secured to the profile pipes, the protective film should be removed from its surface. This completes the frame covering process. In short, anyone can build a greenhouse in their garden using profile pipes and covered with polycarbonate or another material, provided they have a blueprint. While the process will take a fair amount of time and effort, it's well worth it with a good, high-quality harvest.