 A greenhouse in a country house not only decorates the property, but also allows you to harvest organic vegetables for the whole family.
A DIY PVC greenhouse is ideal for achieving this goal. Standard designs offered on the market are not always suitable for the size and shape of a site.
One popular way to create this simple structure is to build it yourself. This involves various materials, designs, and installation methods.
Don't need a greenhouse? We suggest you read the article — How to make a simple greenhouse yourself.

- Types of greenhouses
- Wall structures
- Gable types
- Arched structures
- Dome structures made of PVC pipes
- Selecting a location and preparing the site
- Calculating the Material Requirements for a PVC Pipe Greenhouse + Drawings
- Connecting pipes and fittings when assembling a greenhouse
- Adhesive joint
- Assembling a frame from PVC pipes with screws
- Pouring the foundation yourself
- Step-by-step instructions for assembling a greenhouse frame
- Installing a greenhouse door
- Installation of covering - polyethylene film or monolithic polycarbonate
- Pros and cons of PVC
Types of greenhouses
 Containerized ground systems can vary significantly. This depends on many factors, including the structure's shape, the materials used, the seasonality of use, and the presence and type of heating.
We suggest you find out how to do it Underfloor heating in a greenhouse and installing the heating system yourself.
When using PVC pipes, the following designs are generally suitable:
- wall-mounted – the structure is adjacent to one or two walls of a building, residential or technical;
- a greenhouse with two slopes in the shape of a house;
- polygonal, with a broken roof;
- arched – with a round dome.
Wall structures
They are typically installed against a wall on the southwest or south side of the building. In this case, the wall acts as a thermal energy accumulator, warming up during the day and releasing it during the cool night.
 This helps smooth out daily temperature fluctuations, which has a beneficial effect on plants.
The disadvantage of such greenhouses is the constant exposure of the wall to high humidity from the internal atmosphere, which can contribute to its premature destruction.
This can be avoided by plastering the surface and painting it with waterproof paint. To secure the greenhouse frame to the wall, you can use tubular brackets in the shape of a glass.
The inside diameter of the pipe must match the outside diameter of the plastic frame pipe, ensuring it fits freely. The joint must be secured with a screw perpendicular to its axis. The metal bracket must be painted to protect it from corrosion.
It is advisable to use as a covering for such a greenhouse use monolithic polycarbonateIt is transparent, which makes the structure an additional decoration of the site's exterior.
Gable types
This is the most common form for indoor systems. Its popularity stems from its simple frame design, which can be built by hand using standard PVC pipes and fittings.
 This frame is strong, durable, and fairly resistant to wind and snow. These frames provide a low reflectivity, which helps ensure optimal heating of the PVC greenhouse under sunlight.
By installing the slope at a sharper angle, you can achieve a free-flowing snowfall from the roof, eliminating the need for periodic cleaning in winter.
But this is only possible on a rigid surface that doesn't sag under load. Window glass or cellular polycarbonate possess this property.
Gable-roof greenhouses are equipped with doors and vents for ventilation. These allow warm, moist air that accumulates under the roof to escape.
Installing the side walls of such a greenhouse at an angle will increase the light intensity in the morning and evening hours. This complicates the design somewhat, but in temperate climates, this solution is justified.
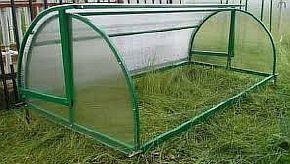
Arched structures
Without a doubt, these are the most popular types of structures for indoor ground construction. They are durable, highly stable, and incredibly easy to install. Furthermore, site preparation for their installation requires minimal effort.
Thanks to the use of lightweight PVC pipes, the greenhouse frame is light enough to be moved to another location without disassembling, which improves the possibility of optimizing crop rotation.
 The versatility of the material allows you to choose any size and configuration of the building.
The arched shape of a greenhouse requires specific spatial arrangements. The structure must be oriented with its axis from south to northIn this case, the maximum amount of sunlight will occur in the morning and evening hours.
During the daytime, the domed part of the greenhouse is most illuminated, where the refraction of rays is not so significant.
Dome structures made of PVC pipes
 This design can be considered a variant of the arched design. This shape allows snow to slide off the roof unimpeded, making winter maintenance easier.
Furthermore, this shape is better suited for growing tall plants. Ventilation in a dome greenhouse is significantly more efficient, given the reduced volume of space at the top of the structure.
Building a greenhouse from PVC pipe yourself is easy, as the installation process uses proven assembly techniques similar to those used for plumbing systems. The same fittings are used.
Selecting a location and preparing the site
The greenhouse's efficiency depends largely on its location. We've already noted the importance of orientation relative to the cardinal directions. It's also crucial that it be located in a well-lit area, not shaded by nearby bushes or trees.

Furthermore, the platform on which the PVC pipe structure is installed must be strictly level. This determines the durability of the structure. If it becomes uneven, it creates conditions for the polycarbonate or glass covering to shift, which can lead to its failure.
If a PVC pipe greenhouse is up to 6 meters long, it can be installed on a wooden beam foundation. This should be placed on a level surface in the fall, and checked for levelness and shape in the spring.
Typically, this is a rectangle, and it's enough to ensure the diagonals are equal. After this step, the foundation must be additionally secured to the ground with anchors.
When installing a wooden foundation, a 10-15 cm thick drainage layer of sand and gravel mixture should be placed underneath it. This will allow for more efficient drainage of excess water from under the greenhouse.
For installation of a greenhouse from PVC pipe longer than 6 meters, it is preferable to use capital strip foundationThis is especially important for soils subject to seasonal heaving.
Calculating the Material Requirements for a PVC Pipe Greenhouse + Drawings
To determine the amount of materials needed, you need to develop a drawing of a greenhouse made from PVC pipes for DIY construction.

To avoid tedious calculations for each individual part, it's best to use graph paper for the drawing. This allows, with a certain amount of meticulousness, to obtain the true dimensions through measurements. This method provides sufficient accuracy for calculations.
It's important to remember that all lumber is produced in standard lengths. Therefore, when designing, it's important to consider the possibility of cutting them efficiently to avoid unnecessary waste.
Standard sizes of some materials:
- PVC pipes measuring 20-25 millimetres are produced in lengths of 1, 2, 3 and 6 metres.
- Coniferous timber beams – 4 or 6 meters;
- Cellular polycarbonate with a thickness of 4, 6, 8 millimeters is produced in sheets with a width of 2.05 and a length of 4, 6 or 12 meters.
- Polyethylene film with a thickness of 90-200 microns is sold in rolls, ranging in width from 1 to 3 meters. It can be welded widthwise during installation. A household iron and aluminum foil are all that's needed for this.
The distance between the arcs of a PVC pipe greenhouse depends on the covering material. For film, it should be 0.7-0.75 meters.
If the covering is made of polycarbonate with sheets overlapping by 10-12 centimeters, each sheet must be supported by at least three arches, meaning the distance between them should be: (2.05 - 0.1) : 2 = 0.97 meters. The number of sheets is determined by the specified length of the greenhouse.
 The amount of materials for the end walls is calculated separately. The supporting structure is made from 50 x 50 mm wooden beams and covered with the base covering material using 15-20 mm thick planks.
The end walls should be designed to allow for a doorway approximately 90 centimeters wide and 1.8-2.0 meters high, allowing for convenient access to a garden wheelbarrow. A window should be provided at the top of the end wall.
If polycarbonate is used for the covering, it is attached in two ways:
- By applying a tie across the greenhouse frame. This part is made from galvanized steel strip at least 40 millimeters wide and 0.7-1.0 mm thick. The strip should be approximately 0.5-0.7 meters longer than the frame circumference, which is necessary to form a clamp. Tensioning is achieved with an M10 stud, 20-25 centimeters long, using two nuts and washers.
- Fastening to the arches with cutting screws with special compensating washers with an installation pitch of 250-300 millimeters.

To install the doors and vents, you'll need two hinges for each piece. Below are drawings of various frame options with dimensions.


Connecting pipes and fittings when assembling a greenhouse
To assemble the greenhouse, PVC pressure pipes and corresponding fittings are used – couplings, elbows, tees and crosses.

Once the required set of parts has been selected, they must be tested for compatibility. A proper fitting should fit onto the pipe, inserting at least 2/3 of its length.
Adhesive joint
PVC adhesives contain this material as their main component, diluted with a special solvent that keeps it fluid. Various additives are used to improve adhesion and give the composition the desired consistency.
After the adhesive is applied to the parts, the long chains of PVC molecules mix, and the solvents evaporate, causing the mixture to thicken. The material from both parts blends, forming a monolithic, durable unit.
When purchasing PVC glue, you should carefully read the instructions for use, which contain instructions on how to prepare for gluing and how to properly carry out the process.
At room temperature, the adhesive's setting time is approximately 4 minutes. At 40 degrees Celsius, it decreases to one minute.
The full-size part is cut from the pipe using special scissors. They are designed to leave no burrs on the end.
Before gluing, the surfaces of the parts to be joined must be specially prepared. The main goal is degreasing. Gluing can be done outdoors, weather permitting. The air temperature should be between 5 and 35 degrees Celsius.
It's important to remember that the brush used to apply the adhesive must be made of natural bristles, otherwise the synthetic material will also dissolve, which can compromise the bond strength. Adhesive manufacturers often include a brush in their packaging.
Gluing of parts is carried out in the following order:
- Test the pipe and fitting to ensure they fit. Mark the adhesive application areas with a marker.
- Clean the parts from burrs and rough damage.
- Degrease the surfaces to be bonded.
- Apply glue with a special brush.
- Align the parts by sliding the fitting onto the pipe. Rotate the parts through approximately 90 degrees and position them correctly. This should ensure even distribution of the adhesive across the surfaces.
- The parts must be held firmly for 15-20 seconds.
- Depending on the ambient temperature, the drying time and final setting of the glue will be up to 4 minutes.
- Excess adhesive from the surface of the parts must be removed with a rag.
- Glued parts cannot be moved for 15-20 minutes.
You can then continue assembly in the same manner. When assembling the greenhouse, it's convenient to assemble individual arches in the required number and only then begin assembling the frame.
- Partial bond failure occurs when the adhesive is applied unevenly or when there are severe damages on the surface of the parts. This can also be caused by an overdried adhesive layer—the time between application and the parts coming together is no more than 12-15 seconds.
- When carrying out work under conditions of minimum permissible temperatures, this may lead to soft non-adhesion, which indicates insufficient polymerization of the adhesive.
- A porous adhesive layer is formed when the adhesive is applied unevenly. This can be caused by contamination in the bonding area, poor mixing of the adhesive before application, or unintentional shifting during drying.
Gluing is the primary assembly method. However, when constructing greenhouse frames, tight joints are not required. Therefore, metal fasteners are often used for this type of work.
Assembling a frame from PVC pipes with screws
The nature of the loading on the PVC pipe greenhouse frame elements allows for its assembly using fasteners. This method even simplifies the assembly process. The pitched surface is no obstacle to drilling if a simple drilling jig is used.
 During installation, drilling may be necessary on-site. This isn't a problem with PVC pipes. Simply make a deep mark at the desired location, which is easily done with a sharpened triangular pin made of any metal. This will prevent the drill from slipping on a sloping surface.
To assemble the greenhouse, simply use standard M6 bolts with a conveniently shaped head. They require a 6.5 mm diameter hole for installation. Along with the bolt, you'll need a matching nut, a standard washer, and a spring washer. Be careful when tightening, as PVC pipe doesn't have high compressive strength.
Pouring the foundation yourself
A supporting foundation is just as essential for a greenhouse as for any other structure. However, in this case, it functions a little differently.
The greenhouse itself, especially one made from lightweight PVC pipes, is lightweight and has a high wind resistance. If not properly secured, it could easily drift into neighboring areas.
- A wooden beam support base is installed if the greenhouse is planned to remain in place for 2-3 years. However, it's possible to simply replace the wooden base without moving the structure.
 For this, 150x50 or 120x100 mm beams are used. Before laying them, the area must be leveled and the sod removed from the support base areas.
It is necessary to create a drainage layer of a mixture of sand and gravel, 120-15 centimeters thick. Lay one or two layers of roofing felt waterproofing on top of the drainage.
Lay the timber along the frame outline. Check the resulting rectangle. for equality of diagonals, secure the sides together. Before laying, the material should be treated with an antiseptic; this will increase its service life.
It should be noted that treatment with antiseptics does not guarantee a long service life for the greenhouse; it will either have to be moved after a few years or the support will have to be replaced.
There are various ways to secure the foundation to the ground. Most commonly, 80-90 cm long pieces of rebar are driven into the ground. However, screw anchors are more reliable. They are more expensive, but more reliable.
 A block foundation is installed in areas with high soil moisture to prevent it from reaching the greenhouse plants. This is accomplished by pouring a 10-centimeter layer of sand and gravel mixture over the soil.

A layer of concrete mortar is poured over it, into which the first corner block is installed. It must be carefully leveled using a spirit level. Then, strings are stretched and the remaining blocks are laid along them around the perimeter. The mortar setting time is approximately 7 days, after which you can proceed with installing the greenhouse frame yourself using PVC pipes.
- A brick foundation on a concrete base is installed if the site has loose soil. To provide support for the greenhouse, dig a trench in the ground 40 centimeters deep and 20 centimeters wide. A 15-20 centimeter thick drainage layer should be placed at the bottom. This should be compacted and watered for better compaction. Install two strands of rebar 5 centimeters above the bedding, using broken brick supports. It is advisable to install the formwork, aligning its top edge horizontally.
Pour the concrete in one continuous pour. Install M12 anchor bolts no more than 1.5 meters apart.
After the concrete has completely hardened, lay a brick belt of two bricks around the perimeter.
After a week, you can begin installing the greenhouse frame.
Other methods of constructing a greenhouse foundation using other materials are also used. The choice of these methods often depends on the availability and type of remnants from the main construction site.
Step-by-step instructions for assembling a greenhouse frame
Greenhouse kits of various sizes are available at construction markets. The included instructions provide a complete overview of assembly and installation procedures.
However, their designs and sizes don't always suit the installation site. In these cases, greenhouses made from PVC pipes of the required dimensions are often manufactured by hand.
But the basic assembly and installation techniques do not depend on this, since the components are the same.
- The cup is a plastic piece with an internal diameter matching the external diameter of the pipe. It is attached to the base with a self-tapping screw through the bottom. The end of the arch is inserted into the hole and secured with a screw.
- A tee is a connecting element with three holes. When assembling an arch, perpendicular, coaxial holes are used to install longitudinal ribs during frame assembly. It is used only for making end arches.
- The crosspiece is used for the same purpose when installing intermediate arches, to which longitudinal ribs are attached from both sides.
The mating parts can be secured with glue or screws. The latter method is more commonly used, as greenhouses are typically installed in early spring, when the outside temperature may not be sufficient for a secure adhesive bond.
When installing a greenhouse directly on the ground, the arches can be installed on pins.

The pins are made of reinforcing steel, the diameter of which is selected depending on the internal dimensions of the pipes used for the frame. They are 0.6-0.8 meters long and driven into the ground to a depth of about half a meter.
After all the arches are installed, wooden frame boards are installed around the perimeter of the frame. They measure 40-50 x 120-150 millimeters. They are attached directly to the arches using metal strips and self-tapping screws.

Installing a greenhouse door
A proper greenhouse requires two doors, installed on both end walls. Their primary purpose is to ensure convenient access to the interior.
Therefore, the opening width should be at least 90 centimeters, allowing for the free passage of a garden wheelbarrow. The height should be approximately 1.8-2.0 meters.
In addition, the passage device must be sufficiently airtight to ensure the maintenance of a microclimate at night.
In addition to the door, the greenhouse is equipped with several vents for ventilation of the roomThey are needed to remove warm, moist air that collects in the upper part of the building and is harmful to seedlings and greenhouse plants.

The door is made from a 50x50 mm wooden block. The rectangular door frame is divided by a crossbar. A brace is a mandatory element, providing rigidity to the structure. The joints are further reinforced with galvanized steel corners.
The door panel is made from the same material as the main covering of the greenhouse – film, polycarbonate or window glass.

The doorway on the end walls is formed during the paneling process. Wooden beams are most often used for this, even if the main frame material is PVC pipe.
Installation of covering - polyethylene film or monolithic polycarbonate
There are several ways to separate the room from the outside space:
- installation of cellular or monolithic polycarbonate with a thickness of 4–8 millimeters;
- covered with a polyethylene film 90-200 microns thick.
It should be noted that using film is several times cheaper, but it usually has to be changed annually.
However, polycarbonate, if it is of high quality (you need to be wary of Chinese counterfeits), can last up to seven years, after which the material begins to cloud due to wear of the outer surface.
 Before installing polycarbonate sheets, self-adhesive sealing tape must be installed on the upper ends of the arches.
The sheet is installed so that the internal cavities are vertical. This prevents moisture accumulation in the voids.
For installation, special fasteners are used that take into account the properties of the material, and for working with them, only standard tools are required.
 The distance between the mounting screws should be no more than 400 millimeters.
Joints and abutments of polycarbonate covering are made using additional elements.
The procedure for installing polycarbonate is as follows:
- The end walls of the greenhouse are covered with sheets.
- Excess pieces are cut out along the frame's generatrix. A regular utility knife can be used for this.
- Openings are cut out for doors and vents.
- The first polycarbonate sheet is laid and secured. An overhang of 8-10 centimeters should be left.
- Next, the remaining sheets are successively applied and secured.

The installation of the film coating is carried out in the following order:
- The end walls of the greenhouse are covered with film. At the edges of the door and window openings, it is secured with 15-20x40 mm strips and 60-70 mm nails.
- The film is attached to the frame using a construction stapler as a temporary measure.
- The film is installed over the frame after the ends are sealed. It is positioned so that it overlaps the lower wooden base, to which it is secured with planks. If the greenhouse is installed directly on the ground, the edges should be tucked under the base of the frame and covered with soil.
- The edges of the film on the end sides are folded and secured with strips together with the previously installed film on the end wall.
Pros and cons of PVC
The material has a number of positive qualities, which include the following:
- Quick and easy installation and dismantling of structures.
- The disassembled structure takes up little space and is lightweight.
- Building a greenhouse from this material does not require any special skills or abilities and can be done by hand.
- Availability and low cost of materials for greenhouse construction.
- High strength and resistance to external factors.
- The service life of a PVC frame is estimated at no less than 10 years.
Even with the best intentions, it's difficult to find any obvious flaws in the design of a PVC pipe greenhouse. It's considered dangerous to install them in regions with strong winds.
But this applies equally to any material. There's only one solution: installing additional braces and stiffeners. For durability, it's also not recommended to use a soft covering material in such conditions.


We built a greenhouse onto the south side of our dacha. It really does allow us to plant seedlings earlier in the spring than in a standalone greenhouse. It accumulates more heat.