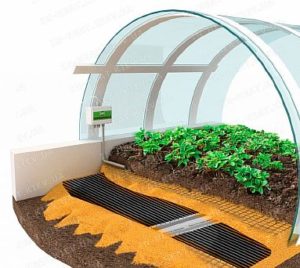
Underfloor heating is gaining popularity these days, being installed in apartments and houses. Even greenhouses are equipped with heated floors to warm the soil in winter.
In our article, you'll learn about the different types of heated floors and which are best suited for greenhouses. We'll explain how to install heated floors in a greenhouse yourself—either hydronic or electric—and how to maintain the right temperature to ensure a warm winter for your crops.
- Is it possible to install heated floors in a greenhouse?
- Methods of soil heating
- Water floor
- Electric floors
- Air heating
- Bioheating
- Which heating system to choose and why
- How to make a hydronic underfloor heating system yourself
- Installing an electric cable floor in a greenhouse
- Installation of infrared film
- How to maintain the temperature at the desired level
- Features of the operation of a heated floor in a greenhouse
Is it possible to install heated floors in a greenhouse?
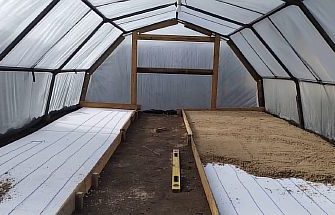
In winter, greenhouses require heating. Various heating systems are used, but the most efficient and cost-effective are underfloor heating. They create the right microclimate and evenly warm the soil.
Installing a heated floor in a greenhouse has many advantages:
- allows you to grow plants in any season;
- ensures rapid germination of seeds;
- leads to accelerated development and early fruiting of plants;
- creates suitable conditions for growing the most heat-loving crops;
- does not dry the air and does not burn oxygen;
- reduces the risk of leaf burns;
- reduces energy consumption.
In greenhouses with heated floors, conditions are created for the fruiting of agricultural crops all year round.
Methods of soil heating
The main purpose of soil heating in a greenhouse is to provide the right temperature for plants. It's important to prevent the soil from drying out while heating, so a combined heating system is recommended.
There are different systems that can be used to heat greenhouses: heated floors (water, electric, infrared) or air heating.
Water floor
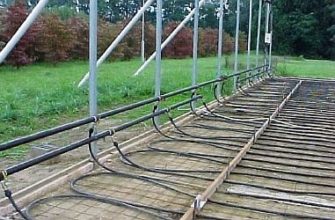
Underfloor heating is a multilayer structure, with each layer playing its own role. The main element is the pipe through which the coolant circulates. Pipes can be made of metal, polymer, or polycarbonate.
Floor piping is laid according to different schemes: "snail" or "snake", and is connected to the collector group, it is connected to the power source - a boiler, water heater or central heating.
TO pros The advantages of hydrofloors in a greenhouse include uniform surface heating and vertical heat distribution, which benefits plants. Furthermore, hydrofloor systems are economical to operate and don't take up valuable space.
Basic minus The downside of such floors is the loss of room height due to the multi-layered construction. Furthermore, installation is expensive, as it requires the purchase of heating equipment and a pump unit.
Electric floors
Electric floors—as the name suggests, they operate using electricity. Due to high electricity rates, these models are rarely installed in greenhouses, although installation is much simpler and more economical than hydronic heating.
Electric floors come in:
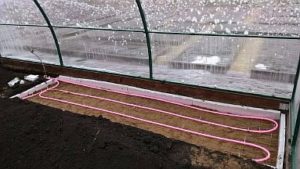
- Cable-based systems are cables laid on the floor in a "snake" or "snail" pattern. The installation process is similar to that of a water-based underfloor heating system.
The advantages of cable-based electric floors are durability, low cost, and uniform heating. The disadvantages include electricity costs and labor-intensive installation.
- Cable mats differ from cable floors in that the wire is secured to the mesh according to a specific pattern, making the installation process much easier.
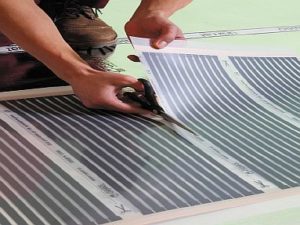
- Infrared flooring is a carbon-coated film with a waterproof coating. The floor is easy to install and does not require a screed. It emits heat in the form of infrared waves. Since infrared film has low thermal efficiency, it is installed no more than 15–20 cm deep, which increases the risk of mechanical damage during excavation work. The advantages of these systems include uniform heat distribution and energy savings.
To regulate electric floors, a thermostat with a sensor is required, which makes the adjustment process automatic.
The main condition for electric heating in a greenhouse is the presence of electrical networks nearby.
Air heating
Air heating is considered a simple method for heating greenhouses. Setting up such a structure yourself is easy, and it doesn't require a large capital investment. However, this model is only suitable for the spring and fall; it doesn't provide sufficient heat for winter.
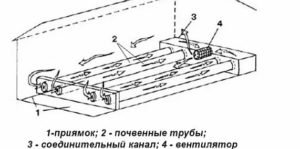
The principle of operation is the accumulation of heat that enters the greenhouse during the day. A 200 mm clay layer, located under the plant cover, acts as the accumulator.
The process looks like this:
- Air masses move through asbestos pipes (100–200 mm in size) under the influence of a small fan;
- under the influence of the day, the air gives off heat through the walls of the pipes to the clay;
- at night, it transfers the accumulated heat to the beds.
To improve heating efficiency, thermal insulation material is placed under the clay.
This system can be used in winter, but it requires upgrades and investment. To do this, a heater—a gas or wood stove—should be installed in the room. This will transfer heat through pipes into the soil.
Bioheating
Bioheating is an economical method of maintaining the desired temperature in a greenhouse. It's based on a biomaterial whose decomposition releases heat:
- mown weeds or fallen leaves;
- animal waste;
- sawdust.
To simultaneously maintain the soil and air temperature in the greenhouse at the desired level, it is recommended to install combined heating.
The downside of this type of heating is the low temperature (+25), as well as the lack of ability to regulate the degree of heating.
Which heating system to choose and why
When choosing underfloor heating for a greenhouse, you need to consider not only your budget but also the specific features of the greenhouse and its location. The cost of the heating medium is also an important factor.
If there's a nearby hot water source, underfloor heating is the obvious choice. Even if only cold water is available, this option is preferable, as it only requires installing an inexpensive water heater.
If there is no water supply and the power grid is nearby, electric floors should be chosen. Cable models are recommended for heating large greenhouses. To effectively heat the soil, the cable system must have a minimum power rating of 75 watts per square meter. If the greenhouse is small, film can be used, as it can heat a small space and is easy to install.
Electric heating is most often used where a multi-tariff meter is installed, then the costs of heating the greenhouse at night will be lower.
How to make a hydronic underfloor heating system yourself
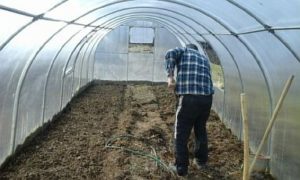
The work of constructing a water floor in a greenhouse is labor-intensive, but almost anyone can do it themselves.
The process looks like this:
- You should start by removing 50 cm of soil.
- Then you need to compact the base, it is better to do this with a roller.
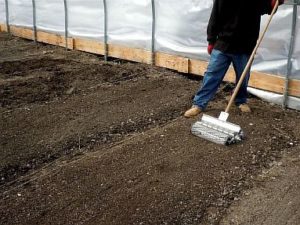
- Lay down thermal insulation - 100 mm foam plastic.
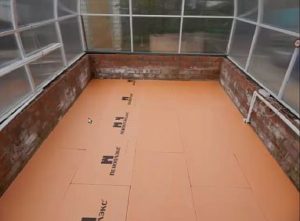
- Cover the insulation with polyethylene film.
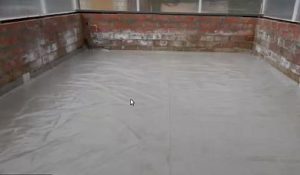
- Cover the film with sand - a layer of 50 mm.

- Water the sand to make it denser.
- Install a mounting mesh - it is needed to secure the pipeline.
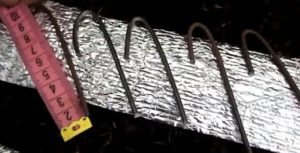
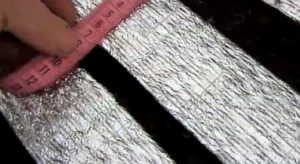
- Lay out the pipes—the recommended diameter is 2 cm, with a distance of 200–300 mm between loops. Metal pipes are best, as they conduct heat well. If using plastic pipes, place a protective mounting mesh over the pipes.
- Cover the pipeline with another layer of sand.
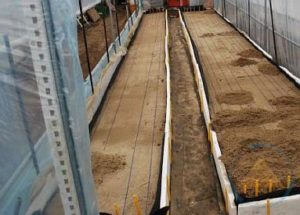
- Place the removed soil on top of the sand.

After this, the return and supply pipes of the underfloor heating system are connected to the heat source. This is done in the following ways:
- Need to install a mixing and distribution unit with a three-way valve and an additional pumpWith this design, some of the coolant from the boiler is diverted to the radiators. This is an expensive option and not suitable for everyone.
- Directing water from the radiator return line to the heated floor is a cheap and effective way to heat the floor.
The most economical way would be to connect the heated floors in the greenhouse to the home boiler.
In summer, you can use water heated by a solar collector, which is placed near the greenhouse and connected to the system using a pump.
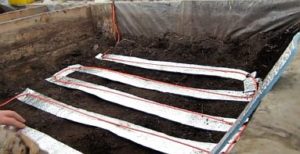
Installing an electric cable floor in a greenhouse
Installing a cable floor in a greenhouse is easy. The process is similar to installing a hydronic heating system, the only difference being the connection.
The process is as follows:
- Cable, thermostat and insulating material are purchased.
- Remove a 30-40 cm layer of soil with a shovel. It's best to do this in warm weather, as the soil can then be easily pushed aside.
- The base is compacted and covered with sand - 5 cm. A polyethylene film is laid on it for waterproofing.
- Wire hooks are made to secure the cable. Installation without them is possible, but there is a risk of the cable shifting during installation. The hooks can be replaced with a mounting mesh to which the cable will be secured.
- Strips of thermal insulation material, 6–7 cm wide, are cut out. They are laid on top of the film, in places where the cable is located.
- The heating element is placed on the insulation in a “snake” pattern and secured with hooks.
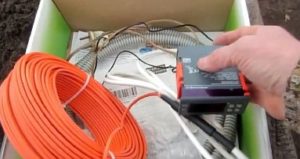
- The wire is connected to the thermostat, which is located in the planned location.
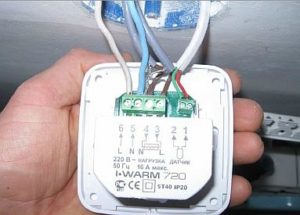
- The temperature sensor is installed. It is passed under the cable and secured with a clamp. All wires leading to the controller and sensor are placed in a corrugated pipe to protect them from damage.
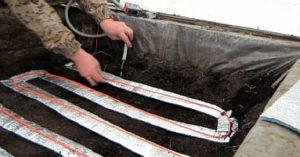
- The cable is covered with film and covered with sand - a layer of 5 cm.
- Fertile soil is poured on top.
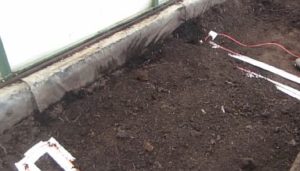
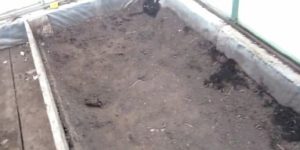
The heated floor for heating the greenhouse is ready, you can proceed to the test check.
Installation of infrared film
Preparatory work for installing heated floors in a greenhouse is the same for all models, and infrared film is no exception.
The sequence of works is as follows:
- You should start by removing 50 cm of soil. The bottom is filled with sand and compacted.
- Then the polyethylene is laid. It is overlapped or joined with tape.
- The insulation is installed; it should not have a reflective surface.
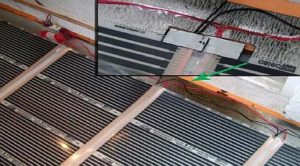
- The heating element, pre-cut into strips of the required size, is laid out. The distance between strips is 10 cm. The film is secured to mounting plates or tape.
- The panels are connected into a single circuit, and the device is connected to a thermostat. All connecting joints are insulated.
- The heating element is covered with polyethylene.

- The film is covered with a layer of wet sand, and a metal mesh is laid on top.
- The removed soil layer is returned to its place, and temperature sensors are installed in its center.
After this, you should test the warm infrared electric floor in the greenhouse.
How to maintain the temperature at the desired level
The optimal temperature for many greenhouse crops is 15–20 degrees Celsius. If the greenhouse is intended for growing seedlings and then planting them in the soil, then a temperature of around 30 degrees Celsius is required.
To maintain the required heating level a thermostat is used in the greenhouseIt allows you to reduce energy costs by up to 30% in electric floors. This is achieved by using the underfloor heating system intermittently. The controller turns on when the temperature drops below the desired level and turns off when it reaches the set level.
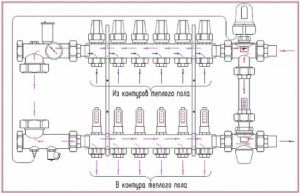
In hydronic systems, temperature control is achieved by a mixing unit. This unit mixes the cooled coolant until the desired temperature is reached.
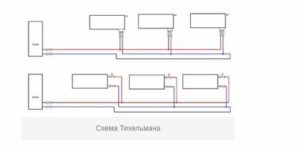
To avoid sudden temperature fluctuations and increase heating intensity, the Tichelman design is recommended, which involves the use of a heat accumulator. This eliminates the need for a manifold assembly.
Features of the operation of a heated floor in a greenhouse
When installing heated floors in a greenhouse, be aware that the soil will dry from the bottom up. Therefore, watering should be done regularly. Mulching—covering the soil with a layer of organic matter—protects the soil from evaporation. The optimal solution is drip irrigation and mulching. Only this option will provide the plant with sufficient moisture.
It's also important that the water used for irrigation isn't excessively hot. Today, heated floors are often used in both commercial greenhouses and small home greenhouses.
They provide air heating and keep the root system warm. Installing a heated floor in a greenhouse will increase yields and allow vegetable crops to be grown year-round.


