To properly install underfloor heating, it is important to study its layout, contours, and placement structure.
Knowing all the system's internals will ensure the finished product is high-quality and durable. We'll explore this in more detail below.
- Underfloor heating connection diagrams
- Directly from the boiler
- From a three-way valve
- From the pumping and mixing unit
- From the radiator
- Laying patterns
- Snake
- Snail
- Combined layout scheme
- How to draw up a floor installation plan?
- Plan for a two-story house
- Multi-room premises (house, apartment)
- Layout for a room with complex wall curvatures
- Types of water floors and their structure
- Modular wooden flooring
- Wooden slatted floors
- Concrete system
- Polystyrene system
Underfloor heating connection diagrams
There are four most commonly used connection schemes. Each is used in specific cases. Everything depends on the type of heating system, the number of rooms, the materials used, and other factors.
We also suggest you read the article. DIY water-heated floor heating, where step-by-step installation on a concrete screed is presented in detail.
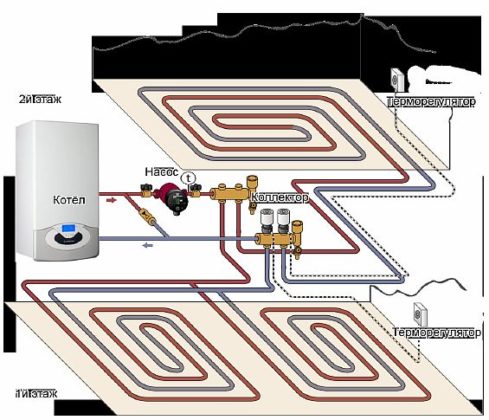
Directly from the boiler
This system requires a boiler, from which the coolant is distributed to underfloor heating and other heating systems (for example, an additional radiator). As the cooled liquid returns to the boiler, where it is reheated. In the system They also use a pump that regulates the movement of the coolant..
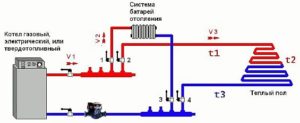
We recommend installing a condensing boiler. It has the most suitable low-temperature mode, unlike other boilers (conventional or solid fuel).
In this video, a specialist demonstrates a completed system installed directly from the boiler. He provides helpful feedback on his work:
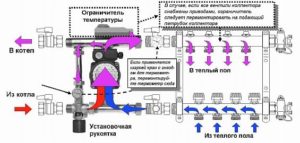
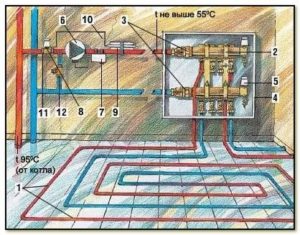
From a three-way valve
This type of connection is typically used in combination heating systems. Since the boiler supplies water at a temperature of 70-80 degrees Celsius, and the underfloor heating accelerates the heat transfer fluid to 45 degrees Celsius, the system needs to cool the hot water somehow. This is why a three-way valve is installed..

How does it work? Take a look at the diagram:
- Hot water comes from the boiler.
- At the same time, cooled water (which passed through the heated floor, heated it, cooled down and returned back) enters the valve from the other side.
- In the center of the valve, hot water and cooled return water are mixed.
- The thermostatic valve head regulates the required temperature. When it reaches the desired 40-45 degrees, water flows back through the underfloor heating pipes, warming the room.
A negative aspect is the inability to precisely distribute the amount of cold and hot water. In some cases, the water entering the heated floor may be either too cold or slightly overheated.
However, given that installing such a system is very simple and affordable, many opt for this connection option. For example, it's an excellent choice for customers who don't have high expectations and want to save money.
Example of a real circuit:

In this video, a specialist installer explains in detail the components of a three-way valve, when it's best to install one, and the different types available. The engineer discusses potential mistakes and provides recommendations on how to avoid them:
From the pumping and mixing unit
The system is a mixed system. It has a radiator heating zone, underfloor heating, and a pump-mixing unit. Mixing occurs from the cooled underfloor heating water, which comes from the return line, to the heated boiler water.
Each mixing unit is equipped with a balancing valve. It precisely doses the volume of cooled liquid (return) added to the hot water. This helps ensure precise temperature control of the coolant entering the underfloor heating system.
From the radiator
In many buildings and apartments, this type of underfloor heating connection is prohibited. However, where it is permitted (permission is obtained from your building's housing and utilities department or management company), the system is installed directly through the radiator.
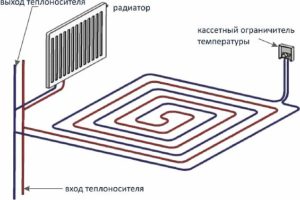
Heated water flows directly from the radiator to the underfloor heating system. Cooled water enters a cassette temperature limiter and returns to the radiator (heat transfer fluid outlet).
Installation is the simplest and most cost-effective. However, it has its drawbacks: the water from the radiator can be too hot for the underfloor heating. This results in a short lifespan for the system and material, and the floor will be too hot. In the summer, when the heating is turned off, the floor will be cold.
It's worth keeping in mind that the water pressure from the radiator won't always be enough to push warm water through the heated floor. In this case, this design will be useless, and only one radiator will heat.
The ideal place to use underfloor heating from a radiator is a bathroom or loggia.
The video shows the installation of underfloor heating directly from a common radiator. The installer demonstrates in detail how to do this with minimal losses. The installation involves three circuits: kitchen, bathroom, and living room. The apartment is small:
Laying patterns
There are several types of heat distribution pipe systems, each used in different situations.
Before reviewing the diagrams, it's important to understand what a "pipe pitch" is. It refers to the distance between pipes.
It's usually done the same way. However, if there's a spot in the room that needs to be heated more intensely, the spacing in that spot is smaller, which allows the pipes to be positioned closer together and produce more heat.
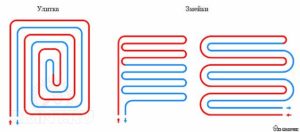
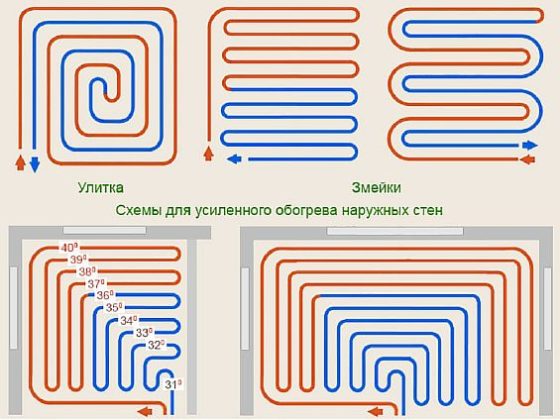
Snake
A serpentine is the easiest to install. It's often used in small, cozy spaces. Its heat output is lower than other options. The standard serpentine pitch is 150 mm (100 mm at the wall and cold zone).
The diagram below (on the left) shows that the pipes only heat up on one side (halfway), while the other side begins to cool, and by the end of the coil, the water has cooled completely. This is the main drawback of this system. However, it is ideal for rooms where one part of the room needs to be heated, while the other part should remain cool or less warm.
The problem of uneven heating can be corrected by using a double-snake circuit. A diagram of this circuit is shown below (on the right).
There's also a corner serpentine. It's used when the walls on either side of the corner face the outside. These walls cool down during cold weather, so it's recommended to install a corner serpentine along these walls. The heating portion of the serpentine will run directly along these walls. The closer to the center of the room, the less heat will be generated.
Watch a video of an underfloor heating installer laying a heating medium in a serpentine pattern. The video concludes with a brief explanation of how to connect the serpentine pattern to the pump and manifold.
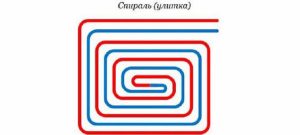
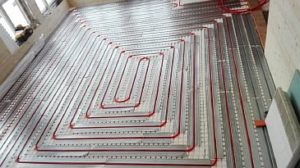
Snail
This type of flooring is a spiral, hence the name "Snail." Compared to a snake, it heats the room more efficiently. Heat is distributed evenly.
The installation begins at the edge of the room, runs along the walls, and reaches the center, then turns and continues from the center to the edge. The spacing for this installation is 1 cm. A spacing of 2-3 cm is most common.
If the room is large, don't stretch the coil too far, as it will not heat the room effectively. It's better to divide the coil into three separate sections, as shown in the figure below:
A more visual snail installation is shown in the video. The technician lays the pipes step by step and provides helpful tips to simplify the flooring installation. Multiple snails are used per room for better heating.
Combined layout scheme
This type of underfloor heating installation uses a combination of a serpentine and a snail system. For example, suppose a room has four rooms. The largest of them will be the snail system, while the smaller ones will be the serpentine system.
You can make two turns of the snake in one room, and then continue with a snail. This way, you combine the patterns in one room.
Below is a diagram of the combined installation:
This method is recommended only for experienced professionals, and not simply for "variety." It's important to properly calculate heat distribution throughout the room and consider where cold zones (furniture locations) should be. If combining methods is not necessary, it is not used.
We suggest watching a helpful video. The technician uses a diagram to demonstrate the installation of a combined flooring system (snake and snail). The example uses a space consisting of four separate rooms (kitchen, bedroom, etc.).
How to draw up a floor installation plan?
The diagram is created even before you purchase all the materials. It helps not only install the underfloor heating correctly but also plan the volumes of materials needed.
First, draw a sketch of the room you plan to install the tiles in. This could be a single room, an entire apartment, or an entire house (private). Make sure the drawing is accurate, taking into account the dimensions of your room. Sketching a sketch by eye won't provide any accuracy. Take into account the square footage of the room and transfer it to paper or the workspace of your PC software.
This video introduces you to a PC program for designing underfloor heating plans. This video provides an overview, presentation of the program's capabilities, and brief instructions on how to use it.
What is included in the plan's accounting:
- building plan (including all floors);
- material of the floor, walls, windows and doors;
- desired temperature in the heated room;
- location of collectors and heating boiler;
- detailed arrangement of furniture, its dimensions taking into account the square meters of the room;
- average ambient temperature in winter;
- the presence of another heat source (radiator, fireplace, split system, etc.)
Tips and tricks for the diagram creation stage:
- The approximate area for 1 circuit should be more than 15 sq. m.
- In large spaces, install multiple circuits. Their lengths should not differ by more than 15 meters.
- If the pitch is 15 cm, it will equal the pipe consumption of 6.7 m per 1 sq. m. If the installation is every 10 cm, then the consumption will be 10 meters per 1 sq. m.
- The minimum bending radius of a pipe is equal to 5 of its diameters.
- Considering that heated water will initially pass through the pipes, and then it will gradually cool down and return to the collector already cooled, you should begin laying in those places that are most susceptible to cooling (windows, corner walls).
- The plan of the circuit can be drawn manually on graph paper.
In the video, the technician draws a diagram of the underfloor heating installation on paper by hand. He also provides visual calculation examples.
It's important to save the completed installation diagram (either drawn or printed). In emergency situations (such as leaks, apartment sales, or renovations), knowing the exact location of the pipes may be necessary.
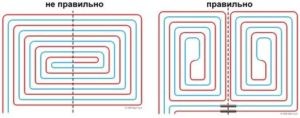
When drawing up the diagram, keep in mind that the manifold is installed in the center of the room (see diagram below). It's important that the distance between all circuits be approximately equal.
Which installation method is best? It's best to choose the pattern that best suits the room. This has already been discussed above.
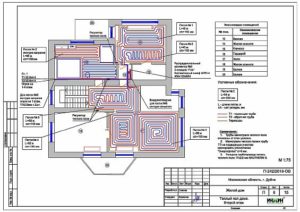
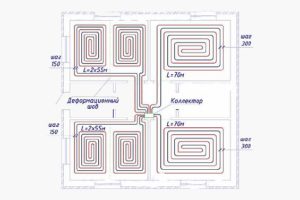
Plan for a two-story house
The plan below shows a layout for underfloor heating on two floors. The first floor is large, so a dual-circuit "Snail" heating system is used.
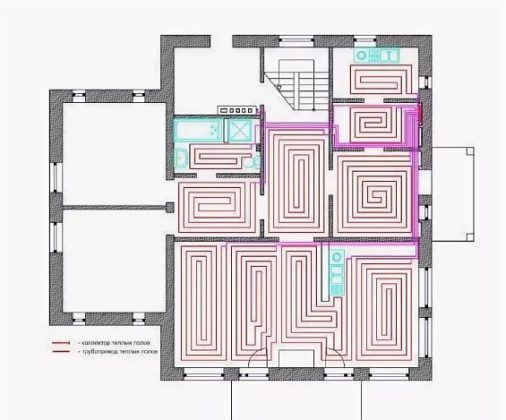
Multi-room premises (house, apartment)
The plan shows that the "Snail" system is used throughout the entire room. This includes the bathroom and kitchen. Note that the contours do not extend under furniture, appliances, or plumbing fixtures.
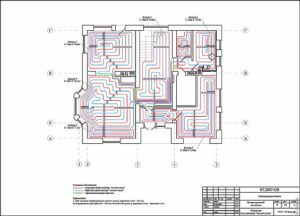
Layout for a room with complex wall curvatures
When laying flooring, you may encounter some minor challenges—curved walls or unique, designer layouts. In such cases, installing a smooth, even serpentine or snail-like pattern can be challenging. A combination installation system is used.
The heating medium is routed based on the shape and curvature of the walls. See the diagram below for a plan for laying out the pipes. The space between rooms is also taken into account when calculating heating.
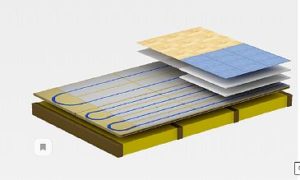
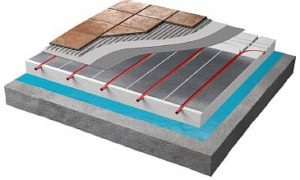
Types of water floors and their structure
There are four types of hydronic underfloor heating. Each has a different structure and installation pattern. The choice is yours. Each has its pros and cons.
Modular wooden flooring
It consists of prefabricated elements—modules (22 mm chipboard) pre-milled with channels. It is installed on the floor joists. Insulation is placed between the joists. The spacing between the joists is 600 mm. When using ceramic, the spacing is 300 mm.
Installation of the modules is very simple: simply lay them out on the floor. A special lock, already installed in the elements, is used to connect the system together.
Modular and slatted flooring is used for wooden bases (in wooden houses), which are installed on wooden joists.
Step by step instructions:
- Make sure the wooden floor where the heating system is to be installed is level and clean. If the floor creaks, shows signs of wood rot, has cracks, or feels drafty under the boards, it's best to redo the surface.
- Make the distance between the joists strictly no more than 60 cm.
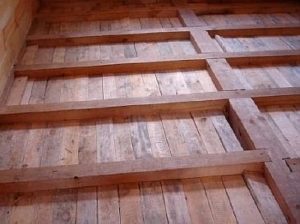
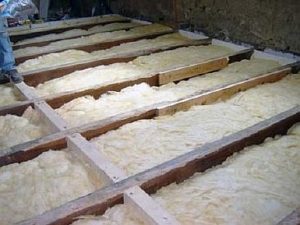
- Next, nail plywood or boards to the beams and to the bottom. This will serve as a raised floor to support the underfloor heating.
- Lay insulation on top of the raised floor. But first, lay a layer of polyethylene. Then, lay polystyrene foam or, better yet, fiberglass on top of that.
- Next, lay out the finished modules, fastening them together with locks.
- Insert the heat transfer pipe into the slots of the modules.
- Next you can lay the laminateIn some cases, a reinforcing layer (aluminum plate, underlay) is placed between the laminate and the heated floor.
Wooden slatted floors
This system differs from the modular type in its design. While a modular system uses prefabricated elements, a slatted system requires the creation of grooves (laying 28 mm thick boards with a 20 mm gap between the slats).
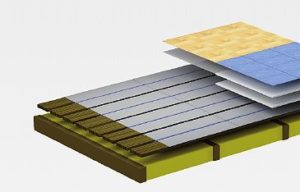
The slatted version is also installed on joists (beams) with the same spacing as the modular version. Insulation is placed between them.
Aluminum sheets are used when the installation pitch is 150, 200, or 300 mm. In areas where heat loss occurs (apartment corners, windows), a pitch of 150 mm is used.
Whether you choose a modular or rack system, please be aware that each requires its own separate project with a unique heating system load calculation.
The step of the contours, their number, installation of distribution manifolds and other automatic systems are taken into account.
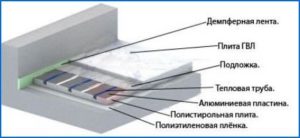
Concrete system
This system is most often used when installing underfloor heating. The concept is simple: pipes are installed and filled with concrete.
What does the concrete system diagram (filling) consist of:
- Thermal insulation (expanded polystyrene is often recommended). This is necessary to retain heat in the room. This ensures that the heat flows upwards into the room and its surroundings, rather than downwards toward the floor.
- Iron mesh. Installation is done on thermal insulation (polystyrene flooring). Pipes are attached to it with special clamps. There are many other accessories for fastening this type of flooring (clips, rails, harpoons).
- Damper tape. It is laid around the perimeter of the room before pouring. It compensates for thermal expansion when the screed heats up.
- Pipes (from 8 to 32 mm). The choice of pipe diameter directly depends on the volume of the heated area and the load on the heating system. Pipes are laid only according to a special design. Before pouring, the entire system is tested for functionality and leaks.
- Concrete pouring (screed). This is a concrete solution. It is poured last. This is the final stage of underfloor heating installation.
Watch the video of the contractors installing the floor and pouring concrete screed. You'll see how to properly distribute the screed over the pipe base: evenly, without any unevenness or lumps.
Polystyrene system
This type is the thinnest and lightest. It consists of expanded polystyrene with special channels and aluminum fins that distribute heat. It is suitable for all types of rooms. The system has different steps, depending on the type and purpose of the room.
The polystyrene system is ideal for areas with low ceilings or on balconies where the floor needs maximum insulation.
Another advantage of this system is that there's no need to pour a screed onto the floor. This saves time and money.
The surface where the polystyrene flooring will be installed must be perfectly flat, smooth, and free of dust and debris. Unevenness is not allowed (maximum 2 mm per square meter). Otherwise, there is a risk of the entire heated floor being distorted.
Installation process:
- Lay a sheet of polyethylene on the surface (base). Lay the slabs on it according to the instructions on the packaging. The installation procedure is standard, but depending on the manufacturer of the polystyrene slabs for underfloor heating, there may be specific installation considerations.
- Pay close attention to the installation step that you calculated when drawing up the plan.
- A damper tape is always placed between the polystyrene and the wall. This prevents stress on the wall when the finished underfloor heating system heats up and cools down.
- Aluminum plates are attached to special grooves in the polystyrene. They will further distribute the heat from the pipes throughout the floor.
- Next, it is placed into the openings of the pipes through which the hot liquid will flow.
- At the end of the installation, the pipes are connected to the manifold and hydraulic tests are carried out.
Underfloor heating can't be installed without understanding the intricacies and layout of its installation. Calculations and proper design are essential. Seeing others do it isn't enough to replicate the installation yourself. Only by learning how to work with a design can you create a high-quality underfloor heating system.


Need advice on installing underfloor heating.
My radiator solution is definitely the most cost-effective, but all the downsides are obvious. The floor is cold during the off-season, but fortunately it's not on the ground floor. I plan to install individual heating.