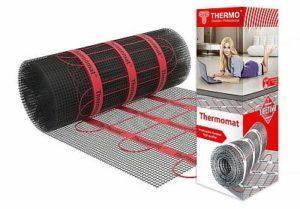
Today, underfloor heating is a popular heating system, offering simple installation, affordable pricing, and low operating costs. Furthermore, unlike electric systems that emit electromagnetic waves, it is completely safe for human health.
How to install underfloor heating: For hydronic underfloor heating, hot water pipes are laid in a serpentine or spiral pattern. For electric underfloor heating, various heating elements are installed using specific technologies.
We also suggest you find out How to install heated floors in a bathroom using a heated towel rail or in apartment from central heating.
- Advantages and disadvantages of water-based underfloor heating
- Installation of water-heated floors
- Features of room preparation
- Requirements for the premises
- Foundation requirements
- How to select and calculate pipes
- Types of pipes
- Calculating pipe sizes
- Selecting a circuit layout and its installation
- Selecting a collector-mixing unit
- Installation of underfloor heating on a concrete screed
- Layers of water-heated floors
- Waterproofing
- Damper tape
- Laying insulation
- Reinforcement
- Laying and fastening pipes
- Connecting and filling the circuit - hydraulic testing
- Installation of beacons
- Preparing the solution, pouring the screed
- Expansion joints
- Cracks in the screed
- Laying the finishing coating
- Video instructions
Advantages and disadvantages of water-based underfloor heating
The main advantage of hydronic floors is that they provide horizontal, uniform heating of the room. Heat is also distributed vertically, creating a healthy microclimate, unlike radiator-based systems. This system is especially recommended for rooms with high ceilings.
The efficiency of underfloor heating depends on good thermal insulation, as increased heat loss reduces heat output. However, installing such a system in a bathroom or toilet has its drawbacks: the possibility of overheating the surface, since the heating element is most often connected to a heated towel rail.
Moreover, such floors negatively impact the height of the room, as the "pie" requires a thick layer of concrete screed. Furthermore, the concrete pour significantly increases the weight of the structure, requiring reinforcement of the floors.
Installation of water-heated floors
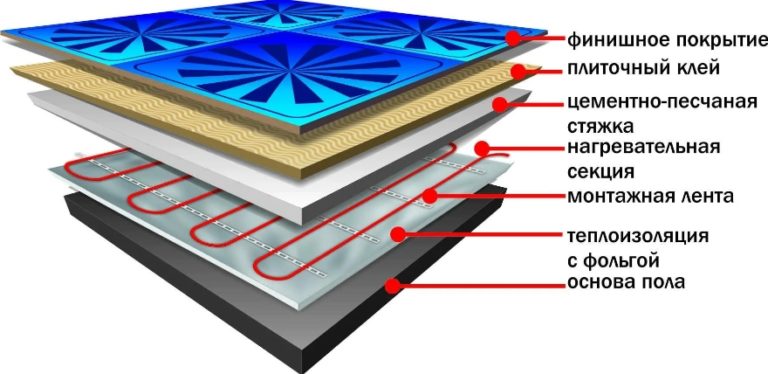
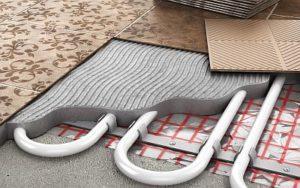
Hydronic underfloor heating has a complex, multi-layer structure, each layer with its own function. It consists of a base, a hydronic and thermal layer, a reinforcing element, a heating element, and a concrete screed.
A base is placed on the screed, onto which the floor covering is installed. It must have a special symbol indicating that it can be installed on warm systems.
The joints between the walls and the screed, as well as the boundaries of the water circuit, should be lined with a damper tape; this will help compensate for the expansion of the concrete due to temperature changes.
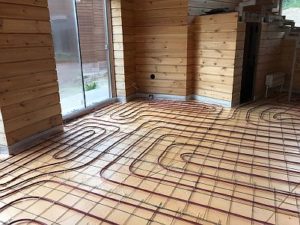
Most often, DIY installation of this heating structure is done using the "wet" method, that is, by pouring a cement-concrete screed. However, "dry" installation is also possible, and is used in houses with wooden floors.
Features of room preparation
Due to the fact that the structure is heavy, with a large length of pipes and connecting nodes, the installation has its own technological features.
Therefore, each layer must be laid strictly according to the instructions. But first, let's look at the specifics of room preparation.
Requirements for the premises
Hydronic underfloor heating is recommended for installation in private buildings. In multi-story buildings, In addition to the heavy load on the floors, there is a risk of flooding the apartment below.
Furthermore, the coolant circuit is connected to the main heating system, which is often not designed for this purpose. This can lead to cold risers in your apartment or a neighboring one.
This is due to the reluctance of the relevant authorities to issue permits for the installation of this system in multi-story buildings.
Today, new buildings often have two systems installed: one for standard heating and the other for underfloor heating.
The ideal solution is to install hydronic underfloor heating yourself, during construction. When installing the system in a finished home, consider the following:
- the height of the ceilings, since such a structure leads to their significant lowering;
- size of doorways - their required height not less than 210 cm;
- strength of the foundation.
In addition, the heat loss rate should be no more than 100 W/m2.
Foundation requirements
When installing a water-heated floor, a level and clean subfloor is essential. If the home is older, the old floor screed must be removed and the subfloor leveled.
The process is complex and time-consuming, but necessary. Afterward, the base is thoroughly cleaned of debris and dust.

For a water-based floor to function properly, a level base is required, with no more than 10 mm of variation allowed. Any cracks or imperfections found must be repaired.
If you are the owner of a new home with panel ceilings, then heating elements can be installed directly on them.
How to select and calculate pipes
Before you begin building a hydrofloor yourself, you should choose the right type of pipe and calculate the optimal diameter size.
Types of pipes
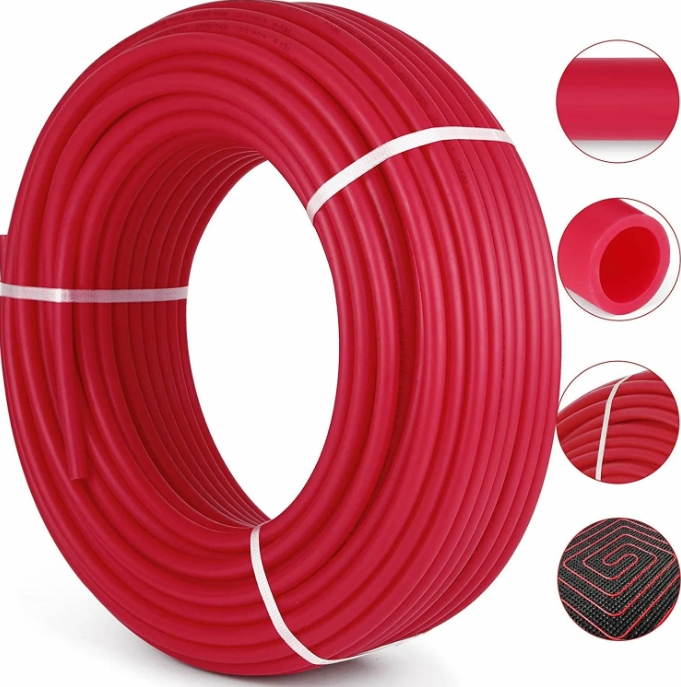
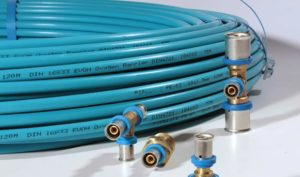
Today, a large number of types of pipes are produced for installation in water-heated floors; they are made from various materials.
Professionals recommend choosing cross-linked polyethylene pipes such as PEX or PERT for DIY installation. PE-Xa, which has the highest cross-link density (85%), is the ideal option.
This makes it possible to use axial fittings with a push-on end, which can be safely installed in concrete structures. Furthermore, if such pipes become kinked, they can easily be restored to their original shape using a heat gun by heating the fractured area.
Read the article: there are situations when it is necessary connect the pipes together in a screed, have a punctured pipeline or need to extend it - find out how to do it.
Experts recommend using the model when installing water systems PE-Xa or PERT with a polyvinylethylene layer, which can be on the outside or inside. It is better to install pipes with an inner layer. EVOH.
Choosing a contour PE-XaYou can test it yourself. Bend a section of the pipe and then heat it with a heat gun. If the product is high-quality, it will return to its original shape.
Another type of pipe recommended for underfloor heating systems is composite. It consists of two layers of cross-linked polyethylene with foil between them. The presence of heterogeneous material, which has different coefficients of expansion when heated, can cause delamination of the circuit.
When choosing a model, you need to consider:
- brand (Rehau, Tece, KAN, Uponor) is a guarantee of quality;
- marking;
- certificate of conformity for products;
- consider coefficient of thermal expansion pipes;
- cost of components required for installation.
Calculating pipe sizes
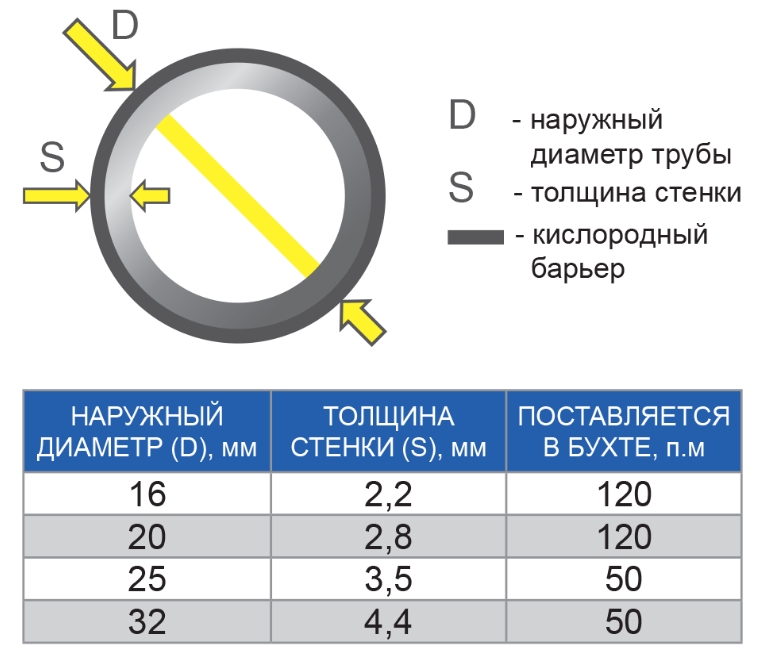
There are three main pipe sizes available for underfloor heating systems:
- 16 mm;
- 17 mm;
- 20 mm.
The most popular sizes for installation 16 And 20 mm.
Before purchasing a heating circuit, you should calculate its size. If you're unsure of how to install it yourself, it's best to leave it to the professionals.
To do this, you need to decide:
- with a diagram of the layout of the water-heated floor;
- with floor areas where furniture will be placed and plumbing will be installed (pipes are not installed under furniture).
A 16 mm diameter product should have a loop length of no more than 100 meters, while a 20 mm diameter product should have a loop length of no more than 120 meters. This means that each loop should occupy a maximum of 15 square meters, otherwise the system pressure will be insufficient.
If the room is large, it is divided into several sections. They must be of the same size, with a maximum difference of 15 meters. With good thermal insulation, the standard installation pitch is 15 cm, but this can be reduced to 10 cm.
At the laying step:
- 15 cm - 6.7 meters of heating element per 1 square meter will be required;
- 10 cm - 10 meters.
Selecting a circuit layout and its installation
When choosing an installation scheme and calculating the pitch, keep in mind that the fluid cools as it passes through the circuit, so the installation should be positioned away from the exterior walls. This will help protect the heated space from cold air penetration.
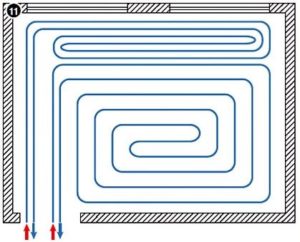
The heating level of the room depends on the heating element layout:
- "Snake" is the easiest method for self-installation, the degree of heating decreases gradually;
- "Snail" - the process is more complicated, but it provides uniform heating of the room with internal walls.
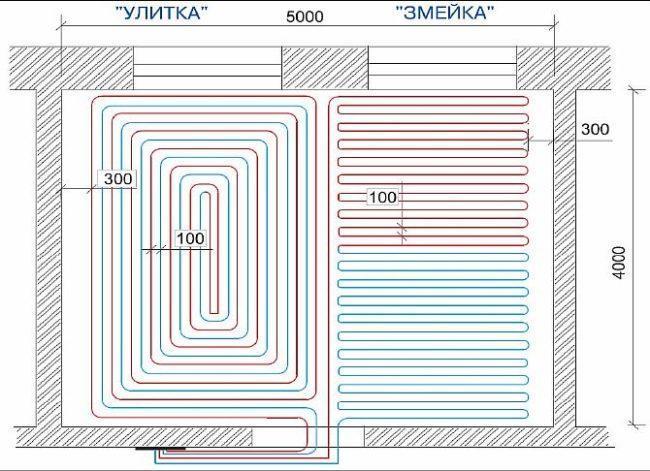
When installing a warm water system, the calculation data and installation plan are taken into account. The standard installation pitch is 15 cm, and loops longer than 100 meters should be divided into several sections. Furthermore, each room should have its own loop.
Couplings or fittings are installed only when repairing breaks or carrying out repair work on heated floors.
In addition, when preparing the calculation and diagram, hydraulic resistance is taken into account. It depends on the number of turns; the more turns, the higher the resistance. Each circuit connected to the manifold must have the same hydraulic resistance.
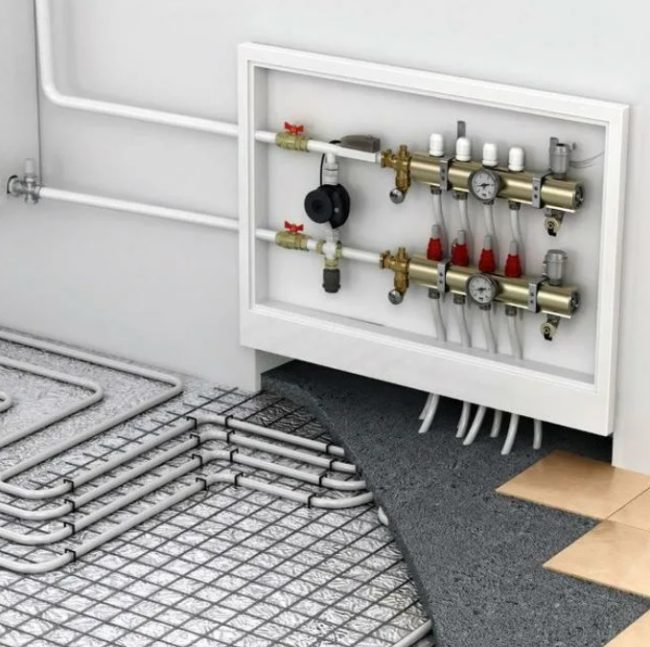
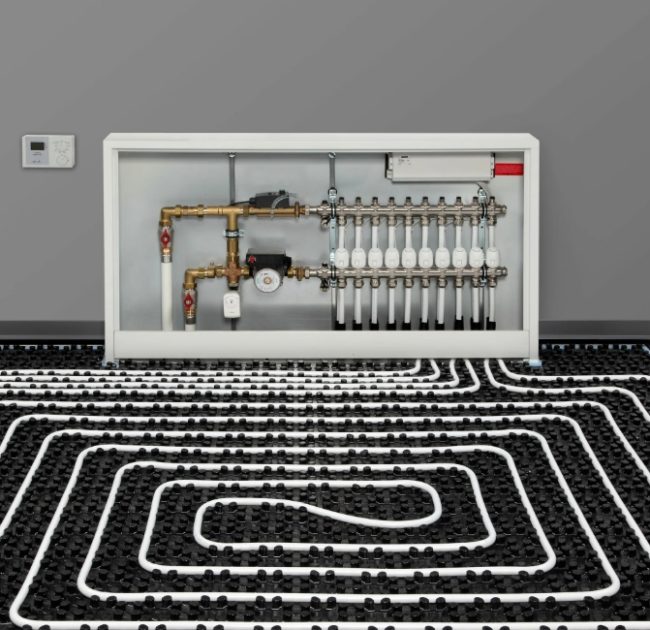
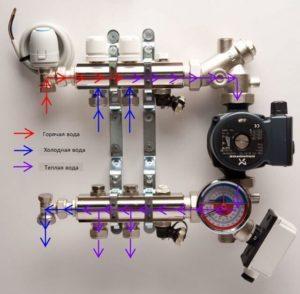
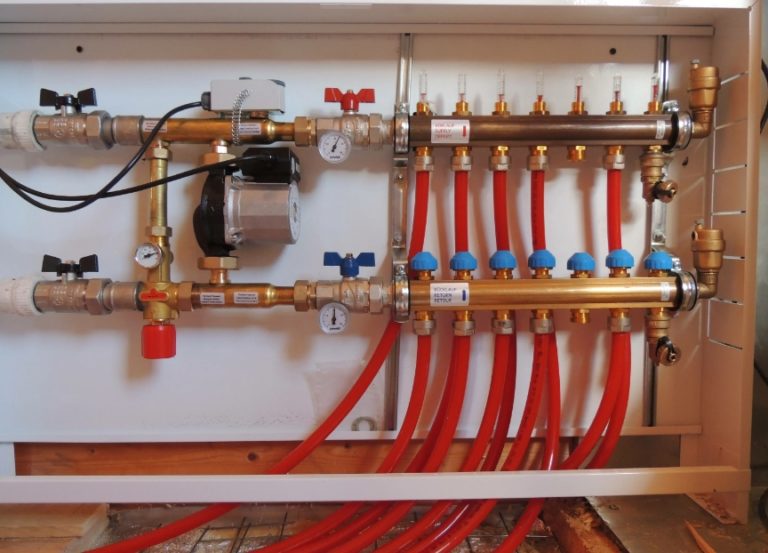
Selecting a collector-mixing unit
Selecting a collector (see types, operating principle and installation of the collector(The connection diagram and setup) is directly related to the number of circuits planned for installation. The device must have as many outlets as the water-heated floor structure will have.
The device allows for the regulation and supply of heated coolant into the system, and its return to the device after use.
The simplest model of the corrector has only a shut-off valve, and it cannot be used to regulate the operation of the structure.
More expensive devices are equipped with control valves, which allow you to independently set the intensity of water flows, separately for each circuit.
In addition, a mandatory feature of any collector is an air bleed valve and a drain cock for emergency situations. To ensure proper operation, all valves only need to be adjusted once to the required parameters.
It's worth noting that inexpensive manifold models are more commonly installed. However, if you don't need to save money, it's better to buy a model with servo drives and mixing units. This device automatically regulates the temperature of the water supplied to the underfloor heating system.
The collector is installed directly in the heated room or in a nearby room. A special cabinet is manufactured for mounting the device; its standard dimensions are 50 x 50 cm and 12-15 cm deep.
It is located above the surface of the underfloor heating. To avoid detracting from the room's decor, the manifold cabinet is often concealed within the wall.
Installation of underfloor heating on a concrete screed
Installing a warm water system with a concrete screed yourself is a labor-intensive and time-consuming process, as it takes about a month for the concrete to harden.
The construction of the structure consists of several step-by-step actions, which we will discuss below.
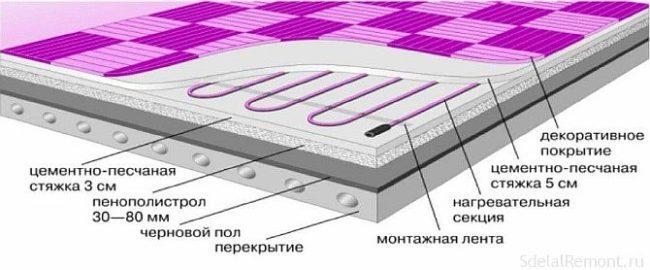
Layers of water-heated floors
Before installing the floor yourself, you should familiarize yourself with both the installation technology and the layers "pie" of the floor that needs to be laidEach layer is laid in a strictly defined sequence. The structure's thickness ranges from 8 to 14 cm, and the floor load is approximately 300 kg/sq.m.
Let's look at what a heated floor consists of and its construction:
- foundation - reliable and durable;
- vapor barrier layer - a polyethylene film with a thickness of at least 0.1 mm is used;
- insulation - extruded polystyrene foam is used;
- reinforcement - it gives strength to the structure;
- heating elements - pipes laid according to the diagram;
- concrete screed with plasticizer - its thickness from 3 to 5 cm.
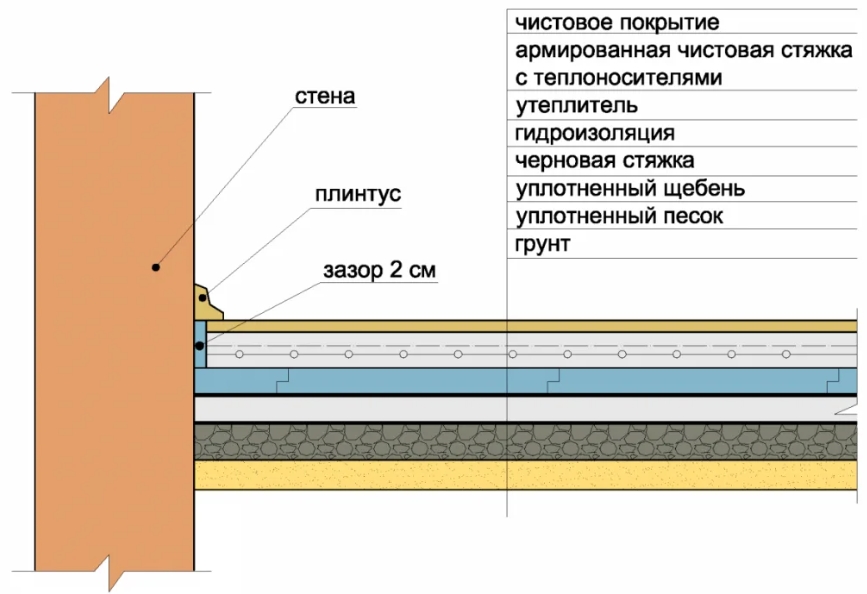
If the heated floor is laid on the ground, then the “pie” is as follows:
- bulk soil - 15 cm;
- crushed stone fractions - 10 cm;
- sand - 5 cm;
- rough screed;
- waterproofing material;
- damper tape;
- insulation - 5 cm;
- reinforcing mesh;
- heating elements;
- cement-concrete screed.
After the concrete has hardened, the flooring is installed on the surface and the finishing coating is laid.
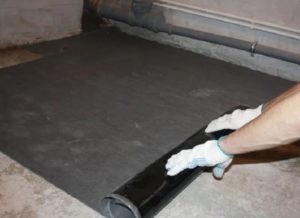
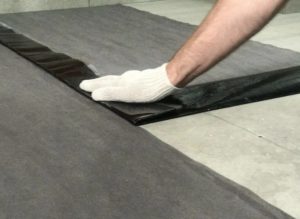
Waterproofing
As mentioned above, the waterproofing layer must be laid on a prepared subfloor; it must be level and clean.
Regular black polyethylene film is used as a waterproofing material. It should be overlapped, one strip over the other, and applied to the walls (20 mm). To ensure a watertight seal, the joints should be sealed with tape.
Damper tape
The damper tape is intended To compensate for expansion of the concrete screed when the system heats up, it protects the surface from cracking. The standard thickness of the mounting tape is 5–8 mm, and the height is 10–15 cm.
When concrete is heated to 40°C, it expands by 0.5 mm per 1 meter.
It is applied along the perimeter of the heated room, where the walls and floor meet. The tape should be higher than the screed, and any excess is trimmed with a knife after installation is complete. Additionally, if there are multiple contours, the edges of each contour are lined with tape.

Laying insulation
When installing underfloor heating, it's important to choose the right type of insulation. The system's efficiency depends on it, as it prevents heat from being wasted.
There are many types of insulation materials, but experts recommend two:
- Extruded polystyrene foam — low thermal conductivity and high mechanical strength. EPSPS is impervious to moisture because it does not absorb it. Furthermore, it is affordably priced.
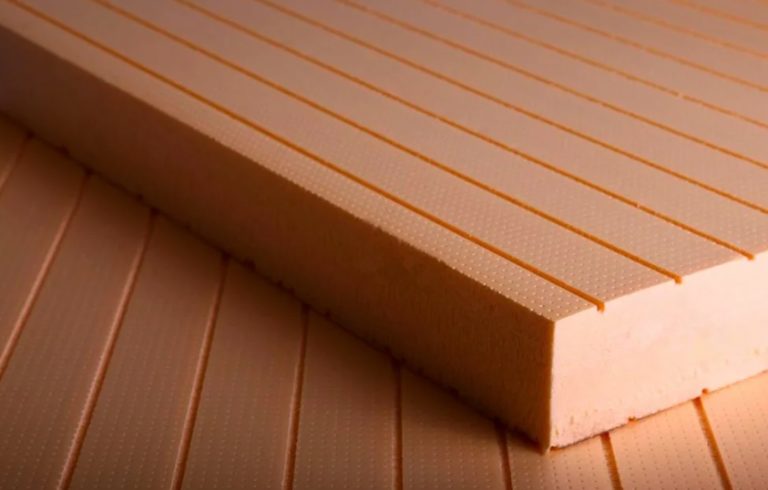
This type of gasket is produced in slabs measuring 50 x 1000 mm or 600 x 1250 mm, and in thicknesses of 20, 30, 50, 80, and 100 mm. The product is equipped with snap-in grooves, allowing for a secure joint.
Polystyrene foam sheets are equipped with a foil layer, which increases the cost. However, it offers no significant benefit, as the reflective properties are ineffective in opaque environments. Furthermore, the cement mixture is alkaline and will corrode the foil.
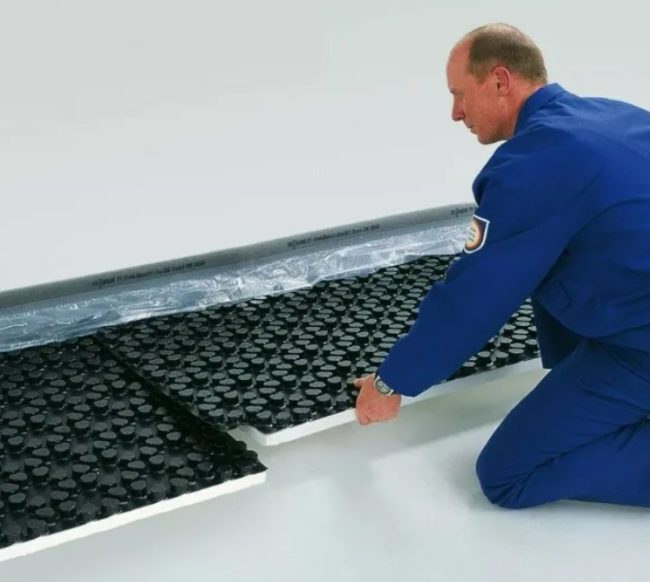
- Profiled polystyrene mats — highly flexible, equipped with special bosses, between which pipes are laid. The bosses also serve as a support for the heating elements.
In these, the contour is attached at 50 mm intervals. Using a mat significantly simplifies the installation process, but they are more expensive than polystyrene foam insulation. The thickness of the boards ranges from 1 to 3 mm, and the sizes are 500 x 1000 mm or 600 x 1200 mm.
When installing hydronic underfloor heating yourself, it's important to choose the right insulation thickness. To do this, follow these guidelines:
- When laying heated floors on the ground, the minimum thickness of the insulation should be 100 mm; it is recommended to install two layers of 50 mm each, located perpendicular to each other;
- when installing on the first floor, 50 mm is sufficient;
- when carrying out thermal insulation in rooms above warm areas - 30 mm.
Insulation sheets are laid around the entire perimeter of the area and secured to the foundation. If EPS boards are used, they are secured with disc anchors at the joints and in the center.
Reinforcement
The need for reinforcement when installing warm water floors on your own is that that the mesh gives strength to the structure, ensures uniform heat distribution and heating elements are attached to it.
The standard diameter of reinforcing mesh rods ranges from 4 to 5 mm, and the cells come in different sizes, which must be selected depending on the installation pitch.
Experts recommend laying two reinforcing layers. The first is on top of the insulation, and the second is on top of the heating elements (pipes). The meshes are connected with wire.
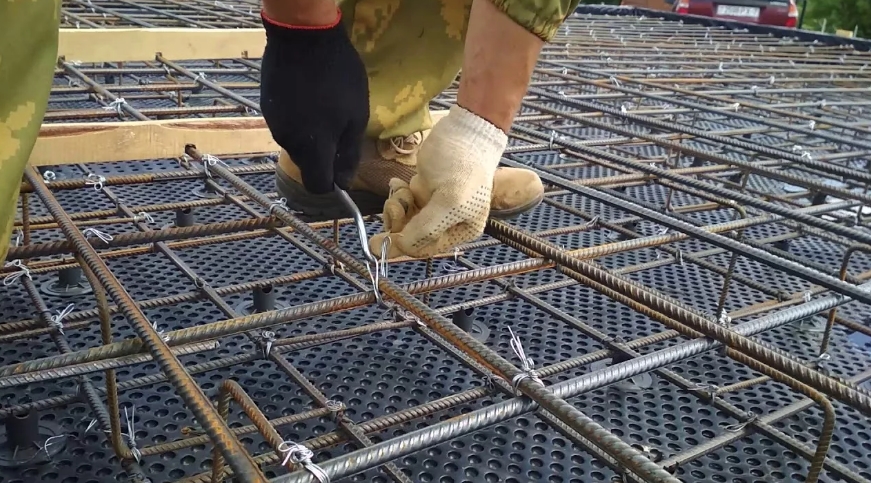
If you don't want to lay two layers of reinforcement, then before installing the mesh on the insulation, you should make supports under it so that when pouring the solution, it can flow under the reinforcement.
Laying and fastening pipes
Installing the heating elements is the most critical step in installing underfloor heating. It's also a good idea to have a device for unwinding coils of pipe, as unwinding them in coils is prohibited, as it creates significant tension and hinders installation.
It's not permissible to remove the circuit from a stationary coil; it must be twisted. You can twist it yourself, but using a device makes it easier.
Use a marker to mark the heating element spacing on the slabs. Then, use a painter's string to mark the spacing and draw the contours.
When installing water pipes yourself, you need to remember that you need to step back from the walls 15–20 cmIdeally, each contour should be uniform, seamless, and of maximum size. 100 mmInstallation should be done according to the diagram and calculations. The permissible distance between the walls is 10 cm, closer to the center - 15 cm.
The circuit should be installed from the areas furthest from the manifold. Furthermore, the transit sections of the unit should be insulated with foamed polyethylene, which will conserve energy and prevent heat loss along the way. Both ends should extend to the location where the manifold cabinet will be installed.
To secure the loop, use mounting profiles that must be screwed to the floor with dowels. The pipes are then pressed against the reinforcing mesh and secured with plastic fasteners. Avoid over-tightening the pipe; the loop should fit snugly against it.
Care must be taken when bending the pipe, especially when made of polyethylene, as this material is prone to deformation. Polypropylene pipes are difficult to bend and tend to spring back. Therefore, when installing underfloor heating, they are secured directly to the mesh with a wide corner radius. If a white spot or streak appears, the material is considered damaged and should not be used.
If you are installing metal-plastic pipes with a diameter 16 or 20 mm, then you can bend them with your own hands without using a special tool.
When bending a small radius, to ensure an even angle and prevent the product from breaking, the bending process is performed in several passes (by interchanging hands). To achieve a 90° angle, 5-6 passes are required.
Connecting and filling the circuit - hydraulic testing
After installing the heating pipes yourself, the device should be connected and checked for functionality and integrity:
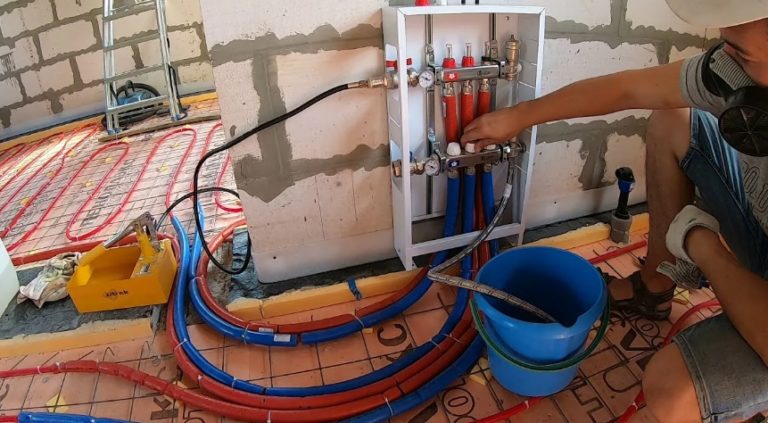
- ConnectionThe most common method for connecting a hydronic underfloor heating system is a distribution unit. Its main purpose is to increase pressure, regulate temperature, and evenly distribute the coolant across multiple circuits. Various units are available, with manual or automatic control.
Connecting the system involves connecting both ends of the pipe to the manifold's distribution system using compression fittings. The manifold also connects the underfloor heating system to the main heating system or a dedicated boiler.
When choosing a heating boiler, it is important to consider its power; it should equalize the power of all floor areas with a small reserve.
The boilers have a water inlet and outlet, which are equipped with shut-off valves.
A pump is also required to circulate the coolant. This is often included with the boiler, but if the area being heated is large, an additional one will be required.
- Filling the systemBefore pouring the concrete screed, the system should be filled and hydraulically tested. Repairing a concrete-filled system will be difficult if it malfunctions. To do this, connect a hose to the collector drain outlet and run it to the sewer.
To make it easier to monitor air escaping from the system, it is better to use a transparent hose.
The manifold responsible for supplying the coolant is equipped with a ball valve, to which the mains water supply is connected. A pressure testing pump is connected to one of the outlets connected to the underfloor heating circuit.
The process of filling the system is as follows:
- all underfloor heating channels are closed except one, while all air vents are opened;
- water is supplied, and the degree of its purity and the release of air from the system are monitored through the drain hose;
The inside of the pipes may be covered with process grease, which must be washed off with water.
- When all the air has come out and the water is completely clear, the drain valve is closed, after which the filled system is shut off;
- if there are several contours, such actions must be performed with each one;
- After all circuits have been flushed and filled, the tap through which water is supplied should be closed.
Once the procedure is complete, there should be no air left in the pipes, and the water should be perfectly clean.
If during the testing of hydrofloors a leak was detected, then it is eliminated immediately, but first it is necessary to relieve the pressure in the system.
- Pressure testingTo perform a pressure test, a special pump, as mentioned above, is required; it must be connected to the outlet of the underfloor heating system.
Sequence of the crimping process:
- all circuits connected to the collector must be opened;
- fill the pump tank with water and open the supply tap;
- using a pump, you need to build up pressure in the system; it should be 2 times higher than the working pressure (6 atm), it is monitored using pressure gauges located on the pump and manifold;
- After increasing the pressure, it is necessary to visually inspect the entire pipeline and its connections;
- after half an hour, increase the pressure again to 6 Bar and conduct an inspection, after another 30 minutes, repeat the steps, if leaks are detected, release the pressure and eliminate them;
- if there are no leaks, the pressure should be raised again to 6 Bar and left for 24 hours;
- If, after this time, the pressure has dropped by no more than 1.5 Bar, then you have assembled the system correctly.

According to the laws of physics, when pressure rises in pipes, they try to straighten out. If they aren't securely fastened, unpleasant surprises will occur during testing. This won't be a concern later, once the circuit is filled with concrete.
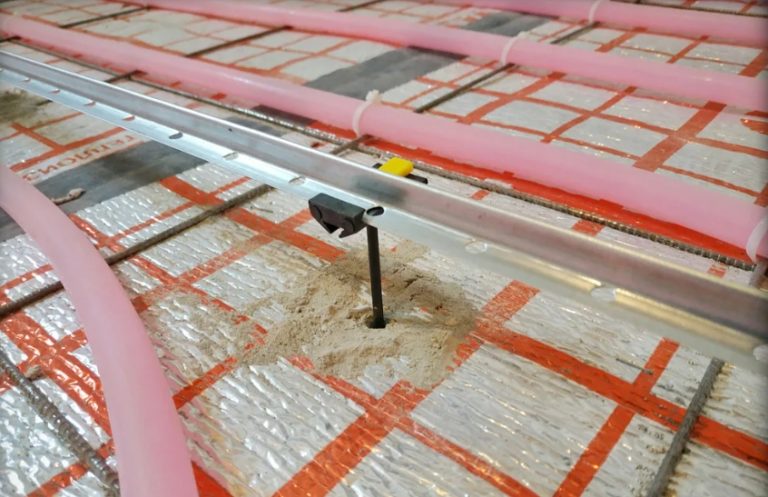
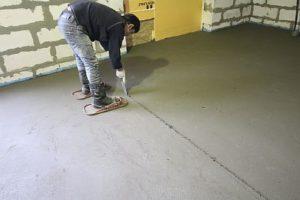
Installation of beacons
To create a level screed yourself, you need to pour it using guides. Experts recommend using plasterboard profiles as guides when installing underfloor heating.
The guide rails are installed according to the finished floor level, minus the flooring thickness. Mortar pads are used to secure the guide rails, and the drywall is placed on them and leveled with a level.
However, this method does have a drawback: if the profile sinks below the required level, it will need to be removed and mortar added underneath. Therefore, a rigid support is recommended under the beacons; dowels can be used. The top of the cap should be raised above the surface of the screed.
The standard installation distance for beacons is 30 cm from the walls, with a small gap between them to prevent the mortar from settling and causing pitting. The recommended distance between beacons is 1.5 m, in which case a 2-meter straightedge will be sufficient for alignment.
The process of installing beacons looks like this:
- A 30 cm indentation is made from the walls located to the right and left of the entrance and lines are drawn that will serve as a mark for the placement of the outer beacons.
- The space between the lines is divided into equal parts, their maximum size is 150 cm. One strip should be located opposite the entrance.
- Parallel lines are drawn along the dividing marks made, and the locations for the placement of the gels are marked on them, with an installation step of 40–50 cm.
- A hammer drill is used to make holes into which they are installed.
For leveling the beacons, it's best to use a laser level. If you're installing the beacons yourself and don't have one, you can rent one. Although it's possible to do the job with a regular level, it will just take more time.
- A profile is placed over the screw heads. However, to ensure the beacons are securely fastened, before installing them on the screw heads, mortar mounds should be created at 1-meter intervals, slightly above the future screed. Then, the profile is installed and pressed down, and any excess mortar that has come out is removed.
The evenness of the installed beacons is also checked with a level.
Preparing the solution, pouring the screed
The concrete screed used for hydronic underfloor heating is subject not only to mechanical stress but also to thermal deformation, so its requirements are higher. A standard concrete mortar won't do; a plasticizer or fiber additive is required.
Using a plasticizer reduces the water-to-cement ratio in the mortar, increases workability, and improves the strength of the screed. Workability is one of the most important indicators of a high-quality mortar for underfloor heating, as it must penetrate well under the pipes and allow air to escape easily. Depending on consistency, additives are available in dry and liquid forms.
Fiber significantly increases the strength of the structure and virtually eliminates the risk of cracking. It comes in metal, polypropylene, and basalt.
Polypropylene and basalt fibers are used for heated water floors. The standard fiber rate is 1 m3 - 500 grams.
A wide variety of mixtures are available in stores, some of which already contain plasticizer and fiber. While ready-made solutions are high-quality and significantly simplify the floor pouring process, they are more expensive than homemade ones.
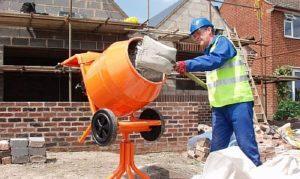
A mandatory requirement when preparing the mixture yourself is the mechanization of the process (using a concrete mixer or construction mixer), as this requires obtaining a high-quality solution.
When making your own cement-concrete mix for underfloor heating, it's recommended to use Portland cement grade M-400 or higher. Furthermore, its production date should be no more than six months old.
Sand must be sifted, washed, and dried before use in mortar. River sand is not suitable for this purpose; it has a regular shape, which is not ideal.
The sand and cement in the mortar should be in a 3:1 ratio. Water is needed at approximately 1/3 of the cement volume, or 15 liters per 15 kg bag. However, using additives reduces the water-to-cement ratio, so water should be added gradually.
The technology for preparing underfloor heating mortar varies depending on the equipment used. If a mixer is used, the dry ingredients—cement, sand, and fluffed fiber—are first mixed at low speed. Only then is the water and plasticizer added. The mixture takes about 7 minutes to prepare.
In a concrete mixer, the process is exactly the opposite. Water with a plasticizer is poured in, then cement is gradually added, then sand, then cement again, and finally the remaining water is added. Fiber is added gradually during the mixing process, always in a fluffy form. The solution is prepared in 3-5 minutes.
The finished concrete mixture is uniform in color and has a flexible consistency. If you squeeze it in your fist, no liquid should leak out. You can place the mixture in a pile; if it doesn't spread but only settles slightly, the quality is good.
Before pouring the hydronic underfloor heating, vacuum the surface to remove dust. Also, close the windows in the room to avoid drafts and direct sunlight.
All screed installation work must be completed in one go. Therefore, if you're pouring the screed yourself, you'll need help. Furthermore, the machine must be set to an operating pressure of 2 atmospheres.
Start pouring the mortar from the far corner of the room, following the guides. Finish with a line at the exit. When leveling, don't try to create a perfect surface right away. It's important to avoid large holes. The minimum mortar layer over the heating elements should be 3 cm.
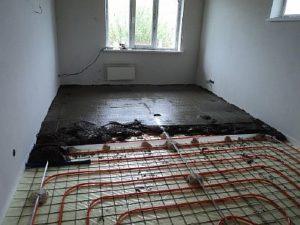
The screed is left in this state for 1-2 days until it hardens enough to be walked on. After this, the cleaning process begins. First, the damper tape, which protrudes above the surface, is removed using a utility knife.
Then, using the sharp edge of the straightedge, press it against the beacons and scrape the concrete away from you with short, sharp movements. Continue this process until the beacons are completely exposed. Any remaining grout debris is removed, the surface is sprayed with water, and covered with plastic.
After a day, the beacons are removed, and the remaining grooves are filled with mortar. The surface is wetted again and covered. The screed must be wetted daily for 10 days. The concrete surface must be left to cure for at least 28 days, before the system is turned on.
Find out How to turn on a hot water heater correctly sex for the first time.
Expansion joints
If expansion joints are incorrectly positioned or missing, this can lead to screed failure. Therefore, it is necessary to install contraction joints if:
- the area of the premises exceeds 30 sq.m.;
- wall size more than 8 m;
- the room has a significant difference in length and width, more than 2 times;
- a room with a curved shape.
To do this, lay a damper tape around the perimeter of the joints. It's important to separate the reinforcement at the joints, and ensure the expansion gap at the base is 10 mm thick.
Seal the top of the joint with sealant. If the room is non-standard, divide it into rectangular or square sections.
When heating elements pass through seams, they are installed in these areas within a corrugated tube. The tube should cover them by 30 cm on each side. Seams should not be placed inside the contour.
If you're laying tiles as flooring, there's a high risk of them peeling off at expansion joints. Therefore, install one section of the tile with adhesive and the other with sealant.
If additional demarcation is necessary, partial expansion joints can be used. These are made with a trowel and are 1/3 thick. Once the concrete has cured, they are also sealed with sealant.
Cracks in the screed
It's not uncommon for cracks to appear after the screed has hardened. These cracks can be caused by:
- low density insulation;
- poor compaction of the solution;
- no plasticizer;
- the screed is too thick;
- no shrinkage seam;
- the concrete dried quickly;
- the ratio of components in the solution is incorrect.
It is easy to avoid cracks in the screed:
- use insulation with a density of at least 35-40 kg/m3, or better yet, higher;
- Make the pouring solution plastic in consistency, with the addition of fiber and plasticizer;
- separate large rooms with shrinkage joints;
- Do not allow the concrete to harden quickly by covering it with plastic film the day after pouring.
Laying the finishing coating
You should only select a finishing coating that is specifically designed for installation over heated floors. A special symbol indicating this is found on the packaging of such products.
The ideal flooring for DIY installation over a hydrofloor is ceramic tile or porcelain stoneware. Laminate, linoleum, or carpet can be used over heated floors, but only if labeled for installation on heated structures. Flooring should only be installed over a well-dried concrete screed.
Anyone can install underfloor heating in a home or apartment. While it may take a fair amount of time and effort, the end result will be a cozy and comfortable home.


Interesting. The reinforcing mesh diameter is 5 cm. Can you lift it?
Hello. Thank you for pointing out the inaccuracy. It has been corrected.
The article explains everything in detail and step-by-step. I'm planning on installing heated floors in my kitchen. The advantages essentially outweigh the disadvantages. The key is to do everything correctly. Even the slightest mistake can ultimately lead to dire consequences. And people make a lot of mistakes due to ignorance.
To be honest, installing underfloor heating is a very painstaking job that doesn't allow for any mistakes, as it could easily damage the system. Before doing it, you need to check everything several times. But I want to say that underfloor heating has countless advantages, as I've personally done it and know for sure. I highly recommend it.