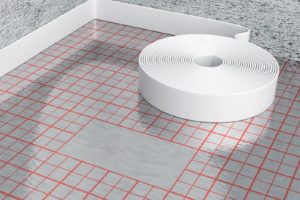
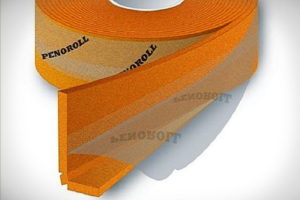
Damper tape for underfloor heating is used in the process of creating a cement screed.
If the flooring isn't made of concrete, installing insulating strips is pointless. This is due to the primary purpose of the building material.
- Why do you need a damper tape for underfloor heating?
- Purpose of the damper tape
- Basic properties
- What is the damper tape for underfloor heating made of?
- Advantages and disadvantages
- Varieties
- Standard
- Self-adhesive
- With a skirt
- T-shaped
- With cuts
- L-shaped
- Laying a damper tape for a water-heated floor
- At what height should I trim?
- How and what to use for trimming correctly?
- Getting ready for work
- Installing a damper tape with a water system – step-by-step instructions
- Helpful installation tips
- What to fill the seam with?
- Rules for choosing a compensating tape
- Popular brands
Why do you need a damper tape for underfloor heating?
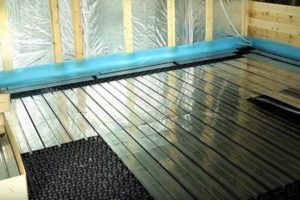
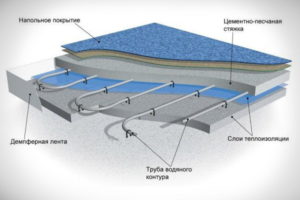
Damping tape (DL) is a roll material for laying along walls indoors when creating a concrete screedThe main location is the corner joint between the wall and the floor in the rough state, but it is installed along the perimeter of the entire surface.
A large number of companies produce expansion joint strips, each independently regulating their own product size range. Therefore, there are no standard specifications.
Despite this, the damper tapes most often found on sale have the following characteristics:
- width – from 80 to 150 mm;
- length of the bay – 100, 50, 30, 20, 15 and 10 m;
- thickness – from 3 to 10 mm.
The widest possible strips are needed for dry screeds and underfloor heating, and 100 mm for single- or double-layer screeds.
The name comes from German. Translated from German, "Dämpfer" means "shock absorber" or "muffler." Therefore, by definition, the damper tape's function is to prevent vibrations and compensate for linear expansion in concrete (when it changes volume due to temperature changes).
During this process, the screed is subject to cracking due to high pressure on the walls, but the damper tape is compressed, so the floor covering does not deform.
Other features:
- If temperature fluctuations occur again during further operation, the damper tape returns to its original state, preventing the screed from cracking;
- If the tape is not used, then not only the concrete covering suffers, but also the upper floor, and additionally, the finishing on the walls.
Purpose of the damper tape
When using thermal insulation structures, the flooring constantly heats and cools, damaging both the subfloor and the finish. This leads to material deterioration, necessitating the need for replacement.
To prevent damage, additional damping tape is installed. This applies primarily to hydronic underfloor heating systems, but experts also recommend using tape when installing electrical cable systems.
It is needed for the following purposes:
- laying a leveling screed (wet and especially dry, in which expanded clay backfill and a hard covering are used);
- pouring self-leveling compounds with organic and mineral bases;
- installation of water and electric underfloor heating;
- placement around the perimeter of the room during the construction of blind areas (so that the gap between the base and the blind area does not deform).
If expansion joints are present, a special type—a T-shaped one—is used. And when using underfloor heating, an edge strip is installed in the doorway area to create a thermal gap.
There are situations in which it makes no sense to install a damper tape:
- simple type screed on a rigid, stable base;
- the presence of thermal insulation around the entire perimeter with a height below the level of the concrete screed;
- thin-layer leveling screed made from quick-hardening mortar and self-leveling floor without heating (if the thickness is no more than 10 mm).
Basic properties
In addition to the above-described effect, the damper tape prevents the grout from spreading. It reduces heat loss because there are no gaps between the joints, so this energy is directed inward rather than outward. Experts note that without the use of damper tape, heat loss increases by 10%.
What properties does the compensating tape have?
- soundproofing – thanks to the foamed polyethylene, sound is poorly transmitted;
- resistant to low and high temperatures – the material can withstand temperatures from -40°C to +80°C (it can even be installed under steam systems);
- moisture-resistant and waterproof – if a pipe in a water-heated floor system breaks, water will not leak through the joints and all the places where the tape is located;
- resistant to chemicals – it is not affected by alkali and other chemical compounds found in concrete and other solutions;
- elastic – after compression, the tape freely takes its original shape, and with new temperature changes it is able to compress again;
- impermeable to ultraviolet rays – direct sunlight does not change the characteristics.
The raw materials from which the DL is made are biologically inert, therefore they do not create a nutritious and favorable environment for mold fungi and other pathogenic microorganisms.
What is the damper tape for underfloor heating made of?
To produce shock-absorbing construction tape, manufacturers use foamed polyethylene, which is divided into two types: synthetic rubber and polyester (densely woven polyester fibers). Their chemical formulas differ, but their properties are identical.
Damper strips come in stitched and non-stitched varieties. The former are cheaper, the latter more expensive.
Many property owners, unlike professional builders, prefer to use improvised materials during rough construction, trying to save money. The following materials are used for this purpose:
- Wooden slats. To install them, incompetent craftsmen wrap the wood in plastic film. This option is considered unacceptable, as wood molds and rots over time and easily allows moisture and cold air from the outside to pass through (because there is no firm contact with the wall and floor).
This design does not correspond at all to the characteristics of the DL. - Styrofoam. Its thickness ranges from 10 to 15 mm. The material insulates well, but it doesn't conform to recesses, corners, protrusions, and other surfaces, so it doesn't adhere tightly to the surface. Another drawback is that foam plastic can't withstand mechanical stress, so it breaks and crumbles.
- Roll insulation. People typically buy options made of foamed polyethylene or similar materials. This isn't the best option, either, as these insulation materials don't offer the same soundproofing, waterproofing, or other properties as the damper tape. This is due to the material's different density.
- Extruded polystyrene foam. It can act as an expansion compensator, but it cannot act as a damper, since it has a low level of elasticity.
The optimal option for replacing the damper tape is considered to be the following:
- rubber;
- polyethylene underlay for laminate;
- penofol;
- old linoleum.
Experts claim that there are no equivalent (100%) analogues to the compensating tape.
Advantages and disadvantages
Professional craftsmen and amateurs alike prefer to work with damper tape because of its many advantages. Specifically:
- a high degree of elasticity allows the material to take the required shape (even if there are irregularities, chips, etc.);
- it does not crumble, crack, or break (under mechanical or other influences);
- resistance to chemical elements makes it possible to use solutions of any composition;
- protects walls from mold;
- It is quick, easy and simple to install, making it easy for even a beginner to complete the task;
- maximum set of properties (absorption of vibration, noise, reduction of heat loss, etc.);
- eco-friendliness – foamed polyethylene does not contain toxins;
- small rodents do not feed on this raw material, so there are no problems with storage and use;
- the characteristics do not change for several years;
- creates a seal;
- wide range of applications;
- withstands significant loads;
- versatility – can be installed not only indoors, but also outdoors.
The damper tape has no downsides, except for one unpleasant point – its too high cost.
Varieties
There are 2 types of damper tape, depending on the location area - edge (installed only along the walls) and inter-contour T-shaped (installed during screeding in expansion joints with a floor area of more than 6 square meters, in doorways and near heating circuits when laying underfloor heating).
There are also other varieties that differ from each other in various respects.
Standard
The second name is straight. It's a strip, usually made of polystyrene, with no adhesive backing. During installation, the technician must lay the damper upright against the wall and secure it. These two drawbacks are considered by technicians to be the main ones. The third drawback is poor sealing.
The main advantage is the lowest cost, the purpose of which is to compensate for the expansion of concrete composition.
How to attach a standard damper tape to a surface:
- by planting on polyurethane glue;
- fixing with double-sided tape;
- pressing with dry backfill mixture or mortar;
- small nails (if the surface allows, for example, plasterboard);
- with liquid nails.
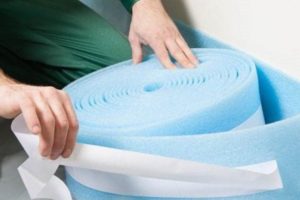
Self-adhesive
Unlike the previous version, one side of the tape is equipped with an adhesive base, which is hidden behind a protective film.
Advantages:
- ease and speed of installation;
- does not move from its place after sticking;
- average price;
- no need to buy fasteners.
Flaws:
- you need to press it hard against the wall;
- Do not attach to uneven surfaces or dirty walls.
To prevent the sticky layer from becoming covered with dust while working, remove the protective film as needed.
With a skirt
This is a damper tape with a peplum. It consists of two parts along its entire length:
- First one. It's made of polyethylene foam, so it's dense. It's applied to the wall.
- Second. Made of thick polyethylene, it's thin and can be mounted to the floor.
Skirt tape is produced in 2 types:
- with adhesive base;
- no glue (construction tape is used for fastening).
Recommended for installation when installing underfloor heating, as the thin section (basque or skirt) is designed to improve the level of tightness, preventing water from leaking into the joints in the event of an accidental pipe rupture.
Additional advantages include high-quality sealing and maximum ease of installation. Disadvantages include high cost (the self-adhesive version is therefore more expensive than the glue-free version) and its impracticality for use with electric heating systems.

T-shaped
This type is suitable for installation in large spaces where expansion joints along the walls become too small to accommodate concrete expansion. Therefore, after installing the T-shaped material and subsequent pouring, an expansion joint is formed.
It is usually produced with an adhesive base, the cost is high, but it is completely justified.
With cuts
This model was specifically designed to improve installation conditions and speed up the process. It consists of a strip with tear-off notches along its entire length. This allows for the quick removal of protruding areas after concrete pouring.
The price is high due to these cuts, but many users believe that there is no point in overpaying for this, since you can make the tear lines yourself using a sharp knife or a utility knife.

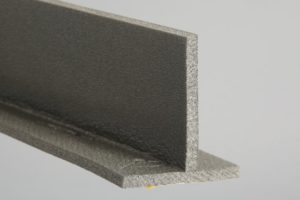
L-shaped
It differs from other options in that the surface of the tape has slots that allow it to be bent into an L-shape. A special feature: when installing, keep in mind that the short edge is placed on the floor, and the wide edge is placed on the wall.
The main advantage is the highest damping and sealing properties, but the price also leaves much to be desired.
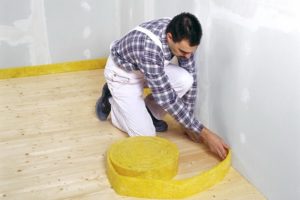
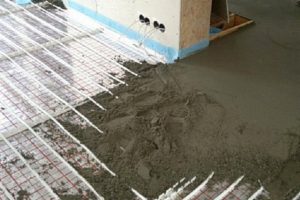
Laying a damper tape for a water-heated floor
When installing damper tapes, especially when installing underfloor heating, it's important to consider a few nuances to ensure high-quality work. This isn't difficult, so even an inexperienced DIYer can handle it.
At what height should I trim?
Since the damper tape is intended for concrete screeds, it is recommended to trim it to the edge of the floor slab. When finishing materials are laid on concrete building slabs, thermal expansion also occurs, so builders leave a gap between the wall and the edge.
The average size of this void is 0.9-1.2 cm. In such cases, the edge is installed at the same thickness and is not trimmed. Based on this, the trim height is equal to the concrete slab or finished surface. The main thing is that it is not lower than the concrete.
How and what to use for trimming correctly?
If it is necessary to cut the damper tape or any material used as a substitute, two methods are used. Namely:
- First. This is considered optimal because the strips are even and the material is easy and quick to cut. To do this, take a wooden board. Fold the tape into 2-4 layers and place it on the board. Place a long ruler on top and cut along it with a sharp knife.
- Second. It's not very convenient and slow. To do this, hold the scissors in one hand and the ribbon in the other. Cut by hand.
If you are cutting rolled materials that are too wide, be sure to first measure the required distance from the edge and draw a line along which to cut.
Getting ready for work
The first thing the technician does is prepare the base for the tape. To do this, follow these steps:
- Apply starting and finishing putty to the walls, as this will be difficult to do after installing the tape.
- Install door and window slopes.
- Prepare the subfloor.
- Lay the waterproofing material.
Installing a damper tape with a water system – step-by-step instructions
After the preparatory work is complete, proceed with the installation of the underfloor heating and damper tape. Proceed as follows:
- Bring the roll to the edge of the wall and unroll it as you work. Position it against the wall and floor so that the concrete screed will be 1-2 cm below the top edge of the strip.
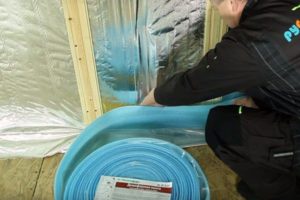
- Fix the tape and press it in the adhesion areas.
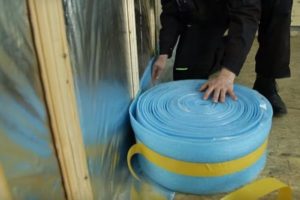
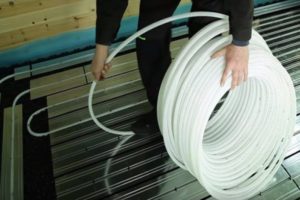
- Lay the insulation boards over the floor surface. Place them flush against the wall so the tape is pressed into place.
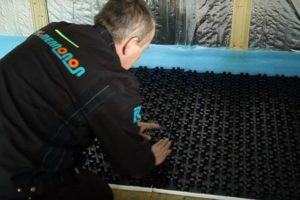
- Lay the heat distribution plates for the underfloor heating at intervals of 2 cm.
- Install the coolant pipes into the grooves of the plates. Start from the water supply manifold. Follow the standard pattern: lay them along all exterior walls at 15 cm intervals, then snake them inward at 20 cm intervals.
- Spread the waterproofing film on top.
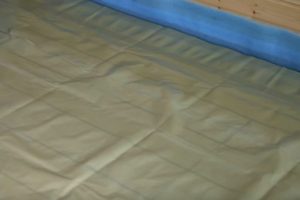
- Now lay down the gypsum fiber sheets.

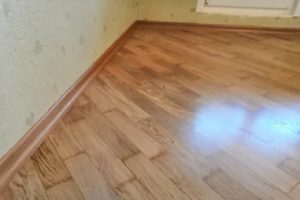
- Cover with finishing floor covering.
If you are planning to make a concrete screed, do not lay gypsum fiber, but immediately fill it with mortar.
Helpful installation tips
There are many nuances and tricks that experienced professionals know. If you're new to this craft, use these tips:
- To improve adhesion (bonding of the material to the surface), roll the roller along the entire length of the tape, especially in the area with the adhesive base;
- Before installation, treat the surfaces with a primer, which will eliminate dust and improve adhesion;
- In places where the two ends of the tape are connected, use an overlap method of 10-15 cm;
- If you are using a damper with a skirt, be sure to level the polyethylene on the floor and overlap it in the corners;
- Trim off any excess with a very sharp knife;
- The edges can be left uncut and hidden under the baseboard;
- Try not to make a large number of joints in the damper tape - this reduces the level of tightness;
- Don't leave gaps.
What to fill the seam with?
Since the damper is a consumable item, many people prefer to remove it. This will leave gaps that need to be filled, otherwise the voids will collect debris and dust, and insects will breed.
Experts recommend two optimal options for filling the gaps:
- Silicone-based sealant is a great option because the material is quite elastic, but it will be expensive;
- Mounting foam is inexpensive and flexible, but it leaves an unsightly appearance (be sure to cut off any excess).
Rules for choosing a compensating tape
There is a huge variety of damper tape available on the market, so it is difficult for someone without experience in the construction industry to understand what exactly to base their choice on.
In fact, it's all simple:
- Decide in advance what width of the product you need and calculate the length based on the area of the room - do not forget about extra centimeters for overlap;
- buy a product that has sealed packaging - this applies to models with an adhesive base;
- Inspect for any deformations - if any, the seller violated the storage conditions during storage, so the material will not fully meet its functionality;
- If you buy an open roll version (without glue), check the surface – it must be clean;
- Check the tightness of the coil winding - unscrupulous sellers may secretly unwind part of the tape;
- In self-adhesive products, delamination of the material is unacceptable;
- choose products from well-known brands and trusted manufacturers;
- don't hesitate to ask to see the certificates to make sure they are not fake;
- pay attention to the thickness along the entire length – it cannot be different;
- If the model has cuts, the line should be perfectly straight.
Compare prices for identical products in different places – if you're offered a price significantly lower than your competitors, be wary – it could be counterfeit.
Popular brands
The most sought-after models include not only global foreign brands, but also Russian products that meet all requirements and standards. Professionals typically purchase models of impeccable quality:
- Knauff FE with a skirt. It is of high quality, but for 40 meters of length, 100 mm width and 8 mm thickness you will have to pay at least 850-900 rubles.
- Energofloor by Energoflex with a peplum. Like the previous option, it offers superior quality and, thanks to its worldwide reputation, is also priced similarly. With a width of 100 mm and a thickness of 10 mm, an 11-meter roll costs approximately 450 rubles.
- Kermi. Self-adhesive tape, 25 m long. Thickness 8 mm, width 160 mm, cost – 870-900 rubles.
- Oventrop. Adhesive-backed, with a perforated line, but intended for standard concrete screeds. A 25-meter roll, 120 mm wide, and 10 mm thick, costs approximately 800 rubles.
- Uponor. The self-adhesive damper is 50 m long, 150 mm wide, and 10 mm thick. A roll of this material costs 3,500 rubles.
- Tilit Super. A high-quality, domestic product with a protective apron on one side. Roll length: 25 m, width: 100 mm, thickness: 10 mm, price: 900-940 rubles.
- Teploflex. Another Russian product considered cost-effective, as 50 meters can cost only 1,200-1,300 rubles. The width is 100 mm, the thickness is 6 mm, and the product is standard (without an adhesive backing).
This is just a small selection of high-quality damping products, but there are also types that are 2-3 times cheaper. Experts do not recommend using them for flooring, as they will require replacement after just 3-4 years.
Everyone has the right to decide for themselves whether to install a damper tape for underfloor heating, but modern residential construction requirements require it. The key is to clearly define your choice, learn how to install it yourself, and, if necessary, consult with specialists.


