No matter how well the radiators heat up, the floors often remain cold, especially on the ground floor. Therefore, the question arises: is underfloor heating necessary in an apartment, and can it create a pleasant indoor atmosphere?
We'll help you understand this issue. We'll examine the pros and cons of each type of underfloor heating system and determine which is best for city apartments.
We'll also tell you how to install heated floors in your apartment using central heating yourself, without breaking the law.
- Advantages of heated floors in an apartment
- Varieties
- Water
- Heating cable or mats
- Infrared film
- What type of flooring is best for a city apartment?
- Is there a fine for underfloor heating in an apartment connected to central heating?
- Installation of a water-heated floor in an apartment
- We are installing a water-heated floor in an apartment connected to central heating.
- Installation of a manifold cabinet
- Preparing the base
- Hydro- and thermal insulation
- Laying the heating circuit
- Connecting and checking the system
- Pouring the screed
- The difference between the "pie" of a water-heated floor in an apartment
- Where is the best place to install them?
- In the bathroom and toilet
- Corridor
- Children's room and bedroom
- Video instructions
Advantages of heated floors in an apartment
Installing heated floors in an apartment has many advantages:
- uniform heating of the room - which creates comfortable conditions;
- Heating is carried out from below - this has a positive effect on health;
- suitable for families with children - they can move freely on the floor;
- does not dry out the air;
- does not spoil the interior and does not lead to a reduction in the usable space in the room;
- has an affordable price;
- You can do the installation yourself.
In addition, installing heated floors instead of standard radiators leads to a reduction in dust formation, since there is no static voltage.
Varieties
Today, there are several types of heated floors on the market, which differ in the heat carrier and installation method.
Underfloor heating comes in two types: hydronic and electric. They all share the same basic principle: the heating element is located inside the "pie."
Water
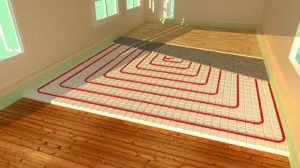
Hydronic underfloor heating—as its name suggests, the heating medium is water, which moves through pipes. The pipes are either covered with screed or laid as a floor covering. It is connected to the central heating system or a boiler.
This type of structure is most often installed in private homes due to its heavy weight. Furthermore, connecting a water-heated floor in an apartment to the central heating system of an apartment building requires permission.
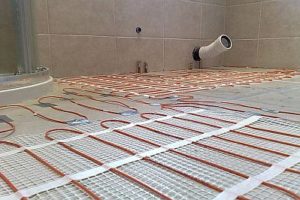
Heating cable or mats
The heat source is a heating cable. It is laid on the floor according to the planned layout. For such systems, either resistive or self-regulating cable is used. If the first option is used, a two-wire cable is recommended, as it poses no harm to humans.
When laying cable mats, the process is much simpler, since the cable is already secured to the mesh at the required pitch.
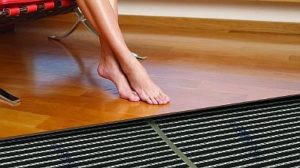
Infrared film
Infrared heating is a thin film with carbon plates inside. The "pie" of this type of flooring has no cement screed layer, so it heats up quickly, but the heat doesn't last long when turned off.
The device is energy-efficient and safe, and runs on electricity. It's easy to install, and even if one strip fails, the entire floor continues to function. Its downside is that it attracts dust.
What type of flooring is best for a city apartment?
When choosing a heated floor system for your apartment, consider the advantages of each system and the room's design features. Decide whether it will be the primary or supplemental heating system.
The water-based design is environmentally friendly and economical to operate. Heat transfer occurs via radiation, preventing the formation of excess positive ions and eliminating the need for an electromagnetic field.
But its installation in an apartment has its own difficulties:
- Obtaining permission to install a system in a multi-story building is crucial. Installing a hot-water heating system in a multi-story building poses a risk of leakage, which could flood the neighbors below, and could also lead to a drop in pressure in the building's overall system. Furthermore, it will significantly increase the load on the floors.
- A mixing unit needs to be installed, which is not always possible in an apartment.
- During repairs to the general house system, slag will get into the hydrofloor.
- When conducting annual pressure tests, the pressure in the system will exceed 6 Bar, and the TP equipment (collector with flow meters) has a maximum pressure of 6 Bar.
- The temperature of the liquid in the heating system can reach up to 100 degrees, which will negatively affect the equipment.
When choosing an electrical system (see the device, types and installation diagrams), all the previously mentioned problems are eliminated: no permits are required, and there's no risk of leaks. Furthermore, such structures are less labor-intensive and less expensive to construct than water-based ones. However, electricity bills increase during operation.
Electric floors with cables and screed are lighter, thus placing less stress on the building's floors. Infrared film is ideal for apartments. It's easy and quick to install and doesn't take up much usable space.
To sum it up, it can be said that for an apartment, purchasing and installing an electric floor is a cheaper option, but in terms of operation, a water floor is less expensive.
But with its installation in an apartment building, as mentioned above, there are a number of problems.
Is there a fine for underfloor heating in an apartment connected to central heating?
Is it legal to install underfloor heating from a central heating system in an apartment? This question is often asked by apartment owners. There is no specific provision in the law prohibiting the installation of such systems or specifying the fine for installing them in an apartment. However, there is a provision that imposes liability for apartment renovations.
Therefore, to avoid breaking the law, it's best to install hydronic underfloor heating legally. Obtaining a permit is possible, especially for apartments in new buildings. In these buildings, the heating system is often distributed floor by floor, so a permit will be issued.
To obtain such permission you need:
- conduct an examination to determine whether the system will disrupt the operation of all communications in the house;
- obtain permission from the heating network and energy supervision;
- make a project and get it approved by the housing inspectorate.
It's not worth circumventing legal requirements, because one day you'll have to deal with regulatory authorities, and then the problems and costs will increase.
Installation of a water-heated floor in an apartment
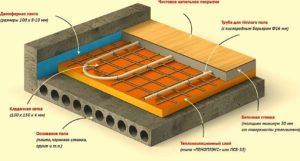
Water-based underfloor heating systems consist of a pipeline laid on the foundation and covered with a cement screed. The pipes used are made of metal-plastic or polymer, with a diameter of 16–20 mm. The coolant is water or a special liquid (antifreeze), heated within the system to temperatures up to 50°C.
The main components of the structure are the pipes containing the coolant. The "pie" also includes hydro and thermal insulation, fasteners, fittings, and a control system designed to regulate the coolant volume.
The floor loops are connected to the manifold, and the movement of the liquid is carried out under the influence of the pump.
We are installing a water-heated floor in an apartment connected to central heating.
Installing underfloor heating from a central heating system in any room, including an apartment, consists of several stages.
It is necessary to make a plan and a diagram of the pipeline layout in advance - this will significantly simplify the process.
Installation of a manifold cabinet
At the first stage of installation of warm water floors in the apartment it is necessary to install a collector unitTo do this, a recess is made in the wall in which a metal cabinet is placed.
It's possible to install the distribution unit directly on the wall, but this will spoil the room's appearance. The cabinet houses a manifold with multiple outlets for the supply and return hoses, which will be connected to the floor circuits.
According to the instructions, the cabinet should be located at a distance of 20–30 cm from the surface, in an easily accessible place.
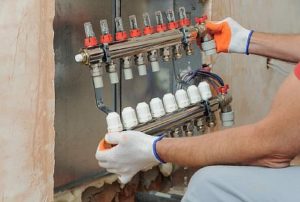
The collector is connected to the central heating.
Preparing the base
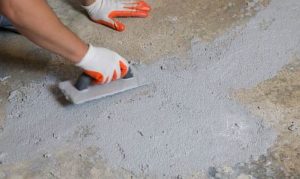
Preparation involves leveling the surface and filling any cracks in the foundation where the heating system will be installed. Unevenness and irregularities will negatively impact its operation.
Small cracks are sealed with cement mortar or a special mixture. Any bumps should be trimmed. If there are large differences in level, it's best to pour a thin leveling layer of screed.
Hydro- and thermal insulation
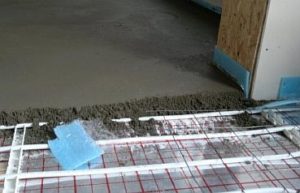
When the base is level, you should move on to laying the floor "pie"A regular thick polyethylene film can be used as a waterproofing layer. It should be laid overlapping the walls, and the strips are joined together with tape. This layer is very important when installing a water-based underfloor heating system in an apartment, as there is a risk of flooding the neighbors below.
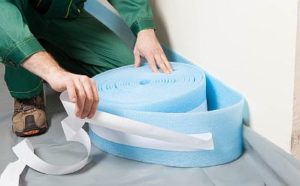
The perimeter of the rooms where the underfloor heating will be installed is sealed with damper tape. It is either adhered with an adhesive backing or secured with screws.
The width of the tape should be greater than the thermal insulation and screed combined, from 100 to 150 mm. The tape is necessary to compensate for the expansion of the concrete when heated and prevent cracking of the screed.
Insulation is laid over the waterproofing. It's best to use insulation with a foil layer. The insulation is placed foil-side up, and the boards are joined together with aluminum tape.
Slabs with studs are recommended; this will significantly simplify the pipe installation process. If the insulation material is smooth, additional reinforcing mesh will be required to secure the circuit.
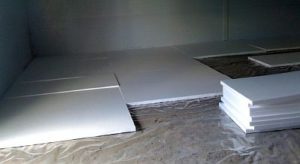
The thickness of the insulation layer depends on the floor on which the hydrofloor is being installed. If it's on the ground floor, the layer should be thicker.
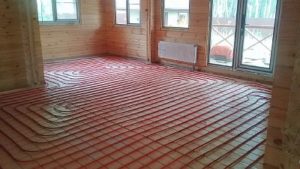
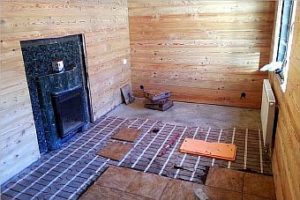
Laying the heating circuit
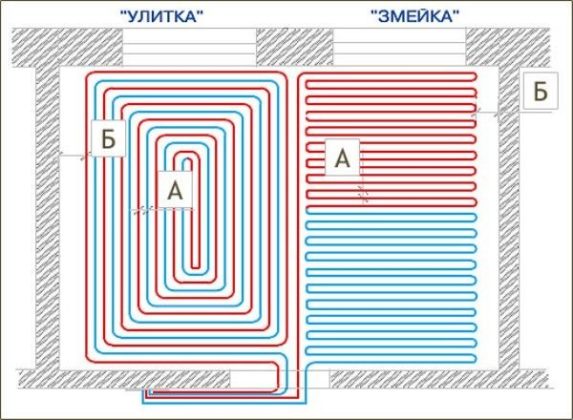
Laying pipes when installing a water-heated floor in an apartment is done in two ways:
- Parallel "snake" installation—pipes are laid parallel and joined at the ends. Installation begins from the coldest point in the room, as with this method, the greatest heat will be at the beginning of the system.
- Spiral – the pipeline is arranged in a spiral, with the supply and return pipes running side by side, and the supply circuit heating the return. This method is recommended for larger spaces.
It is better to take metal-plastic or polypropylene pipes.They are flexible and have a long service life. However, their thermal conductivity is not high, but it is sufficient for an apartment. You can install stainless steel or copper corrugated pipes. Copper products bend well and are wear-resistant, but they are expensive. Corrugated pipes are comparable in cost to plastic ones.
After selecting the pipe material and layout, it's time to calculate the pipeline size. This takes into account the laying pitch, which determines not only the number of turns but also the uniformity of heat distribution.
The larger the step, the higher the heating temperature of the coolant. Furthermore, the spacing between pipes in different areas of the room may vary, depending on the desired heating level.
The standard installation spacing in an apartment with 20 mm diameter pipes is 0.3 meters for a heat output of 50 watts per square meter. For a heat output of 80 watts, the recommended spacing is 20 cm. Around windows and exterior walls, the spacing can be reduced to 0.15 meters.
For clarity, let's look at a calculation example. For a 30 m² room, a 25 m² heated area, and a 15 cm installation pitch, 160 meters of piping would be required.
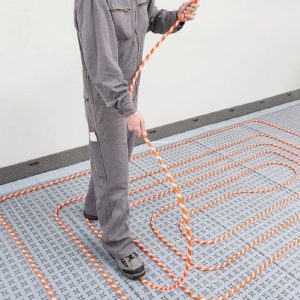
The contour is laid according to the planned pattern and secured to the reinforcement with plastic clamps. When using slabs with bosses, the process is simplified, as the pipes are secured in grooves.
When placing contours, joints must not be allowed at the bends of the pipeline.
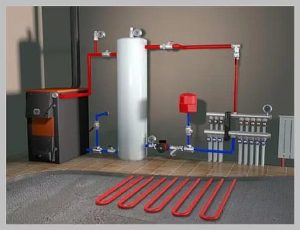
Connecting and checking the system
There are two ways to connect hydronic underfloor heating in an apartment. Let's take a closer look at each:
- The first is a "primary" and "secondary" ring. Central heating is the primary ring, and underfloor heating is the secondary ring.
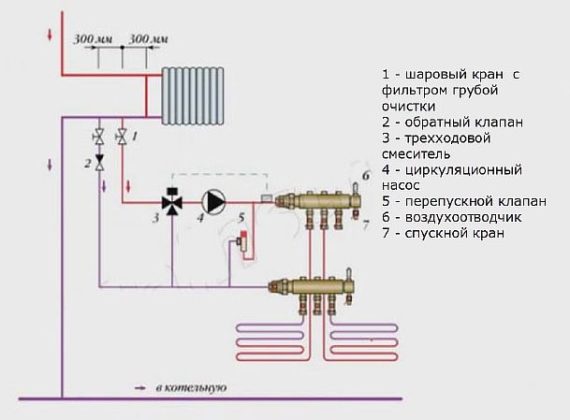
If the radiator system is a single-pipe system, taps are made in the radiator's return pipe. The distance between the taps and the radiator bulkhead must be precisely maintained—300 mm. Ball valves are installed at the taps, and a check valve is also installed in the return pipe to ensure one-way flow of the coolant within the loop.
Next, a mixing unit with a three-way valve and a pump that facilitates liquid circulation are installed on the supply pipe.
This connection doesn't draw all the coolant from the building's heating system and won't cause a significant pressure drop. The process isn't complicated; the main thing is to obtain permission and prove that your floor won't affect your neighbors' heating.
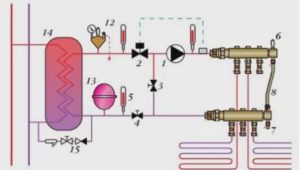
- The second option is to install a heat exchanger, allowing the underfloor heating to operate independently. Here, a heat exchanger is connected to the supply and return pipes of the manifold, located in the location of the radiator. The exchanger's hydraulic resistance is low, so it has virtually no impact on the overall heating system, as water from the riser flows only to the heat exchanger and does not mix with the underfloor heating fluid.
The floor system is filled with water from the mains and heated by hot fluid flowing from the central heating system through the heat exchanger walls. All other components are the same as in the previous design.
After the manifold group is installed, the supply floor circuits are connected first, and then the return ones are connected to the return outlets of the comb.
Before pouring the screed into the system, it should be pressure tested—tested under pressure 1.5 times higher than the operating pressure for 24 hours. If no leaks are detected after this test and everything is functioning properly, you can proceed to the next step.
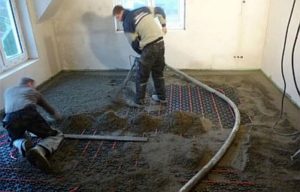
Pouring the screed
You can use a ready-made mortar mix, which is now available in a variety of grades with varying thermal conductivity. Alternatively, you can make your own cement-concrete mortar.
The screed is poured when the system is under operating pressure. The screed layer should extend 5 cm above the pipes. The mortar should be applied starting from the far corner of the room and moving toward the door. Each layer should be leveled using a straightedge.
It's best to install markers before placing the concrete so you can adjust the pouring level. Once the concrete has set slightly, remove them.
After the concrete has been poured and leveled, the screed is left to fully harden. This takes 3-4 weeks. Then the flooring is installed.
The difference between the "pie" of a water-heated floor in an apartment
The hydrofloor "pie" in an apartment is the same as in a private house, the only difference being the thickness, since the load level on the floors cannot be exceeded.
The design of a heated floor in a house where the insulation layer on the ground floor is 100 mm differs from that in an apartment in that the thickness of the thermal insulation material is smaller; 20–50 mm is sufficient, depending on the floor, the number of external walls, and the condition of the house.
If you're buying a resale home, doorways are a common problem—they have a specific height. Increasing the floor area will reduce the doorway height. In the new-build market, you can buy an apartment without partitions and design your own layout.
Where is the best place to install them?
Since heated floors are quite expensive, and not everyone can afford to install them throughout the entire apartment, you need to decide where to install the water heating first.
In the bathroom and toilet
The bathroom and toilet are the main rooms where additional heating will be very useful., since there is a large amount of cold water there, which leads to the formation of condensation.
Underfloor heating from a central heating system will protect against excess humidity and mold growth. It will create a more comfortable atmosphere during bathing, as stepping on warm tiles is much more pleasant.
In addition, if the bathroom is warm, the water becomes less hot when used, which saves resources.
Corridor
Another common place for heated floors is the hallway. Wet footprints, damp rugs, and shoes won't be a problem on such a floor; they'll dry quickly.
A thermostat allows you to set a heating temperature that won't negatively affect leather shoes. Plus, in cold weather, taking off your shoes and stepping onto a warm surface is much more comfortable.
Children's room and bedroom
It is quite logical to want to install heated floors in a room where children play, as well as in a bedroom, because getting out of bed and stepping onto a warm floor is more pleasant.
But at the same time, there are a number of points:
- any heating device “burns” oxygen, and this in turn has a negative impact on human health;
- Not all finishing coatings respond well to heating from below.
In addition, dry air will ruin furniture made of natural wood.
When deciding to install a central heating system in an apartment, it's important to consider all the details, consider the pros and cons, and the economic feasibility of the system. To avoid problems, experts advise adhering to all legal requirements.


