Underfloor heating is a great way to heat a room. It's especially important in bathrooms, where humidity is high. Bathroom floors are often tiled, which looks beautiful and is waterproof. The question arises: is underfloor heating compatible with tile?
We'll try to figure this out by looking at the different types of underfloor heating, their pros and cons. You'll learn which option is best for a tiled bathroom and how to install it yourself.
- How do heated floors and tiles go together?
- Types of heated floors
- Water
- Electric
- Let's compare the systems, pros and cons
- Criteria for choosing underfloor heating under bathroom tiles
- Step-by-step instructions for laying cable mats
- Preparing the base
- Installing a thermostat
- Hydro and thermal insulation
- Laying mats
- Connection
- Finish coating
- Step-by-step instructions for installing a water-based underfloor heating system
- Preparing the base
- Insulation
- Installing the collector
- Pipeline installation
- Connection
- System check
- Pouring the screed
- First launch
- Types of tiles, installation features
- Operation
How do heated floors and tiles go together?
Tile is a cool material, and without additional heating it can be uncomfortable to stand on, especially after a bath. In this case, underfloor heating can help, providing even, even heat to the desired level.
Both electric and hydronic underfloor heating can be installed under tiles. The idea that electric underfloor heating in a damp room is dangerous and can cause electric shock is a myth. After all, it's been known since physics class that ceramics don't conduct electricity. Furthermore, the insulating layer's benefit in this regard is undeniable.
Using cable mats or infrared film to heat the bathroom generally reduces the risk of electric shock to a minimum.
Ceramic retains its properties even when heated to 60 degrees Celsius, making it an excellent choice for underfloor heating. Its thin thickness means minimal heat loss, yet significant heat output.
In addition, ceramic tiles ideal finishing material for water floors, as it has low hygroscopicity.
Types of heated floors
There are two types of underfloor heating: electric and hydronic. In a bathroom, they can be used as the sole or supplemental heating source.
Water
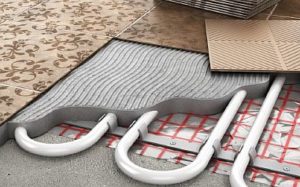
Hydronic underfloor heating is a system of pipes placed on the surface. Hot liquid circulates within them, serving as the heat source.
The system is fed by central heating or an independent boiler, and the circulation of the liquid is ensured by a pumpThe structure is filled with a concrete screed, and a finishing coating is laid on top, for which ceramic tiles are ideal.
Electric
Electric underfloor heating operates off the power grid. It works by converting electrical energy into heat. It is classified as:
- A cable is a wire with a conductive core. Current passing through it causes the cable to heat up. Cable models include:
- From a separate wire - it is placed throughout the entire area of the room with a certain step;
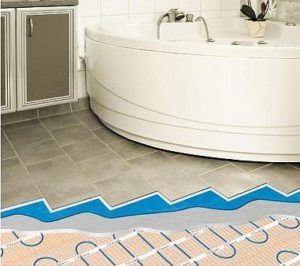
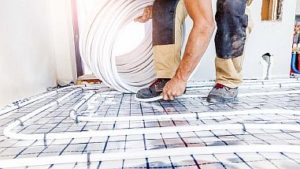
- From the cable, combined into mats - the wire is already secured to the canvas, usually with a step of 9 cm, which simplifies its installation.
Cable heating systems are installed under the screed or as a floor covering. However, the former method is recommended for installation under bathroom tiles. Mats are convenient for this type of space, as they can be embedded in a layer of tile adhesive.
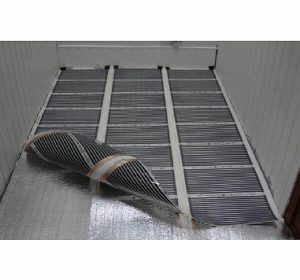
- Infrared is a modern type of heated floors, subdivided into:
- film - a two-layer film with a carbon layer inside, thickness of only 0.4 mm;
- rod - a canvas with carbon rods placed on it.
Infrared devices heat surfaces using the infrared waves they emit. Film or rod-type heated floors are installed under bathroom tiles in a layer of tile adhesive.
Let's compare the systems, pros and cons
Let's conduct a comparative analysis of the underfloor heating models most suitable for tiled bathrooms:
- Cost. Water-based underfloor heating is cheaper in terms of materials and operation, especially if no boiler installation is required. Electrical systems will be more expensive, driven by the cost of materials, and you'll also need a thermostat and sensor. Operation is also expensive, as they rely on electricity, which is expensive.
- Safety. When using electric floors, the risk of electric shock is minimal, except in the event of a malfunction. A hydronic heating system is completely safe, with the only potential for leaks.
- Reliability. Electric heating is reliable and durable. only the thermostat may breakWater-based floors are durable, but if a leak occurs, the screed will need to be removed.
- Power. In electric floors, it ranges from 15 to 30 degrees. In hydronic floors, it reaches 50 degrees.
- Installation. Installing liquid-based heating devices is a labor-intensive and time-consuming process. Installing electric floors, especially infrared ones or mats, is simpler and quicker.
Underfloor heating installed under bathroom tiles has its advantages and disadvantages. The positive aspects include warming the cold tile material and reducing humidity in the room. Underfloor heating is safe for humans. The electromagnetic waves emitted by cable floors are minimal, and in infrared floors, they are completely absent.
It's worth noting that heated floors in the bathroom prevent mold and mildew growth, thus preventing microbes from developing. This type of heating doesn't dry out the air, thereby creating a comfortable indoor climate, which is beneficial for human health.
The downside is the lengthy installation time for types laid under the screed (water or cable).
Criteria for choosing underfloor heating under bathroom tiles
Any underfloor heating system will work under bathroom tiles, but before purchasing one, you need to calculate the unit's wattage. This determines whether it will be used as primary or supplementary heating. If the building is multi-apartment, it will already have radiators, and a wattage of 80-100 W/m² is sufficient.
If there is an unheated room, the power calculated taking into account heat loss. But regardless of this, 130–160 W/m2 is recommended for a bathroom.
Once the required power is determined, the system type is selected. Mats are considered suitable for this type of room; they are easy to install and don't increase ceiling height due to their thin thickness, allowing them to be laid in tile adhesive.
If your ceilings are high, cable-mounted models with screed-mounted connections are suitable, although their installation will take a long time. However, if you have the budget, it's better to buy an infrared rod heater; it's easy to install and won't take up valuable space.
In private buildings where ceilings allow and an independent heat source is available, installation of underfloor heating in the bathroom under the tiles is recommended.
When purchasing a heating system, you should ensure the quality of the material and the availability of warranty service. It's also helpful to read online reviews. Experts advise against choosing the cheapest models; it's better to opt for mid-priced options.
Step-by-step instructions for laying cable mats
Before installing cable flooring in a bathroom under tiles, you should sketch out a layout of the heating elements and prepare materials and tools to avoid distractions while working.

So, we are making heated floors in the bathroom under the tiles using cable mats. The process consists of several stages.
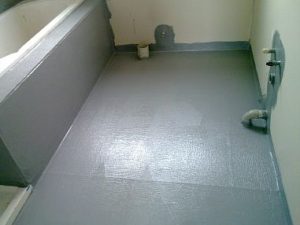
Preparing the base
If there is old flooring, it is removed. The surface is leveled and cleared of debris. Any cracks are repaired to ensure proper placement of the material.
If there are large differences, it is better to install a thin leveling layer of screed.
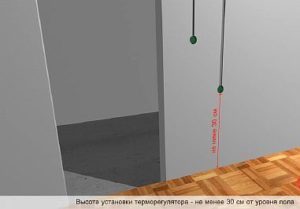
Installing a thermostat
Start by choosing a location for the thermostat. It's recommended to place it near the electric meter, at least 30 cm from the floor. Installation in the bathroom is not recommended, as the contacts may oxidize.
A recess is dug into which a flush-mounted electrical box must be installed, and from there, chases are made in the wall to the floor to accommodate the cable. For efficient operation of the underfloor heating, a separate switch must be installed.
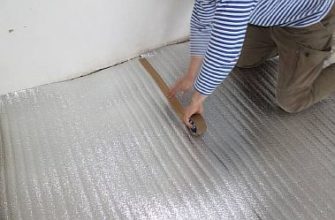
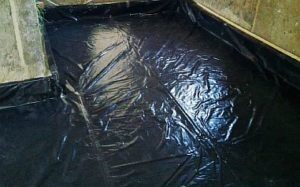
Hydro and thermal insulation
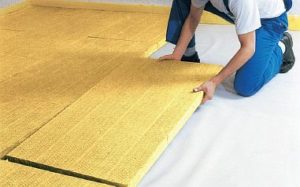
Polyethylene film can be used as a waterproofing material, and 30 mm thick polystyrene foam or foam plastic can be used as insulation. A material with a reflective layer is recommended, which will increase the efficiency of the structure.
The thickness of the insulation should be selected based on the heat loss rate of the room. If the room is on the ground floor, a thicker layer of insulation is needed.
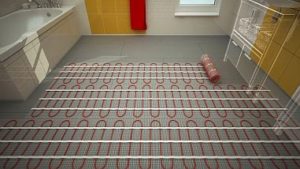
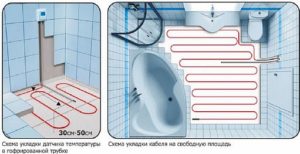
Laying mats
Start by cutting the mat to the required length. To do this, unroll the mats and cut them to the required length. The cut should be made carefully along the mesh to avoid damaging the cable.
The mats should be laid 5 cm from the wall and 10 cm from hot pipes. The mesh is secured to the base with tile adhesive; some mats have an adhesive backing, which simplifies installation.
Connection
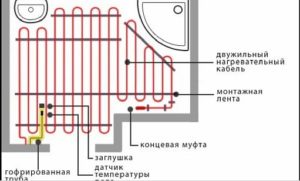
The ends of the wire are fed into the socket box, they need to be stripped and connected to the corresponding phases of the thermostat.
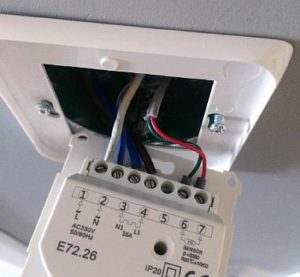
Next, a corrugated conduit is extended from the wall box. It is also placed in the recess cut in the wall and in the floor insulation. A plug is installed at the other end. The corrugated conduit is placed between the cable loops, and the sensor is inserted into it, which is connected to the controller.
The final step is to power the thermostat from the electrical network.
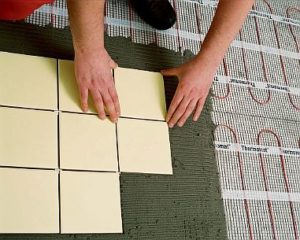
Finish coating
When laying the mat as a heating system, tiles can be attached to heating elements using tile adhesive. However, before doing so, the device should be tested.
Step-by-step instructions for installing a water-based underfloor heating system
Installing hydronic underfloor heating in a bathroom is a more complex process than installing electric heating. The pipes are particularly important; they must withstand high temperatures and pressure.
The installation consists of several stages.
Preparing the base
The work involved in preparing the foundation for the pipeline is the same as when installing electric heating.
The surface is cleared of old finishes and waterproofing, cracks are leveled, and repaired. If there are significant differences in level, a subfloor is recommended.
Insulation
First, a waterproofing layer—polyethylene—is laid on the base. It overlaps the walls and existing pipes by 10 cm.
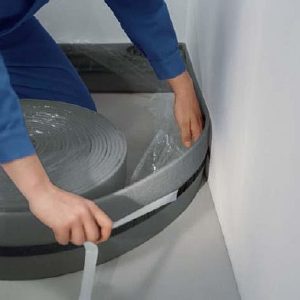
Then, a damper tape is installed around the perimeter of the room - this will protect the concrete surface from cracking when heated.
Installing thermal insulation material—polystyrene foam boards—minimizes heat loss. If the apartment is on the ground floor or above a cold room, expanded clay is suitable.
A mounting mesh is placed on top of the insulation; it will improve the adhesion of the screed and will also serve as a mounting base for the pipes. If the insulation material is studded slabs, the mesh is not needed; the heating element will be secured in the grooves.
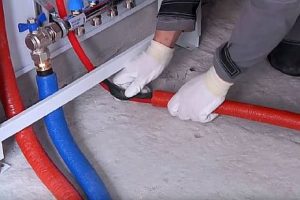
Installing the collector
The manifold cabinet is placed in an easily accessible location. It can be mounted directly to the wall or in a recessed space.
In the closet a pumping and distribution unit is being installed.

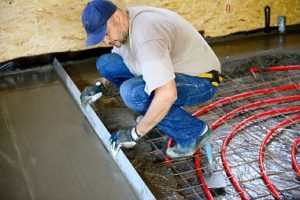
Pipeline installation
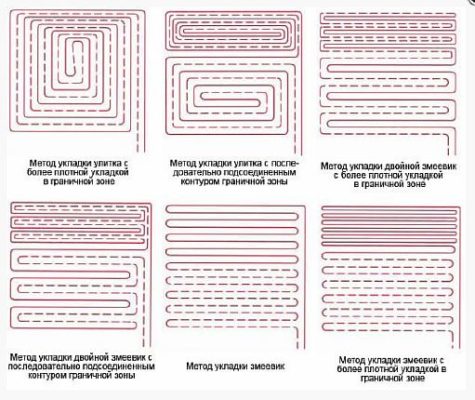
To facilitate pipe installation, prepare a drawing in advance. Installation can be done using a "snake" or "snail" pattern, with a pitch of 200 mm for ceramic pipes. A "spiral" pattern is recommended for bathrooms.
Pipe installation should begin at the manifold and finish near it. The heating element is secured to the mounting grid with clamps, spaced 50 cm apart, or placed between the studs.
Connection
The collector group is connected to a heat source, which can be central heating or an independent boiler.
The return and supply pipes of the underfloor heating are connected to the corresponding branches of the comb using a clamping coupling.
System check
The test involves filling the pipes with water and removing any air pockets. The coolant flow is then shut off and the line is checked for leaks using a pressure gauge. During the test, the system pressure is raised to 50% above the operating pressure. If it drops, there is a leak that needs to be repaired.
But if the pressure has not dropped within 24 hours, then you can proceed to the construction of the screed.
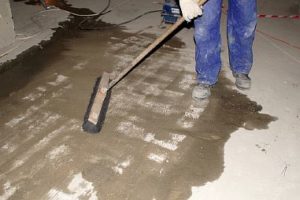
Pouring the screed
A concrete-cement mixture or fine-grained concrete is used to pour the screed. To improve performance, it is recommended to add a plasticizer to the mixture.
The screed is leveled using installed benchmarks; the permissible vertical deviation is ±1 mm per 1 m². The standard screed layer thickness is 3–7 mm. The floor is then left for 4 weeks to dry completely before laying the tiles.
First launch
The system, whether water or electric, should be turned on after the concrete's top layer has been heated by the heating element. If the floor is started before the concrete has set properly, the concrete may warp and damage the heating element.
When using a mat or rod floor filled with tile adhesive, you also need time for the adhesive to dry thoroughly before turning on the device.
When first starting up a water-heated floor heating system, start by introducing a coolant heated to 20–25 degrees Celsius and let it run at this temperature for two days. Then, raise the water temperature by 10 degrees Celsius and the antifreeze by 5 degrees Celsius each day.
Electric floors are also turned on gradually. Start at low speed and increase the temperature to maximum over the course of three days. Then, turn off the heating in reverse order.
When heated, the cable expands and contracts when cooled, leaving a gap between it and the concrete. It is within this gap that the cable will expand.
Types of tiles, installation features
When choosing tiles for underfloor heating, consider models specifically recommended for use near heating systems. They are more durable and wear-resistant.
If underfloor heating is the only heat source, tiles that can withstand temperatures up to 31 degrees Celsius are required. Recommended types are ceramic, clinker tiles, or porcelain tiles.
When heated, this tile retains heat well and releases it slowly, allowing you to create comfortable conditions and save electricity.
When choosing the size and color scheme, consider your preferences. All shades of water—blue, light blue, or white—are always flattering for the bathroom.
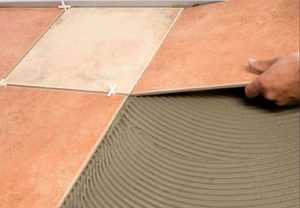
When laying tiles on thin cable mats, a special adhesive is used; it is recommended to give preference to well-known brands.
The process of installing ceramic tiles over underfloor heating is no different from laying them on a regular surface. The surface where the tiles will be laid is marked. A full tile is placed in the center, with cut edges. Installation begins at the far corner of the door. Adhesive is applied with a trowel to the concrete screed or heating elements (if using a mat), ensuring a layer no more than 0.5 cm above the unit.
The tile is carefully pressed into the mortar, and plastic crosses are placed in its corners; these are necessary to ensure even seams.
Once the glue has dried, after 24 hours, the crosses are removed and the seams are filled. After this, it takes a few more days for it to dry completely, and then the heating can be turned on.
Operation
To determine the optimal floor heating level and find a comfortable temperature for yourself, you can experiment with a thermostat. The surface shouldn't be excessively hot, as it will be unpleasant to walk on.
Unfortunately, the unique nature of underfloor heating installation in bathrooms means that it isn't installed over the entire surface. Consequently, condensation accumulates in corners and areas where plumbing fixtures meet the walls, creating ideal conditions for mold and mildew growth.
To prevent water accumulation, it's recommended to use a dehumidifier, such as the Dr. Dry. It's effective and can be placed either vertically or horizontally.
The dehumidifier is a cable attached to a mesh screen. It's equipped with a timer, so you can easily turn it on after your shower and set the time it takes to turn it off. It can be easily mounted under tiles.
It's up to you to decide which type of underfloor heating (hydro or electric) you choose for your tiled bathroom. The key is to follow the installation procedures. Then, the underfloor heating will provide warmth, and you'll never feel the cold tiles under your feet.


