Heating a home with warm water floors is not uncommon these days, and this system is increasingly becoming the preferred heating method.
Underfloor heating systems consist of pipes laid in the floor, containing a coolant (usually water). The system is connected to the central heating system, hot water supply, or a specially equipped boiler.
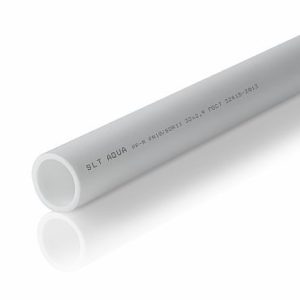
There are many types of pipes that can be installed in underfloor heating systems, but today we'll be talking about polypropylene pipes.
- Types and characteristics of polypropylene pipes
- Single-layer
- Multilayered
- Advantages and disadvantages of polypropylene
- Marking of polypropylene pipes
- Creating a diagram and calculating the number of pipes
- Project preparation
- Calculation of pipeline size
- Preparatory work before installation of the system
- Laying polypropylene pipes
- Connecting the floor
- System testing
- Pouring the screed
- Video
Types and characteristics of polypropylene pipes
Polypropylene pipes are widely used in the construction industry, as they are inexpensive and quite durable.
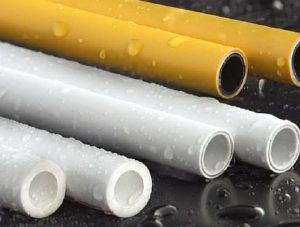
They come in two types: single-layer and multi-layer. Each type has its own advantages and disadvantages. Let's take a look.
Single-layer
Single-layer polypropylene contours come in several varieties:
- RRN are made of homopropylene. They are not intended for underfloor heating, but are widely used in water supply, sewerage, and ventilation systems.
- PPB – made from polypropylene block copolymer. Products of this type are durable and long-lasting.
- PPR — a random copolymer of polypropylene is used in manufacturing. A contour made from it distributes the load evenly across its walls.
- PPS is a flame-retardant product. The pipes can operate efficiently even at temperatures up to 95 degrees Celsius.
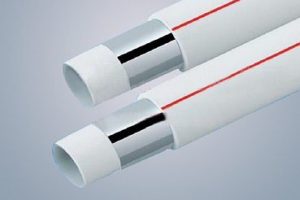
Multilayered
Multilayer polypropylene pipes are also produced in several types and have the following technical characteristics:
- Aluminum pipes have a thin reinforcing layer on the outside. When joining these components, the aluminum layer is trimmed by 1 mm. Some products have the reinforcement between the walls. Polypropylene pipes with a reinforcing layer function effectively even at 95 degrees Celsius.
- Fiberglass – the reinforcement is sandwiched between sheets of polypropylene. This type works well in underfloor heating systems.

- Composite - between two layers of polypropylene there is a layer that combines fiberglass and aluminum fibers.
Advantages and disadvantages of polypropylene
The main reason for the popularity of PPR pipes in underfloor heating installations is their cost-effectiveness. Their affordable price is especially important when installing pipes over a large area.
In addition, polypropylene contours:
- have increased mechanical strength and elasticity;
- have an excellent level of tightness - this is ensured by a special soldering method, the product is monolithic, almost seamless, which allows the pipes to be placed under the screed;
- durable - if installation rules are followed, they will last for several decades without failure;
- they are lightweight, which makes the installation process simple;
- inert - not susceptible to the effects of aggressive substances;
- are not subject to corrosion - therefore, deposits do not accumulate inside the pipe;
- have good sound insulation;
- environmentally friendly - no harmful substances are released when heated.
Polypropylene is highly resistant to low temperatures, which protects the coolant from freezing.
But even if it freezes, the pipe walls do not collapse, as the polymer is expandable and returns to its original shape when heated. Therefore, polypropylene pipes are ideal for installation in country cottages where the owners do not live permanently and the floor is used only occasionally.
However, this type of rolled pipe material also has its drawbacks. Polypropylene is highly flammable and should not be installed in areas with a high fire hazard (such as wood). Furthermore, the optimal operating temperature is 75 degrees Celsius. It's also worth noting that PP has poor flexibility, making it difficult to make tight bends.
Furthermore, while regular PVC pipes are intended for use in water supply and sewerage systems, they cannot be installed in underfloor heating systems, as they cannot withstand the thermal and hydraulic loads. Therefore, a reinforced pipe system must be installed in heated floors.
Marking of polypropylene pipes
Currently, there is a wide variety of products in this segment on the market, which have the following markings:
- PN 10 is used on standard polypropylene pipes with a uniform structure. They are recommended for use in water supply systems with water temperatures up to 20°C and pressures up to 10 atm. Pipes with this marking typically have diameters between 20 and 110 mm.
- PN 16 designates a single-layer product suitable for installation in underfloor heating systems. It can handle heating medium temperatures up to 80°C and pressures up to 10 atm. The circuit diameter is the same as PN 10, but the wall thickness is significantly greater.
- PN 20 is a marking for homogeneous pipes; they have a permitted heating level of the circulating coolant of up to +95°C. The operating pressure in this case is no more than 6 atm, and the diameter ranges from 20 to 110 mm.
- PN20 AL (PN20 GF) is used on polymers with an aluminum or fiberglass reinforcing layer. All other parameters are the same as PN 20. This type differs from other consumables in its coefficient of thermal expansion, which is lower.
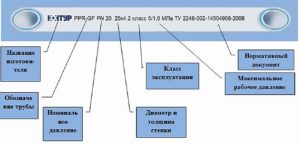
It is very important to take this marking into account when choosing a product for certain operating conditions, as the efficiency of the heated floor depends on it.
Creating a diagram and calculating the number of pipes
Before starting work on installing a water-heated polypropylene floor, you need to prepare a project and calculate everything.
The drawing is made on graph paper and shows the layout and installation step.
Project preparation
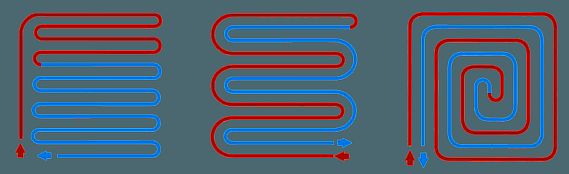
The water heated floor piping can be laid according to the following diagrams:
- The "snake" method is a simple option, but it has a drawback: the coolant cools down as it passes through the pipe, and it will be colder at the end.
- "Spiral" - this method provides uniform heating, which is why it is more popular.
- “Double snake” - in this case, heat is distributed evenly across the floor surface.
When choosing a design, the heat transfer rate of the structure is taken into account, as this will determine the floor's efficiency. This requires information such as the room's area, the material used for the walls, floors, and insulation, the type of flooring, the circuit diameter and material, and the coolant temperature.
Once the installation pattern has been selected, it should be drawn on paper. The recommended spacing between pipes is 10 to 30 cm, and the loop length should not exceed 80 meters. The loop should be laid 20 cm from the walls. The location of the manifold cabinet should be marked on the drawing.
If warm water floors are used as the main heating, then the pipeline should be laid with a step of 12-15 cm.
Calculation of pipeline size
To determine the length of polypropylene pipes for underfloor heating, two methods are used. One involves measuring the pipe size on the drawing with a ruler and then multiplying this measurement by the appropriate scale. A 10% allowance is added to the resulting result for trimming.
The second method is using a string. A string is placed on the floor according to the circuit layout. Then, simply measure it—this will be the pipe size. As in the first method, a 10% allowance must be added.
For each room, the length of the pipes must be calculated separately.
Preparatory work before installation of the system
For the correct installation of a warm water floor "pie" To install a polypropylene pipe, some preparatory work must be carried out. The steps are as follows:
- The old floor covering is removed and the screed is dismantled.
- The subfloor is assessed, and any cracks found must be repaired. However, beforehand, the surface must be cleared of concrete chips and primed. If the subfloor cannot be reconstructed, a thin layer of leveling screed must be poured.
- The manifold cabinet is installed on the wall or in a specially designed niche, 1 meter above the floor. This must be done before laying the flooring, as the installation process is quite messy.
- A waterproofing layer is laid; thick polyethylene is suitable, as it can retain moisture. The film should be laid with a 10 cm overlap on the walls. If the room is large and several strips of film are being laid, they should be overlapped and joined together with tape.
- A damper tape is glued around the perimeter to prevent the concrete screed from cracking when heated.
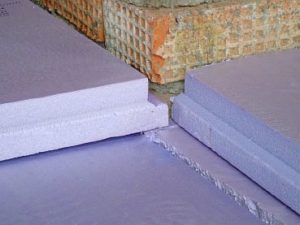
- Thermal insulation is installed. It can be installed in rolls or sheets. When using extruded polystyrene foam boards, there should be no gaps between them, so the material should be laid in two layers. For a better seal, the joints can be sealed with foam.
- A foil backing is laid down to reflect heat rays. The heat is directed upward, thereby warming the floor and the air in the room. The materials are joined with adhesive tape. If the insulation material has a foil layer, this backing is not necessary.
- A reinforcing mesh is placed to give strength to the structure, and a pipeline can also be attached to it.
Strict adherence to all rules for carrying out these works contributes to the efficient operation of the system.
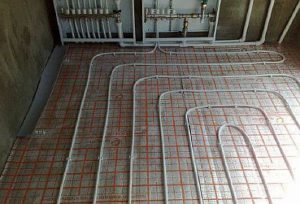
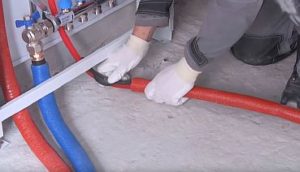
Laying polypropylene pipes
Installation is a crucial step in installing a hydronic underfloor heating system. The pipeline must be laid according to the designed pattern—a "snake" or "snail." Start at the manifold, and the other end of the pipe should also return to it after installation.
When working with polypropylene pipes, the room temperature should be maintained at +5 degrees.
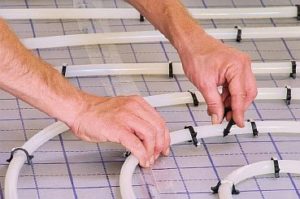
Pipes are fastened in several ways:
- Attaching the reinforcement mesh to the frame using plastic ties or wire is a reliable option. Avoid attaching the frame too tightly, as this can damage it.
- To the thermal insulation product with dowels.
- Using insulating mats with studs. The pipeline is laid between them in grooves, thereby securing it firmly in place.
Fasteners should be installed every 80 cm.
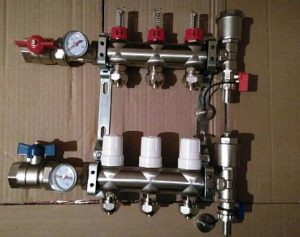
Connecting the floor
The first step is to assemble the device, which consists of a pressure gauge, an air valve, a control and drain valve, and a mixer.
It is possible to install a ready-made manifold with the required number of branches., into the installed cabinet. The pipes supplying the heated coolant are connected to it using a nut and bushing, as well as the return hose.
After this, the floor circuits are connected to the manifold assembly. One end of the pipe is connected to the supply valve, and the other to the return line.
System testing
Before pouring concrete over the pipeline, it is essential to test the device, as any malfunctions or leaks will be difficult to fix under concrete.
To test the system, each circuit is individually filled with water, and all control valves are opened, which helps remove air from the pipes. The pressure is then set to 1.5 times the operating pressure, but not less than 6 bar.
After 3-4 hours, the pressure drops and needs to be increased again. This should be done three times. After this, the floor is left for 24 hours. If the pressure has dropped by no more than 2 bar during this time, the system is installed correctly.
If a leak or malfunction is detected, it must be repaired, the leaking areas must be soldered, and then the floor testing must be repeated.
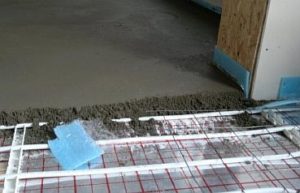
Pouring the screed
To fill the screed, a cement-concrete mortar with plasticizers is used., which you can make yourself or buy ready-made.
To increase the strength of the structure, you can lay another reinforcing mesh over the pipeline. If additional reinforcement is not used, polypropylene fiber should be added to the mortar.
The room temperature during screed installation should be +5°C. A beacon profile should be installed beforehand to ensure a level surface.
Start pouring in strips from the far corner of the room and finish at the exit. Level the mortar using a straightedge.
Depending on the diameter of the pipes, the thickness of the screed varies from 30 to 70 mm.
It will take 28 days for the mortar to dry completely. Only after the screed has hardened can the final flooring be laid. Ceramic tiles are the best choice, especially for bathrooms or toilets, although other flooring materials are also acceptable.
Do not turn on the underfloor heating until the concrete mixture has dried thoroughly. Before using it for the first time, bleed out all the air.
As you can see, installing a water-heated floor using polypropylene pipes is not difficult. The material is easy to work with, so anyone can create a heated polypropylene floor in a home or apartment.


