Underfloor heating is an excellent additional heating option for an apartment, and in a private home, this system is often the primary and only source of heating. The efficiency and longevity of the system depend not only on proper installation but also on the way the underfloor heating is poured.
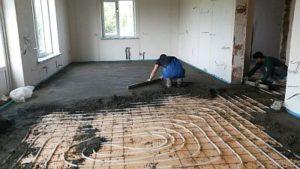
To pour a floor in a house, divide the surface into rectangles. Start in the corner farthest from the entrance. Using guides, pour each section in a 10 cm layer and level it with a shovel. Roll the entire surface with a spiked roller to remove air bubbles and then level it with a straightedge. Once the pour is complete, remove the guides and fill these areas with concrete.
The screed plays a crucial role in this type of structure, protecting the circuit from mechanical damage and ensuring proper heat distribution and exchange. Therefore, when installing underfloor heating, it's important to follow a number of rules, which we'll discuss in detail in this article.
- How to fill a heated floor
- Temperature clearances
- Preparatory work
- Tools and materials we will need for laying underfloor heating
- Recommended floor screed thickness
- Pouring water-heated floor heating
- Concrete screed on beacons
- Semi-dry screed for underfloor heating
- Self-leveling mixtures
- Video instructions for pouring underfloor heating screeds
How to fill a heated floor
There are three methods for installing hydronic underfloor heating. All are simple in technology and follow a similar process, although each method has its own unique characteristics.
| Method of pouring the floor | Description | Pros | Cons |
| Concrete | A common option uses a cement-sand mixture. To increase the strength of the floor structure, the sand is replaced with filler. This prevents the base from crumbling when heated. Furthermore, using filler reduces the thickness of the mortar layer from 50 to 30 mm. | Strength, durability and uniform heating of the floor surface. | Significant floor weight and long curing period. |
| Semi-dry composition | The main difference is that it contains less water than the first composition. It also requires polymer additives and fiber. | The floor is more durable, dries much faster, has less shrinkage, and the resulting surface is virtually resistant to cracking. | Less plastic, which can cause voids to appear. After drying, the resulting base should be protected from water. |
| Self-leveling mixtures | The composition resembles a cement-sand mixture. It can be used as both a rough floor base and a finishing coat. However, only rough screed is suitable for pouring underfloor heating. It comes with different bases: gypsum and cement. Both types can be used for pouring underfloor heating. | It has the greatest plasticity, hardens quickly, and does not require careful leveling, as it flows under its own weight. | High cost. |
Temperature clearances
The main reason why cracks appear in concrete screeds is the incorrect placement of expansion joints.
According to the instructions, when installing underfloor heating screeds in rooms with complex layouts or large areas, it's best to divide the room into zones before pouring the concrete. These zones should be demarcated with 5-10 cm thick damper tape, which should also be laid along the entire area along the walls.
A damper tape helps protect the heating system from damage, as the structural elements expand during heating. Failure to install a damper tape will quickly cause cracking of the concrete floor screed.
There are several points that need to be observed to ensure proper installation of expansion joints:
- Each area fenced with tape must be no more than 30 m2, and the sides no more than 8 meters long.
- If the room has a complex layout, it is divided into square or rectangular zones.
- Under certain conditions, it is permissible to make divisions at 1/3 of the solution depth.
- After the floor screed has hardened, the seams are sealed.
Preparatory work
Before pouring a screed onto a warm water floor, some preparatory work is required:
- level and clean the base;
- install a heating system.
When installing a heated floor, pouring must be done after installation of everything "pie", it is important to arrange all its layers correctly.
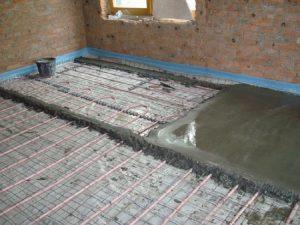
The sequence of laying layers in the “pie” of a warm water floor is as follows:
- Rough screed - it is cleaned and leveled.
- Waterproofing - a polyethylene film with a thickness of 200 - 250 microns is laid.
- Thermal insulation - foamed polyethylene with a foil coating is installed.
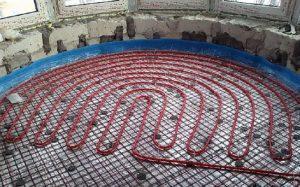
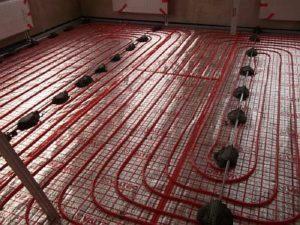
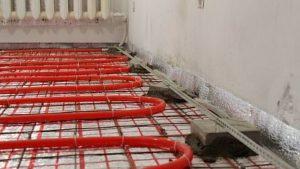
- Reinforcing mesh is essential for structural strength. It can also be used to secure pipes if a polystyrene foam base with studs is not used.
- The heating circuit (metal-plastic or polypropylene pipes with a cross-section of 20 mm) is either fixed to the mesh with special fasteners or laid on polystyrene plates between the bosses.
- Reinforcing mesh - it can be laid over the heating system, if desired, to give greater strength to the structure.
Before filling, it is necessary to connect the system to the manifold and check it for tightness and how it heatsAfter this, a beacon is installed, which helps to obtain a level concrete base.
Tools and materials we will need for laying underfloor heating
Before installing and pouring underfloor heating, you need to prepare the tools and purchase the building materials you will need for the job.
The main tool that will be required during the installation process:
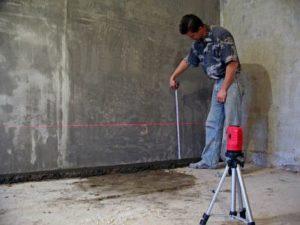
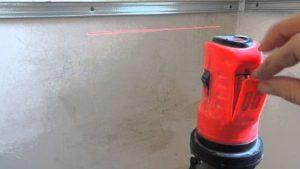
- a level, preferably a laser one - it is used to check the evenness of the poured floor;
- screwdriver - used for installing beacons;
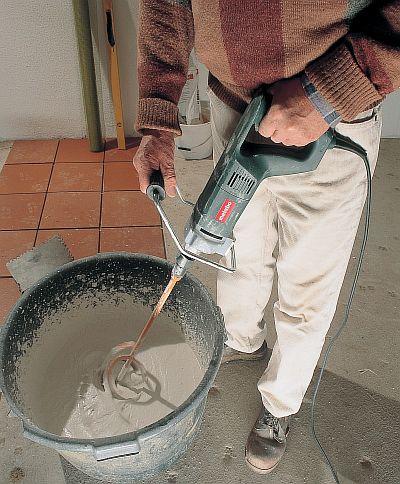
- a hammer drill with an attachment for mixing concrete or a construction mixer;
- 100 liter capacity - the solution will be mixed in it;
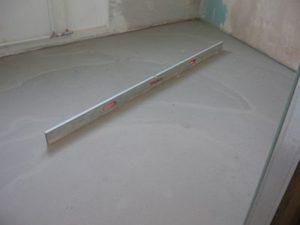
- slats and a rule - for leveling;
- vacuum cleaner and broom - for cleaning the base.
We will also need to purchase the following building materials:
- damper tape - for arranging thermal seams;
- insulation material - used for installation of a thermal insulation layer;
- polyethylene film - for waterproofing;
- material for making the filling composition (sand, cement, plasticizers, fiber) or a ready-made mixture;
- reinforcing mesh;
- beacons;
- fasteners - for securing the circuit to the reinforcement;
- pipes made of polyethylene or metal-plastic;
- polystyrene slabs with bosses - if the pipes will be laid on them.
Personal safety is also important to remember. You'll need rubber boots to protect your feet from cement dust, and knee pads to protect your knees from injury while pouring the floor.
Recommended floor screed thickness
The height of a properly poured screed is uniform throughout its entire perimeter. This determines the efficiency of the heating system and the uniformity of the floor heating. We suggest you find out the optimal, minimum, and maximum heights. thickness of the screed for water-heated floors.
Therefore, it is correct to pour a warm water floor with concrete only on a level sub-base.
The screed height is determined by the specifics of the room: in apartments, it ranges from 5 to 8 cm, and in industrial facilities, 10 cm. The layer under the contour should be at least 1 cm thick, and above the pipes, 3 cm.
In addition, the following factors influence the correct determination of thickness:
- when using a conventional cement-sand composition, the minimum thickness above the heating system is 5 cm;
- if the filling is carried out with plasticizers, its thickness above the heating element can be less than 5 cm, but not less than 3;
- When installing a structure using a reinforcing mesh, a thickness of 2–2.5 cm is permissible; without it, at least 3 cm.
For your information! One of the functions of the screed is to accumulate heat. Therefore, a thin layer will allow the floor to cool more quickly, and the coolant will be heated more frequently. Therefore, the optimal thickness is considered to be 7-8 cm.
Pouring water-heated floor heating
When installing a water-based underfloor heating system yourself, keep in mind that this design will significantly raise the flooring level in the room. However, compared to other types of underfloor heating, it's a more cost-effective option.
You should also decide what to fill the water-heated floor with, and which method will be correct in your conditions: wet, semi-dry, or self-leveling mixture.
Concrete screed on beacons
The most popular method for pouring a screed over a hydronic underfloor heating system is using concrete mortar. It is durable and impervious to moisture and temperature fluctuations. A reinforcing mesh is installed during the pouring process to ensure the structure's strength.
When creating a screed, it's important to consider the mortar's consistency. Its viscosity should allow for easy leveling.
The pouring process for a water-heated floor is as follows:
- Marks are made on the wall indicating the level of cement pouring.
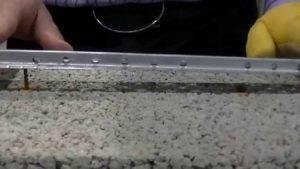
- Beacons are installed. They should be 10 cm high and mounted on a reinforcing mesh. If the mesh isn't installed, then mounds of mortar of the required height can be made as beacons.
- Metal guides are laid out, they are mounted at the same distance, and ultimately the entire area will be divided into equal strips.
- Prepare the mixture. Mix the ingredients in a prepared container using a mixer:
- cement, grade M-150 is recommended for residential premises - 1 part;
- sand, sifted river - 4 parts;
- plasticizer - for plasticity;
- water - approximately 0.7 parts, to obtain a doughy, elastic consistency.
Using a mixer, first mix the dry ingredients, and only then gradually add the water and plasticizer. Mixing time is 6-7 minutes.
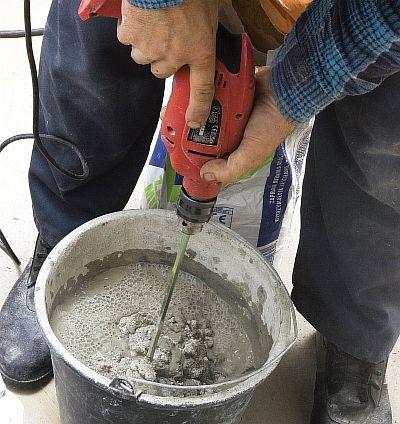
Please note! The consistency of the mixture determines its readiness. The correct mixture should be uniform and not runny; no water should leak out when squeezed.
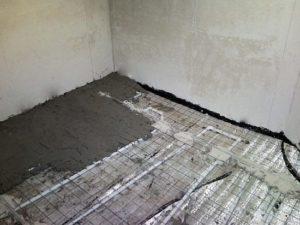
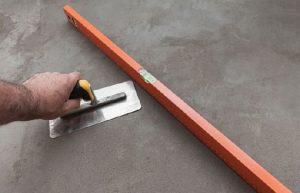
- Concrete is poured over the heating element. Starting from the far corner of the room, the surface is poured in strips, maintaining a pressure of 0.3 MPa. The mortar is poured between the installed guides and spread over the entire area being poured. A shovel or spatula can be used for hard-to-reach areas. After this, use a leveling tool to evenly distribute and level the surface. Care must be taken to avoid damaging the heating element. Do not stop until the entire room is poured and leveled, as the concrete will set differently.
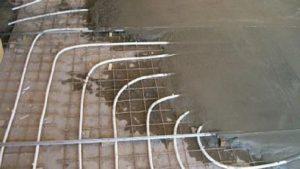
Important! It's important to carefully distribute the mixture so it penetrates all the spaces between the pipes, leaving no air pockets.
At this point, the water-based floor pouring process is complete. Allow 28 days for the entire surface to dry completely. During this time, you can cover the floor with a film. To ensure proper drying, it's important to create the right conditions—a temperature of 15–25°C, no drafts, and no direct sunlight. Additionally, the surface should be moistened periodically.
- The beacons are removed after 48 hours, and the holes left behind are filled with concrete.
- The concrete is cleaned. On average, it takes a day or two for the concrete to cure, and it can be walked on carefully. Excess damper tape is removed. Then, using the sharp edge of a straightedge, any uneven areas of the hardened concrete are trimmed. The trimmed fragments are removed with a broom or vacuum cleaner, the surface is dampened, and covered with plastic film.
You can use the heated floor only when the screed is completely dry.
https://youtu.be/A11UetMaNB8
Semi-dry screed for underfloor heating
Semi-dry screed is a floor surface leveling process using a semi-dry cement-sand mixture. Standard metal mesh, fiberglass, or polypropylene fiber are used for reinforcement. It creates a perfectly flat surface without the need for an additional leveling layer.
As mentioned above, this type of screed hardens faster. Therefore, if you don't want or don't have the time to wait for a wet-poured floor to dry, use this option. Flooring can be installed within 7 days.
The semi-dry mixture can be poured after securing the warm contour and applying the damper tape. The process is similar to installing a concrete foundation:
- The pouring height is determined. Using a level, marks are made on the walls to guide the mortar. Using these marks as a guide, semi-dry mortar beacons are installed.
- Prepare the mixture. You can use a concrete mixer or a stand mixer. You will need:
- cement - 1 part;
- sand, for greater strength it can be replaced with screenings - 3 parts;
- fibers - 500 g;
- water - its quantity is determined during the kneading process, it is added gradually and mixed well.
If the mixture is prepared correctly, it will hold its shape, not spread, and will not stick to your hands.
- The pouring process begins. Beforehand, the pressure in the circuit must be set to 0.3 MPa. The mixture is poured along the guides with a shovel, keeping in mind that the height above the heating elements must be at least 3 cm.
- The surface is leveled. Using a leveling screed, carefully smooth the surface to ensure there are no voids or uneven areas. If any voids are found, they are filled with mortar and the surface is leveled again.
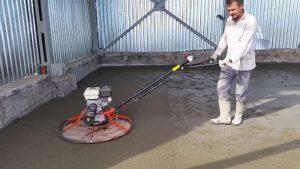
- The screed is being ground. It's best to do this 30-60 minutes after leveling. A special power trowel is used for this; it creates a perfectly smooth surface and compacts it. It's recommended to place boards on your feet to prevent sagging and creating depressions in the floor.
Please note! The longer the time passes after pouring, the less effective and beneficial the sanding will be, as the mortar will have time to set.
It is correct to turn on the “warm water floor” system only after the screed has completely dried, and the temperature should be raised gradually.
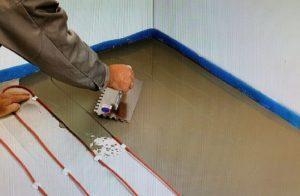
Self-leveling mixtures
Today, ready-made self-leveling mixtures are widely used. They contain all the optimally selected components, and all that's left to do is prepare the solution according to the included instructions. The key is to choose the right mixture; it must be suitable for heated floors, as indicated on the product packaging.
Installing guides is not necessary here. Proper preparation of the "pie" and secure fastening of the pipes are essential. Also, the circuit pressure must be set to 0.3 MPa.
The sequence of actions is as follows:
- The mixture is prepared. The dry ingredients are added to the mixture with water, in the proportions indicated on the instructions, and mixed using a drill with a mixing pad.

- Beacons are installed according to the level, although it is possible to fill without them.
- The solution is spread over the surface. It is applied with a hose in small sections. It should cover the pipes with a layer of at least 30 mm. For a more thorough distribution of the mixture, you can use a wide spatula.
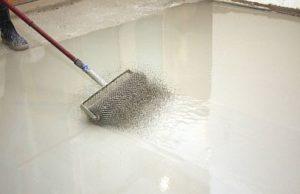
- Air is removed. This can be done using a needle roller, which is used to roll the poured surface.
- The mixture is leveled. A rule is used to distribute the liquid solution into all the voids.
- The beacons are removed. They should be pulled out after 3 hours, and the depressions filled with mortar and leveled.
Cover the floor with plastic film and leave it until completely dry. It's best to keep it out of direct sunlight and away from drafts during this period.
Which method you choose is up to you. Consider the room's features and the characteristics of your underfloor heating system. Regardless of the type of mortar (concrete or self-leveling compound) you use, the key is to do it correctly.
As you can see, pouring a screed over a hydronic underfloor heating system yourself is a labor-intensive, but entirely doable, process. But the effort and expense are well worth the comfort and warmth in your home.
Video instructions for pouring underfloor heating screeds
Never start renovating your floor without watching the video below!


