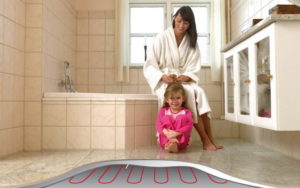
In our country, many regions experience harsh winters. Therefore, radiators are unable to create a comfortable and warm atmosphere in apartment buildings or private homes. The solution is to install hydronic underfloor heating in the apartment.
In a bathroom where additional heating is often needed, heated floors can be installed with a heated towel rail. They will provide the right temperature and prevent humidity from negatively affecting the room's finish.

- Types of heated towel rail connections
- Wiring diagram for underfloor heating to a heated towel rail
- Parallel connection
- Serial connection
- Connection via heat exchanger
- The pros and cons of heated floors with a heated towel rail
- Laying underfloor heating pipes
- System check
- Features of operation, what problems can be encountered
- Video materials
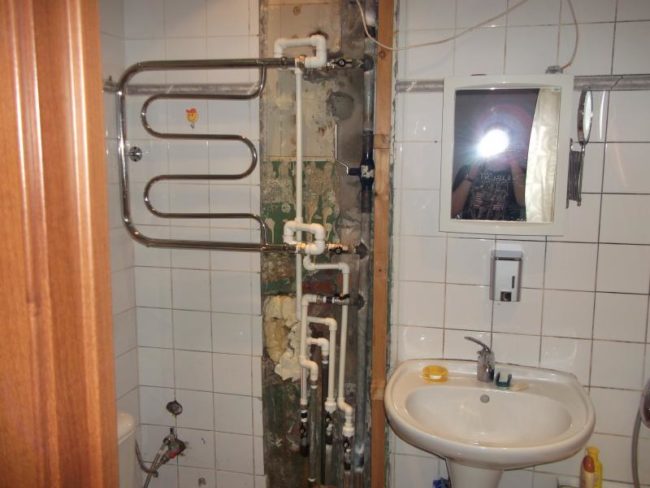
Types of heated towel rail connections
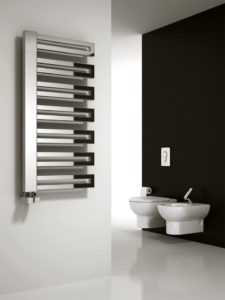
A heated towel rail is a device designed to heat a bathroom, although it is sometimes installed in the kitchen as well. Its primary purpose is to dry wet towels, clothes, etc., as well as the room itself, thereby maintaining an optimal temperature.
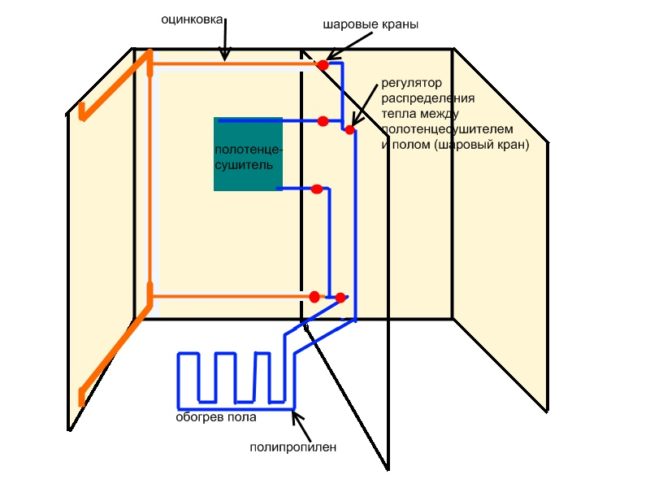
Heated towel rails come in electric or hydronic types. Hydronic radiators are used to power heated floors, and they are classified according to the coil connection method:
- from central heating;
- from hot water supply.
If the heated towel rail is connected to the central heating system, then when the heating season begins, the coil is filled with hot water, and from there it flows into the underfloor heating pipes, thereby warming the surface.
Please note! Since the device operates off the apartment's central heating, the floor stops heating at the end of the heating season. It resumes operation when the heating is turned back on.
Heated floors in the bathroom will function more efficiently if the coil is connected to the hot water supply. The floor will be heated almost constantly, except when the hot water is turned off or when you manually turn off the supply.
Wiring diagram for underfloor heating to a heated towel rail
The process of installing underfloor heating depends on the connection diagram for the heated towel rail in the apartment.
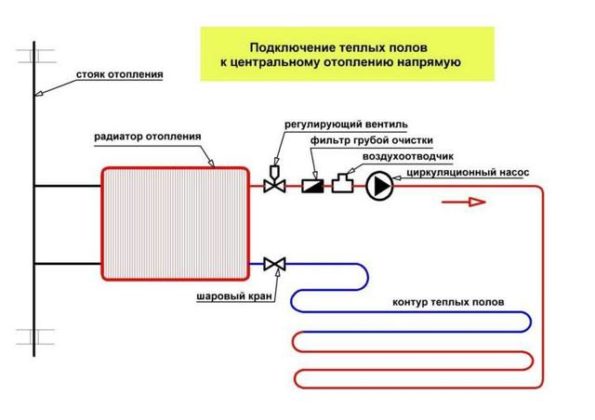
When the dryer is fed by the heating system, the floor only heats up during the heating season. It's also worth noting that the temperature of the coolant in the radiator will not match the temperature required for the proper functioning of the water-based underfloor heating. The maximum temperature for the floor is 45 degrees Celsius, while the water in the radiators reaches 75 degrees Celsius. This difference causes installation difficulties, so experts do not recommend this option.
Please note! Furthermore, to legally connect a heated floor heating system to a heated towel rail in an apartment building, you must obtain permitting documentation. This may affect the operation of the main heating system. However, in the case of a small bathroom, this will have virtually no impact on the building's central heating. However, without this documentation, your actions will be illegal.
Sometimes, the apartment's heating coil is connected to the return line—the most efficient method. It's more advantageous because the coolant has the appropriate temperature.
If the coil is connected to the hot water supply, then the correct choice of pipe diameter is of great importance.
There are several diagrams that can be used to connect water-heated floors to a heated towel rail:
- parallel;
- consistent;
- by installing a heat exchanger.
When connected in parallel or series, hydraulic pressure is applied to the riser. The installed heat exchanger helps separate the floor and coil loops.
Parallel connection
Connecting heated water floors in a parallel system requires tees installed on the heated towel rail. The water line is connected to these tees using shut-off valves. The system is also required to be equipped with valves to regulate the water flow.
The downside of this method is the potential for insufficient coolant flow into the floor heating circuits. This is because the pipeline has a higher hydraulic resistance than the heated towel rail.
To ensure efficient circulation of liquid in the pipes, it is necessary to reduce the water flow in the towel rail. This is accomplished by closing the inlet or outlet valve on the heating system.
However, this will reduce the flow of coolant in the riser. This problem can be solved by installing a circulation pump with a power of 50-70 watts. This will force the water to circulate, but this will result in (minor) electricity costs.
Serial connection
A sequential design involves cutting into the riser, meaning the underfloor heating will operate in conjunction with the coil. The pipe connection must be made when the riser is turned off. A check valve and a ball valve are installed at the cutoff points, and the underfloor heating pipes are connected to them.
The main drawback of this method is increased hydraulic resistance in the riser. If the riser diameter is 15–20 mm, this process is practically unnoticeable, as the circuit is small and of adequate cross-section. If the diameter is greater than 25 mm, the tension increases, and fluid circulation becomes difficult.
Closing the control valve increases resistance. Installing a pump with this method is not recommended, as its capacity is insufficient to provide additional pressure and will only hinder the process.
Connection via heat exchanger
The most optimal method for powering heated hydronic floors from a coil in an apartment is to install a unit that includes a pump and a heat exchanger. The liquid flows into the main line, receiving heat from the heat exchanger, creating hydraulic independence.
The pump is installed on the heated towel rail. Additionally, the station should be equipped with a bypass. Parallel connection can cause the same drawbacks as direct connection, such as insufficient hot water flow.
This method is the most expensive. After all, legal connection requires the mandatory installation of a heat meter in the apartment.
Watch a detailed video with descriptions of all three connection methods!
The pros and cons of heated floors with a heated towel rail
Underfloor heating in the bathroom isn't expected to provide the uniform heating you'd expect from similar floors in other rooms. Its main purpose is to make the floor surface more comfortable and dry, and to ensure water splashes dry quickly. Otherwise, the bathroom will create a microclimate conducive to mold and mildew growth.
Before considering installing this heating device in your bathroom, you should weigh the pros and cons.
Main advantages:
- The design does not take up space and is not visible, so it does not spoil the interior of the room;
- It is much more pleasant to step on a warm floor after taking water procedures;
- The device is easy to install and safe;
- The maintenance process is simple;
- The system quickly pays for itself.
The disadvantages include the relatively high installation cost and the inability to install certain flooring materials on this type of flooring. However, bathrooms are typically tiled, making them ideal for underfloor heating.
Furthermore, in the event of an accident, the floor covering and concrete screed will have to be removed. Furthermore, the quality of this coolant is low, leading to scale and corrosion within the circuit.
This device also affects the heating of radiators in neighboring apartments, so it is recommended to install a two-way valve in them.
Laying underfloor heating pipes
Installing underfloor heating elements is quite simple. For this type of system in a bathtub, elements with a diameter of 16 or 20 mm are suitable. The circuit is laid in an open area; there is no need to install it under the bathtub.
The pipeline can be laid in any pattern: "snail" or "snake." Since it is so small, its placement method will not affect the system's efficiency.
Please note! Before laying the flooring, it is necessary to prepare a plan indicating the length of the pipeline, its layout, pipe diameters, and the locations of the inlet and outlet valves.
You need to start by removing the old finish in the bathtub and cleaning the base onto which the waterproofing and thermal insulation material will be laid. Foamed polyethylene (foil-faced penofol) is suitable for the base.
Since it has a small thickness, that will make the water floor "pie" smallerThis is especially important for the bathroom, as the height of the bathroom is often lower than the ceilings in the rest of the apartment. It's best to install pipes made of cross-linked polyethylene or metal-plastic.
The process of installing heated floors in a bathroom is the same as in any other room in the apartment:
- Laying the circuit depends on the material of the pipe. If polypropylene is used, the connection is made using special fittings. When using metal-plastic pipes, the pipes should be laid out in a way that minimizes the number of connections. When installing copper pipes, corners made of a similar material must be used.
- Fastening pipes to the floor using clamps.
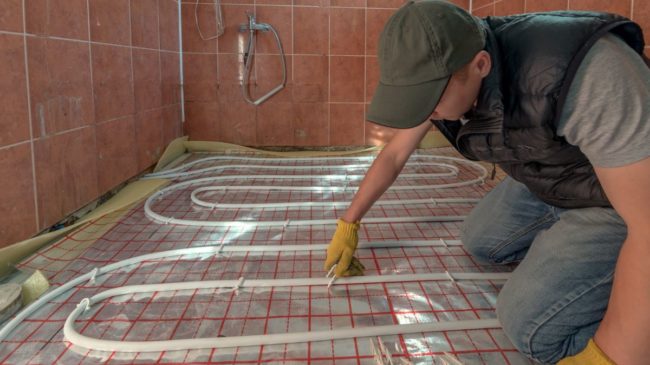
- Connection to the system is made using couplings. Sharp turns in the circuit are not allowed.
- Reinforcement is the laying of a reinforcing mesh, which helps increase the strength of the structure.
- Sealing the perimeter with damper tape is necessary to prevent the concrete from cracking as it dries.
- Pouring the concrete screed is best done using benchmarks. The system should be filled with cold water and pressurized to 2 amps when the concrete is applied. The concrete will take 2 to 4 weeks to harden, during which time the surface should be periodically moistened to prevent it from drying out.
Important! Before pouring the screed, be sure to test the device for proper operation. If there are any problems or leaks, the concrete layer will need to be removed.
System check
The testing process involves checking the main line for leaks. This is done by opening the valves, releasing air from the pipes, and filling the circuit with water. Pressure testing is performed under elevated pressure. If any issues are detected, they are corrected and the process is repeated.
If the test is successful, the screed can be poured. Once the concrete surface has dried, tiling can begin.
For your information! Only after the screed has completely hardened, 3-4 weeks later, and the tile adhesive has dried, can the system be turned on for the first time. The temperature should be increased gradually over several days.
Features of operation, what problems can be encountered
Installing hydronic underfloor heating with a coil in a bathroom is quite rare in our apartments. However, this system is gaining popularity, so in addition to knowing how to properly install underfloor heating, it's important to understand the proper operating procedures.
The key feature of this design is that its efficient operation is affected by the operation of the central heating system. If the pressure in the central heating system drops or the quality of the coolant deteriorates, this affects the fluid flow in the circuit.
If the coil is excessively hot and there's no thermostat, it will be difficult to achieve an optimal, comfortable temperature. An excessively hot floor can dry out a small bathroom. Installing a manifold or temperature control sensor is a solution, but this will significantly increase the cost of installing underfloor heating.
There's a risk of flooding the neighbors' apartments below in the event of an emergency. Furthermore, fixing the problem will require removing the tiles and the concrete screed. This is labor-intensive and messy work, which also entails additional costs.
You can install heated floors in your apartment using a heated towel rail yourself, but if you're unsure of your skills, it's best to hire a professional. Improper installation will impact the operation of your heating system and hot water supply.
A heated water floor in the bathroom from a dryer provides additional warmth and comfort during bathing, which is especially important in winter.


