To eat organic vegetables and be confident in the quality of your produce, it's best to grow them in your own garden. However, proper temperature and humidity levels are required for proper growth of vegetables.
A great solution for creating comfortable conditions for plants is to build a greenhouse from polypropylene pipes, which you can make yourself.
These greenhouses have long been an integral part of any garden, as they're simple to construct, requiring no specialized knowledge or significant investment—just follow the instructions. Furthermore, they're heated by the sun, eliminating the need for a separate heating system.

- Advantages and disadvantages of polypropylene pipes
- Where to place a greenhouse on the site
- Types of structures
- Which pipes to choose
- Necessary tools and materials. Calculation of materials
- Greenhouse made of polypropylene pipes - drawings with dimensions
- Step-by-step instructions on how to build a greenhouse from polypropylene pipes yourself.
- Installing a foundation for a greenhouse
- Installing the frame
- Assembling an arched greenhouse
- The simplest collapsible greenhouse
- What covering material should I choose for greenhouses?
- We attach it to the frame
- Recommendations for greenhouse operation
Advantages and disadvantages of polypropylene pipes
Polymer is a relatively new synthetic material compared to wood and concrete. It is resistant to mechanical stress and atmospheric precipitation.
Recently, polypropylene pipes have been manufactured, quickly gaining popularity due to their affordability and excellent performance characteristics. Polypropylene pipes range in diameter from 20 to 1200 mm.
Due to its positive qualities, polypropylene is widely used in the production greenhouses and hothouses.
| Advantages | Flaws |
| Easy to process | Does not tolerate sunlight well |
| Special fittings allow for a folding version, which is convenient for storage. | Although the light weight of the pipes is a positive quality, the structure can tip over in strong winds. |
| The PVC pipe structure is rigid and does not require additional reinforcement. | |
| Excellent resistance to corrosion, decay and atmospheric influences | |
| Service life of at least 10 years | |
| Difficult to ignite | |
| Flexible, it is possible to make any design | |
| It has a light weight, making it very convenient for transportation. | |
| Eco-friendly |
Where to place a greenhouse on the site
For a plant to thrive, simply building a greenhouse isn't enough; it needs to be positioned correctly. Avoid nearby tall buildings and large trees that block light.
Furthermore, water should not accumulate during heavy rain or heavy watering, as this will negatively impact plant growth. If the site is in a low-lying area, a platform or raised platform is required. The simplest method is to half-bury logs, onto which the frame is then mounted.
Exposure to excessive sun will not harm the plant, as the structure can be covered with a special net for shading.
Types of structures
When choosing a model and size, it's important to know its intended purpose. If you plan to grow vegetables only for yourself, a greenhouse 0.5 meters wide, 1.5 meters long, and 1.3 meters high (the standard height for greenhouses) is sufficient.
By type, greenhouses are divided into:
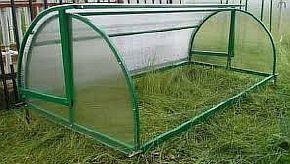
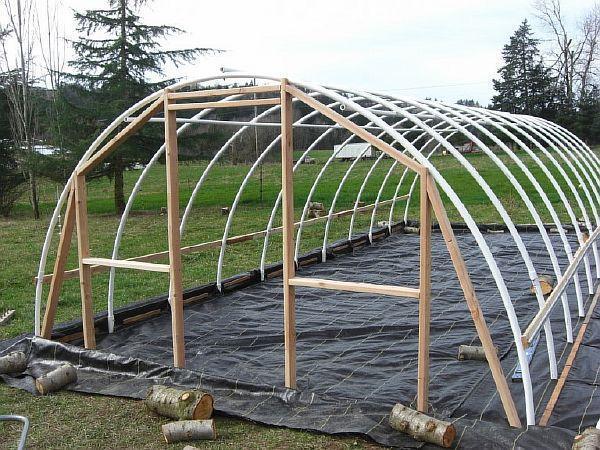
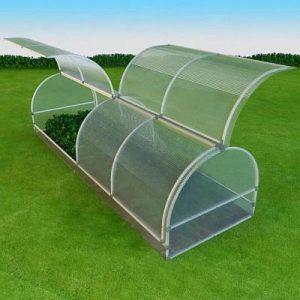
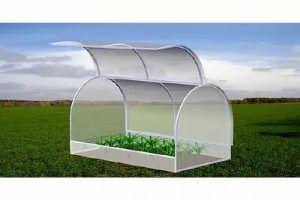
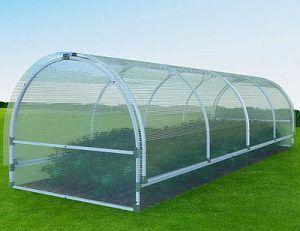
- The arched greenhouse is the simplest and most inexpensive option to assemble. Its streamlined shape resists wind and rain well. Gardeners often build this greenhouse from polypropylene pipes, and the sizes vary. It is usually covered with plastic film.
- A mini-greenhouse made from polypropylene pipes is a common homemade option among summer residents and comes in a variety of shapes:
- It's a simple square frame covered with film. It's most often used for germinating seedlings. This model can be either raised or placed in the ground, as the soil becomes depleted after just three months. Another drawback is the lack of light. However, 1 square meter can grow enough seedlings for 20 acres of land.
- The "Butterfly" model is designed for crops that require constant air circulation. It's arched and features opening side panels, making it very convenient. It's an excellent choice for peppers, tomatoes, and cucumbers.
- The "Bread Bin" is suitable for gardeners with limited experience. It's inexpensive and easy to install. Designed for low-growing crops, the "Bread Bin" is made of polypropylene pipes and consists of a box with an opening lid.
- Rectangular – consists of walls and a roof, which can be either single-pitched or double-pitched. This is also often found on plots of land.
- A lean-to roof is a three-wall structure with a roof covering. The roof has a steep slope. Typically used for growing radishes and carrots.
- Gable roof is a classic option, with slopes diverging in both directions from the middle of the roof.
- Combined - with several sections, not very popular for DIY construction on a small plot.
- A wall-mounted greenhouse is an excellent solution for a small plot. It saves both space and materials. Furthermore, this structure is stable and durable, as it rests on the wall of the house. However, it's only suitable if the house doesn't shade the greenhouse.
- edged boards - 4 pcs;
- reinforcement, 10 m in diameter - its quantity is determined by the size of the structure;
- snap holders;
- slats;
- tees - if the design is more complex;
- wood screws - if polycarbonate will be used (35 and 50 mm).
- screwdriver;
- large hammer;
- two types of shovels - bayonet and scoop;
- grinder;
- file;
- knife;
- blowtorch;
- drill.
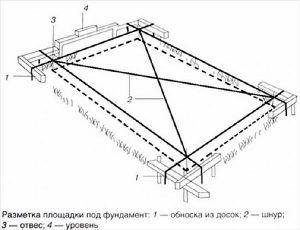
- It is necessary to level the surface in the selected area.
- Use pegs and string to mark the rectangle. To ensure a perfect rectangle, cross the string from one corner to the opposite corner. If the two strings are the same length, the shape is correct.
- A 5-10 cm thick sand bed must be poured under the foundation. The foundation itself is made of 10 x 10 cm timber beams, which evenly distribute the load. Timber beams are inexpensive and will last for over 15 years. The foundation installation process is as follows:
- saw the timber into pieces of the required size, soak it in an antiseptic, and then dry it;
- To check the size, the timber must be laid on a sand base or on built-in posts;
- connect the beams to each other using screws or corners, you can use staples.
- Then sand should be added over the entire area of the foundation to secure the structure.
Almost all types of greenhouses made from polypropylene pipes can be made either permanent or collapsible.
However, a collapsible structure is more convenient and portable; it can be stored for the winter or moved to another site if necessary. In short, polypropylene pipes, in addition to plumbing, can also be used for building greenhouses and hothouses.
Which pipes to choose
You can build a greenhouse frame yourself using plastic pipes of various diameters (16–110 mm), ranging in length from 2–5 meters. You can also use PVC water pipes, polypropylene (PPR), or polyethylene pipes, which have low pressure but high density.
Pipes with an aluminum or fiberglass core are suitable, but they are more expensive. It is recommended to use pipes with different diameters for different parts of the structure.
When choosing, you need to take into account the availability of welding equipment, which is intended for welding plastic pipes, and experience in such workHowever, the process is not complicated, and anyone can handle it.
Necessary tools and materials. Calculation of materials
For construction, you need not only polypropylene pipes, but also stock up on:
To do this work you need to prepare a standard set of tools:
Accurately calculating the required material is crucial, especially for pipes. While there are numerous online calculators available, the results will be approximate. If you want a precise figure and avoid wasting money on unnecessary material, you can perform a simple calculation yourself.
Let's look at the calculation using the most common arch model as an example. Using the Pythagorean theorem and Huygens' formula, we can calculate the arch's size. To do this, we need to know the width and height of the structure.
In our example: height 100 cm, width 120 cm.
m = √b²+a²=√100²+60²=√13600=116.61.
Now, using Huygens' formula, we will calculate the length of 1 arc.
L≈2∙116.61+(2∙116.61–120)/3 = 233.22+(233.22–120)/3 = 233.22+113.22/3 = 233.22+37.74=270.96 cm.
Next, we need to determine the total length of the pipes by multiplying 270.96 by the number of arcs. To this result, we add the length of the cross pipes, which are installed to strengthen the structure. This will be the final result.
Film is usually used for covering; a 6-meter roll will last for several years.
Greenhouse made of polypropylene pipes - drawings with dimensions
Before you begin building a greenhouse from polypropylene pipes yourself, you need to decide on a model and create a drawing. This will help you accurately calculate the materials needed and plan the area. When creating the diagram, consider the connection principle and the arrangement of the supporting parts, ensuring they are spaced evenly.
It's also important to choose the right type of covering, as film is lightweight, while polycarbonate is heavy and the structure may not be able to support its weight. Therefore, additional reinforcement with supports will be required.
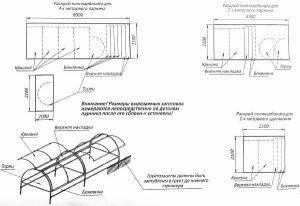
The diagram/drawing should indicate all components, including dimensions and fastenings. It's also important to consider the site's features and the crops to be grown there. If you're planning a mini-greenhouse, a simple schematic drawing will suffice.
The arched mini-greenhouse "Butterfly" made of pipes is designed for temporary use (during the summer) for growing seedlings. It's covered at night and opens during the day to let in sun and air, making it very convenient.
Step-by-step instructions on how to build a greenhouse from polypropylene pipes yourself.
Once the drawing is ready and the necessary materials have been purchased, installation can begin. Here are step-by-step instructions.
Installing a foundation for a greenhouse
For any building, even a small one, it is necessary to arrange a foundation:
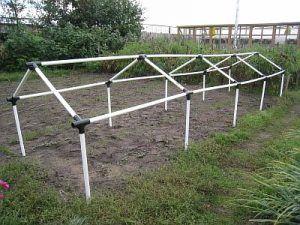
Installing the frame
To begin assembling a greenhouse frame from polypropylene pipes, you need to prepare the material to the required size. You can cut the pipe with a hacksaw, and finish the edges with a file. To avoid mixing up the parts, it's best to mark them with a felt-tip pen. Other elements are cut out as you go.
Let's look at the installation of two of the most popular and simple models of pipe frames.
Assembling an arched greenhouse
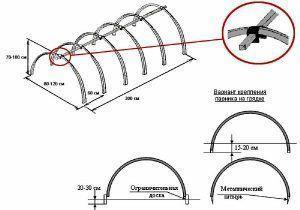
- To strengthen the polypropylene arches of the arched model, reinforcing metal rods must be installed in the base. Suitable rebars are 10-12 mm in diameter and 150 cm long. One rod should be installed on the outside corner of the wooden frame. The other rod should be secured opposite. If the ground is soft, the rod should be driven 70 cm into the ground and at least 60 cm above the surface. The remaining rods should be secured in the same manner. The distance between the rebars should be 60 cm. It is important that the opposite rod is level, otherwise the structure will become warped.
- Install the arched greenhouse arches. To do this, place one end on the rebar located on the outside, and the other on the rod located opposite, forming an arch. The remaining ribs are installed using the same principle.
- To secure the frame and make it more reliable, the ends of the pipes should be secured to the foundation. To do this, screw brackets to the wooden frame and insert the pipes into them. The bracket method is very convenient, as the arches can be easily removed and the structure disassembled if necessary.
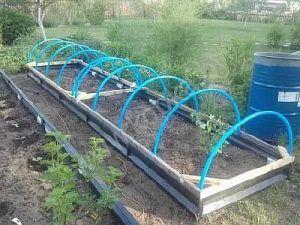
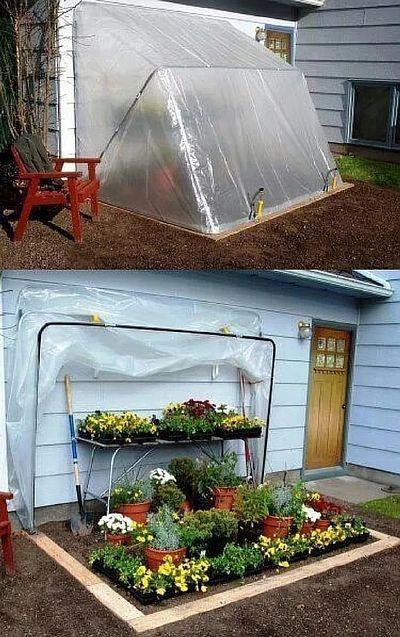
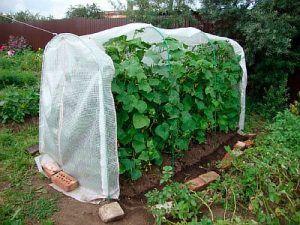
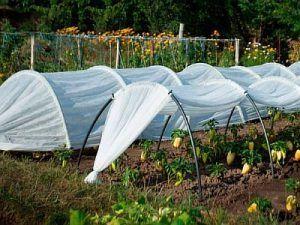
The simplest collapsible greenhouse
This greenhouse option made from polypropylene pipes is easy to build yourself. It's quick to assemble and requires no foundation.
The step-by-step instructions are as follows:
- You need to cut one and a half meters of pipe—this is the standard size of a garden bed. The number of such pipes depends on the length of the garden bed.
- Bend the pipe into an arc, and bury both ends in the ground so that the garden bed is underneath the arc. Make these arcs every 50 cm.
- After which the film can be stretched over the arches.
What covering material should I choose for greenhouses?
After assembling the frame, it needs to be covered. Glass is not suitable for covering a greenhouse made of pipes, as it is heavy and fragile.
Cellular polycarbonate is suitable; it does not break, is easy to cut, is easy to install, withstands minor deformations and has a lower heat transfer.
An excellent option for a greenhouse is polycarbonate, 4-6 mm thick, but in this case, you should also use polypropylene pipes with a diameter of at least 32 mm. Although polycarbonate is quite expensive, it will last longer.
You can also buy a cheaper option for covering a greenhouse:
- polyethylene film;
- reinforced film 11 mm thick - it is stronger than polyethylene, so it will last longer;
- bubble - is an excellent heat insulator;
- Non-woven (Agrospan, Agrotex, Spunbond, Agril) - more durable than film, retains heat well and allows rain to pass through, opaque, which will protect plants from excessive sun.
We attach it to the frame
The method of covering the greenhouse depends on the material you choose:
- There are several ways to secure the film, including using rope, tape, mesh, or screws. When using screws, you can use linoleum or pieces of plastic bottles as washers to protect the film from damage. Special clamps are available for purchase; they simplify the job and ensure a secure hold. Furthermore, unlike screws, some of them can be removed during the day to open the greenhouse. The film is secured to the wooden frame using a strip. The film should be cut directly on the greenhouse, with strips slightly longer than the ribs for securement.
- Polycarbonate is attached to the frame with special thermal washers, spaced 0.3-0.5 meters apart. The polycarbonate sheets are connected with a profile. The polycarbonate should be laid so that its internal channels are vertical. The edges of the sheet should be sealed with end caps.
Important! Polycarbonate changes size with temperature fluctuations. Therefore, gaps between sheets must be left during assembly. A greenhouse clad in this material can be used even in freezing temperatures.
- Non-woven material - fastening methods are the same as for film.
Recommendations for greenhouse operation
To ensure a long-lasting greenhouse made from polypropylene pipes, it must be properly maintained:
- If the greenhouse is not permanent, it is better to dismantle it for the winter;
- After dismantling, all elements must be washed and dried;
- greenhouse parts should be stored in a place protected from precipitation;
- Every year it is necessary to disinfect it with a special liquid or gas; you can use a sulfur candle, after which it should be closed for one day to kill all the parasites.
In addition, if the greenhouse is made of polycarbonate, then:
- You cannot make a fire near it, as this material is afraid of fire;
- a greenhouse covered with such material should be washed with ordinary water, with the addition of non-aggressive detergents, preferably laundry soap;
- It is not recommended to wash in hot weather, as this will have a negative effect on the coating;
- In the fall, the building should be inspected for cracks; if any are found, they should be sealed with a sealant;
- If the greenhouse is left for the winter, then a lot of snow should be thrown inside; this will protect the sheets from damage and also strengthen the structure itself.
With proper care, your greenhouse will last a long time and won't require any additional investment.
As you can see, building a greenhouse yourself using polypropylene pipes is easy and inexpensive. Having such a structure will significantly increase your yield and improve its quality.