 Polypropylene pipe welding has become widespread. Due to its low cost and ease of installation, plastic pipe has firmly established itself as the leading choice for plumbing and heating systems.
These structures are not as durable as their metal counterparts, yet most people prefer plastic. Ease and speed of installation play a significant, and sometimes decisive, role in the choice. The soldering method used to connect polypropylene (PP) pipeline components allows for the construction of a reliable and durable structure in minutes.
- How to properly solder polypropylene pipes - general concepts
- How does the welding process work?
- Necessary tool
- Preparatory work
- Degreasing the ends of welded elements
- We mark the installation depth of the tubular product
- How long to heat
- How to Solder – A Beginner's Guide to Soldering
- Temperature standards
- How to solder correctly - important soldering nuances
- Carrying out polyfusion welding works
- Soldering with an electro-fitting
- What to avoid when welding
- Laying methods
- We produce PCB network layout
- How to choose a welding machine for soldering polypropylene pipes
How to properly solder polypropylene pipes - general concepts
At first glance, this process seems very simple. The elements are heated, connected, and secured. However, experience has proven that such actions involve many nuances, neglecting which will lead to a poor result, i.e., a poorly functioning pipeline. Beginners need to pay close attention to certain aspects.
The main problem is that poorly done work can only be detected after the line has been in operation for a certain amount of time. Therefore, it's crucial to follow certain rules when soldering yourself.
Welding polypropylene pipes and fittings is based on the thermofusion method. This involves heating the elements to be welded and quickly joining them. To make the connection, we need a special device called a soldering iron.
How does the welding process work?
Diffusion welding of polypropylene involves joining two heated parts. These parts are then joined. This results in the interpenetration of the materials (known as diffusion) at the joint.
The welder allows for precise control of the heating temperature during operation. It is recommended to use elements of the same material for the joint.
Watch a video tutorial for beginners on how to solder polypropylene pipes.
There are several welding methods, selected based on the dimensions of the system being installed. These include butt welding, socket welding, and saddle brazing.
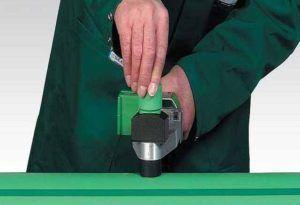
Necessary tool
To ensure a high-quality connection, you need to choose a special soldering iron. It's also called a "welding iron for PP pipes."
 Welding polypropylene pipes yourself with this device is not difficult, and any novice can handle it. Tools in this line cost between eight and fourteen thousand rubles. However, purchasing such a device for a one-time job is not recommended. It's not cost-effective. It's better to rent one from any installation company.
A plastic pipe welding machine is often sold with Teflon-coated nozzles of various diameters (to allow joining pipes of different cross-sections). We'll also need the following tool for the job.
- Pipe cutter. This tool also complements the described device.
- Shaver. This device is designed for reinforcing layers on reinforced tubular products.
- Ruler.
- Means used for degreasing.
- Fitting.
- A well-sharpened knife.
- Marker and rag.
- File.
Preparatory work
After watching a video demonstrating the simple socket soldering process, you can begin the practical steps. At the initial stage of the work, it is recommended to visually inspect the pipe materials for any defects or damage.
If everything is in order, then the cross-section of the pipe assortment should be compared with the diameter of the fittings. They should match exactly.

Next, the rolled tubing must be cut to the required dimensions. The tubular products must be cut strictly perpendicularly. For reinforced types, the surfaces are cleaned using a shaver. Further processing of the reinforced material is the same as for non-reinforced materials.
After cutting the workpiece, the future joint areas need to be finished and burrs removed. This can be done with a knife.
Degreasing the ends of welded elements
Unfortunately, many novice welders ignore this requirement. While it's possible to create a joint without this procedure, professionals warn that the quality will be significantly lower.
Before welding polypropylene pipes yourself, wipe the inside of the fitting and the outside of the pipe blank. This removes abrasives and dust, which can damage the coating of welding equipment nozzles.
The nozzles themselves are treated in the same way. However, before welding polypropylene pipes, they are inspected for any molten plastic residue. If any is present, it must be removed immediately.
We mark the installation depth of the tubular product
This is also a very important point for beginners – the ability to correctly mark the insertion depth of a tubular product into a fitting. Fittings of different diameters have different weld joint depths. For this reason, welding can only be performed after measuring this dimension with a ruler or calipers.
This is necessary to prevent the tubular component from being seated too deeply. Ignoring this warning will narrow the joint, which can lead to subsequent ineffective system operation. Therefore, this calculation must be performed with extreme precision.
Watch a video tutorial for beginner welders on how to solder correctly.
How long to heat
 Before welding plastic pipelines, the welder must be positioned in a convenient location and securely fastened. Then, the nozzles can be installed. Only then can the equipment be connected to a power source. Next, the machine must warm up, which will take approximately ten minutes.
When the desired temperature is reached, the indicator light on the unit should go out, indicating that the device is ready for operation.
It is recommended to install a stand for the hot device, because the master's hands must be free to fasten the heated parts.
How to Solder – A Beginner's Guide to Soldering
The video provided clearly demonstrates how to weld polypropylene pipes. It explains the entire process in great detail. Watching the lesson beforehand will help you quickly understand the technology behind welding polypropylene pipes and demonstrate how it's used in practice.
The video also covers each step in detail, including how to weld the structure correctly. The material it presents should be studied carefully, as this will ensure that subsequent independent work will not present any difficulties.
The video tutorial fully confirms that using a welder is not at all difficult. However, a novice viewer will notice that all actions follow certain rules.
Beginners should definitely watch this video tutorial on how to solder correctly.
The temperature control knob is set to 260 degrees Celsius. This temperature is considered optimal for melting polypropylene products. It is also safe for the Teflon coating of the nozzles. The device may not have a temperature control knob.
This doesn't necessarily mean that such a welder isn't suitable for joining plastics effectively. This is because no other temperature is used to heat plastic materials beyond the specified temperature. Therefore, there's no need to place too much emphasis on this issue.
After this, the actual soldering begins. The fitting and pipe are simultaneously inserted onto the nozzles. Inserting the workpiece and fitting requires significant force. This is because each nozzle on the heating device is shaped like a cone with a five-degree slope.
Only the internal diameter of the surface corresponds to the nominal value. The tubular blank should be inserted as far as it will go, but it should not be pressed further. Excessive pressure in this situation may result in the formation of an internal bulge.
Welding polypropylene pipes yourself involves quickly joining heated polypropylene parts together. It's also important to remember not to rotate or move the completed structure until it has completely cooled.
It only takes a few seconds to correct a minor flaw. Any subsequent movement could adversely affect the tightness of the newly created assembly.
Temperature standards
As already mentioned, welding polypropylene pipes must be performed according to existing regulations. Everything must be done slowly and correctly. This also applies to temperature. When installing a pipeline, it's crucial to maintain not only the correct welding temperature for polypropylene pipes, but also the correct welding time.
Each welder comes with instructions that detail all the required time and temperature requirements for various materials. Failure to follow these instructions will result in a reduction in the internal diameter and reduced water circulation in the system.
Experts also advise beginners that it's important to not just select a temperature of 265 degrees. When working, pay attention to the following additional nuances:
- The diameter of the pipe system.
- Ambient temperature.
- Warm-up time.
Particular attention is paid to the outside air temperature. During installation, short breaks are inevitable, occurring when removing heated parts and coupling them together.
To avoid rapid cooling at low temperatures, the polypropylene structure is heated for a slightly longer period. The recommended time is approximately three seconds. However, this is determined on a case-by-case basis.
When deciding on temperature standards, it's important to consider the diameters of the parts being joined. This also affects the duration and degree of heating.
This work can be significantly simplified by using special tables. They can be found in the soldering iron manual or on our website.

How to solder correctly - important soldering nuances
If you follow the established rules, welding polypropylene pipes and fittings is not difficult. Even a novice or inexperienced craftsman can easily construct a plumbing or heating system from plastic.
Before welding a PCB mesh yourself, it's best to ask someone you know for help. It's easier to solder with one person holding the welding iron and the other joining the heated parts.
Watch the video: Soldering and common mistakes beginners make
Despite the many nuances that need to be addressed, no special knowledge is required for such actions, and anyone can do it themselves at home.
Carrying out polyfusion welding works
Once the necessary parts and tool preparations have been completed, you can begin welding. To ensure proper welding, watch the video and follow the instructions for beginners provided.
- Place the fitting onto the nozzle heated to operating temperature. It takes longer to heat up than usual because its walls are thicker than those of polypropylene pipes.
- Place the plastic tube on the second nozzle of the welding machine only after the fitting has started heating up.
- Now wait until both parts warm up to the required temperature.
- After this, they need to be joined. If they don't fit tightly, they need to be rotated 10 degrees during the welding process.
- To ensure a high-quality connection, the soldering time must be calculated. To do this, use a special table; the soldering time will depend on the diameter.
- Once the elements have heated up, they must be removed and connected with a smooth movement, inserting the pipe into the fitting, according to the previously placed mark.
- Keep both parts tightly closed for some time until the connecting seam cools, as in the video.
Please note that for high-quality welding, precise connections must be made without excessive melting of the plastic material. Excess polypropylene will reduce the pipeline's conductivity due to a reduction in its diameter. This indicates that the polypropylene pipes have been welded incorrectly.
Soldering with an electro-fitting
The process of preparing an electrofusion apparatus for soldering is exactly the same as for a polyfusion apparatus. However, the soldering method itself is slightly different.
- It is necessary to prepare pieces of a given length.
- Inspect all parts for damage.
- Prepare the welding machine.
- The entire surface must be cleaned of oxidation. Also, degrease all parts to be joined.
- Now, when inserting the tube into the fitting, make a mark with a construction marker.
- The electrical fitting is connected to the soldering iron using special wires.
- To start welding, insert the pipe into the electrical fitting.
- Switch the switch to "On" and everything will happen automatically.
- The fact that the soldering is complete will be indicated by special marks on the fitting, where polypropylene will come out.
Once the weld is complete, the joint must undergo natural cooling. Once all parts have cooled, and if the entire process was carried out correctly, the joint will be very secure.
What to avoid when welding
When connecting fittings and plastic structure parts, they must fit tightly to avoid gaps exceeding 1 mm. Otherwise, there will be a gap between the internal stops and the end, which will negatively affect the further operation of the entire system.
Watch a video tutorial for beginners
Do not apply unnecessary force when connecting the parts, as this will cause the internal stop of the pipe and its end to form a burr, which will create an obstacle to the conductivity of liquids inside it.
Laying methods
The layout of PP systems is the first consideration during installation. This requires deciding whether to conceal the piping within the walls or install it openly. This is especially critical for small apartments, as the pipes take up a lot of space.
Open installation is the laying of the main line over a wall or floor.

Whenever possible, the structure is concealed under a decorative structure. The advantages in this situation are as follows:
- Possibility of laying pipes made of any material.
- Simple installation steps.
- Simple layout.
- Low cost.
- Possibility of continuous monitoring of the piping system.
The disadvantages of such designs are:
- Unpresentable appearance.
- Significant loss of usable space. This is especially painful for a small room, where a few extra centimeters means extra space for plumbing fixtures.
Concealed installation is a structure that is distinguished by its aesthetic appearance, since the main line runs through the wall or floor.

This option allows you to avoid wasting useful space. However, it is not without its drawbacks, including:
- the ability to buy rolled pipes only from certain materials;
- labor-intensive preparatory work. More complex installation;
- the impossibility of carrying out repairs without dismantling and destroying the structure.
We produce PCB network layout
Once the piping layout method has been determined and the dimensions of the plumbing fixtures are known, we can design the layout of the system that will need to be installed in the apartment or house.
The plan indicates the exact locations for equipment installation. All measurements must be taken with utmost precision. Before starting welding, please review the following guidelines. These rules are simple:
- Pipe products must not intersect.
- Sewage and water supply are laid as close as possible.
- The whole system should be simple.
- Vertically located branches are equipped with flexible hoses.
- Professional plumbers call the PP range the most suitable option for installing any type of main wiring. The key feature of these products is their easy installation, specifically, soldering, which can be done by yourself.
How to choose a welding machine for soldering polypropylene pipes
 Choosing a welding machine is not difficult if you carefully study the recommendations of specialists. If welding a main pipe up to 63 mm in diameter, the use of couplings and sockets is recommended. If the parts to be joined are larger than 63 mm, then the butt welding method is better for polypropylene pipes.
We weld pipes up to 40 mm in diameter using a socket welding machine for polypropylene pipes. When the cross-section of the main pipe is larger than 49 mm, a device with a centric device helps to secure the elements together.
Equipment for welding polypropylene pipelines is conventionally divided into the following types:
- Mechanical. These devices are used for large-volume pipelines.
- Manual. This type of unit is ideal for DIY use. They can connect lines with a capacity of up to 125 mm.
The choice of welding machine should be based on the specifics of the system being built. It's also important that the kit includes a set of nozzles. This will allow you to work with pipelines of varying volumes.
In addition to the above, a novice craftsman should be aware of the importance of avoiding cheap tools. Their attachments are typically equipped with a low-quality coating. Consequently, it's impossible to weld a high-quality structure with such a device.
A home handyman should choose a dedicated small welding unit. This will be sufficient for the needs of a household main line.
Welding polypropylene pipes yourself isn't a difficult task if you've learned the entire procedure and have the desire to tackle the job. Any electric welding machine will be a great help. And purchasing a complete set of necessary attachments can save you significant money and time.

I'm so grateful! Thank you so much for this material! You were the only place I could find specific information on plastic pipes! Thank you again! Stay healthy! I was looking for a plastic equipment installer. I found all the installer's work. This is my first time posting a comment and my first time here.