Plastic water pipes made of polypropylene are becoming increasingly popular, in part because the installation technology is very simple and can be done independently.
But to do this, you need to know how to properly solder polypropylene pipes, because this is the main operation that determines the durability of the entire system.
Installing plastic pipes for internal wiring is a fairly simple, but labor-intensive process, so first of all, you need to understand how to properly solder polypropylene.
- Properties of polypropylene
- Which polypropylene products should you choose?
- Equipment for polypropylene installation
- Preparing for the installation of a water supply system made of polypropylene pipes
- Selecting a connection diagram
- Operating temperature conditions
- How to solder polypropylene pipes yourself
- How to properly solder using the diffusion method – step-by-step instructions
- How to solder using the socket method
- Soldering using the end method
- How to properly solder reinforced polypropylene
- Cold welding in polypropylene joints
- Connecting polypropylene pipes with electrofittings
- Soldering pipes in difficult areas
- We install saddles into the plumbing system
- Video on how to choose a polypropylene welding machine
Properties of polypropylene
 One of the many materials in the plastic family, polypropylene is a product of the polymerization of two gases, ethylene and propylene, mixed in a specific proportion. The result is granules, which are then extruded into various products.
Water supply products are made from PPR plastic, which has the following characteristics:
- operating temperature range from -10 to +90 degrees;
- plastic starts melting at 149 degrees;
- nominal pressure from 1.5 to 2.5 atmospheres.
 The parameters listed are suitable for cold water supply, but the need for a broader range of characteristics is obvious. Therefore, certain technological measures are taken to enhance them.
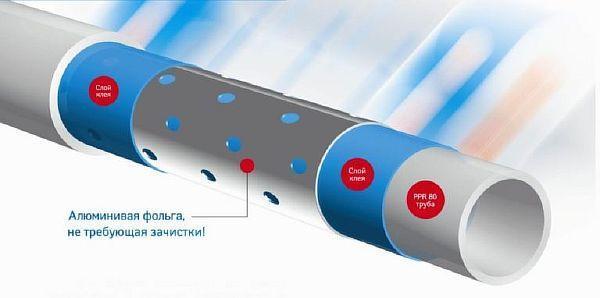
One method is to reinforce the walls with fiberglass or aluminum. This involves laying a layer of fiberglass or aluminum foil over the finished pipe, followed by another layer of polypropylene.
This design allows us to produce polypropylene pipes that are even suitable for use in heating and hot water supply systems.

A radical method for reinforcing polypropylene products is the installation of a metal layer. For this, aluminum foil is used in strip form.
It is wound onto the workpiece in a helical pattern over a layer of adhesive, and a second adhesive layer is applied over the metal foil. The outer shell is made of the same polypropylene.
Such products are suitable for use in water supply systems with high pressure up to 6 atmospheres.
Which polypropylene products should you choose?
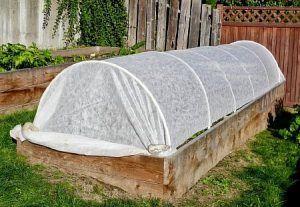
For low-pressure cold water supply networks, PN16 products are the most practical. They easily withstand pressures of up to 2 atmospheres at temperatures up to +40°C. This is sufficient to withstand the loads of a water supply system in a private home or an irrigation system in a greenhouse or vegetable garden.
More resistant to various impacts are polypropylene products of the PN20 brand, which are considered universal and can be used, among other things, for heating with a coolant temperature of up to 95 degrees.
But the most reliable pipes for any water supply system are PN25 pipes, reinforced with aluminum or fiberglass.
Equipment for polypropylene installation
Polypropylene water pipes have their own assembly requirements, determined by the properties of the source material. Before soldering polypropylene pipes, you must purchase specialized tools.
 Its set is not very extensive, but it does contain some devices that are used only for this process:
Scissors for cutting polypropylene products. They are needed to ensure a strictly perpendicular cut. If a gap forms at the joint during soldering, there is a risk of leakage.
A shaver is a device used to clean the surface of products before soldering. Without this device, soldering polypropylene pipes, even those reinforced with any materials, is impossible. This is because soldering polyethylene is a diffusion process, which involves the mutual penetration of molten material.
 Naturally, aluminum or fiberglass are unsuitable for this purpose. This tool can also be used to chamfer the ends of the parts being joined at a 45-degree angle to facilitate joining during soldering.
There are many design solutions for this device, so when purchasing a tool, you are guaranteed a wide choice.
Soldering iron. The primary tool used for soldering polypropylene water pipes. Its core is a plate onto which interchangeable bushings of various sizes are attached. These nozzles come in pairs—one for the fitting, the other for the pipe.

The parts to be joined are mounted on a replaceable tool. The device is activated via the handle, which also houses the temperature control. The heating time for the mating parts is 6 seconds or more.
Recommendations for this parameter are provided in the soldering iron's specifications. The parts are heated to melting point and held together for up to 30 seconds. During this time, the material cools until it hardens.
Typically, the tool kit also includes a screwdriver for installing the replaceable tool, a marker for marking, and a tape measure for taking measurements.
Preparing for the installation of a water supply system made of polypropylene pipes
It is safe to say that high-quality preparation for wiring assembly largely determines its functionality and durability.
In addition, one of the main objectives of these activities is to calculate the actual need for water supply elements.
Selecting a connection diagram
Currently, there are two main common schemes for installing pipe wiring:
Tee — with this system, each water consumer is connected to a central pipe connected to a riser. Tees are used for this purpose.
The disadvantage of this scheme is the fact that, that when opened simultaneously several taps, the pressure in the supply pipe drops sharply and water flow at each of them decreases. The draw-off points located far from the riser are particularly affected.
The second negative aspect is that if the need for routine repairs arises, the entire water supply system has to be shut off for that time.

Tee-type systems are used in apartments or small private homes. Their advantages include ease of installation and relatively low material consumption.
Collector wiring diagramThis method of forming a water supply network consists of running a feeder pipe from the riser to the topographic center of the water supply system and ending with the installation of a comb.
The manifold is a short pipe with threaded outlets for a ball valve installed on it. This forms a distribution unit, from which the water is piped to the points of consumption.
As a result, it's possible to shut off any water consumption point individually. The rest of the system continues to operate normally with the same water flow.

Operating temperature conditions
Manufacturers of plumbing products declare a maximum coolant temperature of 95 degrees Celsius. However, the physical properties of the material differ somewhat from this figure.
Polypropylene begins to soften at temperatures around 140 degrees Celsius, and melts at 175 degrees Celsius. Given these parameters, it can be concluded that this material is suitable for all heating systems, with the exception of steam.
The operating temperature in steam pipelines is exactly 175 degrees.
It would seem that what could be better? But the peculiarity of the material is that it changes depending on the temperature in At 135 degrees it starts to soften.The wires begin to sag, become thinner, and eventually break.
Manufacturers of polypropylene pipes officially declare a significantly lower permissible temperature, wanting to insure their products and make them more durable.
It should be noted that in a properly equipped home with sufficient thermal insulation of the walls, this operating temperature is quite sufficient.
It should be noted that in heating systems it is advisable to use reinforced polypropylene pipes, which have a number of advantages:
- Stable linear expansion of plumbing components under thermal and mechanical loads. They withstand pressures up to 10 atmospheres without noticeable change.
- The service life of a reinforced pipeline, constantly under pressure at elevated temperatures, is several times longer than that of a non-reinforced product.
- The melting point in both products is the same, but under equal conditions, a pipe without reinforcement will collapse, while a reinforced one will not.
How to solder polypropylene pipes yourself
The process of soldering polypropylene products is simple and therefore has become widely used in the installation of cold and hot water supply systems and heating systems.
However, there are some subtleties that you need to know and take into account in your work.
How to properly solder using the diffusion method – step-by-step instructions
The soldering process is based on melting the surface of a component to a certain depth. If two components are joined in this state and allowed to cool, the material returns to its original state and assumes its original structure.

The execution of a joint involves the following technological operations:
- Cut the pipe to the required length using special scissors.
- Chamfer at 45 degrees on both ends.
- Clean and degrease the surfaces to be welded on the outside of the workpiece and the inside of the fitting.
- Install the nozzles of the required size on the soldering iron.
- Turn on the soldering iron and heat the mating parts for the time specified in the instructions.
- Remove the parts from the soldering iron and join them in the desired position. Hold them there until they cool completely.
Careful attention must be paid to the heating time. To ensure a high-quality joint, a solid base must remain beneath the molten plastic. This will allow the parts to fit together coaxially. If the parts are overheated and the plastic softens throughout its entire thickness, they will be impossible to join; they will simply collapse.
Therefore, tool manufacturers recommend time intervals for each size separately.

The table below shows how much time is required to complete each assembly stage to a high standard. As you can see, the conditions are quite stringent.
When soldering yourself, it is important to make several test joints before starting work to get a feel for the durability of the temporary materials.
It's also important to pay attention to the axial alignment accuracy when mating parts. This will leave only a few seconds for inspection and correction.
How to solder using the socket method
This connection method is used to connect items to extend straight sections. A coupling fitting is used for this purpose.
Soldering using the end method
 It's more commonly referred to as welding. The operating principle remains the same: melting the material, pressing the two ends together in a special mechanism, and cooling. This joining method is used for parts with a diameter greater than 63 millimeters.
Butt-welding using this technology can be successfully used in the field. How to butt-weld polypropylene pipes evenly?
To do this, it is necessary to carry out preliminary mechanical processing of the ends, ensuring absolute parallelism of the joined ends.
How to properly solder reinforced polypropylene
The reinforcing layer strengthens the structure of the polypropylene pipe. It creates a certain barrier to joining the individual parts. The reinforcing insert prevents material diffusion, resulting in an unreliable connection.
The only way to ensure a secure connection is to remove the reinforced layer. Removal of the outer and reinforcing layers is performed using a special tool called a shaver.
After cleaning the top layer, you need to carefully remove burrs and clean the surface from contaminants, after which you can perform soldering using the technology described above.
To understand the temperature at which to solder reinforced polypropylene, it is necessary to take into account that its structure is no different from ordinary pipes and the soldering conditions are the same.
Cold welding in polypropylene joints
 This two-component epoxy adhesive has gained popularity due to its effectiveness. Its ease of use is appealing—simply knead a small lump of the adhesive and apply it to the surfaces to be bonded. The mixture cures in about 10 minutes, and fully sets in about an hour.
The physical properties of the adhesive do not allow it to be used on hot water or heating pipes. It is only suitable for plumbing installations.
Connecting polypropylene pipes with electrofittings
This assembly method is widely used in industry. Electrofittings are used to make joints. A heating element is installed in the part body during manufacturing.
 The system is installed without soldering, but each fitting is connected to the power grid. Only after the wiring is complete is power applied.
Under the influence of current, the heating elements melt the mating parts to the required temperature, and the switch is switched off automatically. After the parts cool, the entire network or its local section is ready for operation.
Using this installation method significantly increases productivity and eliminates the personal factor during work. Therefore, the quality of connections is consistent throughout the entire water supply network.
This technology allows for high-quality assembly of pipeline elements in hard-to-reach places.
Soldering pipes in difficult areas
When assembling a complex plumbing or heating system, access to the soldering area may be a challenge. How do you solder polypropylene pipes in hard-to-reach areas?
During preparation, the entire network must be roughly divided into individual nodes that can be connected on a workbench. The completed branches are then welded into the system at two or three points. The following sections can be considered difficult to install:
- pipelines placed under the ceiling;
- in places where it is impossible to place a soldering iron.
The best way to avoid difficulties in this case is to prevent them from arising. To do this, think through the assembly sequence, fabricating complex components on a workbench rather than by hand. If this is not possible, it's better to use electrical fittings.
In general, difficulties of this kind arise from design errors. Efficient installation is a key requirement for the designer.
We install saddles into the plumbing system
This pipeline element is used to create an additional branch, and the need for its installation usually arises during repairs to existing distribution systems.
To do this you need:
- The craftsman needs to drill a hole of the required diameter into the wall of an existing pipe, remove burrs, and chamfer it.

- The mating parts are heated with a soldering iron using traditional technology.

- The saddle (fitting) fits tightly into the hole in the pipe.

This method of creating additional branches in a water supply system made of polypropylene pipes allows for the continued development of the network with minimal labor intensity.
Knowing how to properly solder polypropylene will allow you to easily install pipelines of any length and complexity.