It's hard to imagine a sauna without a stove, as it not only heats the room but also ensures comfort and enjoyment during the sauna experience.
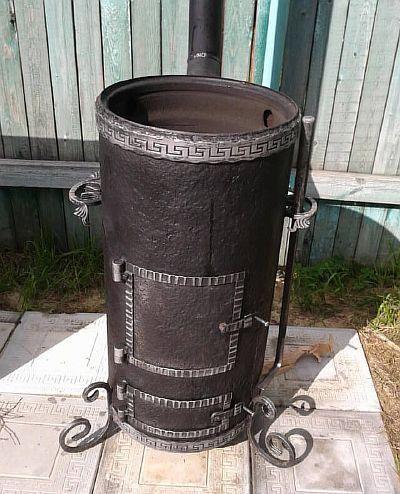
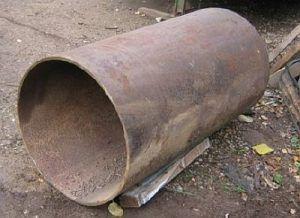
A sauna stove is easy to build yourself, it will function well, and it won't require much time or money. The simplest model is a sauna stove made from a large-diameter pipe. Its construction doesn't require any special experience or knowledge in this field.

- Pros and cons of such ovens
- Types of ovens - horizontal and vertical, selection features, pros and cons
- Vertical
- Horizontal
- What we need - tools and materials
- Diagrams and dimensions of vertical and horizontal furnaces
- Horizontal model diagrams
- Vertical furnace diagrams
- The process of assembling the stove
- Foundation
- grate
- Chimney
- Assembling the horizontal model
- Assembling a vertical oven
- Brick lining
- Painting and bluing
- First firebox
- Video review of sauna stove design errors
Pros and cons of such ovens
The required properties for the material used in stove construction include heat resistance, strength, durability, and corrosion resistance. Furthermore, it must withstand sudden temperature changes and exhibit good thermal conductivity.
The ferrous metal used to make thick-walled pipes with a diameter of 500-600 mm is not completely corrosion-resistant. However, it is ideal for building a sauna stove yourself, as it meets virtually all the requirements listed above.
With walls at least 8 mm thick, the sauna stove has sufficient thermal capacity to retain heat even after the fuel has burned out. Its round cross-section allows for efficient heat distribution.
The use of a round pipe for a sauna stove reduces the length of the weld seams - these are the very first places where corrosion occurs, and it's through them that carbon monoxide escapes. Furthermore, this option remains the cheapest, even though ferrous metal prices are rising.
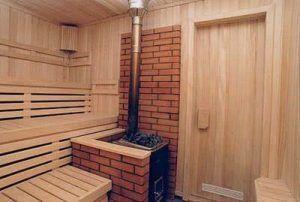
Types of ovens - horizontal and vertical, selection features, pros and cons
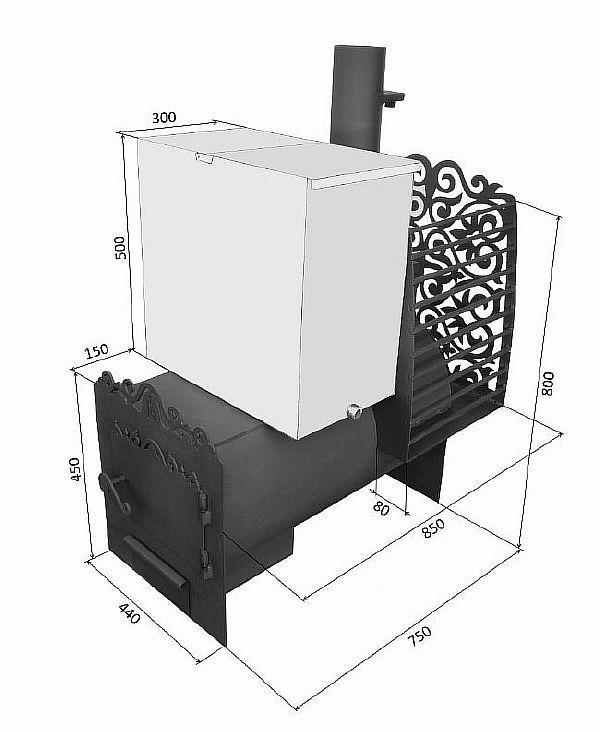
A homemade sauna stove made from a pipe, while simple in appearance, does an excellent job of heating the steam room. It comes in either vertical or horizontal configurations. The choice depends directly on the size of the steam room and the owner's preferences.
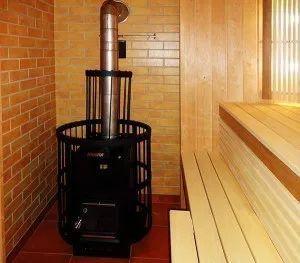
Vertical
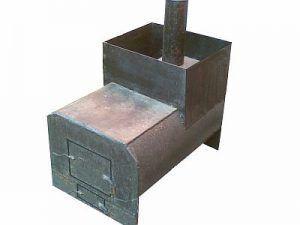
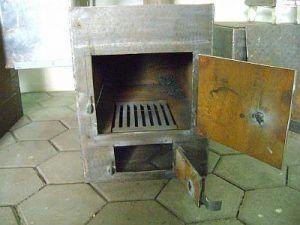
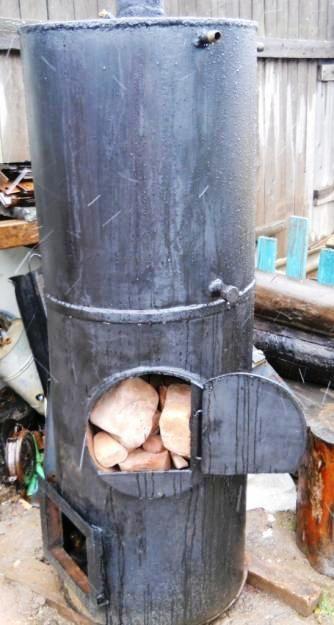
Externally, this stove resembles a common potbelly stove, but has distinct design features. In addition to the firebox and a compartment for storing stones, there's a special tank for heating water. This type is ideal for a small sauna.
The firebox and grate are positioned one above the other in a stepped fashion, saving space. Therefore, this model is gaining popularity for installation in saunas.
However, it's worth noting that it's less efficient, as heat escapes upward, preventing the walls from warming up. Furthermore, fuel burns faster in a vertical design. The main drawback is the location of the firebox and the draft chamber in the steam room.
Horizontal
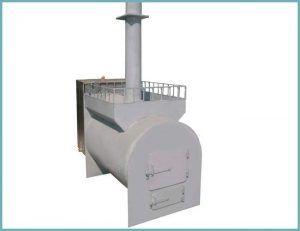
The horizontal shape is recommended for bathhouses with a large area.It's equipped with a compartment for storing stones and a water tank. The firebox is larger, and its doors and ash pit are located at the end of the chimney; they often open into the room before the steam room, which speeds up the heating process. This arrangement is also more convenient, as there's no need to enter the steam room when lighting the fire, and it doesn't cool down.
Unlike the vertical type, this type of sauna stove requires more space, but since the firebox is longer and located at the bottom, it significantly increases the heating area and improves the natural exchange of warm air in the sauna. Therefore, experts recommend this model if the sauna space allows.
What we need - tools and materials
Before you begin building your own sauna stove from a 530 mm pipe, you should prepare a work area and stock up on the necessary tools:
- welding machine;
- grinder with different attachments;
- electric drill;
- locksmith tools;
- door handles;
- with a built-in tap;
- with an asbestos cord.
In addition to the tools, you will need the following materials:
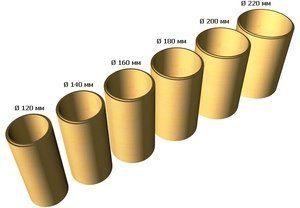
- Thick-walled metal pipes for the firebox and water tank, with a diameter of 500 to 650 mm, a wall thickness of 8-16 mm, and a length of 1.2 to 1.5 meters. Also included is a carbon monoxide exhaust pipe, with a diameter of 120 to 150 mm and a wall thickness of 2-4 mm.
- A steel pipe where the stones will be placed. Its wall thickness is 5-8 mm, and its diameter is 350 mm.
- Sheet metal, size 600 by 800 mm, having a thickness of 8 - 12.
- Overhead steel hinges.
- Water pipe - a small piece of pipe, suitable diameter ½ or ¾ inch, length 50 - 80 mm, and a ball valve with similar threads.
- Metal reinforcement bars - 500 mm, diameter 12 - 18.
- Cement.
- Brick.
- Sand.
Diagrams and dimensions of vertical and horizontal furnaces
After selecting a model, before building your sauna stove yourself, a drawing should be drawn. It must reflect all the stove's parameters and configuration. A properly drawn drawing will not only facilitate installation but also avoid operational problems.
The diagram should show the main parts of the stove. If you're building a sauna stove for the first time, it's best to use a pre-made diagram.
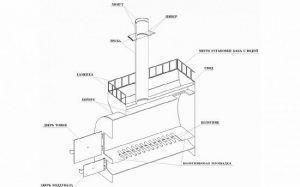
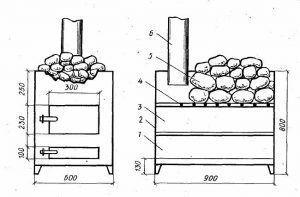
Horizontal model diagrams
It is the model with a horizontal pipe that is most often installed in baths, if space allows.
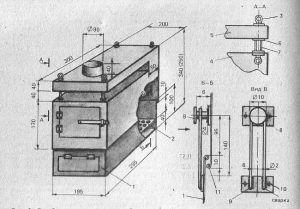
Vertical furnace diagrams
As with the horizontal oven, a pipe with a diameter of 530 is also ideal for the vertical model.
An example of a drawing of a vertical sauna stove that is easy to install yourself.
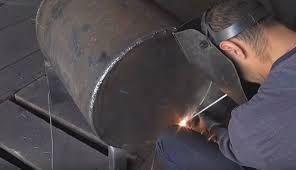
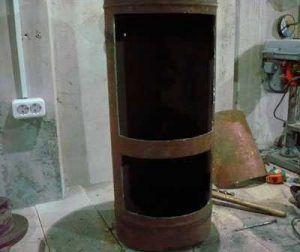
The process of assembling the stove
Naturally, a homemade sauna stove made from a pipe won't look super-perfect. However, it looks quite decent and will perform its main function just as well as a factory-made model—even heat distribution.
When installing a stove in a sauna, it's important to remember that it carries a burn hazard and must comply with all fire safety regulations. Therefore, the following installation rules must be followed:
- it must be placed on the foundation, 0.2 meters away from the wall;
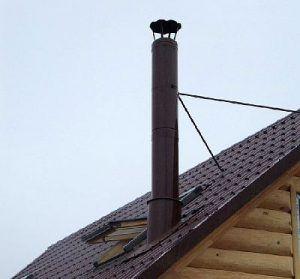
- at the point where the pipe comes out, a 120 mm thickening should be made, and it should protrude above the roof by at least 0.5 meters;
- all wooden elements must be treated with an insulating compound containing clay;
- the section of the chimney between the ceiling and the roof must be plastered and lime mortar applied;
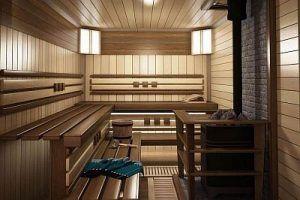
- Place the shelves near the wall where the stove is installed.
Foundation
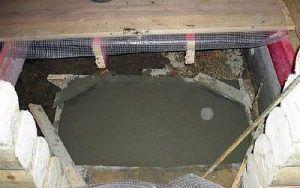
The independent manufacture of any model of sauna stove begins with the installation of the foundation.
- At the location in the bathhouse where the stove is planned to be placed, it is necessary to dig a hole 0.5 meters deep, and the length and width can reach 0.7 meters.
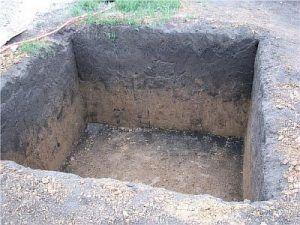
- Fill it with 0.3 meters of crushed stone, small fractions, and compact it well.
- Prepare a solution of cement and sand in a ratio of 1 to 4, dilute with water.
- Pour the solution into the hole and leave it for 24 hours so that it dries and becomes hard.
- You need to put roofing felt on top; it will protect against moisture.

- Prepare a concrete solution consisting of cement, sand, fine gravel and water in a ratio of 1 to 2 to 4. Pour the resulting mixture over the roofing felt.
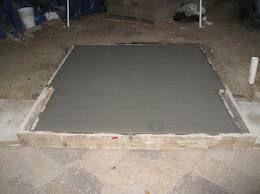
- Level the base well with a building level.
Once the mortar has dried, you can use brickwork for a more aesthetic look.
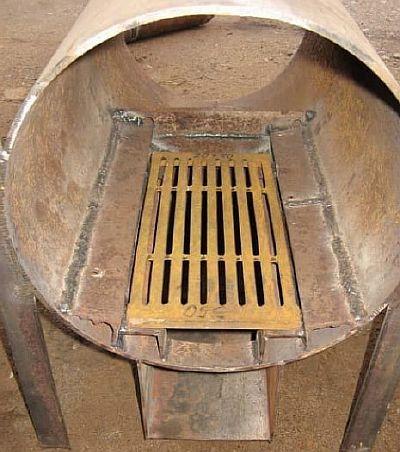
grate
A grate is a special grate that provides draft. There are two ways to make a grate.
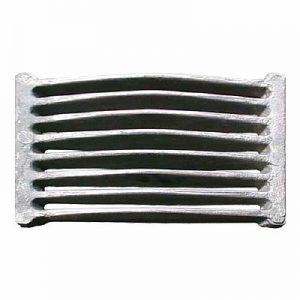
First:
- Cut out a metal rectangle 10–12 mm thick, the size of which corresponds to the parameters of the pipe inside.
- In the manufactured part, remove the middle, leaving space for welding along the edges.
- Weld metal rods to this frame, placing them horizontally or vertically.
Second:
- Cut a circle out of metal, its diameter should match the pipe inside.
- Cut large holes in the circle to create something like a sieve.

The structure is welded inside the pipe and is located 15-20 cm from the bottom.
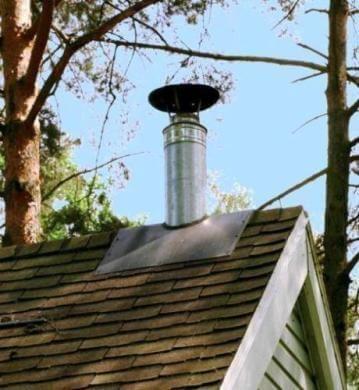
Chimney
This design element is an important part of any furnace; it is necessary for the release of combustion products.
Chimneys come in:
- Ceramic ones are the most resistant to high temperatures. These models have the longest service life.
- Brick - since the surface is rough, soot accumulates quickly, which leads to a slowdown in air flow.
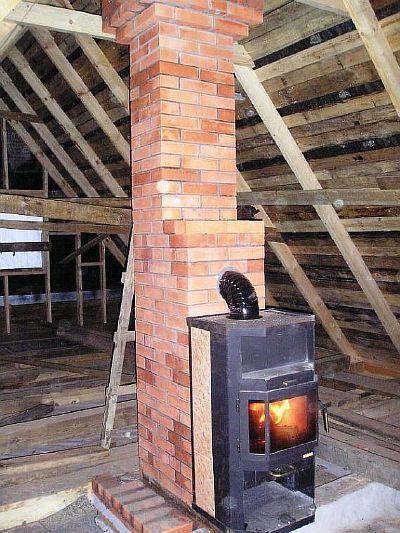
- Steel is the most suitable option for a homemade sauna, as it's inexpensive. The material is lightweight and extremely durable, and it withstands temperature fluctuations well, as well as being water and corrosion resistant. It heats up quickly, so a water tank can be placed on it for subsequent sauna sessions.
The assembly process is simple:
- First, you need to mark the place for the hole and make it according to the marks.
- Attach a steel casing to the pipe, place the rings on it, and secure them to the ceiling. Secure the bottom edge with screws.
- Extend the other end onto the roof. Expanded clay, clay, or asbestos can be used to fill the gaps between it and the roof.
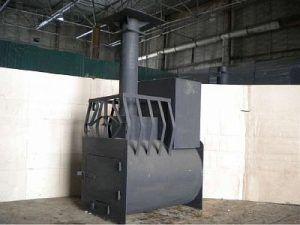
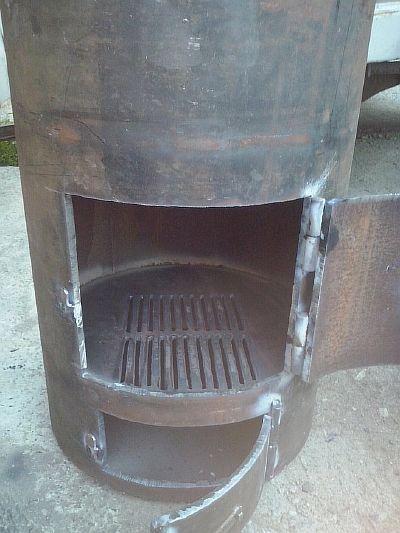
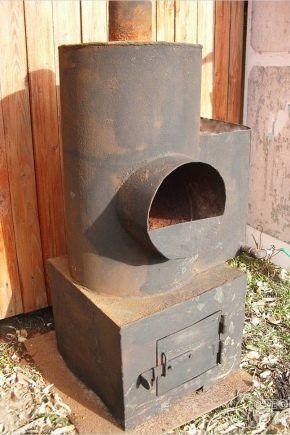
Assembling the horizontal model
A sauna stove made from a horizontal pipe has a heater located outside, and the tank is wall-mounted. The advantage of this device is its compact size and deep firebox. It ensures complete combustion of the fuel, which means more heat enters the sauna.

The instructions for making your own horizontal sauna stove are as follows:
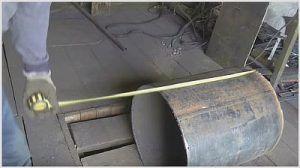
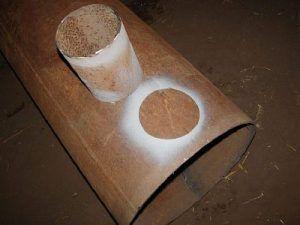
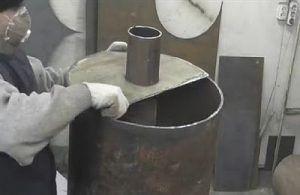
- You'll need a 2-meter, 500mm diameter, thick-walled pipe. Mark it. To do this, lay it on its side on a flat surface, secure it, and, leaving a 1/3 diameter offset from the bottom, draw two horizontal, parallel lines on it.
- A round base for the firebox is cut out of metal, the size of which is equal to the length of the pipe, and the width corresponding to the distance between the lines.
A rectangular or square window is made in the center of the circle, into which a grate should be installed. It may be possible to simply weld reinforcing bars to the bottom of the window to form a grate.
- The base is inserted into the main pipe of the stove strictly according to the marks and is fixed by welding inside it.
- Two blanks are made from thick-walled sheet metal, with their lower portions serving as the device's legs. The width of the walls should be 20 mm wider than the pipe diameter. To achieve an aesthetically pleasing appearance, the front wall is rounded, while the rear wall remains rectangular, where the water tank will be mounted.
- A firebox opening and a draft-boosting compartment are cut into the stove's front wall. The lower edge of the firebox opening is positioned 0.03 meters above the base of the firebox. The upper edge of the ash pit is positioned 0.01 meters below the stone container.
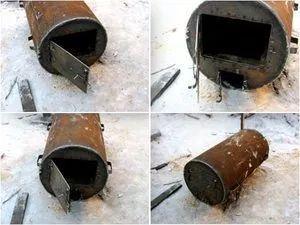
- Doors are made from the cut-out pieces. They are welded to the front of the stove with hinges near the openings. Handles and latches are attached to them.
- Each end strip is attached to the base of the pipe and secured with a weld over the entire area.
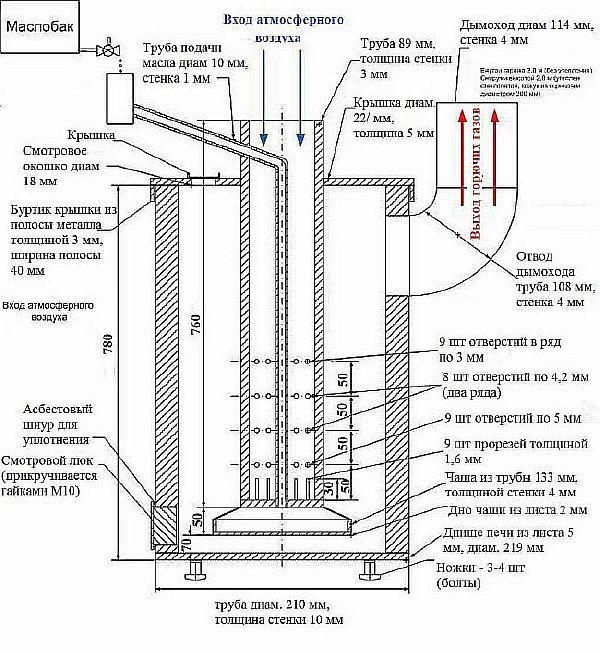
- To increase the stove's heat output, it is recommended to install an additional chamber between the firebox windows and the chimney; this chamber transfers the accumulated heat to the stone. You will need a 350 mm pipe, 0.35–0.45 meters long. It should be cut in half horizontally. One end is welded shut with a semicircular plug.
- A hole is cut in the top of this device, slightly offset from the center. The size of the opening should be equal to the diameter of the chimney. A 0.1-meter pipe is inserted into it to connect to the chimney.
- A 150 mm round hole is made at the top of the main structure, not far from the rear wall. Next, the prepared dome is installed into the stove pipe so that the two openings are slightly offset from each other. It is then welded to the main pipe.
- The final step is to create a metal basket around the additional chamber, made from welded rebar. This will hold the stones. A water tank is attached to the back wall, and you can begin testing your homemade pipe sauna stove.
Advice! Since the firebox and draft-enhancing window are located in the room in front of the steam room, it is recommended to protect the wall around the door with metal plates.
Watch the video
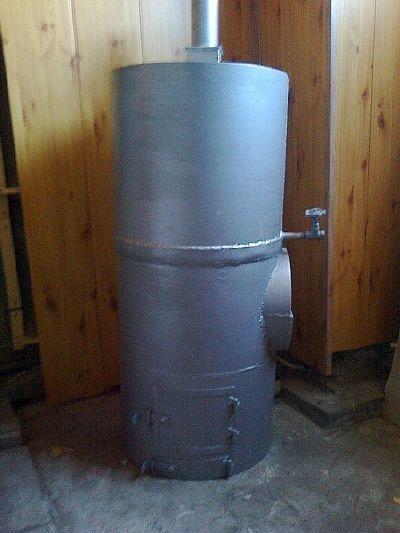
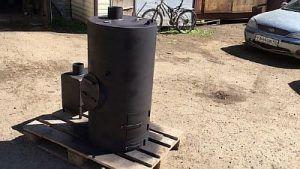
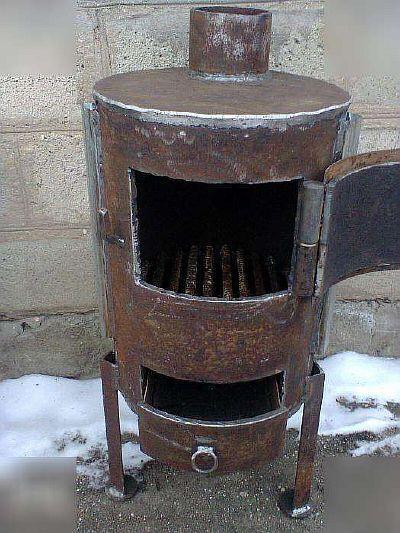
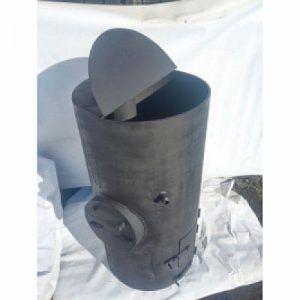
Assembling a vertical oven
A vertical sauna stove is a little more difficult to assemble yourself, as the stones are placed directly into the firebox.
The step-by-step algorithm of work looks like this:
- A hatch for the ash pit is made in the thick pipe. It is needed to allow air to enter instead of burning fuel and to collect burnt ash. It is cut with a grinder, leaving a 0.04 meter margin at the bottom, and measuring 0.24 by 0.08 meters.
- The firebox is designed 200 mm above the top of the ash pit. It should be aligned with the ash pit. To achieve this, a small rectangular opening (0.24 by 0.20 meters) is cut above the grate. The cut metal pieces will be used as the door, so they must be cut carefully using thin discs.
- A loading container is made for the stones; it is positioned slightly above the firebox (0.12–0.18 meters). This circular opening (350 mm) is moved along the pipe by 90 degrees in the desired direction.
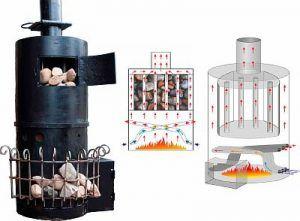
- The second pipe, 350 mm in diameter, is cut to a length equal to the outer diameter of the larger pipe. A scoop-shaped piece (¾ of a piece) is cut off at the top, slightly indented from the front edge. A wall is welded to the back of the scoop, and a semicircular plug is welded to the front end. This plug is used to place stones and add water to them during the steam room.
- This scoop is inserted into the opening of the main body of the sauna stove. It should extend 20 mm beyond the stove, with space around it. The perimeter of the opening must be welded securely. If necessary, the scoop can be additionally secured with reinforcing bars, which are pre-welded to the inside of the main structure.
- A prefabricated grate is welded in place; it will serve as the base of the firebox. It is positioned parallel to the floor, 0.02 meters from the top of the ash pit.
- Cut a metal circle the same size as the outside diameter of the pipe and weld it to the bottom of the heater. If you plan to raise the heater above the floor, you can weld on legs made from angle iron.
- A water tank is constructed to house the chimney. The tank's side walls form the stove's main flue, and its bottom forms the top of the firebox.
- The bottom of the tank is made of metal, sized to match the diameter of the stove's flue pipe. A circular opening should be made in this part, 0.05 meters away, to enhance draft. A chimney is welded to this opening, positioned higher than the stove itself.
- The bottom of the barrel with the chimney pipe is installed in the furnace body; it should be located 100–120 mm higher than the container for stones, and away from the scoop.
- The installation is checked for correctness, and the bottom is secured with welding. A hole is drilled in it, into which a water pipe is inserted and welded. A ball valve is attached to it.
- The top of the water tank is assembled from two pieces: one welded, and the other mounted on hinges. Two metal semicircles need to be made, one with a chimney opening. The opening should be welded tightly, and the other piece should be attached to hinges so it can be opened.
- The final stage is the installation of the almost finished device and its attachment to the prepared foundation.
- Hinges are welded to the body, and firebox doors and windows are attached to them to enhance draft. Handles and latches are pre-installed.
- The stove is checked for leaks - fill the tank with water and check if it leaks.
Important to know! To reduce the risk of scalding from steam when water is added to the heater, it is recommended to locate the doors to the compartment in a secluded corner where there are no benches for people.
Advice: The stove made from a pipe in a bathhouse should be turned so that the seam passes under the grate; this will reduce the load on it.
Watch the video
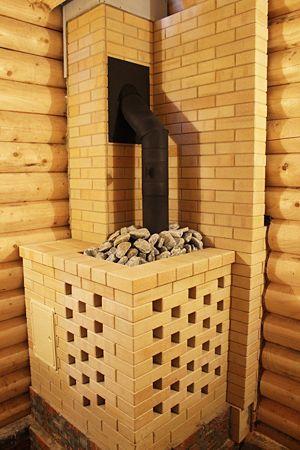
Brick lining
To give a metal stove in a bathhouse an aesthetic appearance, it can be lined with brick.
There may be different cladding options:
- Solid – rapid heat transfer, which leads to reduced device performance. This is purely a decorative detail.
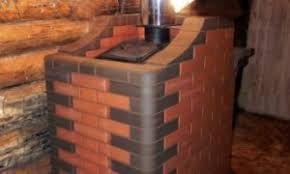
- A heat shield is a small stone enclosure. This model increases heat output and ensures comfort for those relaxing near the stove. The standard width and length are 0.7 meters, and the height is 1.2 meters.
- A convector with vents is a universal type; it can be used to design any metal structure of varying sizes.
Painting and bluing
To make the sauna stove you built yourself look more appealing, it's recommended to decorate it. There are several ways to do this:
- Paint. There are many special heat-resistant paints available these days. Avoid aluminum paint.
Important: Experts recommend choosing a dark paint color, as a dark-painted stove with a rough surface distributes heat better. A chimney with a smooth, shiny surface, however, transfers heat poorly.
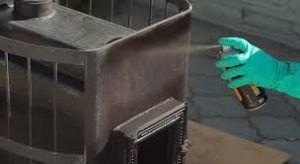
- Blueing is a surface treatment using chemical compounds. These compounds not only protect the device from corrosion but also add aesthetic appeal. There's no need to buy this compound; you can make it yourself. For one liter of water, you'll need 4 grams of butyl alcohol and 150 grams of phosphoric acid.
Before applying, it's best to thoroughly clean the metal surface of the pipe to ensure the composition lasts longer. Afterward, heat the oven to 150°C (392°F) and apply caustic soda to the metal for an hour.
First firebox
A test firing is essential to test the structure and seam tightness. The process is as follows:
- It is necessary to open the damper and the blower.
- Place firewood and set fire.
- Close the door and supply oxygen to the upper compartment.

It is necessary to monitor the process, the presence of draft and check the tightness of the seams.
A homemade sauna stove made from a pipe is not only an excellent and affordable option, but also a wonderful alternative to factory-made models. Moreover, such a stove will meet the individual needs of your steam room and your personal preferences.