For owners of private homes or simply country plots, the topic of building canopies has always been, and remains, relevant.
It is possible to hire a group of builders to solve this issue, but the installation is distinguished by simple instructions.
There's no better material for such a structure than metal profile pipes. This makes building a canopy from profile pipes easy for anyone.
About the material and its advantages
- Strength characteristics are maintained at a high level due to the geometrically correct shape. The smooth walls on opposite sides act as natural stiffeners. This is how all DIY canopies made from profile pipes are constructed, photos of which are available on our website.
- The profile structure can easily be either straight or curved.
- The production technology for profiled pipes is much more accessible than that of solid-rolled alternatives. Therefore, their cost is significantly lower than that of other types.
- The frame maintains high stability but is relatively lightweight. This is due to the fact that the forms are assembled from a hollow core.
- You can easily use a welding machine and bolts to connect the forms together in both perpendicular and parallel positions.
- The frame belongs to the stationary or collapsible group.
- The wall thickness of the products used for installation does not exceed 2 millimeters. This allows the roofing material to be attached to the structure itself with minimal tools.

The DIY construction process and basic tips
Several types of profile pipes are available: unpainted, galvanized, and coated with a special coating. Savings can reach up to 30 percent by purchasing a clean product and then painting it yourself.
This article features photo and video tutorials, as well as canopy frame drawings. If you study everything carefully, you'll be able to easily build this structure yourself in no time.
Preparatory work
First, you need to decide on a location for the canopy. If you have a choice of several construction methods, the best option is a relatively flat surface or a raised area.
In this case, there will be no problems with drainage. All water will be collected in the lowland. This will result in additional costs associated with sewer installation.

It's important to start with a preliminary drawing of the canopy itself. It's important to consider not only the layout of the structural components but also the cross-section of the pipes.

A 60 x 60 mm section, for example, will only be sufficient if certain conditions are met.
- With a width of 3-4 meters.
- If the length does not exceed 4-6 meters.
A cross-section of 80 x 80 millimeters is necessary if the frame dimensions exceed the parameters specified above. A drawing of a canopy made from profile pipe makes the builder's job easier.
What needs to be done next?
The top frame is made by hand from a 40 x 25 profile. The trusses for the six-meter canopy are then installed on it.
Depending on how often precipitation occurs in the region, it is necessary to select a pipe, not only for arches, but also for forms located in the transverse plane.
30 by 30 millimeters – this section is quite sufficient for creating small-area yard sheds.
 Roofing material is of great importance. Translucent and lightweight cellular polycarbonate is an excellent option for curved, arched roofs.
Fireproof metal profile sheet It's best used for erecting a straight canopy, either single- or double-pitched, in the barbecue area. The structure should be thicker if it's covered with heavy materials.
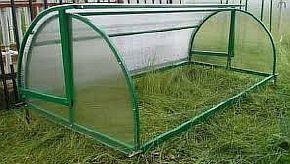
The light and curved shapes of the frame look attractive. There are special roller pipe benders, which allow you to set a specific bend in the pipe with your own hands.
Video
This device allows you to assemble the frame of the canopy with your own hands much faster using a professional pipe.
Watch the video
[sociallocker]
Let's move on to installing the canopy with our own hands.
This stage always begins not only with the installation of the support columns but also with markings. It is recommended to maintain a 2-3 meter spacing when installing the components.

The pipe cross-section will have to be increased if the spans themselves are larger. This makes the work more expensive.
A garden drill with a diameter of up to 30 centimeters will allow you to easily create the pits that are also necessary for installing the frame (drawings of the canopy frame are presented below in the article).
A depth of 60 centimeters will be sufficient. The bottom of the holes must be compacted thoroughly once all the holes are ready. Otherwise, the columns will settle.
A gravel or sand base up to 50 mm thick is compacted and backfilled before installation begins.
Next, the column itself is installed and then filled with concrete. For more precise installation, use a plumb line and a spirit level.
It's possible to do the job alone, but there's a high risk of error. Therefore, it's best to enlist helpers. Once the concrete has set, there's no room for correction.
Concrete is poured to the level where the excavation pit itself begins. For floors, you can either use a concrete screed or cover the surface with paving slabs.
Video
What other stages are included in the work?
Creating a small pit is essential, regardless of the materials used. This requires removing soil to a depth of 100-150 mm.
 After this, the surface can be easily compacted and leveled. It's best to cover the surface with geotextile if you're laying special paving slabs. This will prevent grass from growing through. A concrete screed is also an option, which is essentially the best option.
Gravel or sand are equally suitable for the base. A 50 mm layer is added. The material is then compacted.
Creating an optimal drainage system is impossible without this layer. It's always necessary for a project like a DIY canopy made from profile pipes, as the videos confirm.
After this, they move on to laying the reinforcement cage. A layer of concrete at least 50 mm thick must also be poured. This structure can easily support a load of up to 3 tons. There are also several other important steps.
- We take the upper part of the columns and make the frame around the entire perimeter.
- On a beam with a horizontal arrangement, it is necessary to place transverse trusses for the form in an inclined position.
- It is recommended to install parts at intervals of up to 80 centimeters if the roof is single-pitched or gabled.
- In general, the step is selected depending on the width of the polycarbonate sheets themselves.
- Most often they try to stick to the figure of 400 mm.
Video
Features of the roofing device
The canopy roof is the primary goal for all other work. Two factors determine the complexity of fabrication and installation:
- Step at the support posts.
- How long is the overlapping side?
As the length of the canopy and girder trusses increases, the design of the product itself becomes more complex.A three-meter span is the optimal solution, allowing for a standard area to be achieved at minimal cost.
There's a simple, single-pitched roof option. It's constructed using a simple purlin made from profile pipes. This issue is best addressed using rectangular profile elements.

One side of the beam cross-section, the larger one, is installed vertically. The side with the smaller parameters becomes the base.
The customer can select the profile size themselves, or they can hire a specialist. The main thing is to consider the expected load the structure will bear.
This, in turn, determines the weight of the roofing material, the length and pitch of the purlins, the climate zone, and so on.
Watch the video
[sociallocker]
If a welded truss is used instead of a solid purlin, the profile height is reduced. It's important that this structure not be too complex. A profile height of 6 centimeters is sufficient.
The examples provided correspond to a light load on the building frame, using minimum spans as a basis. Calculations will differ for larger or smaller sizes. Therefore, a customized approach is required when building canopies from profile pipes yourself.
Browse the drawings and choose the option that's right for you. Photos and videos will help you make the right choice.
See different drawing options: