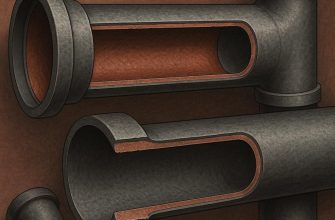
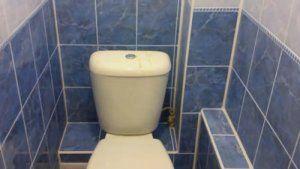
The toilet space is limited. The clutter of utilities makes the already small space feel overwhelming.
Even beautiful tiles are lost against the backdrop of pipes. Many homeowners prefer to hide these unsightly elements from prying eyes.
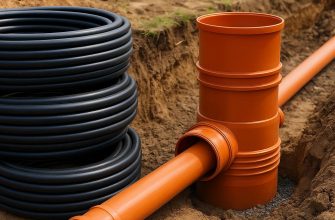
The wide range of building materials allows for options to suit any budget. Below, we'll explore the most common methods for covering toilet pipes and see photos of designs.
- Requirements for materials
- Covering Toilet Pipes with Plastic Panels – Instructions
- Features of work
- Application of plastic panels
- Features of marking application
- Installing the frame
- Sheathing the structure with panels
- Plastic box
- PVC toilet box: advantages and disadvantages
- How to cover pipes with plasterboard?
- Blinds or roller shutters
- Decorative blinds
- Roller shutters
- False wall
- Plumbing cabinets
- Masking by chasing
- Decorating pipes
Requirements for materials
A toilet is a room with a specific microclimate. Therefore, before hiding the pipes in the toilet, decide on the material.
 It must meet such important criteria as:
- Moisture resistance. Condensation is constant in the toilet. Water droplets settle on surfaces. Over time, unstable products begin to soak, leading to mold and mildew growth. Therefore, wiring should be sealed with products that are resistant to high humidity.
- Durability. Meters and ball valves require constant access. Special access hatches are installed for this purpose—their fragile structure won't withstand them.
- Aesthetics. Another important criterion. It's best if the product matches the overall decor of the bathroom.
Covering Toilet Pipes with Plastic Panels – Instructions
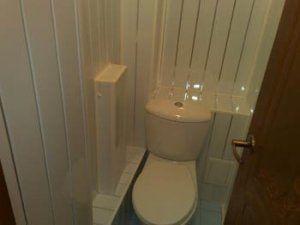
 Hiding pipes in a bathroom with plastic panels isn't difficult. The entire process doesn't take much time. However, it dramatically changes the look of the room. It's no secret that sewer and water pipes aren't decorative. Against a backdrop of beautiful tiles, they look out of place and significantly detract from the overall décor. This is why many people cover the pipes with various materials, with plastic panels being the most popular.
There are several ways to conceal water and drainage systems. The most common is a false wall. There are also other, more complex options. One is to create chases in the walls. Another option is roller shutters.
Drywall or plastic are often used to cover pipes. Experts, however, consider plastic to be more practical, as it can be easily removed from the frame during renovations. Another important advantage is its high resistance to moisture; it's completely impervious to it.
 To the listed positive aspects we add the following factors:
- short period of time for installation;
- low weight of the structure;
- increasing the noise insulation level;
- a variety of options allows you to choose a material for any interior design solution;
- affordable price;
- long time of use.
They are made of polyvinyl chloride, also known as PVC panels or siding. In cross-section, they are distinguished by a cellular structure.

The thickness of the lining is usually no more than 1 cm. Its width varies from 15 to 50 cm. The standard length is three meters. The most common size is 20-37 cm.
A wide range of colours makes it easy to choose a specific design solution.
To decorate the perimeter of the paneling fasteners, joints, and corners, moldings of various shapes are used. Painted white, they blend beautifully with any color scheme.
To install the paneling, you don't need a lot of tools (read below about which ones you'll need); the usual ones for finishing metal and wood will suffice.
As mentioned above, timber is not a good choice for a room like a bathroom or toilet. This is because the room is damp, which will have a negative impact on the wood. Even with protective solutions, the required protection is not achieved.
Modern manufacturers offer a wide variety of galvanized steel profiles and fasteners. To conceal pipes in a bathroom or toilet, a special profile is used. Its standard length is 3–4 meters. The cross-sectional dimensions are 20 x 20 mm, but they can be larger.
Features of work
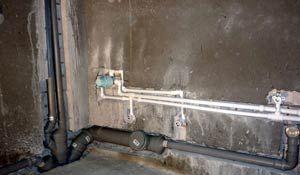
- Before hiding pipes, it's important to check their condition. They may need replacing, and this issue should be addressed before starting the sheathing. An emergency could arise after the entire structure is installed, requiring dismantling. Old steel and cast iron pipes require special inspection. These are highly durable and reliable building materials, but a thorough inspection can reveal cracks and chips, which can quickly become major problems.
- Once the issue with the pipes has been finally resolved, it is necessary to precisely determine the shape of the structure that will cover them.
Pipes don't take up much space. The size of the overall concealing structure depends on the location of the pipeline. After all, the riser can be located in a corner, or in the middle. Horizontal piping is most often located close to the floor.
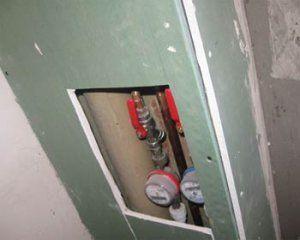
- We must not forget about valves, metering devices, etc.; hatches must be made to access them.

- If the pipes run through niches, it is recommended to cover such places with a false wall or make an L-shaped structure.
- Horizontally positioned pipes should be covered with a rectangular threshold. Around the sink, the threshold should be raised to match its height, and the empty space should be used for shelves.

Once all these points have been thought through, you can take care of the building materials and necessary tools.
Tools needed for sheathing:
- building level;
- knife (for assembly operations);
- profile (starting and guide);
- screwdriver and screwdriver;
- panels.
Before starting work, it's recommended to sketch out a small sketch, indicating all the dimensions of the future concealing structure. Also at this stage, the material for attaching the siding is determined.
It's important to note that glue isn't the best option in this situation, as the need to dismantle the structure may arise at any moment. From this perspective, self-tapping screws are preferable.
Application of plastic panels
Before covering the toilet pipes with plastic panels, you'll need to construct a false wall. The instructions for constructing it are as follows:
- Marking the ceiling and floor areas. Attaching the guide profiles to the floor and the studs to the walls.

- rack profiles are fixed in the corner parts of the structure;
- The profiles are mounted transversely with a half-meter indentation, otherwise the structure will not be rigid:

- frame sheathing.
The video provided explains the process in detail, making it easy for any beginner to complete.
By carefully studying the information provided, you can not only cover up an unsightly pipeline, but also create a beautiful decoration for the room.
Features of marking application
First, draw the outline on the floor. Use a square to check the angles. Once verified, the outline can be transferred to the ceiling.
IMPORTANT! To ensure precise alignment of the marks on the ceiling and floor, check the floor's horizontal alignment before marking.
Installing the frame
To cover the pipes in a toilet with plastic panels, you can't do without building a foundation. This construction is necessary not only when working with paneling but also when covering with other materials.
It's worth noting right away that experts say galvanized metal profiles are the most suitable fasteners for plastic paneling. They provide the necessary rigidity, and their protective treatment protects the metal from corrosion.
Many people use ordinary wooden blocks to close the system instead. However, this option is not considered the best because the wood must be treated with a preservative. This option also significantly reduces fire safety.
To cover the pipes in the toilet, you need to prepare a plastic frame. This option requires installing the panels using special clips. However, this frame has a major drawback: it lacks rigidity.
Construction of the frame begins with fastening the profiles to the floor. Vertical uprights are installed behind them. The cross ribs are installed at the very end. The profiles are fastened together with screws.
IMPORTANT! Don't forget to leave a window near the inspection hatch and fittings. This will be needed for access to the system. It is recommended to consider the location of this window during frame construction.
Sheathing the structure with panels
To close the sewer pipe, it is necessary to secure the panels to the installed base.
A starting molding is installed against the wall. It is attached to the profile using screws. This fastening is done through the shelf covered by the next plate. This way, the screw head will not be visible on the plastic sheathing.
 The protruding portion of the next panel is placed into the groove of the previous one and pushed in until it stops. The loose portion of the panel is secured with screws. Each wall of the prepared base is covered in this manner. Molding is installed at the outer corner. The joints between the structure and the ceiling and floor are finished in the same manner. It's important to remember that the frame shouldn't be completely closed. A ventilation hole should be made in the top of the structure; its diameter should be at least 5 cm.
This solves the problem of how to seal pipes. By carefully watching the provided videos, you can quickly complete this task.
Plastic box
The sewer can be concealed with a plastic box. This is one of the most common concealment methods.
The process includes several stages:
- Testing. Before starting work, check the operation of all devices, as well as the condition of components and connections.
- Sanitary treatment. Antiseptics are used to combat fungi. Before closing the drain, the wall is treated with a special solution. The toilet is a small, enclosed space with poor ventilation, so the risk of fungal spores developing is very high.
- It's necessary to install sheathing. This can be on all the walls where the box will be installed, or just in the areas where utilities run. The sheathing is made from metal profiles or wooden beams.
- Installing the frame. Covering the desired area with plastic doesn't take long. Each section must be secured precisely in place. Small nails will suffice as fasteners. Small gaps remain in the corners and at the joints. We hide these with inserts or decorative strips.
Please note! Cutting a hatch out of plastic is not practical. It's better to buy a ready-made one. It will be visible, so it should look presentable. A large enough model will provide full access to the devices located inside the box.
PVC toilet box: advantages and disadvantages
 PVC panel boxes are a very popular way to conceal utility lines. They're inexpensive, and their color range allows them to blend harmoniously into a room's interior.
They are popular due to the following characteristics:
- They are easy to use for sewing up communications.
- They are quite strong and light.
- They don't weigh down the interior.
- The plastic is resistant to moisture.
- With regular maintenance, there will be no problems with mold.
Compared to other materials, installing a sewer pipe in a PVC box will be cheaper.
How to cover pipes with plasterboard?
 This material requires additional finishing. And this doesn't limit your imagination. Otherwise, drywall has excellent properties. It's easy to conceal wiring. It's easy to install and remove.
Installing plumbing access panels is much easier. The material is environmentally friendly, moisture-resistant, and fireproof. Tile is used for further finishing. This is the most optimal way to cover the riser. Tile is easy to keep clean.
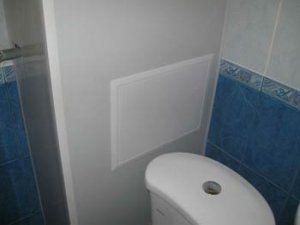
Several types of boxes are made from plasterboard sheets. Each type has its own installation requirements. For example, a blank wall is used for utility lines located behind the toilet.
To close off the area, sheets are installed around the entire perimeter of the opening. The frame is first secured with dowels and screws, followed by the sheathing. The final step is to install the drywall sheets.
A square plasterboard box is used for toilets where the utilities are located in a corner or occupy only part of the wall. To conceal the wiring, a metal profile is attached to the floor, walls, and ceiling. Next, vertical guides are inserted. Before installing the door, a window is made from a metal profile. Now the toilet system is covered with a sheet of plasterboard.
If the plumbing is located below, the sheathing is done using a multi-level box. A slanted false wall helps maximize available space. The profiles are attached to the floor, ceiling, and walls. Then a horizontal frame is constructed. Now the profile needs to be sheathed with sheets.
Step-by-step instructions for covering pipes in a toilet with plasterboard:
- Mark the future frame on the floor, walls, and ceiling. Attach the canopies to these marks. The profiles will be installed on them. Start from the floor, slowly moving up to the walls and ceiling. The next step is installing the extension profiles. The canopies and profiles are secured with screws.
- Now the frame is ready. It's time to install the drywall. The sheets are attached to the profile strips, secured with screws every 20 cm.
- We seal the gaps between the sheets with reinforcing mesh or putty. The mesh will prevent cracks from forming in the seams.
- The sheathing is ready. Several openings need to be made in the sheets and inspection hatches installed in them.
- Additionally, it is processed with putty and the final cladding is done.
Blinds or roller shutters
A practical way to conceal communications. But it also has its advantages and disadvantages. Below, we'll explore all the nuances in more detail.
Decorative blinds
 Many bathroom pipes are concealed with vertical or horizontal blinds. These serve as a kind of curtain, easily obscuring any unsightly appearance. When needed, they are simply rolled up, giving easy access to the pipes.
The main advantages of blinds include:
- space saving;
- simple and quick installation without construction waste;
- the work is carried out very quickly;
- strength and durability;
- affordable price;
- a large selection of colors and patterns;
- If one lamella is damaged, it can be easily replaced; there is no need to throw away the entire structure.
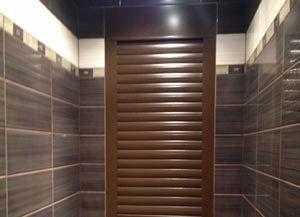
Roller shutters
Enclosing an area with roller shutters is more practical. They are more durable and reliable. However, they take up significantly more space than blinds. Automatic roller shutters deserve special attention. They are easy to close and convenient to use. They come with a remote control.
Hiding the pipe with shutters will be more expensive and time-consuming. Almost any design can be applied to the panels using photo printing. We hide household items behind the panels. Adding a few extra shelves is sufficient.
Roller shutters do have their drawbacks. They come with a special frame, which is installed around the perimeter of the opening. The pipes require ventilation. Therefore, the frame doesn't extend to the ceiling, meaning it can't be completely closed.
The upper section will require different materials. The lifting mechanism will need to be taken into account. The same applies to the lower section. Due to the plumbing, the roller blinds do not lower completely and cannot be completely concealed. To conceal the lower section, a second section of the blind is used.
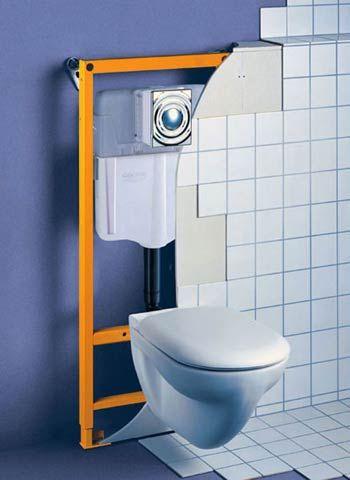
False wall
 If utilities and meters are located flat, the entire rear wall is covered. The false wall is made of profile and plasterboard (or plastic).
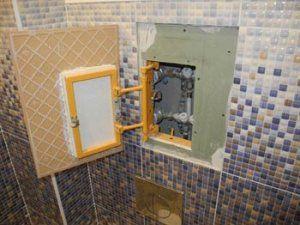
But before you seal the pipes, you need to plan the location of the hatch. It's easier to install a special door in plastic panels. Ready-made models are available.
But with plasterboard covered with tiles, there are more options:
- The first is a hatch made of metal or plastic with hinged doors.
- The second is a special hatch with tiles glued to the doors. These are purchased in advance. The tiles are positioned so that their seams perfectly match the seams of the wall tiles.
- The third option is a homemade hatch. It's cheaper. A window is made in a false wall. Then measurements are taken. A metal frame is made using these measurements. A cut sheet of drywall is attached to it. Tiles are then glued to it.
Plumbing cabinets
They allow for the most efficient use of space. Covering the sewer pipe with a plumbing cabinet is a smart solution for small spaces. This niche combines a screen with additional storage for household chemicals, paper, and other items. The most convenient type is a two-door plumbing cabinet. The doors are cut from MDF boards. A ready-made screen is also available.

Furniture companies will select the desired color and texture. To conceal the wiring, wooden beams are installed on the side walls of the opening. The doors are then installed using hinges. Sliding doors are also available. To save money, edged boards are used.
Masking by chasing
 Concealed installation is the most aesthetically pleasing. The components are sewn into pre-drilled grooves. These are called chases. The holes can be cut with a hammer drill or a chaser. When installing sewer and water pipes concealed, they are hidden within the floor screed.
The pipework is poured with concrete from above. This process is expensive and complex. If a leak occurs, it's impossible to access. Say goodbye to a perfect repair. Also, before concealing the pipe with chases, there are some nuances to consider.
It is not possible to use grooves:
- In load-bearing walls. They already bear a heavy load. Chasing will only increase it.
- It will not be possible to conceal it this way in areas where electrical networks are located.
- This method is only suitable for soldered parts. Monolithic technology is used to join them.
- Anyone who's sealed pipes this way knows that they make unpleasant noises when they touch the walls. Clamps can help eliminate this problem. Thermal insulation is also used.
Please note! An accurate drawing will be helpful. It's best to save it. It will be useful to plumbers in case of an emergency.
Decorating pipes
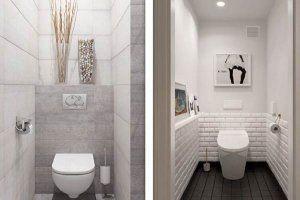
Since it is not always possible to seal the pipes in the toilet due to the small size of the room, in order for the room to have an aesthetic appearance, it is possible to simply decorate some of its elements.
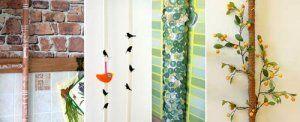
Decorating techniques:
- You don't have to hide it; just paint it. The color should match the overall bathroom design.
- Stencils are used to create original designs. With a little patience, even boring pipes can become the subject of interesting designs.
- Various pieces of glass, pebbles, or regular sewing tape can be used as decorative elements.
- You can weave artificial flowers around it. The design will be closer to eco-style.
- Stickers and decals are also an option. If you cover them with newspaper or magazine clippings, they'll resemble poster stands. It'll look stylish and unique.
- Plumbing fixtures can be wrapped with twine or other similar elements.
Homeowners don't always try to seal off utility lines. Sometimes plumbing systems become part of the interior design. Fans of high-tech or loft styles will appreciate this design. The most successful combination is copper plumbing fixtures and copper pipes.
External piping is much faster to install. And repairs won't be a problem. Worn parts can always be replaced.
Metal products require careful maintenance. A significant drawback is the price. Furthermore, metal heats up quickly. Contact with it can cause serious burns.
Designing a bathroom requires a special approach. The materials must be durable and meet sanitary standards. There's plenty to choose from. Now all you need to do is decide on your preferences. There are no strict guidelines. Each option can be easily adapted to your own needs. It all depends on the size of the room and the owner's imagination. Using these options, you can create your own personalized camouflage solution. Dream big, and leave the execution to the professionals.