There are two main methods for installing a wall-hung toilet: on a wall-hung toilet or on a concrete pedestal. Each type has unique features, as well as advantages and disadvantages.
Before choosing one of the models, you should carefully study all the intricacies of the design and installation.
Installing a wall-hung toilet isn't complicated and can be done independently. It's important to read the instructions first and follow them carefully.
- Construction of a suspended structure
- With installation
- On a concrete pedestal
- Materials and tools
- Installation work with installation
- Creating a niche
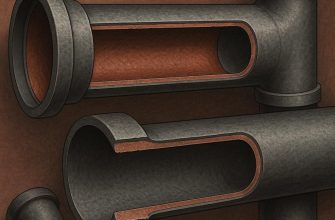
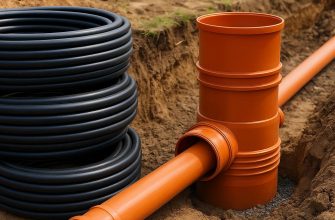
- Sewage supply
- Securing the frame
- Connecting communications
- Finishing works
- Installing a hanging bowl
- Installing a flush button
- Installation of plumbing fixtures on the base
- Assembling the formwork
- Preparing for concrete pouring
- Pouring concrete
- Final works
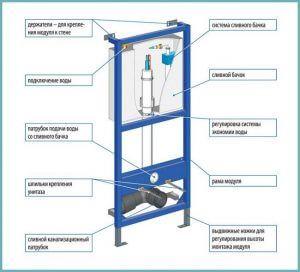
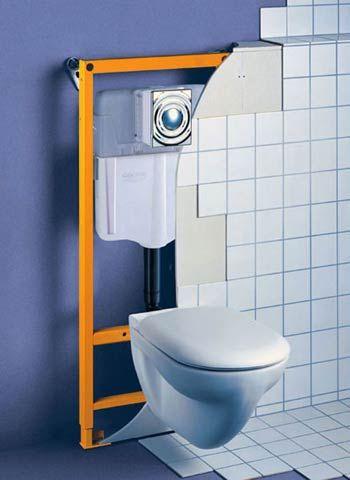
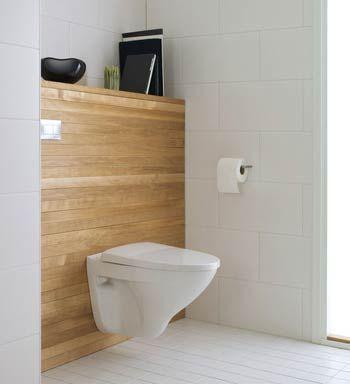
Construction of a suspended structure
Unlike a floor-standing toilet, a wall-hung toilet has a more complex design and, consequently, more complex installation. These models differ depending on the mounting method. The toilet bowl can be installed using:
- frames – is a metal frame;
- foundations – usually made of concrete.
With installation
The design consists of the following elements:
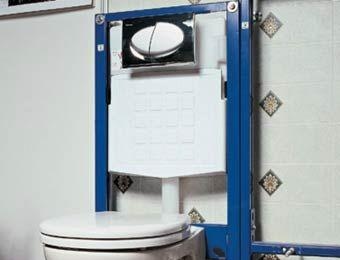
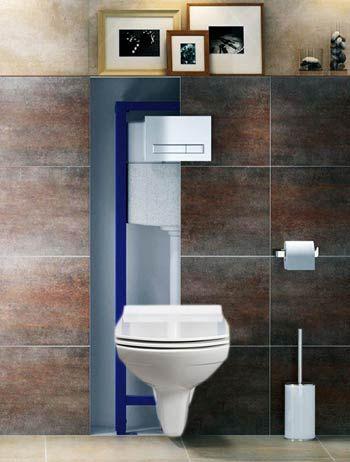
- The steel frame is the key component, as it is where the cistern and other components are mounted. The frame must be high-quality and highly durable and reliable. Typically, it can support up to 400 kg.
- The drain tank, along with the utilities, is hidden behind a false wall or trim. It is most often made of durable plastic and coated with a special material that prevents condensation from forming on the walls;
- The toilet bowl is the only visible component of the plumbing system. In most cases, it is selected based on the personal preferences of the residents and the interior style of the room.
One of the features of this type is the need for a solid (or very strong) wall. Since the fastening is done to the floor and wall, this type of system cannot be used if the walls are made of drywall.
The steel frame in most cases has a mechanism that allows the bowl's height to be adjusted within a few centimeters. A wall-hung toilet can be between 40 and 43 cm high.
The flush tank is thin and wide. One side features an opening for the flush button. This opening also allows for the removal of internal components if they break. A special feature of this type of tank is its half-flush function, which significantly reduces fluid consumption.
Advantages of installing a wall hung toilet:
- beautiful appearance that will suit almost any bathroom design;
- visual increase of free space;
- simplification of cleaning due to the absence of a toilet base and concealment of communications;
- there is no need to damage the floor covering for installing plumbing;
- Possibility of installing a double flush button.
Disadvantages and controversial points:
- The actual increase in space in the toilet only occurs if there's a niche in the wall for installation. However, this is usually not the case, so it's important to consider that an additional 15 cm of space will be required for installation. Also, keep in mind the thickness of the false wall and trim;
- Concealed water and sewer connections are only an advantage if the utilities are intact. If any malfunctions occur, the false wall and possibly the installation itself will need to be dismantled. Such repairs and subsequent restoration of the appearance will require significant financial investment;
- The high cost of a steel module significantly increases the overall cost of the plumbing fixtures. You can save some money by installing them yourself.
Therefore, you should carefully consider what type of plumbing fixture to use.
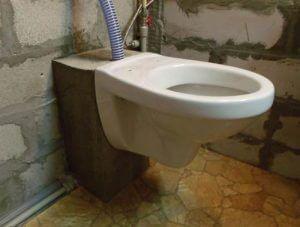
On a concrete pedestal
A wall-hung toilet can also be installed on a concrete base. Building the base yourself doesn't require much time and is fairly simple. Installation is often expensive, so many choose a more cost-effective alternative: installation on a concrete base.

This method provides 2 options for tank placement:
- a suspended tank located above the toilet;
- A wall-mounted cistern with an external flush button. Externally, this option is virtually indistinguishable from the wall-mounted model.
The structure consists of a bowl, which is mounted to the foundation and wall using two sturdy rods, the base itself, and a sewer pipe, which is also secured with concrete. It should be noted that installation is only possible on a load-bearing wall.
Materials and tools
To install the system you will need:
- ready-made structure (metal frame with a tank);
- bowl;
- A flush button. If your tank allows, it's best to purchase a double flush button that can perform a half flush;
- pins that secure the bowl;
- connecting pipes.
In most cases, all accessories (a set of pipes, studs, etc.) and fasteners are sold as a kit with the plumbing fixtures. However, it's best to confirm the availability of all required components in advance and, if necessary, purchase additional ones.
The toilet bowl is not included in the kit, so it must be selected and purchased separately. The kit often includes a specialized material used to coat the cistern to prevent condensation.
It also reduces the noise from the flush mechanism, so the plumbing operates almost silently.
Tools for installation:
- building level;
- roulette;
- drill or hammer drill;
- pencil or marker for marking;
- open-end wrench;
- moisture-resistant plasterboard sheets – required for finishing;
- hacksaw for cutting plasterboard sheets.
To install plumbing fixtures on a pedestal, you will need the following materials and tools:
- foam plastic;
- silicone-based sealant for waterproofing;
- coupling sleeve;
- formwork boards;
- about 40 liters of concrete (grade M200);
- nuts, washers, screws (suitable for woodworking);
- plastic pipe with a cross-section of 11 cm and a length of 8 cm;
- 2 threaded rods, their thickness should be 2 cm, and the length – 55-80 cm.
Installation work with installation
Once all the necessary tools/materials are prepared and the installation option for the wall-hung toilet has been selected, the installation procedure can begin.
It's not overly complicated; the main thing is to follow the instructions. For convenience, the process is divided into several main steps.
Creating a niche
The walls on which the frame is installed must be as strong as possible. Plasterboard is not suitable. The frame must be able to withstand a load of up to 400 kg (some models up to 800 kg), distributed evenly across the walls and floor.
To create a niche, a recess must be created in the wall, measuring 60 cm wide, 100 cm high, and 15-20 cm deep. Sometimes the required depth cannot be achieved, in which case the deficiency is compensated for with finishing. If the contractor decides to build a false wall to conceal structural elements, the space savings in the room are minimized.
Sometimes a niche is created in the location of the waste stack (if you live on the top floors of an apartment building). This is a rather complicated procedure, and it's best not to attempt it yourself. In this case, you'll also need to obtain a construction permit for this type of work.
Sewage supply
The sewer pipe connected to the plumbing fixture should have a cross-section of approximately 100 mm. The pipe should be positioned as close to the floor as possible, maintaining the required slope.
Securing the frame
 The toilet cistern is not installed separately, as it is integrated into the frame. The frame is secured at four points: two in the floor and two in the wall using brackets. It is recommended to regularly check the levelness of the cistern with a spirit level during installation.
It's important that the frame be secured vertically and horizontally as evenly as possible. The vertical adjustment is done using the feet, and the horizontal adjustment is done using the wall mounting brackets. Even a slight misalignment will result in premature failure of the system.
For added stability, the structure's legs can be cemented in place. In this case, a 20-centimeter layer of screed is recommended. About 40 cm above the floor, there are holes for studs on which the suspended basin will be installed. Insert studs into these holes and secure them with fasteners.
Connecting communications
First, you need to connect the sewer line. This is done using a black elbow, often included with the plumbing fixtures. One end is connected to the sewer pipe, and the other is attached to the frame.
It is recommended to use polypropylene or copper water pipes. It is advisable to ensure a detachable connection when connecting.
The preferred method for connecting cold water to the tank is using pipes, but flexible hoses can also be used. Keep in mind that hoses have a shorter lifespan. Be sure to test the lines to ensure there are no leaks. If any leaks occur, seal them with a sealant.
Finishing works
Drywall, which is moisture-resistant, is typically used for finishing. Using the included diagram, mark the mounting holes and then carefully cut them out.
Once the drywall installation is complete, finishing materials can be applied. Ceramic tile is the most popular choice for bathrooms.
Installing a hanging bowl
Instructions:
- Make sure that the drain tank and sewer pipe protrudes 50 mm beyond the wall.
- A gasket is placed on the pipes.
- The bowl is hung on studs and the pipes are connected.
- Rubber gaskets and plastic inserts are installed.
- The fastening nuts are tightened.
- If any parts of the gasket protrude, they are cut off.
The standard height for placing the bowl is considered to be 40 cm, however the size can be adjusted within 3 cm.
Installing a flush button
The final step is installing the flush button. Mechanical models are installed using pins, while pneumatic models are installed using tubes. This procedure is generally straightforward.
Installation of plumbing fixtures on the base
Installing a wall-hung toilet on a pedestal is just as challenging as installing a wall-hung toilet. To ensure the highest quality, carefully follow the steps outlined below.
It's important to first determine the location of the plumbing fixtures and calculate the toilet installation height. Installing a wall-hung model on a concrete foundation consists of several steps.
Assembling the formwork
The formwork will be assembled from planks, into which the concrete will then be poured. Two holes will need to be marked and made on the front part, where the rods will be inserted to secure the bowl.
Next, carefully drill holes in the wall and fill them with chemical anchor. This adhesive will securely bond the steel studs to the concrete or brick wall.
Preparing for concrete pouring
The next step is to insert the rods into the wall through the holes made in the formwork in the previous step. To secure them, they are pressed against the formwork using nuts. A small piece of foam plastic is then placed on the facing side. This will be removed in the following steps, and the remaining seal will be used to accommodate the coupling.
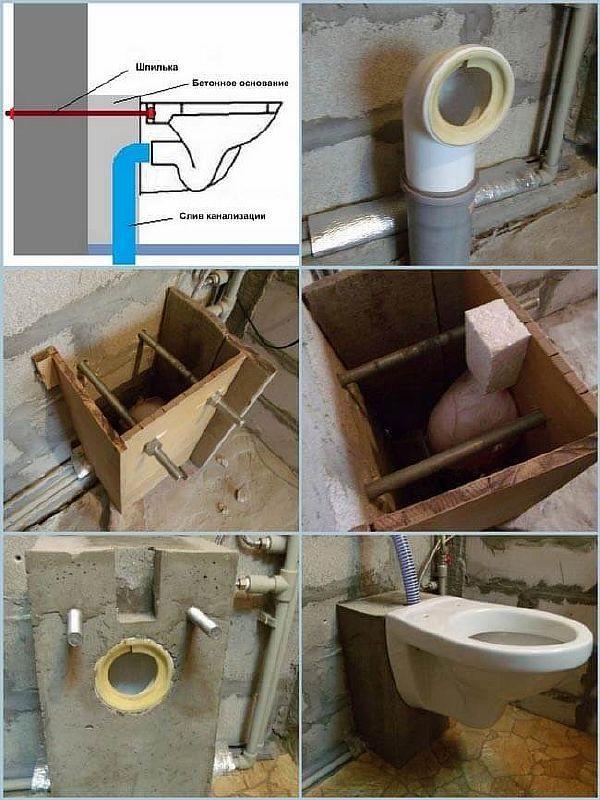
Pouring concrete
Pour concrete mix into the wooden formwork and let it set completely. Typically, 40 liters of mix is used, and it takes about a week to dry. Once hardened, the formwork is dismantled, leaving only the monolithic base with rods for attaching the wall-hung toilet bowl.
The piece of foam is removed, and a coupling is placed into the resulting recess, which will connect the pipe to the sewer riser. The connection of the utilities must be sealed with silicone sealant to prevent leaks.
Final works
The final step involves installing the toilet cistern, finishing, concealing the base, and connecting the flush button to the outside. It's also essential to test the system for proper operation.
Therefore, the installation procedures for a wall-hung toilet on a concrete frame or pedestal differ significantly. The former is more reliable, with a structure capable of supporting up to 400 kg, while the latter is more affordable. Before beginning construction, it's important to study the installation requirements and prepare the necessary materials and tools.

I recently bought a wall-hung toilet, and thanks to your instructions, I installed it correctly, as it should be. I'm very pleased with the result. Thank you for your helpful advice, it was very helpful.
We installed the toilet on a concrete pedestal. I had a hard time getting the right angle for the sewer pipe when installing it.