Underfloor heating is often installed in homes today. Its effectiveness depends largely on proper foundation preparation.
In this article, we'll explain the different types of foundations and describe in detail the installation process for each type.
- Preparing the base for a water-heated floor
- Types of foundations
- Concrete screed
- Warm floor on the ground
- Semi-dry screed
- Dry screed
- Warm floor without concrete screed
- Types of insulation
- Polystyrene foam and foam plastic
- Cork
- Mineral wool
- Foamed polyethylene
- The process of constructing a foundation for underfloor heating
- Installation of underfloor heating on a concrete base
- Semi-dry screed device
- Dry screed installation
- Ground installation
- The floor method
- What kind of base is suitable for what type of underfloor heating?
- Errors in foundation preparation
Preparing the base for a water-heated floor
Preparing the subfloor before installing a water-based underfloor heating system is an important step in installing a heating system, as it determines the heating efficiency. The subfloor must be strong, level, and well-insulated to prevent heat loss.
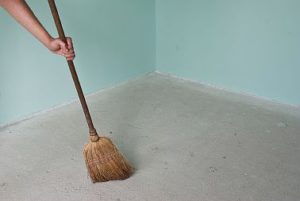
After the design is completed, the surface is cleared of debris and checked for evenness. A perfectly flat surface isn't necessary; the main thing is to avoid large differences in alignment, as uneven pipes will result in uneven heating.
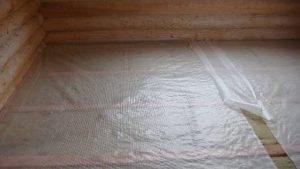
Only after this is the thermal and waterproofing insulation laid, onto which the heating element is installed.
If polystyrene foam boards with bosses are used as insulation, they will serve as clamps for the pipes.
Types of foundations
There are various technologies for installing water heating systems, but most often installation is carried out on a cement-sand cushion or concrete floors, as well as in private houses underfloor heating can be installed on the ground.
Concrete screed
Pouring a concrete floor is a popular option because it creates a strong and reliable foundation. A concrete base is a standalone element, not affecting the foundation or exterior walls of the building. It's also easy to lay pipes on.
Advantages of this method:
- creation of a high-quality thermal insulation layer, which significantly reduces heat loss;
- obtaining the most even surface that can withstand strong mechanical impacts;
- uniform heat distribution.
For a high-quality foundation for underfloor heating, M150 concrete is recommended. When pouring the foundation in a large room, M300 or higher concrete should be used.
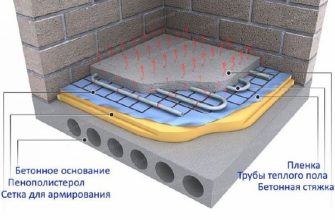
Warm floor on the ground
If the underfloor heating is installed on the ground, the ground must first be prepared before pouring the concrete foundation. This should begin with determining the groundwater level to prevent foundation flooding. It's best to install a drainage system to ensure water drainage.
Conditions to be observed when preparing the foundation:
- Create a 4-5 cm thick bedding layer; this will serve as the load-bearing layer. To achieve this, pour the crushed stone with a cement-sand mixture. In this case, grade B10 concrete is recommended. To prevent the mixture from spreading, surround the poured surface with slats, creating a box to accommodate the concrete screed. The mixture needs to be constantly moistened until the surface is completely dry.
- A waterproofing layer on the lower level is essential. A thick polyethylene sheet should be used, overlapping it. A polymer-bitumen membrane can be used instead of the polyethylene film.
- Install insulation—it will prevent heat loss. High-quality thermal insulation can retain up to 20% of heat. A good thermal insulation material should have low thermal conductivity, be highly durable, and maintain its properties in high humidity and low temperatures. The best material is polystyrene foam underlayment.
Semi-dry screed
Semi-dry mortar differs from wet mortar in that it contains less water. The quality of the mixture is tested by squeezing the mortar in your hand; water should be released, but the mixture should not spread.
The main advantages of the semi-dry type:
- not a high price;
- ease of use;
- good thermal insulation;
- no shrinkage when drying;
- the process of preparing the mixture takes less time.
Dry screed
Dry screed is a loose special mixture that is poured onto the waterproofing material.
Advantages of this method:
- ease of installation;
- construction in several stages is possible;
- does not require drying, so you can continue working immediately;
- excellent thermal insulation properties, especially if expanded clay is used;
- It is easy to hide communications under the backfill.
Flaws:
- Insects often appear in the composition;
- In case of a coolant leak, water will easily seep through the mixture and lead to the formation of mold;
- Possesses poor load-bearing capacity.
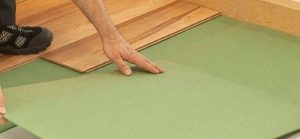
Warm floor without concrete screed
When installing underfloor heating without pouring concrete, wooden boards or chipboard sheets serve as the base. It is recommended to use products at least 20 mm thick. This method is called "floor-mounted."
This option is used for a heating system if:
- the room height is limited;
- non-durable floors that may not be able to withstand heavy loads;
- For one reason or another, pouring concrete mortar is not possible.
Types of insulation
When preparing the base for underfloor heating, thermal insulation material plays an important role. When choosing it, consider the characteristics of the room and the type of base.
Most insulation materials have the same degree of thermal conductivity, but their thickness should be selected individually.
Let's look at the most common types of thermal insulation.
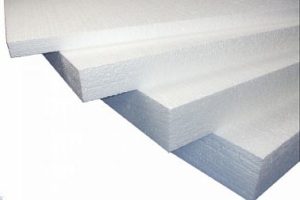
Polystyrene foam and foam plastic
The production technology for expanded polystyrene insulation involves creating channels in the material's texture to promote air movement. These products are durable and can withstand heavy mechanical loads. Foam insulation is lighter and "breathes" well, allowing water vapor to pass through better.
Penoplex is available in various sizes: 120 x 240 cm, 50 x 130 cm, and 90 x 500 cm. These products differ in density: polystyrene—150 kg/m³, while foam plastic—125 kg/m³. Because foam plastic is less dense, it deforms under physical impact, which reduces its thermal insulation properties. Therefore, it is more often used for installation between joists.
Cork
A natural material, the main raw material used for production is oak bark, making it expensive. It is produced in sheets and rolls, but the characteristics are identical, differing only in thickness.
Cork gasket is:
- low thermal conductivity;
- water resistance;
- elasticity;
- lightfastness;
- fire safety;
- resistance to temperature changes;
- resistance to chemical influences.
If funds allow, this underlayment is the best option - it saves heat resources.
The material doesn't shrink or warp under mechanical stress. Cork doesn't grow mold or attract insects. Its only drawback is that it steals the room's height.
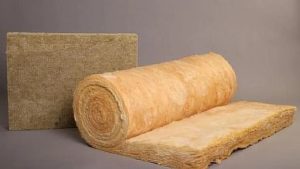
Mineral wool
A long-established type of insulation with enhanced fire safety. It's produced in slab form, making it easy to install. When used with an aluminum backing, the useful life of mineral wool increases severalfold, even when installed on the ground.
The material's rigid structure makes it resistant to chemicals. It also retains heat well and absorbs noise.
Despite the many advantages, there are also disadvantages:
- contains toxins and carcinogens;
- Mineral fibers are hygroscopic and require protection from moisture.
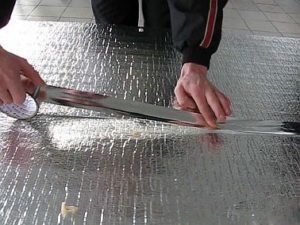
Foamed polyethylene
Today, penofol is often used as thermal insulation. The product is 3–10 mm thick, with a reflective foil surface. This layer eliminates the need for a waterproofing material.
Foamed polyethylene comes in:
- with one layer of foil - grade A;
- with two - B;
- self-adhesive (foil on one side, self-adhesive base on the other) - C;
- combined (foil on top, special film on the bottom) - "ALP".
All of these insulation models are ideal for preparing the base for hydronic underfloor heating. It should be noted that this material absorbs moisture, which reduces its thermal insulation properties.
The process of constructing a foundation for underfloor heating
As mentioned above, underfloor heating can be installed on different types of bases.
The type of base must be selected taking into account the characteristics of the room.
The main thing to remember is that when using a screed (no matter what type), its thickness at the base and above the heated floor must be the same, otherwise the level of heating of the surface will be different.
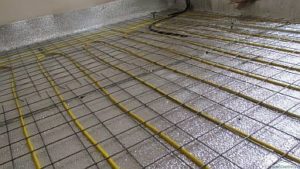
Installation of underfloor heating on a concrete base
The diagram of the installation of a water-heated floor in a cement-screed mortar is a classic option.
When constructing the foundation, it's important to choose the right concrete grade and mortar composition. Since the resulting concrete slab will be subject to constant thermal stress, it's important to maximize its strength while maintaining its ductility.
For the solution it is recommended to use:
- sifted river sand, fraction 3-5 mm;
- cement grade M 150, better M 300 and higher;
- plasticizers and fiber fibers.
Step by step, the process of preparing a concrete base for underfloor heating looks like this:
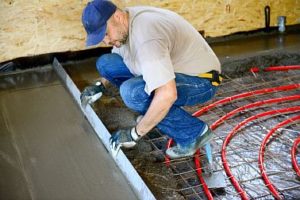
- Pouring a rough screed—the mortar is poured over the entire area of the room in a layer at least 5 cm thick. It is important that the corners of the floor and walls are at 90 degrees. The surface should be horizontally level, without any dips; a 5 mm deviation is acceptable. A rough pour is also necessary if there are uneven concrete floors.

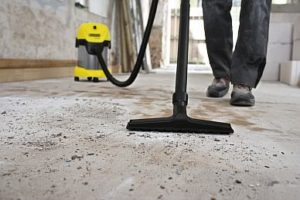
- Surface cleaning - after the concrete has completely dried, the floor is cleaned of dust and treated with a primer.
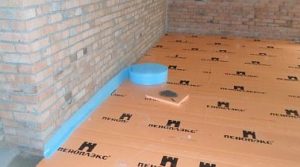
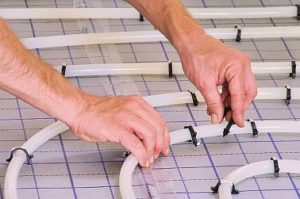
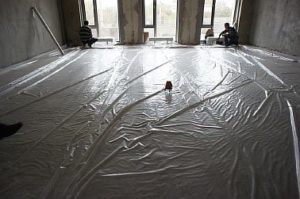
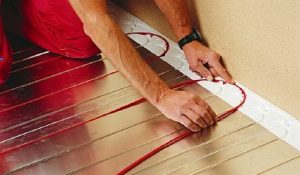
- Installing waterproofing and thermal insulation materials. Thick polyethylene is suitable as a waterproofing material. Any of the above-mentioned materials can be used as insulation. Ideally, use polypropylene boards with studs, with the heating element attached between them. If the insulation is not foil-lined, a reflective film is installed on top.
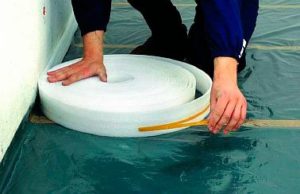
- Applying damper tape around the entire perimeter of the room. Its purpose is to prevent concrete from cracking when heated. Deformation can damage pipes and lead to system failure.
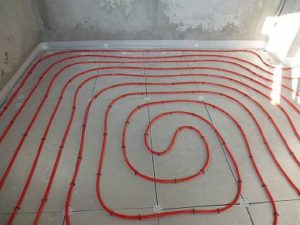
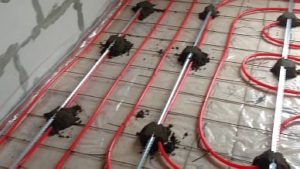
- The foundation for the heating unit is ready, and we can begin laying the piping. The heating element should be laid out according to the pre-prepared plan. The layout can be either a "snake" or "snail" pattern.
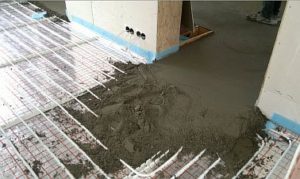
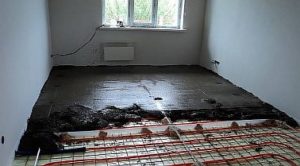
After connecting and testing the system, the pipes are filled with a concrete-cement mixture, 5-10 cm thick. Once the solution has dried, the floor covering is installed.
Semi-dry screed device
The difference between a semi-dry screed and a “wet” one is its reduced water content.
The solution contains:
- cement grade M 400;
- purified coarse sand;
- fiber filler.
Strength depends on the correct proportions. The cement to sand ratio is 1:3, and 0.6 kg of filler should be added per 1 m³ of mixture. Enough water is needed to achieve a moist but crumbly consistency.
The process for preparing a semi-dry screed base for installing a heating unit is similar to the previous one. First, the subfloor is cleaned and leveled, then primed.
After this, apply a damper tape along the walls to separate the mortar from the walls. The tape should extend 3 cm above the future surface.
Then a polyethylene film and insulation are laid, to which the heating element is fixed.
Now you can begin installing the semi-dry screed. To do this, you need to install markers made from this mortar in the form of small mounds of the required height. Using these markers as a guide, pour the foundation. The mixture should rise 3 cm above the pipes.
In this case, you can use the heating after just 2 weeks, since the drying time of this solution is less than when pouring a "wet" concrete mixture.
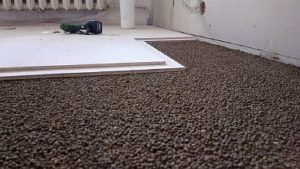
Dry screed installation
Recently, this method has been used frequently, since the process of preparing the base for a heated floor using this method is quite fast:
- The subfloor is cleared of debris and covered with waterproofing material.
- The perimeter of the room is sealed with foam polyethylene tape.
- A dry mixture—usually expanded clay or ready-made compounds—is poured onto the film. It also serves as a thermal insulation layer, as it has good thermal properties. It's important that the mixture be completely dry.
- GVL boards are placed on top, in which grooves are made to accommodate metal guides for the heater.
The remaining stages of constructing the underfloor heating "pie" are similar - laying pipes, placing the underlayment, and installing the floor covering.

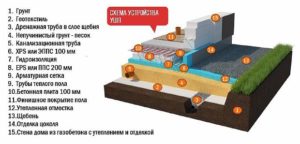
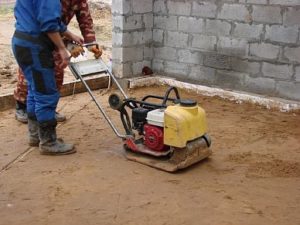
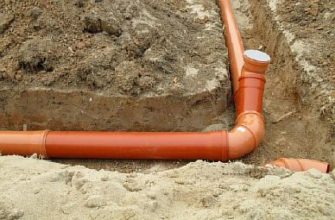
Ground installation
Before installing underfloor heating on the ground, the groundwater level must be determined. Only after the groundwater level has been determined can you proceed with preparing the foundation and installing the underfloor heating.
Sequence of work:
- The black soil is removed, as it will cause the floor to settle.
- A layer of sand is poured to the required level and compacted. Compaction wets the sand.
- Sewer pipes are laid. Marks are placed on the wall to determine the depth of the pipes. Using these marks as a guide, trenches are dug at a slope of 3 cm per meter, into which the sewer pipes are laid. The trenches are also backfilled with sand.
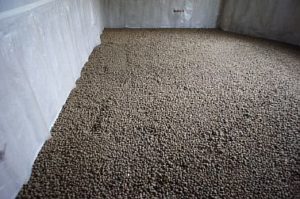
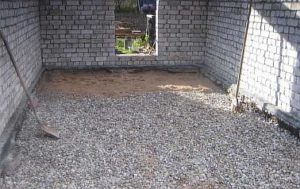
- Granite crushed stone is poured in a 10 cm layer to level the surface and prevent water from penetrating the insulation. It also needs to be compacted.
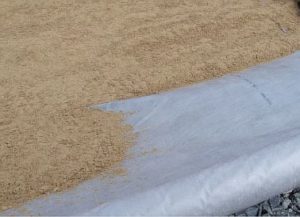
- A geotextile base is laid to prevent moisture penetration.

- Wet sand is poured on top of it, it is well compacted and leveled.
- Hydro- and thermal insulation is installed. Polyethylene is laid on the sand with an overlap, and insulation is placed on top. The insulation boards are laid in a staggered pattern, and the joints are sealed with tape.
- A damper tape is glued on to prevent concrete cracking.
- The pipeline is positioned by placing reinforcement on the insulation to which the pipe will be attached. The heater is installed according to the planned layout.
- The final stage is the pouring of a concrete screed (7 cm thick) over the pipes. Once it has completely dried, the heating system is ready for use.
The floor method
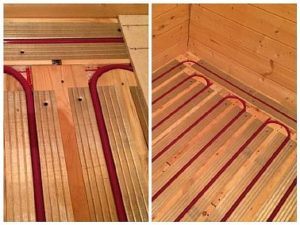
The floor-mounted method eliminates the need for wet work—no concrete screed is required. There are two options for installing floor-mounted heating: on a wooden base or on polystyrene boards:
- Preparing a wooden base for underfloor heating installation includes the following steps:
- the wooden surface is cleared of debris and inspected for cracks, which are sealed; it is better to lay an additional sub-base made of any boards or plywood sheets;
- a vapor barrier is laid out - polyethylene;
- the room is covered with damper tape to protect it from expansion when heated;
- joists are mounted across the boards - the distance between them is at least 60 cm;
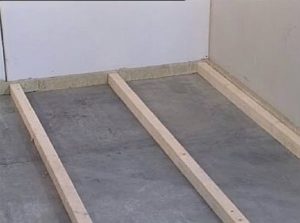
- thermal insulation material is laid between the joists - mineral wool is suitable;
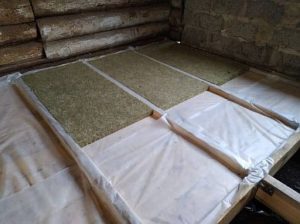
- the second waterproofing layer is laid out, it should run along the joists in tension;
- the slats are nailed across the joists - the grooves between them depend on the laying step;
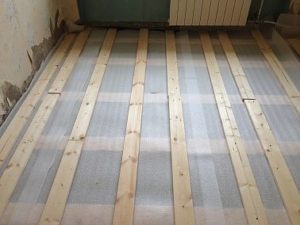
- metal plates are mounted into the grooves and the pipeline is placed in them;
- This structure is covered with gypsum fiber boards or chipboard sheets, on which finishing materials are laid.
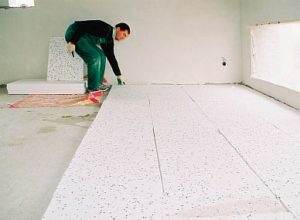
- Preparing a polystyrene base for underfloor heating is a simpler method. As with any option, a clean and level subfloor is required, which is then covered with a waterproofing material. The perimeter is sealed with damper tape.
Polystyrene mats (preferably with protrusions) are laid out on the film and secured together using locking joints. Metal plates are placed between the protrusions, into which the pipes are mounted.
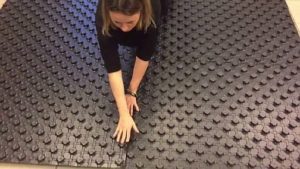
The mats are covered with a second layer of polyethylene and two layers of 10mm thick gypsum fiber sheets. The final finishing is then installed on top of these.
What kind of base is suitable for what type of underfloor heating?
The choice of underfloor heating installation technology and foundation should be based on the characteristics of the room. The most suitable method for heating systems (water or cable) is a concrete screed.
This option is ideal for laying floors in private homes, but is not recommended for wooden houses with weak floors, as the structure may not be able to withstand the weight of the mortar.
In houses with wooden floors or in apartments, a deck base is the best option for all types of underfloor heating. The "pie" is lighter, and the process of preparing the base and installing the heating is quick and easy.
If you plan to install heated floors yourself during the construction phase of your home, then ground installation is the best option.
Errors in foundation preparation
Non-specialists make a number of mistakes when preparing the foundation:
- the most common is when the screed is laid in a snail shape, this option leads to poor heating, since there is a cold return;
- the wrong insulation is selected - it is of the wrong thickness;
- the laying step is not calculated correctly - this can lead to the “zebra” effect;
- · the concrete layer is not of the proper thickness – it should be at least 7 cm.
If you're planning to install underfloor heating in your house or apartment, you need to choose the right type of foundation carefully. The efficiency of your heating system depends on how well you prepare the foundation and follow the correct pouring technique.


