The main goal when building any home is to create warmth and a cozy atmosphere in the living space. An excellent solution for private homes to achieve a comfortable environment is installing underfloor heating on the ground. Furthermore, it offers savings, as it can be connected to a furnace.
A ground floor is a floor structure laid within a strip foundation. It has no load-bearing elements such as columns or walls. A ground floor is not laid on a foundation slab and is tightly connected to the foundation. soil properties and groundwater, the flow level of which must be taken into account (at least 5 meters from the surface).
The unique feature of these types of floors is that this system can only be installed during construction, and only on the ground floor. Installation of this type of heating is not possible during renovations, once the building is already in use.

- Installation of a water-heated floor on the ground
- Tools and determination of material quantity
- Measuring the foundation level
- Preparing the pie crust
- Selection and installation of hydro- and thermal-insulating layers
- We pour the rough screed and determine its thickness
- We select the type of rolled pipes and carry out their installation
- Installation, proportions and loop pitch
- Pressure testing of underfloor heating
- Pouring cement-sand screed
- Features of designing underfloor heating systems with high groundwater levels
- Common mistakes when installing underfloor heating on the ground
- Video instructions
Installation of a water-heated floor on the ground
The installation process for a hydronic underfloor heating system depends on the soil conditions. It must have certain characteristics and meet the following standards:
- The groundwater level is no higher than 5–6 meters from the surface.
- Excessively loose and airy soil is contraindicated; such a structure cannot be built on sandy soil or black soil.
- Correct load calculation is important.
When planning heating in a private home on the ground, preparatory work is carried out in two stages, as shrinkage is possible:
- rough concrete screed;
- the remaining layers of the warm floor pie.
This rule must not be ignored, as soil movement occurs even when compacted, which can create problems and lead to cracks. Concrete will strengthen the foundation and improve its quality, making it easy to install water or electrical systems.
The heated floor does not touch the building's foundation or walls; it is laid on its own base.
Ultimately, the design of a water-heated floor is aimed at:
- creating reliable thermal insulation in the room;
- protection from groundwater;
- elimination of external noise;
- water vapor retention;
- Ensuring the comfort of residents.
This type of heating can, serve as the main source of heat in the room, since its efficiency is comparable to standard heating.
In addition, it is more aesthetically pleasing because it is hidden under the floor covering, which cannot be said about radiators and other heating elements.
We invite you to read the article - How to install hydronic and electric underfloor heating in a garage with your own hands.
Tools and determination of material quantity
When starting to install underfloor heating, you need to prepare not only the material, but also the tools that will be used during the work.
You need to stock up on the following components, without which it is impossible to carry out all the work:
- coarse sand and crushed stone;
- thermal insulation with a foil-clad aluminum layer;
- reinforced pipes;
- fasteners: arcs designed for bending heating elements, fixing devices;
- damper tape;
- reinforced mesh or fiber;
- proofreader and distribution cabinet;
- self-leveling mixture or materials for the production of cement composition.
The pipe size and pitch should be determined for each room individually. This can be done using specialized software or by hiring professionals.
If you decide to calculate the power yourself, you must take this procedure seriously, as errors will lead to a decrease in the efficiency of the system.
For calculations we need the following parameters:
- Room size.
- The material from which the walls are made.
- Type of insulation.
- Type of flooring.
- The material of the pipes and their diameter.
- Boiler capacity.
Knowing these indicators, you can determine the required pipe length.
Measuring the foundation level
The level is set before work begins. This is necessary to understand the position of the subfloor underfloor heating relative to the layers. When setting it, use the floor heights in other rooms as a guide.
To calculate the required material, measurements must be taken starting from the door. The finished floor level is determined using a taut string secured to nails. Then, using a measuring device, determine the size of each layer of the pie; it's advisable to mark each layer.
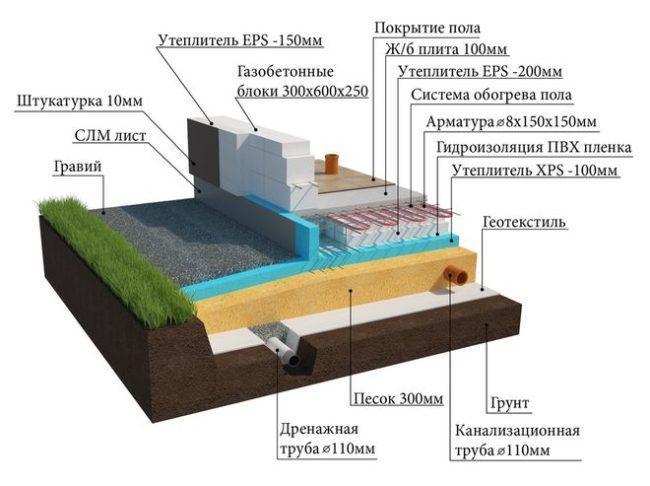
The multilayer structure of the floor looks like this:
- cladding;
- coupler;
- hydro- and thermal insulation;
- lining;
- priming.
Preparing the pie crust
Installing a floor on the ground should begin with soil preparation. The presence of groundwater and its depth are crucial, as this affects the risk of foundation flooding. It's best to install drainage to direct water away from the structure.
Work should begin by removing a layer of soil 30–35 cm below the surface of the future finished floor. This is mandatory.
If plant debris located in the topsoil is not removed, it will decompose and emit an unpleasant odor. Furthermore, the topsoil is loose, which can also create problems down the road.
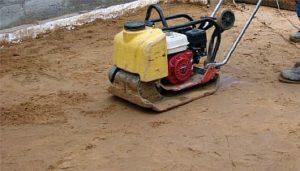
After removing all the debris and stones, the soil is compacted and leveled.
Then sand is poured around the entire perimeter, which is also well compacted by adding liquid, and leveled using a level.
If there is no significant groundwater, a bedding material is placed on this layer. Otherwise, it is replaced with geotextile, which will prevent moisture from penetrating higher.
The next layer is crushed stone, which has low thermal conductivity. The particle size should be small or medium. Compaction should be thorough, creating a virtually monolithic structure.
After this, a layer of cement mixture is poured, which also serves as additional insulation. It should be 4-5 cm thick; to prevent the mixture from spreading, it must be protected with slats.
Let the mixture harden, moistening it periodically. This screed can be replaced with an alternative option—profiled membranes—which will significantly reduce floor installation time.
Selection and installation of hydro- and thermal-insulating layers
According to the technology of installing underfloor heating on the ground installation of hydro and thermal insulation is required on the basis.
- For waterproofing, a thick polyethylene film, laid with an overlap, is suitable. It's inexpensive, and the quality matches the price. A more practical option would be polyvinyl chloride fractions or bitumen with added polyester.
Important to know! The waterproofing is laid with an overlap onto the walls; any excess can be easily removed with a sharp knife at the end of the work.
- An insulating layer will eliminate the risk of freezing and heat loss. The function of the underfloor heating system is to block heat loss and direct it upward to warm the room. More details For information on the structure of the pie, see this article..
Characteristics of high-quality thermal insulation include low thermal conductivity, a good degree of strength, and the ability to maintain key parameters at high humidity.
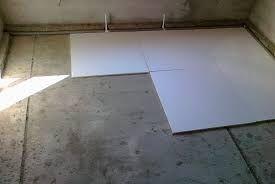
There are quite a few such products currently available. However, expanded polystyrene is considered the most suitable. It is produced in several types:
- clean - it must be covered with polyethylene;
- having a foil-coated aluminum coating - easy to install and requires special fasteners;
- extruded - no coating required.
The thermal insulation sheets are laid end to end, and the seams are secured with tape.
We pour the rough screed and determine its thickness
To ensure a durable underfloor heating system, a rough screed is required. Before pouring, it is recommended to divide the surface with slats spaced 1 meter apart. This method allows for pouring the mortar in strips.
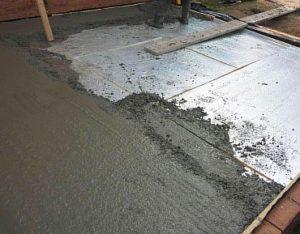
The process begins with laying 1 m² of 3 cm thick reinforcing mesh in the center of the room, and sealing the floor and wall joints with damper tape. It's best to use M100 or M200 grade concrete. Pour the cement from the far corner of the room, toward the door, with a thickness of 50 to 100 mm.
Once the mixture has dried slightly, remove the slats and fill the gaps with mortar. Cover the screed with plastic and keep it moist until it hardens completely. Afterward, clean off any dust and prime.
It is also possible to use dry screed, which is gaining popularity today, since there is no work with concrete, thus the process becomes faster.
We select the type of rolled pipes and carry out their installation
Before designing a heated floor, you should decide on the material for the rolled pipes. Acceptable materials include metal-plastic, polyethylene, galvanized, or copper. The most popular materials are metal-plastic and polymer.
The quality of the structure depends on the strength of the material and the integrity of the circuit. Pipes must not be laid on surfaces with slopes or unevenness greater than 5 mm.
Installation, proportions and loop pitch
Installation of underfloor heating on the ground must be carried out according to a pre-prepared installation plan. If the room is not rectangular, a diagram must be created using individual rectangles, each with its own loop.

In each section, taking into account the intended purpose of the zone and the desired heating level, the circuit can be arranged in a snake or snail pattern.
When carrying out work, you must follow certain rules:
- To prevent the structure from overheating, the pipes must be properly spaced across the surface area. They are placed more densely around the perimeter, with a more widely spaced contour in the center. The distance from the walls should be approximately 15 cm.
- The distance between heating elements, regardless of the installation method, should be 0.3 meters.
- At the joints of slabs and ceilings, rolled pipe products should be separated with a metal sleeve.
- The size of the circuit should not exceed 100 meters, as this will reduce the level of heat transfer.
The contour can be laid in one of two ways:
- bifilar (spiral) - characterized by uniform heating, the process is not complicated, since the bending angle is 90 degrees;
- meander (zigzag) - the coolant cools down while passing through the main line, thus the floor heating becomes uneven.
The system is secured to the concrete foundation through the bottom layer of insulation using dowels. Each branch of the pipeline, regardless of the chosen circuit layout, must terminate at the distribution cabinet.
The ends of the pipeline are connected to the corrector unit by crimping or soldering. Each branch must be equipped with shutoff valves, and ball valves must be installed at the supply sections. Furthermore, it is advisable to insulate the pipes exiting into the adjacent room.
Pressure testing of underfloor heating
Before pouring the final screed, pressure testing must be performed. The pipes that will be connected to the corrector must be free of air. To do this, air is removed through the drain valves. It is important that the air vents are closed at this point.
Testing of metal products is carried out using cold water, and testing of plastic products is carried out with a double increase in pressure in the pipeline.
This process is repeated twice to detect the pressure difference. If it's not significant, the system is operational; all that remains is to check for leaks in the circuit.
Pouring cement-sand screed
The screed mixture is prepared from 1 part cement and 3 parts sand. 200 grams of liquid are needed per 1 kg of the mixture. To increase the strength of the structure, 1 gram of polymer fiber is added.
Pouring underfloor heating is similar to installing a foundation. A reinforced screed 8 cm thick is recommended. It's important to note that underfloor heating can only be used after a month, as this time is necessary for the screed to harden. Furthermore, only then should you begin installing the final coating.
Features of designing underfloor heating systems with high groundwater levels
If groundwater is located close to the underfloor heating layer, care must be taken to drain it - install drainage 30 cm below the floor level.
The bottom is filled with river sand or soil mixed with crushed stone. It is poured in 10-cm layers and moistened with water. Three layers are usually sufficient, on top of which a geological fabric is laid.
Next, you need to build a foundation using bitumen mastic or another waterproofing material, and install polystyrene boards for thermal insulation. The subsequent installation of hydronic underfloor heating is no different from a standard installation.
Common mistakes when installing underfloor heating on the ground
According to expert analysis, the main mistake made when installing underfloor heating on the ground is a violation of technology—a lack of expansion joints in the slab, poor compaction of the backfill, and improperly installed waterproofing.
Underfloor heating installed on the ground in a private home is a complex installation, and its installation requires careful consideration. However, by choosing this option, you'll be creating the conditions for a comfortable home from the start.


