Film-based underfloor heating is one of the most popular space heating systems. The absence of radiators and hot water pipes on the walls inside the home, and hot water pipes under the floor, frees interiors from bulky, unsightly structures.
Another important aspect is the elimination of the risk of flooding in the rooms below. All of this can be achieved by installing an infrared floor, and proper installation of all film heating elements will yield significant economic benefits.
- Installation of infrared film flooring
- Installation
- Connection diagram
- Preparing the floor base
- Cutting infrared film coating
- Selecting the optimal wire cross-section
- Connecting infrared underfloor heating sections
- Selecting a location for the thermostat and its installation
- Installing a temperature sensor
- Grounding of the ITP
- First commissioning
- Conclusion
Installation of infrared film flooring
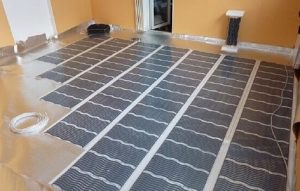
Infrared film underfloor heating (IFWH) is a thin polymer film imprinted with a network of flat heating elements. The heating strips, made of pressed carbon paste (high-strength carbon fiber), are enclosed in a protective polymer shell.
The heating mat thickness is 3–4 mm. The central heating point is installed using a dry method. The installation and connection process takes only a few hours.
Installation
Film heating is installed under any sheet or roll floor covering. It provides great results. infrared film placed under the laminate, linoleum, carpet or other flooring material of small thickness.
One of the most common connection schemes for film-based underfloor heating is connecting the heating system through a thermostat.
Connection diagram
There are two common methods for connecting a central heating point to electricity: direct connection to a power outlet and connection via a thermostat. The first option is fraught with all sorts of inconveniences.
You have to manually turn the heated floor on and off by connecting it to the power grid via a switch. This is quite a hassle and is only cost-effective when the cost of installing an infrared system (for a small heating area) is significantly less than the price of a thermostat.
Connecting an infrared heated floor with a thermostat is straightforward. Simply follow the tips and instructions below, as well as the instructions included with the kit, to get an efficient, heated film floor.
The diagram below shows two-way connection of heating stripsThere is a one-sided connection of copper busbars, but every other connection is possible. Both options are equally correct.
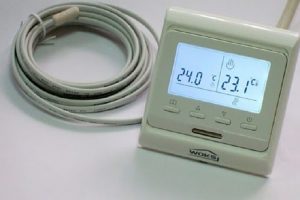
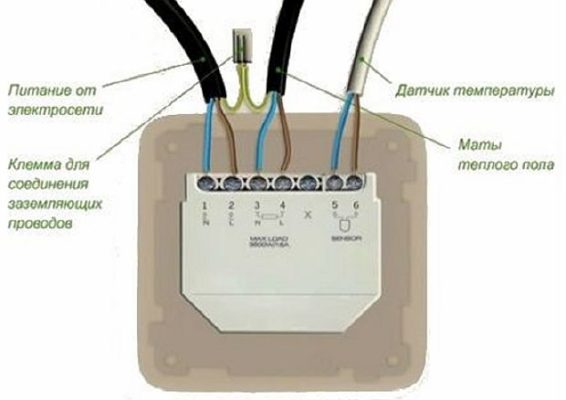
Two wires from the infrared coating, a wire from the temperature sensor and two power conductors converge in the pinout of the thermostat.
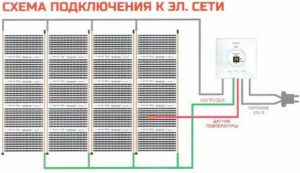
The thermostat receives information about the floor heating level via a temperature sensor. By comparing the actual floor heating temperature with the set value, the controller's microprocessor sends signals to the relay to turn the underfloor heating system on or off.
Each infrared underfloor heating kit comes with detailed installation instructions, including connecting all components into a single system and connecting to the power grid.
Using this manual, homeowners can easily assemble and commission infrared heated floors themselves. To do this, simply follow the steps below.
- Prepare the floor base.
- Cutting of infrared film coating.
- Selecting the optimal wire cross-section.
- Connecting fragments of infrared heated floors.
- Selecting a location for the thermostat and its installation.
- Installing a temperature sensor.
- Grounding of the ITP.
- First commissioning.
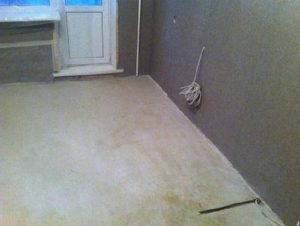
Preparing the floor base
Before installing the central heating system, the old floor covering is removed. Depending on the condition of the subfloor, cracks and holes are filled with cement mortar or a completely new cement screed is installed. After the mortar has cured, the underlayment included with the underfloor heating system is installed.
The purpose of the underlayment is to direct as much heat upward as possible onto the floor covering.
Along with a thin lining, experts recommend using as a backing cork sheets 4–5 mm thickWhen laying laminate flooring, it's important to ensure there are no protrusions underneath. Cork allows for the concealment of connections and wires within its solid surface.

To do this, use a utility knife to cut out the desired shape in the cork sheets. To route the wires, simply push the cork apart, creating gaps for the wiring.
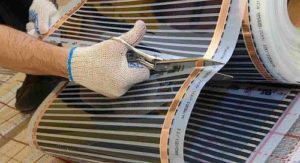
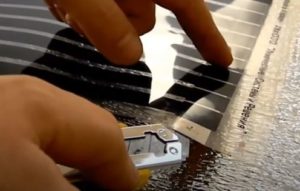
Cutting infrared film coating
Before installing the infrared strips, a layout diagram for the film covering is drawn on the room plan. Infrared films are sold in rolls of 50 cm, 80 cm, and 100 cm widths.
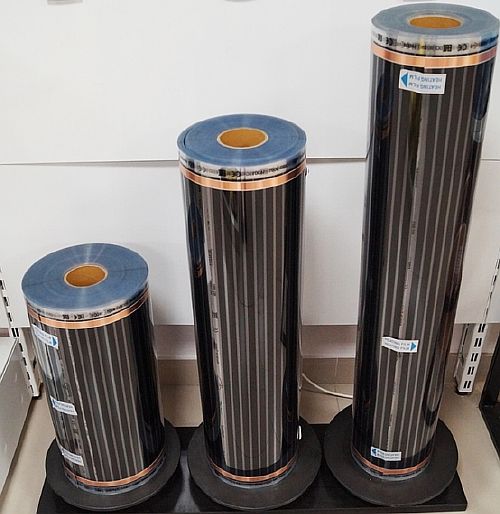
Roll lengths can range from 6 m to 12 m. Thanks to the special arrangement of the heating elements, strips can be cut every 25 cm along the roll.
Following the instructions, lay the strips so their edges are 50 cm from the walls. Given the cutting conditions, the strips can be laid on the foundation of a room of any shape and size.
Selecting the optimal wire cross-section
Heating film strips with widths of 0.5 m, 0.8 m, and 1 m and standard lengths of 6 m, 8 m, and 12 m are connected with PV-3 cable. It offers increased flexibility thanks to its multi-stranded conductor. The PVC sheath serves as a reliable insulator.
The wire cross-section is selected depending on the power of the electrical components of the underfloor system. For ISP power levels up to 1500 W, the strip connections are made using 1.5 mm2 wire.2.
If the heating coating power is in the range above 1.5 kW to 3.5 kW, then a wire with a cross-section of 2.5 mm is used.2When purchasing a set of infrared underfloor heating, pay attention to the packaging. The manufacturer always specifies the equipment's power in kilowatts.
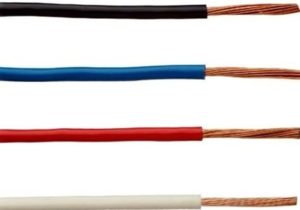
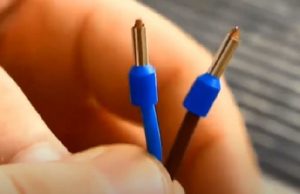
To ensure proper connection of the infrared underfloor heating system, use wires with red, blue, white, and black PVC sheaths. For example, for a series connection of the left busbars, use the red phase wire, and for the right busbars, use the blue-sheathed wire. A white wire is used for connecting the temperature sensor, and a black wire is used for grounding.
Connecting infrared underfloor heating sections
Connecting the infrared film is done as follows:
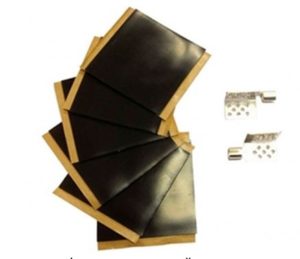
- The ITP strips are cut with scissors into sections of the required length strictly along the white cutting lines. The film is placed on a backing;
- take a mounting kit consisting of two contact clips and the required amount of bitumen insulation;
- Strip the ends of the power supply wires to a length of approximately 18 mm. This is best done with a special stripper. It gently removes the insulation without damaging the multi-wire core.

- The stripped ends of the wires are twisted into a pigtail and inserted into the slots of the clip legs. They are crimped with pliers;
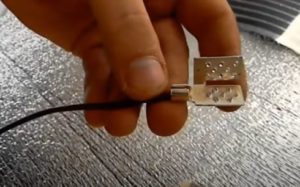
- carefully lifting the layer of polymer film over the copper busbar with a knife;
- A clip is inserted into the resulting cavity so that the end of the busbar fits between the two wings of the contact piece. They are crimped with pliers;
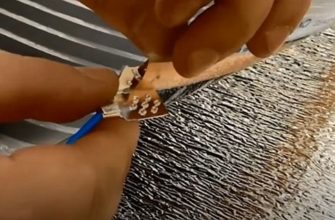
- Prepare the bitumen tape. Cut the strip in half, remove the insulation, and attach it to the clip. Press the halves of the bitumen tape together with your fingers until a homogeneous mass is formed;

- To connect the power wires to the thermostat, crimping sleeves with an insulated flange are placed on their ends. The sleeves are crimped using special pliers;
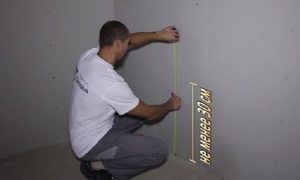
Selecting a location for the thermostat and its installation
The thermostat should be mounted on the wall as close to the heating zone as possible. The optimal height for the device is 30–40 cm from the floor surface.
Some IHU manufacturers' instructions recommend installing the thermostat at a height of 90 cm from the baseboard. It's worth noting that the first option significantly reduces the length of the power cable and temperature sensor wire.
To avoid cutting extra grooves in the walls to accommodate the thermostat cable, it is placed next to the electrical outlet. They can be connected using a single frame. If this is not possible, the power cable is routed through the wall all the way to the electrical panel, where it is connected to a separate circuit breaker.
If infrared heated floors are installed in unheated utility rooms (glazed balconies, loggias, etc.), the thermostat is installed closer to the front door.
Here are some tips on how to connect an infrared heated floor to a thermostat:
- The thermostat housing is most often mounted in a hidden manner, that is, it is built into the wall structure;
- in the designated place on the wall, use a hammer drill to cut out a seat for the thermostat housing box and punch a groove down to the floor;
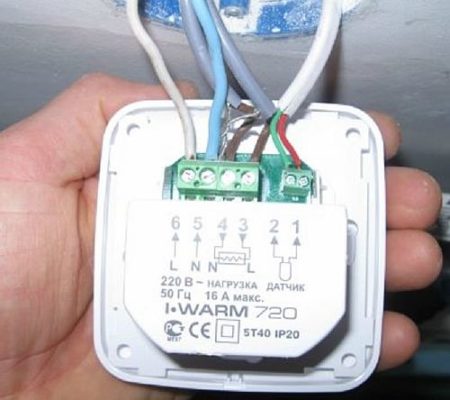
- the ends of the power wires for the infrared heated floor, the temperature sensor and the electrical network are brought out;
- The wire pinout on the back of the case is determined according to the wiring diagram using the ITP thermostat. The photo below shows how this should be done;
- the thermostat is fixed in the mounting location;
- The groove is filled with mortar and putty.
Installing a temperature sensor
I install the temperature sensor before laying the infrared underfloor heating panels, following these steps:
- the wire with the temperature sensor is pulled through a corrugated pipe, which is brought out from the seat of the thermostat to the base of the floor;
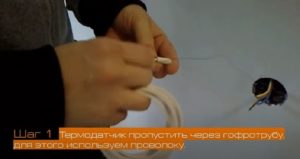
- The sensor's location in the corrugated pipe allows it to be replaced in the event of a breakdown without damaging the wall or floor covering;
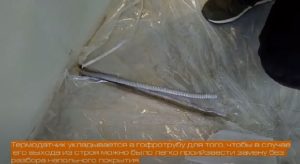
- the end of the corrugated pipe is cut in such a way that the sensor remains insulated at the bottom and open at the top;
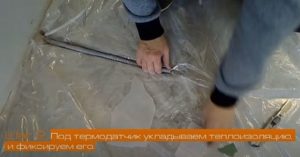
- when laying the substrate, a cutout is made in it for the sensor;

- A piece of tape is attached to the sensor. When laying out the infrared strip, it is pressed against the temperature sensor.
Grounding of the ITP
During operation of infrared underfloor heating, various emergency situations may arise, which could result in a short circuit. This could result in a fire. To prevent this, the heating substation must be grounded.
To do this, the edges of the infrared floor covering's contour are sealed with aluminum tape. At the point closest to the thermostat, one end of the wire is attached to the aluminum frame, and the other is connected to the thermostat's pinout, where there is a grounding terminal. The grounding terminal is visible in the photo below.
The terminal must be connected with a wire to the grounding busbar. If there is none in the room, the reinforcement of the reinforced concrete wall can serve as a grounding busbar. A hammer drill is used to remove the protective concrete layer until the reinforcement bars are exposed. The grounding wire is attached to these.
First commissioning
When testing infrared heated floors for the first time, all safety precautions must be taken in case of an unexpected short circuit.
During the first few hours of operation, the electrical components of the central heating system will use some of the heat generated to dry the new flooring. Subsequently, the entire system will reach the set temperature much more quickly.
Typically, this takes 2-3 weeks of regular heating of the room with infrared underfloor heating.
Conclusion
When installing infrared heated floors, it is necessary to strictly follow all requirements for laying the heating covering, as specified in the manufacturer's instructions.
If installed and operated correctly, the IWP will last for several decades.


