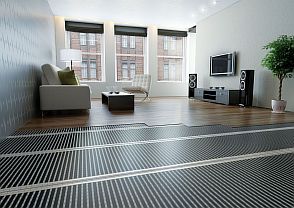
Infrared underfloor heating is a modern heating system that effectively warms a room. It's affordable for most consumers, although it's more expensive than a cable system. Installation is simple, making this type of heating system increasingly popular and often installed in apartments.
When installing a film heater, the question arises - What flooring should I use: linoleum, laminate, or tiles?.
Today we'll discuss installing laminate flooring on a film heater. We'll explore the criteria for choosing lamellas, as well as the advantages of an infrared floor with laminate flooring.
- Is infrared underfloor heating compatible with laminate flooring?
- Design and operating principle
- Advantages and disadvantages
- Laminate selection criteria
- Laying diagram
- Installing infrared underfloor heating under laminate flooring
- Materials and tools
- Preparing a place for a thermostat
- Installation of the substrate
- Laying thermal film
- Connecting the floor
- Connecting the sensor
- Connecting the thermostat
- Laying laminate flooring
- Features of operation
- Prices and Manufacturers
Is infrared underfloor heating compatible with laminate flooring?
If we compare laminate with tiles, its thermal conductivity is lower, and its heat capacity is higher than that of ceramics.
Laminate flooring does not tolerate overheating or sudden temperature fluctuations, which can occur with water or cable heating. Exposure to extreme temperatures can cause cracks, leading to creaking sounds in the planks.
An infrared system is ideal for parquet floors; its thin thickness allows for rapid and even heating with infrared waves. If the heating film is installed correctly, the rays will not escape through the subfloor, preventing wasted heat. Even if the system malfunctions, overheating will not occur, and the temperature will not exceed 45 degrees Celsius.
Design and operating principle
Standard heating systems operate on the principle of direct heat exchange. Radiators receive heat from a water coolant flowing from a nearby boiler and transfer it to the air.
In water or cable floors, the heat exchange process is also simple, but there the screed, which is located above the heating elements, is heated first.
Infrared heaters work differently; they emit heat similar to the sun. The design features a heating pad with carbon strips located directly beneath the boards. Each strip has a copper busbar that supplies the voltage.
The current passing through the carbon coating emits infrared rays with a length of 5–20 microns, which heat the surface.
The film and tires generate virtually no heat. Longer rays pass through the surface, heating furniture placed on it, so it should not be placed on a heating device.
In such a warm “pie” there are no intermediate layers between the film and the laminate, meaning it receives the heat first.
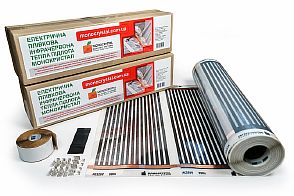
Film-based underfloor heating systems range in power from 150 to 440 watts. When installed under laminate flooring, the recommended power is 150 watts/m². The film is available in rolls of 50, 60, 80, and 100 cm widths, and in various lengths. The product is equipped with special strips that can be cut to size.
There are infrared heating models in which carbon paste is placed between the lavsan sheets not in strips, but in a continuous layer; they are called carbon ones.
The infrared system kit consists of a temperature sensor, wires, clips for connecting the film and insulating material.
Advantages and disadvantages
For heating laminate floors, infrared heating systems are the best option, as they offer a number of advantages:
- distribute heat optimally and evenly across the surface;
- economical;
- have a maximum heating of 45 degrees;
- quickly warm up the lamellas;
- installation and repair are simple and can be done by yourself;
- there is no need for screed, the lamellas can be laid on the film;
- long service life;
- retain their functionality even when exposed to sub-zero temperatures for a long time;
- if one strip fails, the entire device continues to operate;
- there are no invective movements of air flows, thus dust is not driven around the house;
- They do not dry out the air and do not emit electromagnetic waves, therefore they are not harmful to health.
Infrared heating is easy to maintain and operate and is controlled by a remote control.
The disadvantages include: Cost – this type of heating will be more expensive than other underfloor heating systems, but this will quickly pay for itself. As with any electrical appliance, there is a risk of electric shock or short circuit, but it is not significant.
Furthermore, the device's operation depends on the availability of electricity. Since IR heaters are not installed under furniture, remodeling is not possible; the heating element will have to be replaced.
Laminate selection criteria
When deciding to install infrared underfloor heating in an apartment with laminate flooring, the question arises: which type of laminate flooring is suitable for this system? If the wrong type of parquet flooring is installed, it will warp when heated, may emit harmful substances, and will conduct heat poorly.
The product must:
- have a special marking - a “snake”, which indicates the possibility of using it with an infrared heating system;

- have good thermal conductivity - the thermal resistance coefficient should be from 0.05 to 0.10 m2 x °K/W;
- have a thickness of 8 - 9 cm;
- does not emit formaldehyde when heated to 30 degrees, that is, the permissible emission class is E1 or E0;
- be wear-resistant - preferably wear resistance class 32 or 33.
All this information can be found on the packaging.
Laying diagram
The effectiveness of a film-based heating device depends on its proper installation and connection. It's important to determine the installation areas in advance, and avoid placing the device under furniture.
The average thickness of infrared heated floors is 1 mm, making them ideal for DIY installation under laminate flooring.
There are several schemes for installing infrared heating under slats:
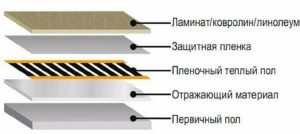
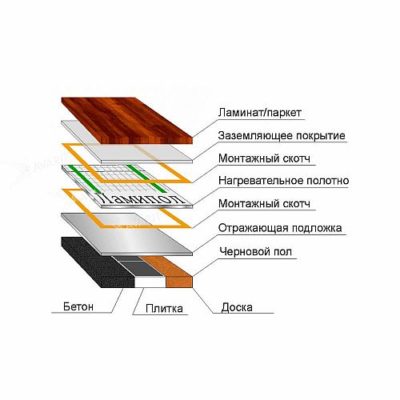
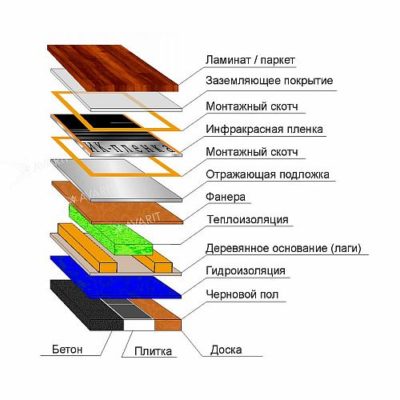
- Laying an infrared product on a concrete floor, over old tiles, on boards. The "pie" of such a floor is:
- lamellas;
- grounding coating;
- fixing mounting tape;
- heating element, a cloth covered with a continuous layer of carbon paste;
- construction tape that secures the underlayment;
- a substrate with a reflective layer 3–4 cm thick;
- rough base, which includes concrete flooring, old tiles, and boards.
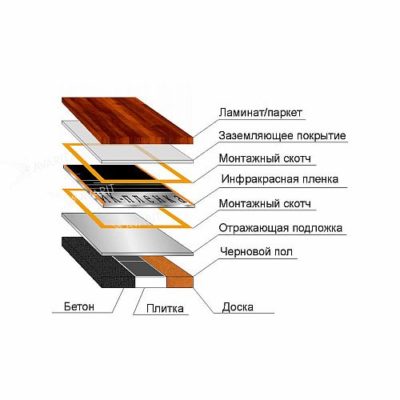
- Installing infrared heating film on concrete floors, over old tiles, or on boards. The "pie" is similar to the previous one, except the heating element is infrared film with carbon strips.
- Installing infrared underfloor heating on wood (on wooden joists). The design is:
- laminate panels;
- grounding material;
- mounting tape that secures the film;
- heating element in the form of infrared film;
- mounting tape that secures the backing;
- reflective backing, 3-4 cm thick;
- plywood sheets 1 cm thick;
- thermal insulation material;
- wooden base (logs), placed at intervals of 55–60 cm;
- waterproofing product;
- rough base (concrete floor, old tiles, boards).
Installing infrared heating under laminate flooring on joists will provide better insulation, but the structure will be heavier and more expensive.
Installing infrared underfloor heating under laminate flooring
You can hire a professional to install infrared underfloor heating under laminate flooring, but the installation process is simple, so you can install it yourself. Beforehand, it's best to watch a video online on how to install infrared underfloor heating on a concrete floor.
Before starting work, prepare a diagram of the heating film layout and mark the locations of the controller and temperature sensor. The device's power rating must also be calculated.
Materials and tools
To install a warm IR floor under laminate flooring, you need to stock up on:
- infrared system kit, which includes film, fasteners, wires, insulation, contact clips;
- temperature sensor;
- thermostat;
- backing with a foil layer;
- polyethylene film;
- with electrical tape;
- with construction tape;
- with scissors;
- with pliers and a tape measure.
Preparing a place for a thermostat
The thermostat is mounted to the wall. It's best to cut grooves for its box and the wires that run to the floor. This will hide all the wiring without affecting the room's design.
If you don't want to cut holes, you can hide the wires in a plastic channel that is attached to the wall.
Alignment
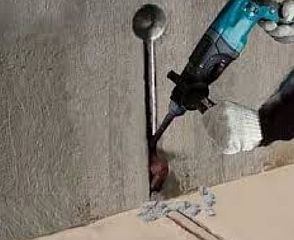
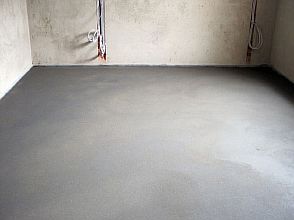
The first step is to level the subfloor. To do this, remove the old coating and clean the surface of any dirt. If there are any small holes in the floor slab, they can be simply filled with cement mortar after priming the concrete surface.
If the differences are large, the subfloor must be additionally filled with self-leveling mortar.
If the base is not a concrete floor, but a wooden one, and it is uneven, plywood sheets are laid.
Installation of the substrate
A 2-3 mm thick foil material, which reflects thermal radiation, is used as a substrate under the film. This coating significantly reduces heat loss through the base and increases the system's efficiency.
The underlayment is laid flush against the walls throughout the room, foil side up. The strips are laid end to end. To prevent the product from shifting, it is secured to the base with double-sided tape.
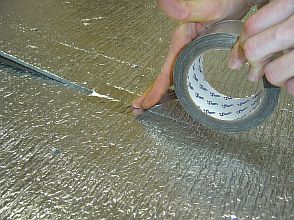
Slots must be made in the material to accommodate the sensor, wires and terminals; they should not protrude from the surface.
Before laying the film, it is recommended to cover the base with a waterproofing material - polyethylene.
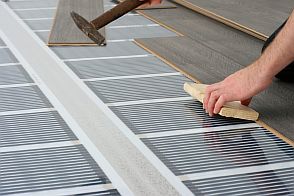
Laying thermal film
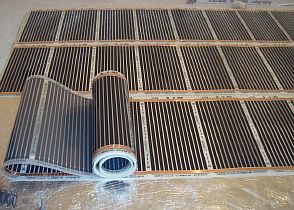
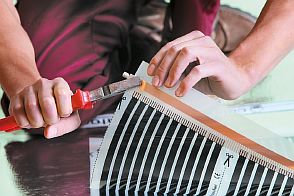
First, the film placement locations are marked on the backing according to the diagram. Then, strips of the required length are prepared; they should not exceed 8 meters. The product can only be cut along the designated lines.
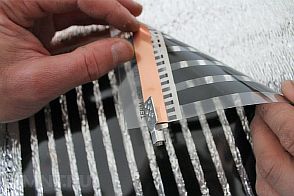
In places of cuts, unused contacts should be insulated, for this purpose bitumen tape is used.
The film is laid with the copper strips facing down, although there are models that are laid the other way around, so you should read the manufacturer's instructions first.
The canvas is placed along the length of the wall, at least 25 cm from the wall. The strips should not overlap; they are laid end-to-end or spaced 5 cm apart. This installation detail is also specified in the instructions.
Connecting the floor
To connect the film to the power supply, you will need a flexible cable with fire-resistant insulation. The wire cross-section is selected based on the system's power. Connect the cable to the thermostat according to the included documentation, where the L channel should correspond to the live wire, and the N channel to the neutral wire.
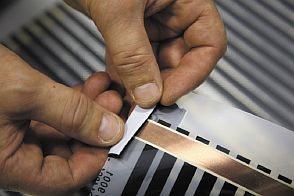
Step-by-step connection instructions are as follows:
- First, terminals are installed on the copper strips of film. One part is placed inside the film, the other outside.
- Then the contact is fixed with pliers.
- The stripped wires are connected to the clips and clamped.
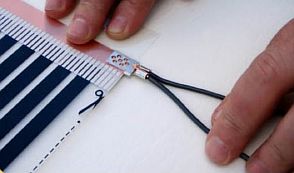
- The terminals are insulated with bitumen tape.
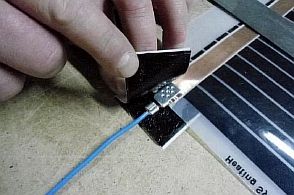
- All cables are routed to the thermostat and connected to it.
Connecting the sensor
The sensor is installed on a black graphite strip of film at the designated location and secured with tape. It and the wires leading from it to the thermostat are placed in pre-drilled grooves in the corrugated pipe substrate. The cable from the sensor is also connected to the thermostat.

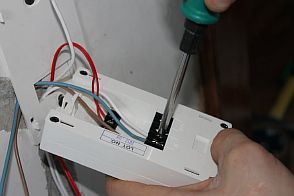
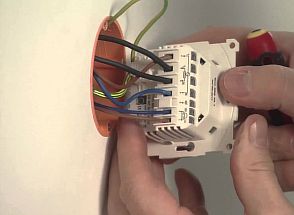
Connecting the thermostat
The regulator is installed at the designated location. The thermostat is powered by an RCD—a special protective device. Avoid twisting the wires, as this can cause overheating.
It is recommended to ground the system, this ensures complete safety during use.
After the device is fully connected, it is essential to test its operation.
Laying laminate flooring
Before laying the laminate flooring, it's important to protect it from water. To do this, cover it with polyethylene sheeting, overlapping the walls. Tape the seams.
The tongues on one side of the first row of slabs are cut off. This side of the slats is laid against the wall, with a 10 mm gap left to accommodate the spacer. This gap is necessary to allow for the material to expand or contract with temperature changes.
The boards of the second and subsequent rows are placed against the adjacent panels at a 45-degree angle and snapped into place using locks. The last board should be installed using a clamp.
Once all the finishing materials have been laid, baseboards are installed around the perimeter of the room to cover the gaps.
Features of operation
After installing film heating under the laminate, it's important to keep a diagram of its placement. This will allow you to rearrange the furniture correctly.
After connecting the infrared floor and laying the laminate, don't immediately turn the unit on at full power. The slats need time to adjust, so set the temperature to 15-20 degrees Celsius (59-68 degrees Fahrenheit) and increase it a few degrees daily.
Additionally, slowly increasing the heating temperature will allow you to understand whether the system is working effectively and determine the optimal heating level for yourself.
Prices and Manufacturers
When choosing a film floor, it is better to give preference to well-established manufacturers, such as:
- Caleo is a South Korean manufacturer. This company's infrared systems are leading the way and are suitable for installation under laminate flooring. Their products are reliable, durable, and have a minimal thickness. They come with a 10-year warranty. Their only drawback is their fragility. The average price starts at 2,500 rubles per meter.
- Heat Plus is a Korean manufacturer of premium flooring. Its films have a high melting point and are safe and effective. The average price per square meter is 1,000 rubles.
- Daewoo, a South Korean company, offers high-quality flooring at the most affordable prices, starting from 500 rubles per linear meter. Models range from standard to self-leveling.
When purchasing laminate flooring, check out the rankings of manufacturers that produce products for underfloor heating systems. The top-ranked companies are:
- Quick-Step — Belgium. They offer a wide range of flooring options, each with an exclusive design. Prices start at 800 rubles.
- Tarkett — Serbia. Reliable flooring in a wide range of colors. Average price: 800 rubles per square meter.
- Kronostar, Germany. The film offers high performance properties and an attractive appearance—all at a low cost.
Installing infrared flooring under laminate flooring is an excellent solution. This design can create a comfortable home. Furthermore, it's inexpensive, easy to install, and can be done yourself.


The key here is not to skimp on film flooring (I recommend Kaleo), as these are extremely sensitive systems, and if one unit malfunctions, the entire system is useless. It's the same with laminate flooring. There's no point in skimping on this, otherwise you'll end up constantly re-laying and repairing everything, speaking from experience.