Underfloor heating is gaining popularity every year. But to ensure it's reliable and durable, It is important to choose the right pipes, namely the material from which they are made.
In this article, we'll take a detailed look at the technical characteristics, advantages, and disadvantages of cross-linked polyethylene underfloor heating, how to install it yourself, and more.
- Material features
- Strength
- Temperature resistance
- Physical properties
- Chemical properties
- Other characteristics
- Advantages and disadvantages of cross-linked polyethylene
- Construction of polyethylene pipe
- Types of fittings for joining cross-linked polyethylene
- Compression
- Press fittings
- Axial
- Installation of underfloor heating with cross-linked polyethylene piping
- Preparatory work
- Heating element layout diagram
- Calculation of the number of pipes
- Preparing the base for pipes
- Installation of polyethylene pipes
- Water connection and pressure testing
- Pouring the screed
- Concrete screed
- Dry floors
- Operating Rules
- What difficulties and errors can occur?
- Comparison of polyethylene pipes with other materials
- Video instructions
Material features
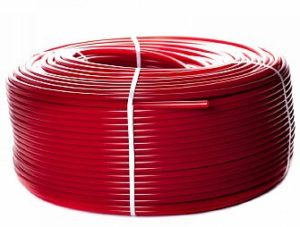
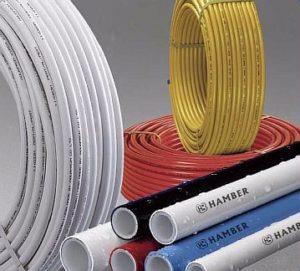
Underfloor heating pipes are made from various materials: copper, metal-plastic, but the most modern type is considered to be a pipe made of cross-linked polyethylene.
Cross-linked polyethylene is a type of ethylene produced through chemical and physical manipulation. During production, ethylene molecules are fused into a three-dimensional cellular network. This model was named PEX.
Strength
The strength of this product is provided by transverse joints formed during the manufacturing process, in addition to longitudinal ones. The expansion rate of PEX tubing ranges from 250 to 800%.
In addition, unlike polypropylene, the material has increased durability and does not deteriorate even with significant temperature changes.
Temperature resistance
When using cross-linked polyethylene hoses, the recommended maximum temperature is 140 degrees Celsius. However, melting processes begin at temperatures exceeding 190 degrees Celsius.
The lowest temperature this pipeline can withstand, and at which the strength and elasticity of the product is maintained, is -50 degrees Celsius.
Please note: Cross-linked polyethylene has increased resistance to short-term temperature fluctuations.
Therefore, it is recommended for use in low-temperature heating systems, where the heating is not significant and temperature fluctuations are frequent. However, polyethylene should be used in areas where the pipeline is constantly hot.
Physical properties
Despite the high density of PEX tubing, the material is soft and elastic, and has the following properties:
- liquids and gases do not pass through it;
- It bends easily, allowing you to make the sharpest turns.
Chemical properties
An improved production process—cross-linking—has made polyethylene more resistant to organic and inorganic influences, and it is also not affected by solvents.
Furthermore, the material is resistant to the negative effects of the environment, including sunlight and oxygen. This quality is due to the protective anti-diffusion coating found on most PEX models.
Other characteristics
Polyethylene contours have diameters from 10 to 200 mm. For hydronic underfloor heating, the recommended diameter is 16 mm.
Main technical characteristics:
- wall thickness - 2 mm;
- meter weight - 110 g;
- meter volume - 0.113 l;
- density - 940 sq. m3;
- thermal conductivity - 0.39 W/mK.
Advantages and disadvantages of cross-linked polyethylene
Cross-linked polyethylene piping, like any other type, has its pros and cons.
Advantages:
- Its elasticity allows it to be used when laying out circuits with large bends, without the risk of the product being kinked.
- Environmentally friendly - it does not contain harmful components, so no substances hazardous to human health are released when heated.
- The combustion temperature is high—full melting begins at 400 degrees Celsius. But even during decomposition, all components are non-toxic.
- Performance characteristics—the unit does not rot, is resistant to corrosion, and is resistant to chemicals. All this guarantees a long service life for hydronic underfloor heating systems made from this material.
- Frost resistance - no deformation occurs at significant sub-zero temperatures.
- It has sound-absorbing properties—a floor with a heating element made of cross-linked polyethylene operates silently.
- It has the property of “shape memory” – it is able to restore its original appearance.
- It has an acceptable price.
It's also worth mentioning the minor drawbacks of cross-linked polyethylene pipes. First and foremost, these relate to some installation difficulties.
Bends in the pipes require secure support. Furthermore, extreme care must be taken when installing them into the underfloor heating system to avoid damaging the protective coating.
Another disadvantage is the negative impact of direct ultraviolet rays, which make the material brittle.
Construction of polyethylene pipe
The polyethylene contour is a multi-layer structure with a reinforcing layer. The reinforcement increases the product's strength, reduces its expansion, and cushions internal pressure surges.
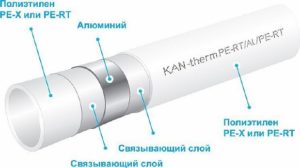
The reinforcing layer can be polypropylene, fiberglass, aluminum foil, or sheets. When connecting multiple pipes, this layer must be stripped back to a depth of 1 cm.
Important to know! It's worth noting that for underfloor heating systems, a non-reinforced circuit is most often used.
In addition, cross-linked polyethylene has an "oxygen barrier"—an anti-diffusion layer. This layer is present in all PEX products. Without it, oxygen penetrates deeper, leading to, albeit slow, degradation of the product.
There are several types of cross-linked polyethylene that are used in the manufacture of pipes for underfloor heating:
- PEX is manufactured using hydrogen peroxide. Cross-linking with peroxide provides strength and elasticity. These pipes have the best molecular memory.
- PEX-b — silane is used to stitch polyethylene; it bonds up to 80% of the molecules. The resulting contours are similar in strength to PEX-type, but are less elastic and retain their shape less well.
- PEX-c — cross-linking is achieved using radioactive radiation. The pipes are less flexible, which can lead to kinks during installation. These kinks are eliminated using a coupling.
- PEX-d - nitrogen is used for cross-linking, but the technology is complex and rarely used.
Types of fittings for joining cross-linked polyethylene
Today, the following types of fittings are used to connect polyethylene pipes together.
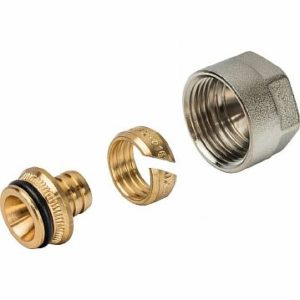
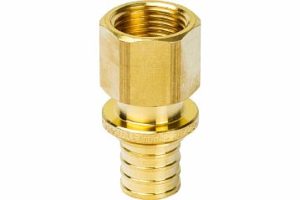
Compression
Compression fittings, also known as crimp fittings, are a detachable connection method. The fitting consists of a nut, a split ring, and a nipple, most often made of brass.
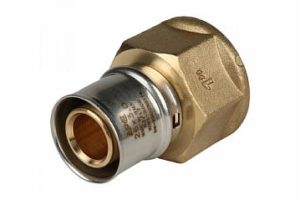
Press fittings
This type of fitting creates a permanent connection that is strong and durable. It is recommended for use in tie-type structures and in high-pressure, high-temperature systems.
The press fitting consists of a body, a compression ring and a sleeve.
Axial
An axial fitting is a device consisting of a nipple and a sleeve. It is installed using expansion and tension tools.
Installation of underfloor heating with cross-linked polyethylene piping
The installation process for underfloor heating systems using cross-linked polyethylene contours is a step-by-step process of laying the structural layers. The total thickness of the structure is approximately 15 cm.
Preparatory work
Before you begin installing the system, you should complete some preparatory steps. First, you need to decide on the type of pipes and components.

To install a structure with heating you will need:
- polyethylene pipeline;
- expansion tank;
- boiler for heating water;
- circulation pump;
- plumbing fittings;
- fasteners;
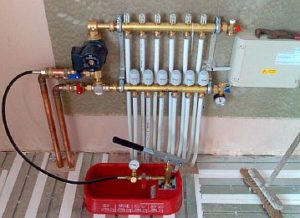
- manifold, ideally with a hydraulic arrow;
- damper tape;
- insulating material and reinforcement;
- screed solution.
When selecting a manifold unit, it is recommended to choose a device with balancing valves and flow meters; this will simplify the process of adjusting the system.
All necessary components should be prepared before installation to avoid distractions during the work process.
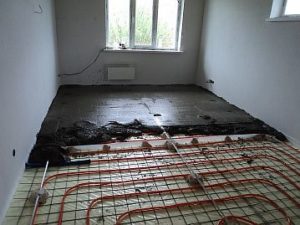
Heating element layout diagram
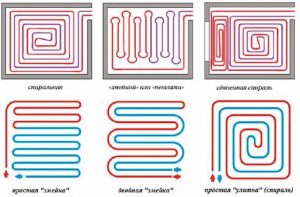
There are several basic patterns used when laying underfloor heating pipes: "snake", "snail" and "double spiral":
- The "snail" design is the most common; it is easy to install and provides uniform heating throughout the entire room, as all angles are 90 degrees.
- The "snake" pattern is more complex to install, as the turns can reach 180 degrees. This pattern works well with cross-linked polyethylene pipes, as they bend easily.
When choosing a layout for hydronic underfloor heating, consider the specific features of the room. For large areas, a "double snail" or "spiral" layout is recommended. This layout should also be used when zoning areas based on heating levels.
With a standard "snake" or "snail" system, the maximum length of the main line is 60-80 meters. In rooms where the length significantly exceeds the width, the circuit size can be increased to 120 meters, but the pipe diameter must be larger.
When laying pipes, the spacing between them is crucial. Typically, it's 10-35 cm; the smaller the spacing, the more heat the floor will transfer. In areas where heat loss is high (near doors and windows), the spacing should be minimized, while in the center of the room it can be increased. Pipes should be installed at least 30 cm from the walls.
Please note! It is recommended to place the collector in the center of the apartment or house; this will ensure even heating of all rooms.
Calculation of the number of pipes
Before purchasing cross-linked polyethylene pipes for underfloor heating, you need to calculate the required size and diameter. Based on current practice, a 16 mm diameter pipe with a 2 mm wall thickness is considered suitable. For larger areas, a size of 20–25 mm is recommended.
To calculate the amount of product required to heat a room, you can use the formula:
D=S/M x k, where:
- D — calculated pipe size;
- S — the size of the room area;
- M — laying step;
- k is the safety factor, if the area is 30 m2 – 1.1, more – 1.4.
The maximum pipeline length is affected by the circuit diameter. For a 16 mm diameter, the maximum length is 90 m, for 20 mm diameter, the maximum length is 120 m, and for 25 mm diameter, the maximum length is 150 m.
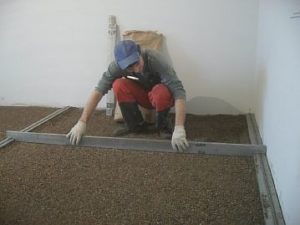
Preparing the base for pipes
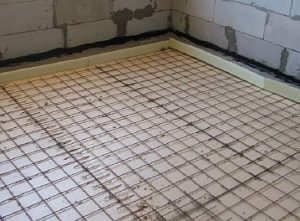
Installation of the underfloor heating system should begin with preparing the subfloor. The process consists of:
- dismantling the old finishing coating and screed, cleaning and leveling the base;
- laying waterproofing material - polyethylene film;
Please note! If you have the funds, it's best to use a polymer membrane; it will allow the floor to "breathe."
- base thermal insulation - extruded polystyrene foam tiles or cork are used;
- placement of a reinforcing grid - there is no need for it if polystyrene foam is used as thermal insulation;
- installation of a damper tape - it is necessary to compensate for the thermal expansion of the screed.
Next, the boiler and manifold are installed at the planned location. The unit should be connected to the water supply and power.
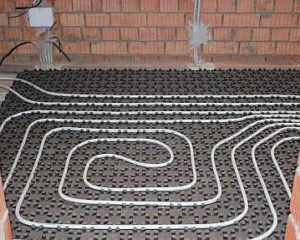
Installation of polyethylene pipes
Polyethylene pipes are laid according to the diagram on polystyrene foam sheets or a reinforcing mesh. If the room is large, the area is divided into several contours.
To simplify the installation process, it is recommended to mark the slabs. Start at the manifold, and the other end should also return to it.
Important! Before beginning installation, consider the method for connecting and securing the pipes.
It is recommended that the circuit be seamless. However, if necessary, the pipes can be connected to each other or to the manifold by welding, compression, or pressing fittings.
Sewing a circuit using compression fittings is a reliable and simple method. A coupling is attached to the hose, then the internal diameter of the pipe is expanded to the required size using an expander. The nipple is screwed tightly and a sleeve is placed on it.
There are several ways to fix pipes to fittings or polystyrene foam boards:
- polyethylene clamps;
- steel wire;
- fixing tracks.
Using clamps is the simplest and most cost-effective option. Only two are required per meter. They are installed every 50 cm in a straight line and every 20 cm in a curve.
Basic rules for installing cross-linked polyethylene pipelines:
- when turning, do not make sharp bends;
- installation work should be carried out at a temperature of at least +18;
- If the pipes were in the cold, they should be kept in a warm room before installation;
- the turning radius of a pipeline with a diameter of 16 mm should not exceed 12 cm;
- Excess length of the circuit should be cut off only before connection;
- It is prohibited to place heavy objects or step on pipes during installation;
- The outline must be positioned evenly, without twisting.
Water connection and pressure testing
Before pouring the screed, the system should be checked for functionality and for defects in the main line.
Connecting the floor involves connecting the supply and return hoses to the manifold. Afterward, open the control and air valves. Then turn on the circulation pump and compressor, producing a pressure of 5-6 bar.
Using these, water is supplied to the main line for 12 hours. The pressure should be 1.5 times higher than the operating pressure. If the clamps are blown off during this process, they are reinstalled, but 5 cm lower.
After this time, all valves are closed except one, the pressure is set to the operating level, and each branch is adjusted in turn.
Pouring the screed
Only after the structure has been tested can the next layer of the structure be laid. There are two options: a concrete screed or a dry floor.
Concrete screed
For the screed, either store-bought or homemade mortar made from M300 cement is suitable. The minimum concrete layer that can protect polyethylene pipes is 3 cm, and the maximum is 7 cm.
Most often, the screed is installed without thermal seams, they are necessary:
- if the area of the room is more than 33 m2;
- if the length of the room exceeds 10 m;
- with complex layout.
It is possible to pour a reinforcing screed, that is, using a reinforcing mesh, this gives strength to the structure.
The screed is poured one at a time, starting from the front corner of the room and finishing at the door. After leveling the concrete surface, the floor is left for four weeks to dry completely.
Dry floors
Installing a dry floor over pipes is an easier and faster method, as there are no wet processes that are labor-intensive and require curing.
Expanded clay sand is an inexpensive option for dry flooring. Furthermore, if a leak occurs, the sand is simply removed and then replaced after the damage is repaired.
Operating Rules
The service life of underfloor heating systems made from polyethylene pipes is affected by operating conditions—heat transfer fluid temperature and pressure. PEX pipes tolerate temperature fluctuations well, but over time, this leads to their aging.
Basic operating rules that will extend the life of your floor:
- After installation, it is prohibited to turn on the device to maximum;
- the heating level of water entering the circuit should not exceed +45;
- When commissioning the system, especially in winter, switching on should be gradual, starting at 2 o'clock, with a subsequent increase in operating time every day.
What difficulties and errors can occur?
When installing polyethylene pipes, it's not uncommon for the pipe to become kinked. Continuing to install such a circuit is not an option; it must be replaced, as it will eventually leak.
Re-crimping press fittings is prohibited, so apply maximum force when squeezing the handles. Also, remove all burrs.
Comparison of polyethylene pipes with other materials
A comparison of the polyethylene circuit with pipes made of other materials is shown in the table:
| Pipes made of | Pros | Cons |
| Cross-linked polyethylene | Products made from this material can regain their shape. They are heat-resistant, durable, corrosion-resistant, lightweight, provide noise insulation, are environmentally friendly, and affordable. | Cross-linked polyethylene reacts negatively to ultraviolet radiation, so it can only be installed in closed communications. |
| Copper | Copper pipes are durable; they won't melt or crack, and they resist bacterial growth and corrosion. Copper products tolerate high and sub-zero temperatures well and are resistant to mechanical stress. | Pipes made of this material are expensive and heavy, and they do not tolerate hard, acidic water well. Copper and steel pipes should not be combined in the same system. |
| Polypropylene | This material is non-toxic, resistant to chemicals, pressure, and temperature fluctuations. Pipes made from it are lightweight, making installation easier. | Polypropylene pipes have low flexibility and a high expansion coefficient, which leads to an increase in their dimensions. |
| Metal-plastic | Despite the affordable cost, metal-plastic pipes are durable, corrosion-resistant, and acid-resistant. They are lightweight, maintain their shape, and are environmentally friendly. They are also easily bent, making installation easier. | The two layers of the pipes—polyethylene and aluminum—have different rates of linear expansion, which can cause delamination. There's a risk of pipe rupture if the fitting is over-tightened, and if threaded fittings are used, there's a risk of scale formation inside. |
In summary, copper pipes for underfloor heating are an excellent option, but not affordable for everyone. Polypropylene products are cheaper but lack flexibility, and metal-plastic pipes don't handle temperature fluctuations well.
Therefore, the use of cross-linked polyethylene piping in underfloor heating systems is practical and convenient, and is gaining popularity every year. Furthermore, it can withstand freezing, and minor deformations disappear at a comfortable temperature.
However, experts advise choosing underfloor heating pipes based on the room's characteristics and operating conditions, as these factors influence the comfort of the home and the service life of the device.


