Today, underfloor heating is a popular source of additional heating, especially in ground-floor apartments. The most common finishing option is laying ceramic tiles over underfloor heating.
The variety of modern tile types allows you to match them to any interior. There are models that imitate stone, wood, and other materials. The combination of heated floors and ceramic tiles is practical, warm, and beautiful.
- Types of floors
- Types of electrical structures
- Technology for laying tiles on electric floors
- Advantages and disadvantages of tile flooring
- Preparation of material
- Which floor tiles should I choose?
- Adhesives
- Necessary tools
- Step-by-step instructions for laying tiles
- Preparing the base
- Installing markings
- Preparing the glue
- Features of tile adhesive
- Laying tiles
- Grouting
Types of floors
There are several different types of underfloor heating systems that can be installed with this type of flooring. They differ in their performance, energy consumption, installation method, and operation.
The following varieties are found:
- Water-based systems require the installation of pipes with a specific cross-section. The design works similarly to a central heating system, meaning water circulates through the pipes. They are either filled with a concrete screed or dry-installed. Water-based underfloor heating is ideal for laying ceramic tiles, but the design is expensive, installation is labor-intensive, and the operating process is unsafe.
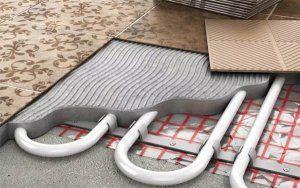
The technology for laying tiles over hydronic underfloor heating is not particularly different, but the main thing is to test the system before laying. Otherwise, if there's a leak or a malfunction, you'll have to tear out the entire surface.
- Infrared is a modern model. It uses thin heating plates protected from water by a polyethylene film. The infrared system is more energy-efficient and corrosion-resistant. Furthermore, if a fault occurs, only the faulty section can be disconnected, while the rest of the system continues to function. This modern model is the most reliable and easiest to install. The tiles are laid on a mounting grid, and adhesive is used as a fastener.
- Electric – multi-layer, equipped with insulation, a heating element, screed, and a finishing coating. This model reduces the room's height by 100 mm.
Types of electrical structures
Electric models are classified according to the built-in heating elements and are powered by electricity.
| Pros | Cons |
| Can be installed in any room. | The cost of electricity is high. |
| No consent documents are required. | |
| A safer way, no risk of flooding your neighbors. | |
| Although in some cases a concrete screed is required, it is much thinner in thickness, so the load on the foundation is lower. | |
| Compact equipment and ease of operation. | |
| Installation is simple and the cost is significantly lower than for water. | |
| Service life is several decades. |
There are:
- Cable-based systems—thick cable is laid under the screed. They are rarely used in apartments, as they require a cement screed, which takes 28 days to dry and significantly increases weight, making them unsuitable for multi-story buildings.
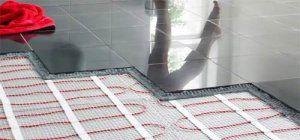
- Electrical mats (the cable is laid on a reinforced mesh) greatly simplify the installation process, as there is no need to pour concrete, and the tile covering is laid with adhesive. This option is ideal for tiled surfaces.
- Rod-type elements are carbon fiber elements that are interconnected. Despite their cost-effective operation, they require a cement screed, so they are not popular.
Technology for laying tiles on electric floors
Before laying floor tiles, it's important to ensure the system is working properly to avoid having to open the surface later. The tiling technique generally depends on the installation method: wet or dry.
In wet pouring, a cement and sand mortar is used to fill the structure. In dry pouring, an organic material, rather than a concrete mix, is used. This is important to know!
In addition, there are two installation technologies: seamed and seamlessThe first method is better because the grout absorbs some of the expansion that occurs due to temperature. This method will result in a smaller decorative shell.
Advantages and disadvantages of tile flooring
Ceramics are considered a cold covering, but laying tiles over electric or water-heated floors is a popular solution for both bathrooms and kitchens, as well as for any room.
Although this material doesn't heat up quickly, it retains accumulated heat for a long time and dissipates it well. Furthermore, its slow heating rate ensures uniform surface heating and prevents excessively hot or cold spots.
Tiles are especially suitable for bathroom floors, which have high humidity. They dry quickly and resist mold growth. Furthermore, they increase the strength of the entire structure.
Preparation of material
The purchase of materials should be approached seriously, as the quality of the flooring is directly related to the quality of the building material used.
Which floor tiles should I choose?
How do you choose floor tiles? Important factors include safety (non-slip), high density, and hardness. Choose based on the markings, which indicate:
- wear resistance index (from minimum 1 to maximum 5);
- level of moisture resistance (high porosity – low moisture resistance);
- size;
- degree of chemical resistance;
- production method (pressing or extrusion).
In addition, practicality and consistency with the overall design play an important role.
Today, the range of floor tiles for heated floors is vast, including natural stone, porcelain stoneware, and monocottura. These materials meet all the standards and regulations for heated floor tiles.
It's thicker than the wall-mounted wallpaper. It also needs to be free of defects, as this will result in uneven surfaces and differences in joint width. It's best to choose a matte or rough texture, as it's less slippery.
When calculating the quantity of ceramic tiles, you need to start from the square footage of the area, plus 10% for breakage.
Adhesives
When choosing a laying and grouting mortar, consider its elasticity and thermal conductivity. For gluing tiles over heated floors, experts recommend the following mortars:
- "Ceresit" (CM-14 EXTRA, CM-16, CM-17, CM-115);
- Knauf Flex – for laying floor tiles in rooms with high humidity levels.

Adhesives for laying floor tiles from companies like Keramik and Starateli are also very popular. Grout should be matched to the color of the tiles.
When purchasing a composition, be sure to read the instructions for use, characteristics, and consumption rates of the mixture.
Necessary tools
When laying ceramic tiles on a heated floor, you should stock up on the necessary tools:
- spatula (notched and regular);
- rule;
- crosses of your chosen size for joining seams;
- level (large and small);
- tape measure;
- tile cutter;
- with a pencil;
- with tape;
- with a hammer.
Once you have all the necessary materials and tools, you can start gluing the tiles.
Step-by-step instructions for laying tiles
The rules for laying tiles on heated floors are no different from the process of working with this material on other flat surfaces.
If you don't want to entrust the work to professionals and plan to lay tile on a heated floor yourself, then you should follow these rules:
- the heated floor and other surfaces must be located at the same level;
- the size of the screed should be no less than 1 cm, otherwise the heat will not be distributed evenly;
- It is forbidden to place furniture on an electric heated floor, and it is forbidden to cover it, as this will lead to rapid burnout;
- After pouring the screed, the underfloor heating system must not be switched on for 28 days in concrete heating mode above 28 degrees;
- After the concrete has completely hardened, the system should be switched on in normal mode for 2–3 days;
- the temperature of the underfloor heating screed when laying tiles should be 25 - 28 degrees;
- It is not recommended to lay tiles on a working floor, as the adhesive may dry out quickly and the surfaces will not have time to set;
- until all components have completely dried and hardened (14 days), the system must not be heated to a temperature higher than 28 degrees;
- Only after the grout layer has dried can you turn on the heating in the room.
Laying ceramic tiles should only begin after all systems have been checked.
Preparing the base
The preparatory process is as follows:
- checking the reliability of fastening the structural elements; they can be fastened with tile adhesive;
- Check the evenness and horizontality of the surface using a building level; if cracks are found, they must be filled with a cement mixture;
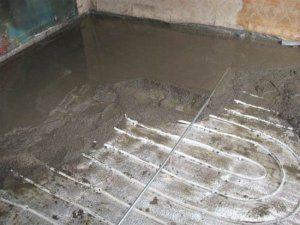
- pouring the screed, using a solution of sand and cement or a special glue, it must dry, it dries from 3 to 25 days;
- the screed must be primed and dried for two hours, then apply a second layer of primer;
- Before laying tiles on a warm water floor, preliminary marking and chasing of channels for pipes is done;
- laying a heat-insulating layer that will prevent condensation and heat loss.
The average soil consumption rate is 200-300 g/m2.
Installing markings
Marking is a mandatory step in laying tiles; it ensures the evenness and quality of the covering.
The classic tile laying method is straightforward. The long wall serves as a reference point, from which markings are made. Using chalk and a string, mark the first row, from which subsequent rows are measured.
If you plan to lay tiles in a pattern on the floor, you need to draw diagonal lines intersecting in the very center of the area. From this point, the pattern is laid out.
First, it's best to lay the tiles dry according to the installation pattern to verify the correct amount of material. The choice of pattern does not affect the performance of the system.
Preparing the glue
The next step is selecting and preparing the adhesive. All materials included in the underfloor heating system are subject to temperature fluctuations, so the adhesive needs to be flexible and able to withstand these fluctuations.
A standard adhesive isn't suitable; a special one is required. Adhesive consumption depends on the surface quality (unevenness). The average amount of adhesive per square meter is specified in the instructions, although there are nuances that depend on a number of factors.
| What influences glue consumption? | |
| Surface of the base | The average adhesive consumption per square meter is up to 5 kg. If the surface is uneven or porous, the consumption increases. |
| Tile size | If it is large in size, then the glue consumption increases. |
| Air temperature | If the air temperature is high, the water from the solution evaporates and a new one needs to be prepared. |
Features of tile adhesive
- withstands temperature fluctuations from 30 to 90 degrees;
- provides adhesion at the level of 0.8 - 1.0 MPa;
- is compatible with the base and floor covering;
- has a “warm floor” icon or inscription on the packaging;
- Ideally, it contains aluminum cement, which can provide maximum strength.
To properly prepare the adhesive mixture, follow the instructions on the packaging. Don't mix all the adhesive at once; it dries quickly, so it's best to mix it in small batches.
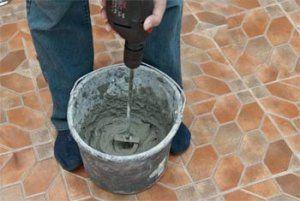
The preparation method is simple: pour water into a container and add the mixture, strictly following the proportions specified in the instructions. Mix thoroughly with a drill. The result should be a consistency similar to thick sour cream.
The prepared adhesive solution should be left for 15 minutes, stirred again, and you can begin laying tiles on the heated floor.
To check the adhesive quality, place a small amount of the mixture on a spatula and tilt it slightly. If the adhesive doesn't flow, the quality is good.
Laying tiles
Once the preparatory work is complete, you can begin laying tiles on the heated floor. Find out How long after pouring the screed can I turn on the underfloor heating?.
The technological process of laying tiles on a warm floor:
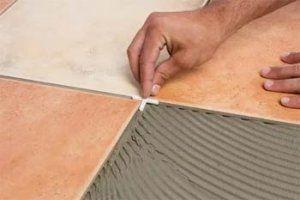
- The adhesive is applied to the base using a spatula, both a regular and a notched trowel. The former smooths the mixture, while the latter creates a ribbed surface, which promotes better adhesion.
- The floor is coated with glue, 1 square meter at a time.
- Glue is also applied to the back of the tile, and it is carefully placed on the floor, pressed down, and you can lightly tap it with a rubber mallet.
- The surface is constantly checked for horizontality.
- Plastic crosses are installed in the seams; this will help ensure the distance between tiles is uniform during installation.
- Tile scraps should be placed in corners and under furniture. To decorate the area around pipes, first prepare a cardboard template to use for cutting out the tiles.
- After laying the tiles over the entire floor, check the surface for unevenness and, if necessary, level any defects and remove the spacers. These steps must be completed before the adhesive dries, otherwise they will be impossible.

Tiles should be placed 1–2 cm from the wall. This gap allows for expansion and contraction.
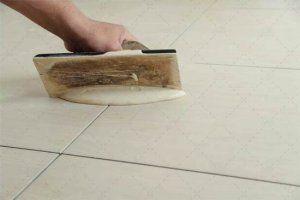
Grouting
You can begin grouting only after the adhesive has dried; the drying time is approximately two weeks. However, each adhesive has its own drying time, so it's important to check the packaging beforehand.
Apply grout to the joints using a rubber spatula and a special grouting compound. After 40 minutes, the grouting compound can be washed off with cold water. Apply silicone sealant around the perimeter of the joints, and then install the baseboards.
According to the tile installation technology, furniture can only be placed on the floor after 2-3 days. Once the structure has completely hardened, the system can be turned on and fully loaded.
By following the above rules and procedures, you can lay tiles on your heated floor yourself and enjoy a comfortable atmosphere in your home.


