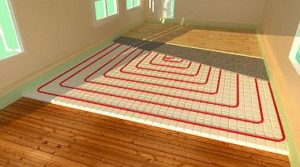
Underfloor heating is gaining popularity, and for good reason, as it creates comfort in the home without taking up valuable space. For this heating system devices are used that can limit the heating degree of the coolant to no more than 55 degrees.
However, such structures take up a lot of space and are intended for underfloor heating in large spaces. They are not suitable for smaller spaces (bathrooms, toilets), so a simplified unit called a unibox is recommended for these.
In this article, you'll learn what a unibox is for underfloor heating, what it's used for, how it works, and how to install it when installing a hydronic floor in a residential building.
What is a unibox and why is it needed?
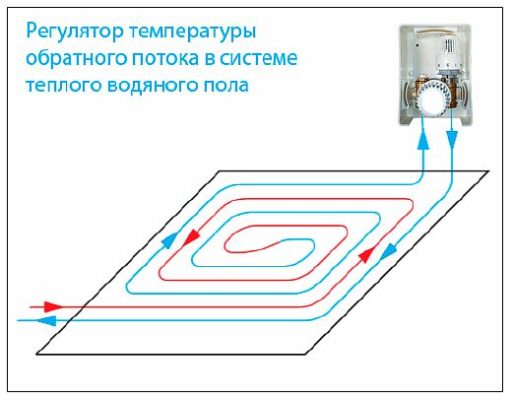
A unibox is a valve designed to regulate the temperature in an underfloor heating system. This is accomplished by restricting the flow of return heat transfer fluid.
Unibox is traditionally used in two-pipe heating systems. However, it can also be used in single-pipe systems. It is recommended for installing underfloor heating in rooms up to 20 m². Standard pipe diameters range from 1.6 to 2.0 mm, with a length of 200 mm.
Based on practical application, a number of rules have been developed for using the unibox for heated floors, which require special attention:
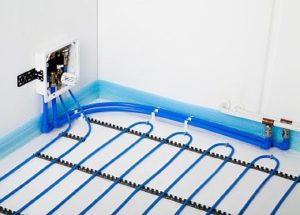
- The pipeline must be laid so that the supply and return lines are located in a “snail” pattern in the screed.
- Unibox is designed for one loop, but if it is necessary to install two circuits, the connection must be from one point (tee), and they must be of the same size.
Unibox is also suitable for combined systems – panel and radiator.
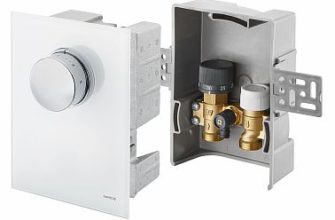
Device
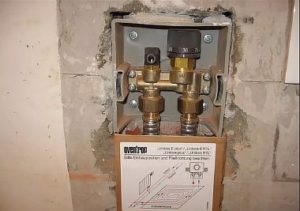
The Unibox is a mounting box containing the components. Its size varies by model, ranging from 135 to 190 mm. The width (145 mm) and depth (57 mm) are the same for all devices.
The Oventrop Unibox underfloor heating kit includes:
- brass body - a two-way valve with a thermostat is mounted inside, designed to adjust the temperature level;
- Mayevsky tap - has an air vent, a cover and a thread for connecting collet fittings.
The front side of the mounting box is equipped with a temperature controller.
Types
Oventrop offers 18 models of uniboxes for underfloor heating. The most common mounting unit is the Unibox RTL-K. This unit is recommended for regulating heating in small rooms where a full-fledged mixing and distribution system is not required. Connection to the underfloor heating is made using a ¾-width cone.
There are several modifications of this mounting device:
- Without thermostat K—this model doesn't have the ability to control the room climate via air. A shut-off or regulating valve must be installed.
- Without an RTL thermostat, it's impossible to control the climate using the coolant. A regulating or shut-off valve is also required.
Operating principle
The operating principle of a unibox differs from that of a manifold. If a pump-distribution unit is used, the coolant flows from two streams and is mixed to the desired temperature.
The controller doesn't mix hot and cooled water. Heated coolant is supplied to the floor heating system's main line through a tee. As it moves through the underfloor heating system's pipeline to the unibox (RTL thermostatic head), it cools.
The temperature to be maintained is set on the thermostatic head. The temperature control ranges from 10 to 50 degrees.
According to the set temperature, the valve limits the flow of coolant at the outlet of the underfloor heating loop. Hot coolant is supplied to the floor in portions, preventing the system from overheating. This thermostatic valve is rarely adjusted during operation.
Next comes thermal head-KIt reacts to the room air temperature. If necessary, this valve can shut off the flow that passed through the first one. The K-valve is used to adjust the floor's operation. Its temperature range is from 7 to 28 degrees Celsius.
Pros and cons of using
The unibox design is simple and small, but despite this, it has many technical advantages:
- ease of adjustment;
- excellent design solution;
- the ability to connect to pipes of any type;
- the presence of a protective box - performs the function of insulation;
- it does not require additional energy to operate;
- easy installation;
- the presence of an air vent;
- is able to create comfort in the home.
Experts and users do not note any significant shortcomings in this equipment.
Features of operation
The operating principle of all unibox models is the same:
- One circuit is no more than 100 meters;
- Recommended pipeline diameter is 16 mm;
- Input temperature degree - maximum 70;
- Installing the device at the outlet.
It is important to calculate the pressure correctly; it should be within 10 bar, no more, the permissible pressure difference is 1 bar.
Analogues
The Oventrop Unibox analogues include reverse flow thermostatic heads from Herz and Heimeier, which have the abbreviation RTL, and:
- Valtec - VT. ICBOX-1.0, 2.0 and 5.0.
- Meibes — RTL-I (internal thermostat); RTL-A (external thermostat); RTL-BOX TH; RTL SI; RTL ER-TH; ER-RTL.
- Danfoss valve: FHV-R and FHV-A.
To regulate the temperature of the return coolant, the FJVR thermostat or the FTC thermostatic device, which has a remote sensor, is suitable.
Installation
The connection of the unibox mounting box to the underfloor heating system looks like this:
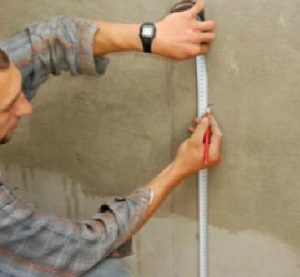
- Start by choosing a location for the device and marking the walls. The Unibox should be positioned at least 20 cm above the floor. Ideally, it should be level with other switches, away from heat sources and drafts. The device should also be out of direct sunlight.
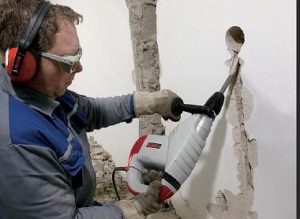
- Next, you need to make grooves for the pipes and a recess for the device. The recess in the wall for the device should be 2-3 cm larger than the box itself; this will allow it to be secured with plaster of Paris.
- Next, install the mounting box into the prepared niche. When securing the unit, it must be positioned horizontally, which is easy to check with a spirit level. The open side, where the pipes will be connected, should face downward. The standard installation depth for the box is 1–2 cm from the edge of the wall to the unit. A larger gap is acceptable, as the unit's long guides allow the front wall to cover up to 6 cm of space. The unit's cover should be flush with the wall.
- Once the unibox is installed, you can begin installing the piping and connecting it. The pipes transfer heat in all directions, even downwards. Therefore, to avoid heat loss, install the insulation on the base before installing the pipes.
There are two options for connecting underfloor heating to a unibox: using a press coupling or a press fitting. When pouring concrete screed into the pipes, press couplings are recommended, as they don't require additional threading.
- The final stage is pouring the screed and sealing the grooves in the wall. Only after the concrete has dried, after 21 days, can the flooring be laid and the system turned on.
As you can see, a unibox is a simple device, but in the absence of a distribution manifold in a water-heated underfloor heating system, it plays a significant role in its efficiency. Therefore, before purchasing a distribution manifold, read the installation instructions and its functions, and the unit will serve you well for years to come.


