To connect a water heater, you need to prepare the necessary tools and materials, determine the connection diagram, select the installation location, mount the boiler, and then connect it to the water supply and electrical network.
Living in a house without hot water is hardly comfortable. Water is needed literally every minute for a variety of purposes. Therefore, connecting a storage or instantaneous water heater is planned in advance and is carried out routinely during the finishing stage. In an existing building, connection is usually combined with renovations. Before beginning these renovations, you need to determine which type of water heater is optimal for your home.
The need to connect a water heater may arise for the following reasons: lack of centralized hot water supply, remoteness of the heating station, or deterioration of the boiler equipment or heating main, which may result in the water entering the apartment being below the expected temperature. Each specific case will require a specific type of water heater.
 For a family of more than three, a tankless heater is sufficient, but only if the house isn't visited periodically.
If the family size is larger, or if guests may be arriving, it is necessary to arrange for hot water to be used at several water points simultaneously.
This becomes possible only when connecting a storage water heater with a capacity of at least 100 liters, and the actual connection diagram will depend on its type and design.
To install the water heater, hang the boiler in the desired position using secure mounting hardware. A pressure relief valve and a tee with a ball valve for draining the boiler are installed on the cold water inlet. Shut-off valves are installed at the inlet and outlet of the water heater. To check for leaks, fill the boiler by opening the hot water valve on the faucet and on the water main.
- Let's look at the types of water heaters
- Indirect heating devices
- Storage water heaters
- Flowing
- Gas
- Installing a storage water heater - step-by-step instructions
- What tools and materials will we need?
- Connection diagram for a storage water heater
- Selecting a location for installation
- We produce fastenings
- Connecting to the water supply
- Connecting to the electrical network
- First start-up
- Installation of a flow-through water heater
- Connecting a flow-through water heater to the power grid
- Connecting a gas water heater
- How to work with different types of pipelines
- Installation of metal piping systems
- Installation of polypropylene pipelines
- Installation of metal-plastic systems
- Application of check valve
- Pressure testing
- Common connection errors
Let's look at the types of water heaters
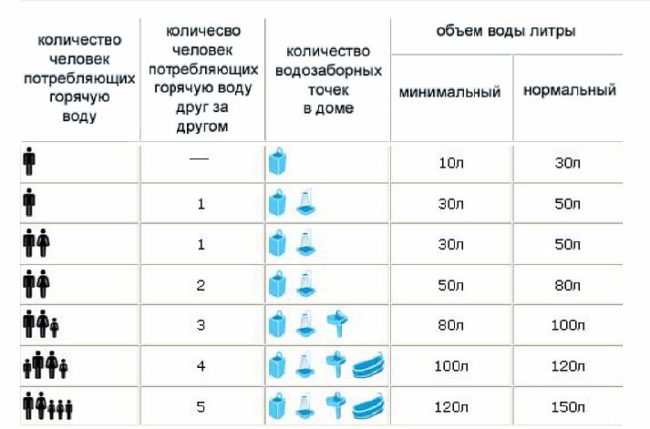
Water heaters for apartments and private homes are differentiated by energy source: electric and gas appliances. Electric units can be storage or instantaneous, while gas models operate only as instantaneous units. Heaters come in vertical and horizontal, floor-standing and wall-mounted configurations. To properly connect a heating unit with a tank of the required capacity, we recommend using the table below.
Before choosing a particular model of water heating equipment, you need to have an idea of how different types of devices work.
Indirect heating devices
Heaters indirect heating They operate using coolant from the heating system, which passes through the tank via a spiral heating element. This element is usually made of copper, which has high thermal conductivity.
At this point, the coolant is at its highest temperature, as it enters this circuit directly from the boiler. The water temperature in such a water heater usually does not exceed 80 degrees Celsius. During periods of intense hot water use, it may drop when the boiler is refilled.

The operating conditions are such that the heating process is not continuous. This means that water heating is not provided outside the heating season. However, it is possible to isolate the boiler circuit in a private home into a separate network and heat it during this time using the boiler's minimum operating mode.
Furthermore, any heating system should preferably include a backup heating system running on an alternative fuel. This is typically a lower-power boiler.
It can be switched to a water heater via a separate circuit. This complicates the plumbing and heating system somewhat, but not so much that connecting the water heater yourself becomes impossible.
Indirect heating is used as a backup hot water supply system during the heating season.
Storage water heaters
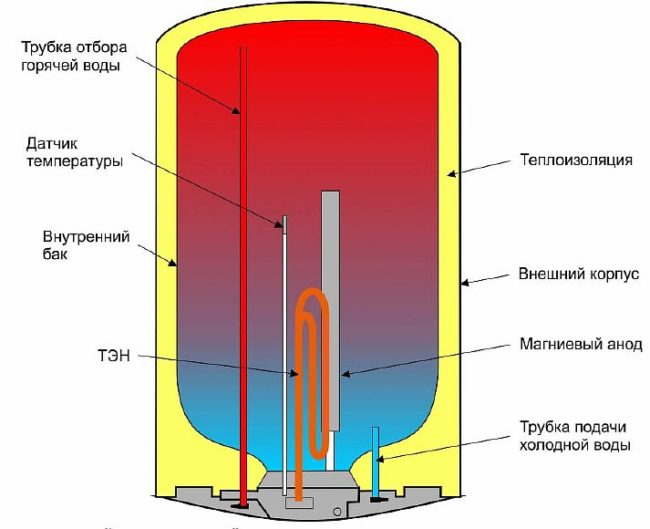
The name suggests that a storage-type boiler has a tank in which a certain volume of hot water is accumulated, which is necessary to meet the needs of all residents of the apartment or house.
The tank is equipped with a thermostat that controls the heating elements, maintaining a constant temperature of the working volume of water (about 700 C.). For example, for a family of five, a storage water heater with a 50-liter tank is sufficient. Models with a 150-liter capacity are also available.

One advantage is that these storage tanks offer a large capacity reserve. Large tanks can supply hot water simultaneously to washbasins, showers, bathtubs, and kitchen sinks for as long as they are connected.
The only drawback of such units is that after the working volume of hot water has been completely consumed, you have to wait for it to be fully refilled and heated for an hour and a half.
Flowing
The devices are equipped with small tanks. The heating element of a flow-through heater is activated when the tap is opened. Rapid heating occurs due to the flow of liquid through a heated coil. Unlike storage heaters, flow-through models cannot heat water to high temperatures due to the short-term operation of the heating elements.
The valve on the tap regulates the replenishment of the water level in the tank as it is consumed from the central water supply or a reserve tank on the garden plot.
Despite this, instantaneous heaters are proving their effectiveness as backup power during seasonal and emergency hot water outages. They are in high demand among summer residents, who install them in showers.
A disadvantage of a tankless heater is its low efficiency. For example, a bathtub might only be filled with warm, not hot, water, which would require a lot of electricity.
Gas
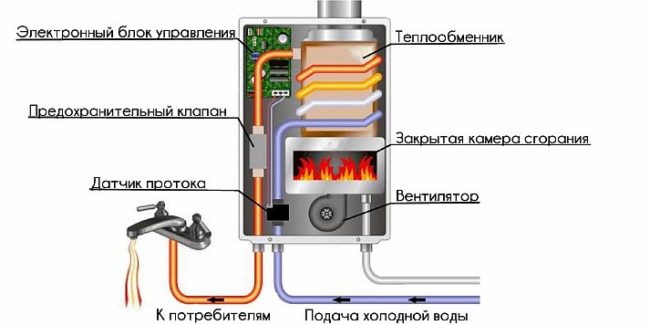
Gas water heaters are instantaneous water heaters. They began to be installed en masse in the USSR in the early 1960s, when the country began constructing multi-story residential buildings with gasification. These devices are heated as follows: water from the mains flows through a spiral water pipe around a copper box-shaped screen, inside which the gas is burned in burners (grate).
In its initial position, the gas pilot burns continuously. When the tap is turned, water from the mains opens the valve, and gas flows into the grate, where it is ignited by the pilot light. Different models have manual or automatic water temperature control. However, in all models, an automatic shut-off valve shuts off the gas supply if the water supply is suddenly cut off.

The advantage of gas water heaters is their high performance and efficiency. Their ability to quickly provide hot water is highly valued by consumers. Gas water heaters can only operate effectively and safely with a centralized water and gas supply.
Installing a storage water heater - step-by-step instructions
Installing a storage water heater can be more challenging for wall-mounted units than for floor-mounted units. Otherwise, the connection diagram is the same for both types of units.
A homeowner can connect a storage water heater themselves if they have experience with tools, electrical wiring, and plumbing. First, gather the necessary tools and materials, determine the water heater's connection diagram, and select the installation location. Then, proceed with the installation and connection of the boiler.
What tools and materials will we need?
We will need the following tools:
- hammer drill;
- level or laser level;
- tape measure, marker, ruler;
- 2 brackets with anchor bolts;
- PVC cable 3 x 2.5;
- 3-socket socket;
- 16 A circuit breaker;
- 2 flexible hoses;
- 1/5 inch water pipe;
- couplings, fittings;
- welding machine (if using polypropylene pipes);
- 2 shut-off valves;
- drainage and water tap;
- hacksaw for metal;
- FUM tape;
- cement + sand;
- putty.
Keep in mind that you may need additional tools, such as an angle grinder or circular saw.
Connection diagram for a storage water heater
The vertical unit's wiring is simpler than the horizontal one. The latter's wiring is complicated by the fact that the horizontal storage heater is placed under the ceiling, requiring all utilities to be routed upward to the unit.
Selecting a location for installation
The location of a storage water heater depends on its type. Floor-standing units are large and require a significant amount of space. Moreover, there must be sufficient clearance around the unit for maintenance and repairs.
The location should be as close as possible to the points of hot water consumption, which will reduce heat loss as it passes through the pipes.
When choosing a location for the boiler connection, try to find a location close to the water supply and taps—that is, a "golden mean." Small wall-mounted heaters can be hung on any wall, but if the tank is larger than 80 liters, it can only be hung on load-bearing vertical walls made of concrete or brick.
For vertical floor-standing boilers, it is essential to choose a location with a solid floor baseSometimes the floor area under the water heater is made of monolithic concrete or covered with ceramic tiles.
Unlike larger homes, in most standard-type apartments, especially older buildings, choosing a location for a storage water heater is quite challenging. Experience shows that owners of smaller apartments most often locate the boiler in locations such as:
- above the toilet cistern, which saves space, especially in combined bathrooms;
- in similar bathrooms, horizontal hot water tanks are attached to the wall above the bathtub;
- a unit with a capacity of 10–15 liters is placed in a floor cabinet under the kitchen sink;
- The horizontal water heater is placed under the ceiling in a hallway or other room, which requires additional installation of water pipes.
We produce fastenings
Floor-standing boilers No additional fastenings are required. The units rest on metal feet with rubber pads, and the bottom of the unit has adjustment screws. If necessary, plates made of any sufficiently strong sheet material can be used.
 Included in delivery horizontal boiler The supplier will always include brackets. The mounting locations are marked on the wall with a marker.
We install the unit in the chosen location. Carefully align it horizontally using a spirit level. The two points should be level, which is verified with a spirit level or laser level. Using a hammer drill, drill two holes in the concrete or brickwork. Drive anchors into the holes in the brackets.
The boiler is suspended from the supports. The homeowner doesn't need to come up with anything themselves; the manufacturer's accompanying documentation provides instructions on how to mark the mounting locations on the wall.
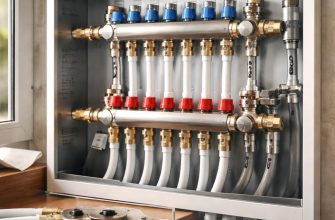
Connecting to the water supply
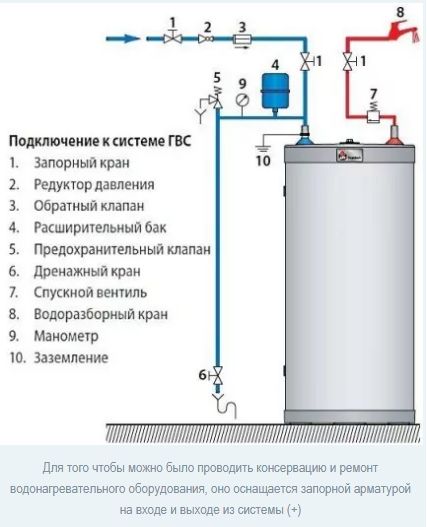
To make it easier for a wider range of consumers to understand how to install a storage water heater, we propose considering a general diagram of the connection to the water supply in conditions where there are cold and hot water risers, and pipes connecting to the faucet.
A storage water heater is installed on the floor or hung on the wall, and hot and cold water pipes are connected to it. A ball valve and a safety valve are installed at the cold water inlet of the electric heater. This valve protects the unit from draining the tank, deformation, and damage due to increased pressure or temperature. The valve is an integral part of the equipment package.
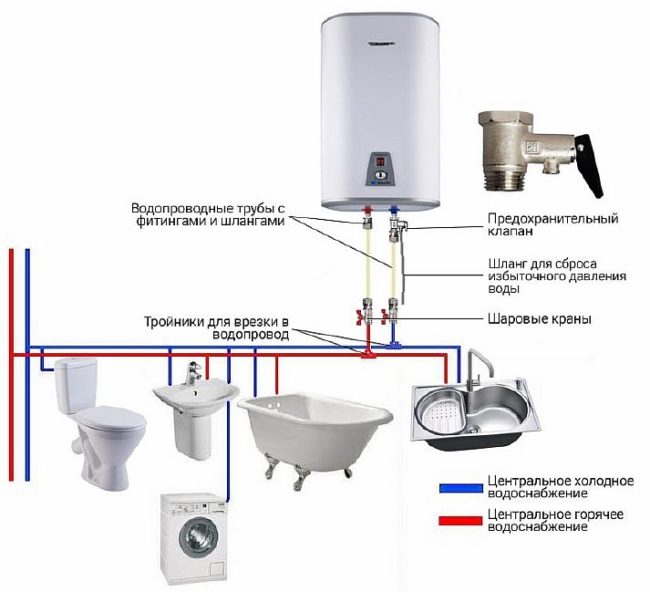 Tees are installed in the hot and cold water pipes to connect flexible hoses or plastic or steel pipes from the water heater. All threaded connections are made with FUM tape. The heater inlets are color-coded: red for the hot water outlet, and blue for the cold water intake from the water supply.
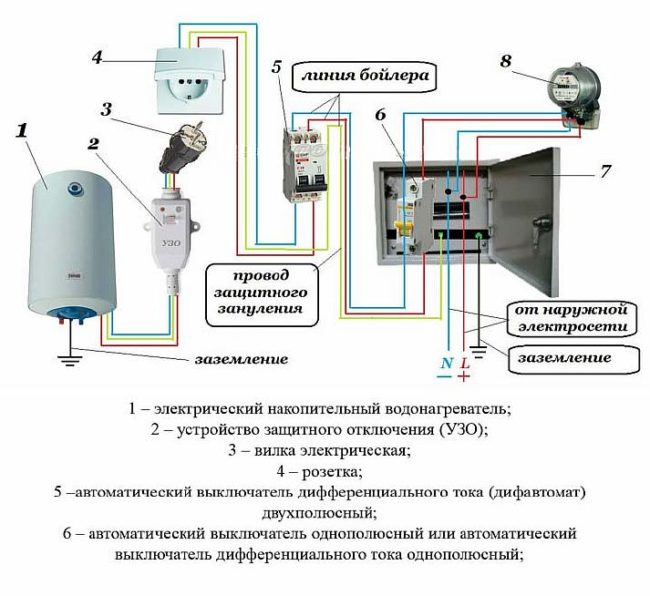
Connecting to the electrical network
Domestic water heaters are designed to operate on a 220-volt power supply. All storage water heaters are equipped with three-pronged connectors—two for power and a third for ground. The corresponding socket is mounted to the wall at least 500 mm above the floor.
Since a storage water heater is equipped with heating elements, which have significant power, a separate wiring system is installed for them to connect to the electrical network. The wire cross-section is selected depending on the power rating, and the connection is made through a separate circuit breaker rated for 9-16 amps. When installing the line, you may need a tool for cutting channels in the walls, electrical installation tools, and a drill for drilling holes in the walls. To do this, a groove is made in the concrete or brick wall from the outlet to the meter using a hammer drill. The electrical wire is then installed in this groove.
A 16 A circuit breaker is mounted on a DIN rail in the electrical panel and connected to the electricity meter. A chase is also made to the grounding busbar. If there is a grounding terminal in the electrical panel, a three-wire cable is run from the outlet. The cable channels are sealed with cement mortar and putty.
First start-up
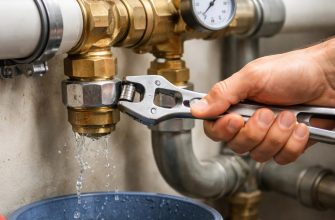
Before starting up new equipment for the first time, visually inspect all connections. Then, open the cold water tap and fill the tank. Turn on the heating. After the specified time, open the nearest water tap and determine the water's temperature.
At the same time, all threaded connections are checked by touch to ensure they are dry. If a leak is detected, the system is shut off and the defective connections are repaired. The boiler should then be restarted to ensure proper operation.
Installation of a flow-through water heater
Flow-through heaters come in various designs and power ratings, but they all share the same simple installation and are somewhat simpler than storage units. Water in them is heated by passing through a small, enclosed space containing a heating element. Obviously, the heating process occurs in a very short time, requiring powerful heating elements.
A tankless water heater is typically a compact unit connected via a flexible hose to a tee, which is inserted into the cold water pipe. It is then plugged into the nearest 220V outlet.
A unique feature of instantaneous water heaters is that they can only be used for a single point of use. However, there are designs that can power multiple units simultaneously, but these are quite expensive and consume significant amounts of electricity. They can be installed in any convenient location: on the wall above or below a sink, bathtub, kitchen sink, or on the ceiling of a shower stall.
Of course, it's possible to install instantaneous water heaters at multiple points. However, even then, they can only be used one at a time, otherwise the electrical system may be overloaded and unable to withstand the significant load. It follows that such a device is only suitable for a small family of two or three people.
A test run of the instantaneous water heater is carried out to detect leaks at the point of connection to the water supply.

The simplest method of connecting to the water supply is provided for a flow heater in the form of a tap.

There are many designs of such devices, each with its own unique characteristics. Therefore, when purchasing a heater, it's important to carefully read the installation instructions and follow them meticulously.
Wall-mounted and other suspended instantaneous water heaters can be connected to the water supply using a standard flexible tube.
Connecting a flow-through water heater to the power grid
Consumers commonly believe that connecting a water heater to the power supply is as simple as plugging it into an outlet. However, it's important to remember that this particular device there is direct contact between water and electricityWhat can cause circumstances that lead to electric shock to a person?
There are several circumstances that need to be taken into account:
- selection of the cross-section of the electrical cable, which is determined by the power consumption of the water heater;
- selection of a circuit breaker for the water heater power supply network;
- selection of socket, if used.
- grounding.
When connecting a heater with a power of 3.5 kW or more, a three-core cable with a cross-section of 3 mm should be used.2.

 Connecting via a power outlet requires installation of an IP44-rated product. These are moisture-resistant devices designed specifically for installation in high-humidity areas.
The circuit breaker should be selected based on the device's power consumption. The following considerations can be used:
- for devices with a power of up to 2 kW, a 9 amp circuit breaker can be used;
- for devices consuming up to 3.5 kW, a 16 A circuit breaker is suitable;
- For more powerful units, a device up to 25 A should be used.
If the boiler's power is more than 3.5 kW, it must be connected directly, not through a socket.
Connecting a gas water heater
Home DIYers should be aware that all work related to the installation of gas equipment may only be performed by gas service employees (Gorgaz) with special permission. This information is not intended to serve as a DIY installation guide for a gas water heater.
Even if the owner demonstrates independence and properly installs a gas water heater, he will not avoid problems with the gas service, including the imposition of fines.
In the 1960s, the USSR saw the mass construction of five-story panel buildings, known as "Khrushchev-era buildings." These buildings typically had gas, and each apartment had a gas water heater. Over time, gas water heaters became obsolete and were replaced by new, modern gas water heaters.
Installing the new equipment in place of the old water heater is fairly straightforward. The gas and water pipes remain virtually unchanged, with the exception of some adjustments to their connections to the new water heater's outlets. Tools required may include a hammer drill for installing the new brackets, wrenches, and a pipe wrench.
The new water heater is hung on the brackets. Using couplings, elbows, and gaskets, the gas and water pipes are connected to the boiler's connections. A flexible hose is used to connect the hot water outlet pipe to the water tap. The exhaust pipe is connected to the water heater's outlet.
Once all connections are made, a test run is performed. During the initial startup, the hood is checked for draft and the absence of water and gas leaks. If any leaks are detected, the unit is turned off and corrected.
How to work with different types of pipelines
Not long ago, the question of what to make a water supply system from was practically non-existent. There were always metal pipes of various types.
To speed up and ensure high-quality installation, additional components were used—fittings to connect various pipeline elements into a single, functional system. These were always divided into threaded and welded types.
Installation of metal piping systems
Metal water supply systems can be made from two main materials: steel or copper. Installations using other materials are considered exotic.
The primary connection methods for steel pipes are threaded and welded. To eliminate the need for thread-cutting tools, welded threaded ends are sometimes used. Primary assembly, including for pipelines with complex configurations, is accomplished using fittings.

This type of connection in pipelines, such as flanged ones, is practically not used for heating and hot water supply systems in country houses and apartments.

When bending pipes, keep in mind that the minimum bending radius for steel pipes is 2.5 times the pipe diameter. For bending at home, manual mechanical or hydraulic pipe benders can be used.

Copper pipes are installed in the same way as steel ones. The difference lies in the connection method. Copper components are installed by soldering.
Flaring of the pipe ends is often performed to ensure a secure connection. This process is possible due to the high ductility of the metal.

Connections using threaded fittings are also used. In this case, the ends are also flared, but at an angle of approximately 45 degrees.


The advantages of copper water pipes are:
- Resistance to hydraulic shock;
- Absence of limescale deposits on the inner surface of the pipe walls.
- Durability – service life is up to 50 years.
The disadvantages include the high cost of materials.
Installation of polypropylene pipelines
Polypropylene, as an alternative material for plumbing and heating installations, emerged several decades ago and immediately became a popular replacement for metal pipes. This was made possible by its easy installation, light weight for easy delivery, and long service life.
The material used is resistant to bending, so installation is strictly along straight lines. Fittings made of the same material are used for connections.
 Threaded fittings have also been developed and are used, primarily at the transition points between metal and polypropylene pipelines, for example, when installing pipeline components with metal housings. These can include valves, plugs, control and monitoring devices, and so on.
When using polypropylene as the main material in heating networks and hot water supply systems, it should be taken into account that the maximum temperature it can withstand without consequences is no more than 90 degrees.
This is quite sufficient for heating any room. When used under extreme conditions for heating and hot water supply, polypropylene pipes have a service life of approximately 20 years, and in low-temperature water systems, it can reach 50 years.

Polypropylene pipeline components are connected by soldering, using a special soldering iron.

For pipes of various diameters, the soldering iron heating time ranges from 5 to 10 seconds. The joint should be held still for 15 to 20 seconds while connecting.
Soldered installation is performed on a workbench, with individual network links being assembled and then installed into the system by hand. This is less convenient and requires the assistance of an assistant.
This installation procedure eliminates the need for closed heating networks – if leaks occur, the wall will have to be destroyed.

Installation of metal-plastic systems
The use of an aluminum interlayer in the wall of a water pipe for both cold and hot water is caused by the need to protect the metal parts of the system from oxidation.
Oxygen from the air can penetrate plastic in its atomic form and dissolve in water. This water becomes aggressive and actively oxidizes the metal, causing it to fail.
 To prevent this, aluminum foil is applied to the workpiece over the adhesive layer. The material is applied in a spiral pattern, and the joint is laser-welded.
A second adhesive layer and an outer plastic layer are applied over the foil. This creates a barrier to the penetration of aggressive substances, a process known as oxygen shielding.
The installation of metal-plastic pipes differs from that described above only in the need to clean the metal layer before soldering. A special tool is used for this.
The physical properties of metal-plastic pipes allow for bending during installation. This allows for seamless water supply sections, with connections made only at the outlet of the channel, concealed in the wall or floor.
This method is widely used for underfloor heating and concealed plumbing systems. For this reason, metal-plastic pipes are produced in coils up to 600 meters long.
Application of check valve
 This mechanism is part of the safety system and is required for use on pressure-operated devices.
When heated, the water in the boiler significantly expands in volume, causing pressure within the vessel to rise. The extreme case of this process is a rupture. As a result, the room fills with steam and hot water, which can cause significant harm to people.
When critical pressures are reached, a valve installed on the boiler opens a spring-loaded flap to release water, which is discharged through a fitting. To dispose of the water, a hose is installed on the fitting and connected to the nearest sewer outlet. It must be securely fastened, as the discharge can occur with high pressure. After the excess water has been discharged, the spring-loaded valve closes.
On the valve too there is a lever to release water, which can be used manually.
Pressure testing
This term refers to a control test that confirms the functionality of equipment and plumbing. When performed in an apartment or private home, a special device is used to pump water into the system and manually increase the pressure. This is performed in the following order:
- The pressure tester is connected to a water pipe filled with water. The pressure is increased to 4-5 atmospheres.
- The system is inspected to identify leaks and eliminate them as they are identified.
- A further increase in pressure to 10-12 atmospheres is carried out after their elimination.
- The heater and its pipelines are left in this state for 24 hours.
Common connection errors
All water heater components must be properly connected. These include tees, relief valves, and ball valves. Despite detailed step-by-step instructions available online, DIYers still make the following mistakes when connecting water heaters:
- Instead of a safety device, a regular valve is installed. In this case, the pressure on the unit does not decrease, leading to premature wear of the equipment;
- the lack of thermal insulation on the hot water pipe leads to the water losing its high temperature more quickly and taking a long time to heat up in the tank;
- Unjustified extension of communications during installation of the unit may cause a drop in boiler performance.
If all installation and connection requirements for the water heater are met at a high level, the device itself will last for many years.
It's been two years since we switched from a boiler to a gas water heater. At the very least, it's more practical and, in my opinion, more cost-effective.