Automatic dishwashing machines are gradually becoming a common feature in many modern kitchens. Appliance manufacturers, responding to homeowners' needs, are producing dishwashers with a variety of capacities and sizes.
Considering that many families face a shortage of usable space in the kitchen, many companies have begun producing dishwashing machines that can be hidden inside cabinetry or placed between kitchen cabinets under the countertop.
Installing a built-in dishwasher involves a whole host of steps. This includes choosing a location and connecting to the water supply, electrical system, and sewer system. Read this article to learn how to do it yourself.
- Choosing a location for installing a built-in dishwasher
- Distance from communications
- Embedding method
- Dangerous Neighborhood
- Necessary tools and materials
- Tools
- Consumables
- Installation diagram
- Instructions for DIY dishwasher installation
- Preparing the dishwasher
- Connection to the water supply
- Connecting to electricity
- Sewer drain device
- Embedding methods
- Into furniture
- Into the body
- Into the countertop
- Installation of the facade
- First launch
- Tips and tricks for installation
- Installation by a wizard
- Key Parameters for Choosing a Built-in Dishwasher
- Types
- Dimensions
- Capacity
- Power
- Energy efficiency and labeling
Choosing a location for installing a built-in dishwasher
From the very beginning, it's important to determine the location of the dishwasher. Consider its distance from utility lines, the installation method, and any potential hazards associated with other appliances.
Distance from communications
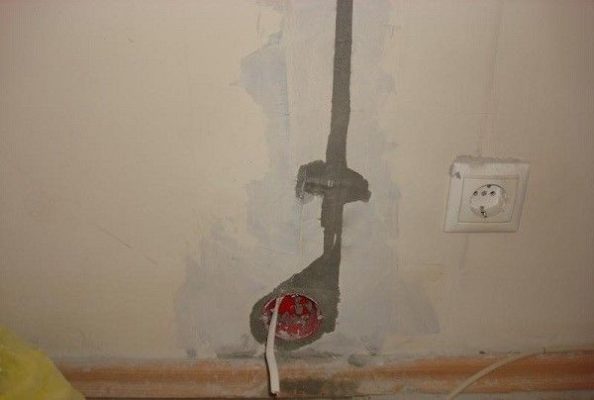
The location where the built-in dishwasher will be located must be suitable conditions for safe operation of the unitThe machine body must not come into contact with electrical wiring, water pipes, or sewer pipes. To ensure effective ventilation of the enclosed space, the rear panel of the machine must be at least 50 mm from the wall.
The outlet can be installed in a convenient location with the wiring routed. Wires should not be located behind or underneath the dishwasher. The distance from the sink should be kept to a minimum.
The closer the siphon is under the sink, the more efficiently the waste water from the dishwasher will be drained into the sewer.
Embedding method
There are two solutions to this problem. The dishwasher can be hidden within one of the existing kitchen cabinets or built into a pre-drilled opening between base cabinets. The second option involves installing the dishwasher directly on the wall, which will be discussed in this article.
Dangerous Neighborhood
To ensure long and trouble-free operation of the dishwasher It's important to pay attention to expert advice on the proper placement of your dishwasher relative to other kitchen appliances. Here are four tips on this matter.
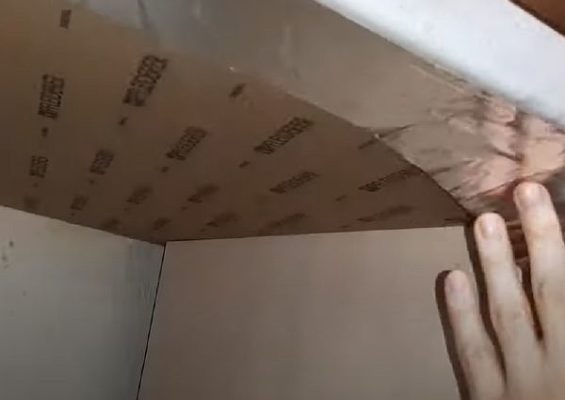
- Dishwashers should not be installed close to heat sources such as radiators, ovens, or gas or electric stoves. Failure to do so will result in frequent overheating, which can lead to malfunction. For example, the distance between the dishwasher and the oven should be at least 40 cm. If this is not possible due to limited kitchen space, a sheet of foil-clad polypropylene or foam plastic should be placed between the appliances.
- Avoid placing a dishwasher directly next to a washing machine. The washing machine can vibrate excessively during spin cycles. This vibration will be transmitted to all other appliances, which will quickly negatively impact the machine's performance. Using both appliances simultaneously can cause breakage of dishes inside the washing chamber.
- The proximity of a microwave oven can affect the operation of the dishwasher's electronics. Ideally, the microwave oven should be located 0.7–1 m away from the dishwasher. Experts recommend hanging the microwave on brackets rather than leaving it on the counter.
- Close proximity to the refrigerator and freezer is acceptable. The slight heat and vibration of these appliances pose no threat to the dishwasher.
Necessary tools and materials
Before you begin installing your dishwasher, you need to prepare the tools and consumables.
Tools
To install a built-in device, you will need the following tools:
- Phillips screwdriver for adjusting the height of the legs, hanging the facade, fastening clamps, etc.;
- laser level for checking the horizontal and vertical alignment of the washing cabinet;
- pliers for fixing parts;
- wrenches for connecting the inlet hose, installing the tee and supplying the water supply;
- a hammer drill with a crown for concrete and brickwork for installing sockets and hidden wiring;
- screwdriver;
- tape measure, set square, marker.
Consumables
Additionally, you will need the following materials, if they are not included in the machine delivery kit:
- fum tape, plumbing tape, gaskets, ties;
- flexible hose with fasteners (union nuts);
- corrugated hose with a sealing cuff and a union nut with a gasket;
- A siphon with a branch pipe for draining water from a dishwasher.
- socket with a wall box.
- two-wire cable.
- RCD circuit breaker for the electric meter panel.
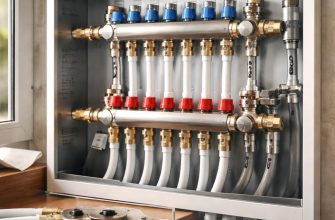
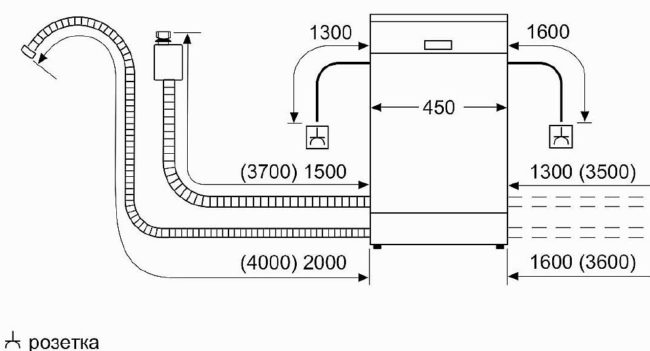
Installation diagram
Built-in dishwashers come in full-size, slimline, and mini units. The installation diagram is shown in the figure below.
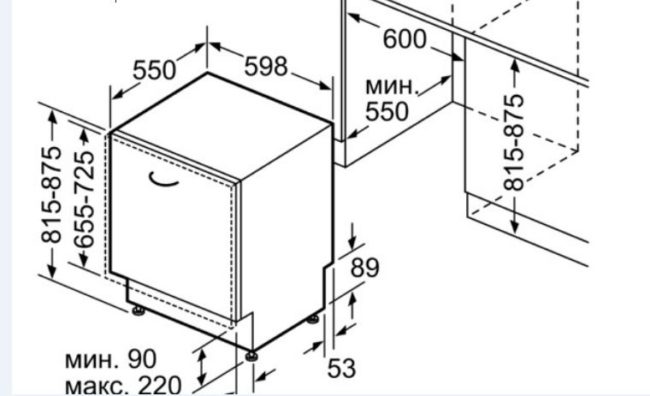
- The dimensions of full-size dishwashers are defined as the width, depth, and height of the appliance body. Standard dimensions (W/D/H) are 598/545/818-868 mm. These dishwashers are installed between kitchen cabinets under the countertop.
- Narrow dishwashers are compact. W/D/H dimensions are 448/570/805-870 mm. They can also be inserted between cabinets under the countertop;
- Mini washing machines are considered built-in appliances, but only conditionally. Small appliances (550/500/550 mm) are installed either inside kitchen cabinets or on the countertop.
In each specific case, the dimensions of the washing units must be clarified. Manufacturers strive to standardize the dimensions of their appliances as much as possible, based on the standard dimensions of mass-produced kitchen units.
The 60 cm wide opening between the base units allows for the installation of a full-size model with a standard height of 87 cm. Before purchasing a dishwasher, it's important to consider all of the above.
Instructions for DIY dishwasher installation
Home appliance manufacturers include installation instructions with every built-in dishwasher. These instructions provide detailed recommendations on the required cabinet recess dimensions, how to prepare the unit for installation, and how to connect it to the utility lines. DIY installation involves several steps.
- Preparation.
- Connection to the water supply.
- Connection to electricity.
- Drainage device into the sewer.
- Embedding methods.
- Facade canopy.
- First launch.
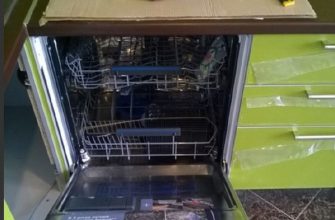
Preparing the dishwasher
Preparatory work includes attaching the seal and applying the vapor barrier. This is how it's done:
- the unit is placed with the front panel down;
- the protective film is removed from the sealing tape;
- the tape is glued to the bottom, flowing around the legs from the inside
- the machine is returned to its original position;
- the protective film coating is removed from the foil tape;
- the strip is pressed with the adhesive side from below to the front part of the table top in the mounting opening;
- the edges of the vapor barrier tape are placed on the walls of the cabinets in the opening, cutting off the excess with scissors;
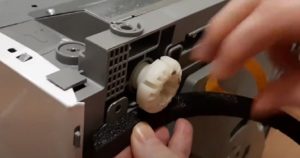
- Check the fastening of the inlet hose and drain pipe on the back of the machine and pull their ends inside the opening.
It's worth noting that not all models come with soundproofing. Also, instead of a vapor barrier foil, a steel or rubber plate is installed.
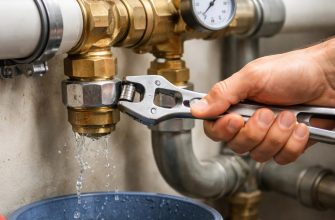
Connection to the water supply
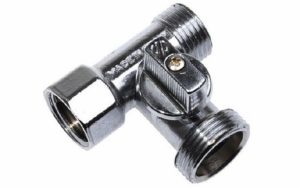
The dishwasher's inlet hose is connected to the cold water supply via a tee. Typically, a tee is installed where the flexible hose from the kitchen sink faucet connects to the water supply.
The connection is as follows:
- unscrew the union nut and remove the end of the flexible mixer hose;
- a tee tap is installed in its place;
- the dishwasher inlet hose is connected to the side branch of the tap;
- If there are no leaks when you open the tap, the cold water connection is successful. Otherwise, reassemble the connections and replace the gaskets.
Experts recommend using filling hoses with Aquastop devices, which prevent leaks. If the filler pipe isn't long enough, it's best not to extend it; instead, purchase a new hose of the correct size.
There are situations where there is no plumbing, such as at a summer cottage. A dishwasher model without a water supply was specially designed for this situation.
Connecting to electricity
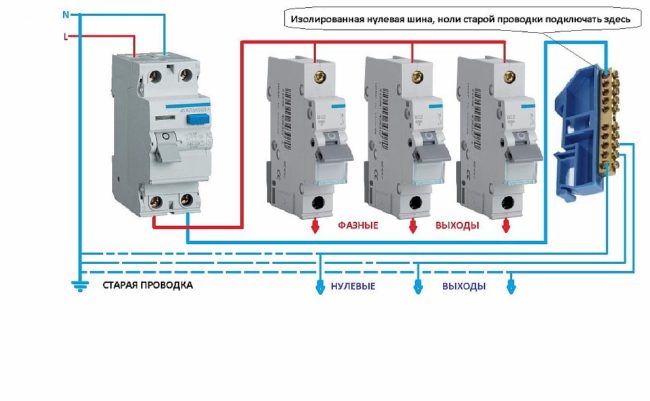
The main requirement for connecting the machine to the power grid is the installation of a separate grounded socket and connection through a separate RCD circuit breaker.
Connection to the power grid is carried out as follows:
- choose a place on the back wall to the side of the opening;
- Using a drill bit, drill a hole in the wall to create a mounting location and install the socket box;
- using a hammer drill with a chisel or a wall chaser, cut grooves in the wall from the socket box to the electricity meter and ground busbar;
- a two-wire cable is placed into the grooves;
- a new RCD circuit breaker is attached to the DIN rail, connecting it to the meter and the socket wire;
- the grooves are sealed with cement mortar and the final coating of the walls is restored;
- I connect the wire to the wall box and screw on the socket panel;
- turn on the machine and check the voltage in the socket with a test screwdriver;
- If there is no plug on the dishwasher cable, install it and insert it into the socket.
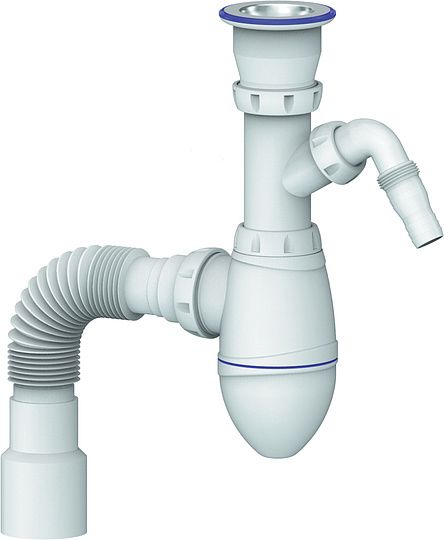
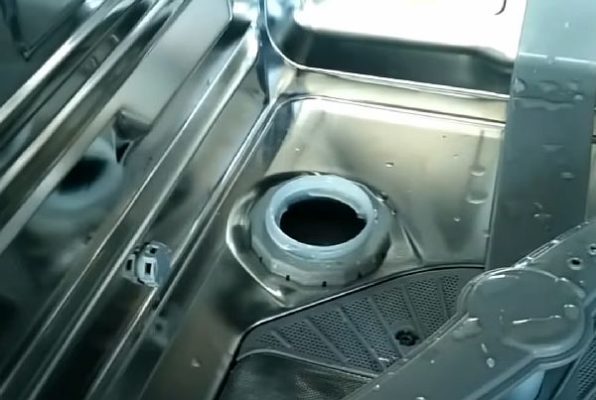
Sewer drain device
The instructions do not recommend connecting the dishwasher directly to the sewer line. Without any obstructions, foul odors will be able to penetrate from the sewer line through the flexible drain pipe and into the dishwasher. Imagine the aroma the washed dishes will emit.
The connection must be made only through a trap with a drain outlet. If one is not available, you will have to purchase and install this type of plumbing fixture.
The drain hose is placed on the side outlet pipe and secured with a clamp.
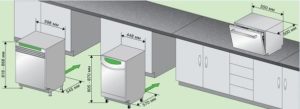
Embedding methods
There are several installation methods that can be noted – this is the built-in dishwasher:
- in furniture;
- into the body;
- into the countertop.
Into furniture
This applies to freestanding models. Dishwashers with their own lid and front panel fit between the base cabinets of a kitchen unit.
The disadvantage of this method is is a violation of the integrity of the table and the color background of the floor cabinets, which does not always have a favorable effect on the attractiveness of the kitchen interior.
Into the body
As mentioned above, mini dishwashers are installed inside cabinetry. They are hidden behind the doors of the base cabinets and can be moved to any other location in the kitchen.
Into the countertop
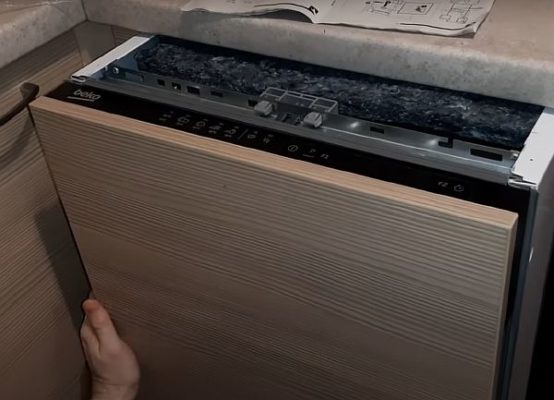
A dishwasher placed between the cabinets under the countertop and hidden under the front of the furniture set will not disrupt the harmony of the kitchen interior with its appearance.
This method of built-in dishwashers is considered the most effective solution for placing dishwashing units in kitchen units.
Installation of the facade
When manufacturing a custom kitchen cabinet, an additional front panel for the dishwasher is prepared. The manufacturer includes a template and guide rollers for hanging the front panel. Once you've prepared the tools and materials, proceed with the step-by-step installation of the front panel:
- the facade is placed on the floor with the back side up;
- draw a line with a marker in the center of the panel from top to bottom;
- in relation to the markings, the template is applied to the panel;
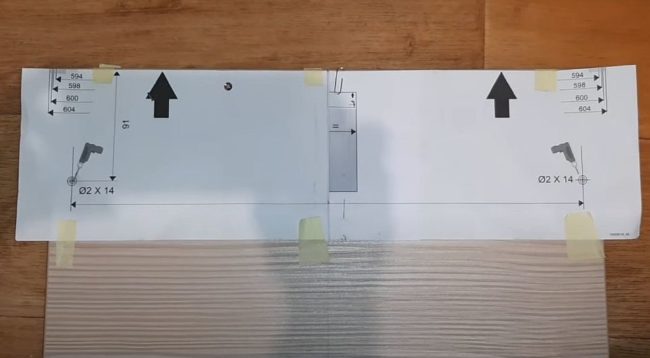
- mark two points with an awl;
- They are drilled shallowly with a screwdriver;
- Using a Phillips screwdriver, screw in the plastic washers;

- a handle is screwed onto the front side of the panel;
- hang the facade by inserting washers into the openings of the machine door;
- the door is lowered all the way down and screws are screwed into the lower part of the facade through special holes;
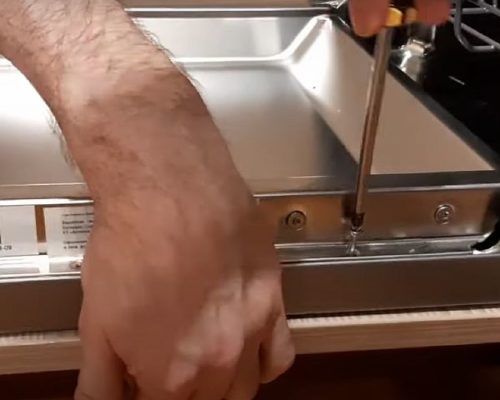
- insert the side clips and screw them with self-tapping screws to the body of the dishwasher and the sides of the cabinets;

- adjust the height of the front and rear legs.
This completes the DIY installation of a built-in dishwasher.
First launch
The first run is performed without loading any dishes. This is necessary to remove any residue left on the surfaces inside the wash chamber from factory assembly. Follow these steps:
- unscrew the compartment lid at the bottom of the chamber;
- regenerating salt is poured into the neck up to the very top;
- the lid is screwed back on;
- on the inner surface of the door, pour gel into containers or place a tablet, and pour in rinse aid;
- On the control panel, by pressing the corresponding keys, set the degree of water hardness, select the washing mode (at the first start, set the economical program);
- press the "Start" button and close the door.
- Once the cycle is complete, the dishwasher can be loaded with dirty dishes.
Tips and tricks for installation
When installing a dishwasher, experts recommend following several tips:
- Before starting work, carefully read the instructions and follow all its points step by step;
- Use fasteners (screws, washers and nuts) made of stainless steel only;
- Avoid dangerous proximity to large household appliances;
- First, try the machine on the niche under the table top;
- All connection points to communications must be checked for strength and tightness before the first start-up of the dishwasher;
- If the electrical network suffers from sudden voltage fluctuations, you need to connect a stabilizer.
Installation by a wizard
Not everyone can handle installing a built-in dishwasher on their own. Therefore, it's best to call a professional experienced in built-in appliances.
Our experts will professionally perform the following work:
- The household appliance will be securely fastened in a cabinet niche or installed in a correctly chosen location,
- The plumbing pipes will be extended,
- They will lay hidden wiring from the electricity meter to the car,
- They will install a circuit breaker (RCD),
- They will install a separate outlet,
- The car will be tested in test mode.
The final cost of installing a built-in dishwasher is determined after a specialist inspects the installation site. Based on information collected online, average prices are presented in the following table.
| Type of work | Cost, RUB |
| Standard dishwasher installation | 2000 |
| Completion of plumbing communications | 1000 |
| Under-counter installation | 2000 |
| Connecting to the power grid | 2000 |
| Facade canopy | 800 |
| Test run with refilling of detergents | 1200 |
| Call a technician | 300 |
Key Parameters for Choosing a Built-in Dishwasher
The main parameters of a built-in dishwasher include the following:
- types;
- dimensions;
- capacity;
- power;
- Class;
- energy efficiency.
Types
Dishwashers differ in their installation method. They can be divided into two types: freestanding and built-in models. The former have their own front and countertop. The latter are either fully integrated or partially integrated.
Dimensions
These are the width, depth, and height of the machines (W/D/H). Full-size models range from 598/545/818-868 mm, narrow units from 448/570/805-870 mm, and compact mini machines from 550/500/550 mm.
Capacity
The load is determined by the number of sets of cookware and cutlery. Dishwashers are divided into four performance groups, each capable of processing the following number of sets of dishes per wash:
1 – from 3 to 8.
2 – from 8 to 12.
3 — from 12 to 15.
4 – from 15 to 18.
Power
Based on their power, washing machines are divided into 3 energy consumption classes for one dishwashing session:
- A class – from 0.8 to 1.04 kWh;
- In class - from 1.05 to 1.1 kWh;
- C class – from 1.1 to 1.5 kWh.
Energy efficiency and labeling
Energy consumption is an important parameter and is determined by a metric called energy efficiency. The manufacturer indicates the energy efficiency class on a sticker attached to the front of the machine.
Classes are designated by the Latin letters A, B, C, D, E, F, and G. Since 2010, the "+" sign has been added to the letters. The more of these signs, the more energy and water efficient the model is.

Next come less significant parameters: drying class and methods, noise level, weight, washing modes, and control methods. These generally have a minor impact on model selection.