 As practice shows, building a chimney from a steel pipe yourself is not difficult. This topic is very relevant, as people use various devices to heat their homes:
- ovens;
- fireplaces;
- potbelly stoves;
- gas boilers;
- solid fuel boilers.
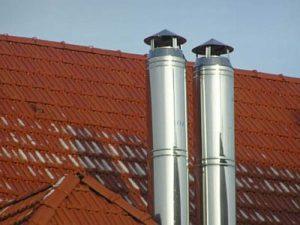
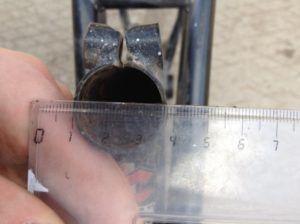
However, none of the above devices can function without a chimney installed. This design ensures the exhaust gases are removed from the firebox, which in turn is freed to receive a new supply of oxygen through the ash pit. This is what a homemade chimney looks like in a house:
These structures can be made with your own hands from various materials:
- bricks;
- stainless steel;
- ceramics;
- asbestos cement.
A chimney made of brick and asbestos cement will require a foundation because such a structure is heavy. Masonry requires specific skills, and asbestos cement won't last long.

Ceramic and glass-ceramic chimney materials are considered durable. However, these materials are currently quite expensive. Stainless steel is comparable to the options described above in terms of overall performance.
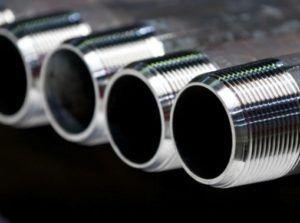
However, steel tubular products are proving to be the most affordable. They are relatively lightweight, and joining prefabricated modules is easy without assistance.
With welding skills, it's easy to weld a chimney yourself from rolled metal pipes. However, assembling prefabricated components is much easier.
Manufacturers offer a full range of components for steel construction, including:
- tees;
- fasteners (clamps);
- bends;
- dampers;
- plugs;
- pipes.
Video
Another advantage of metal tubular products is their resistance to corrosion. Condensation is inevitable, regardless.
Brick chimneys quickly deteriorate due to accumulated moisture, causing the masonry to crack. Only ceramic chimneys can compete with iron chimneys. However, in this case, the buyer can expect a higher price.
- Types of steel structures
- How to perform calculations
- How to make a chimney from a steel pipe
- Preparation of material
- Installation of a single structure
- Installation of a sandwich channel
- Rules you need to know when installing a chimney
- Ceramic chimney
- Kit composition
- Assembly rule
- Installation method
- Preparation and application of glue
- Brick chimney
- Chimney insulation
- Insulation options
- A few words about safety
- Arguments for DIY construction
Types of steel structures
Such structures are divided into the following:
- Chimney with one wall.
- WITH two walls. In these types, fire-resistant insulation is placed between two blanks of different volumes.
- Coaxial. With two walls, but without an insulating layer between them.
 The first type of chimney is used in warm climates. The third type is suitable for gas boilers.
The second type is considered a popular option because the insulation reduces condensation, resulting in a structure that can last a very long time.
How to perform calculations
 The diameter, height, and wall thickness of the chimney must be precisely determined during construction. It's important to avoid any errors. The chimney diameter must be sufficient to exhaust the exhaust gas. At the same time, the draft must not be excessive.
If it's a boiler pipe, the manufacturer's instructions are the primary source of information when choosing. If the data sheet doesn't include this information, calculations are made taking into account the volume and height of the firebox.
 The height of iron pipes is a bit more complicated. The higher the pipe, the greater the draft. And how much longer the pipe needs to be is a complex question. Specially developed formulas and programs are used to determine the distance from the stove to the chimney head.
However, one condition remains the same in such calculations: the chimney must be at least 50 cm higher than the roof overhang, and in vertical sections its height can be no less than five meters.
Video on how to calculate height
How to make a chimney from a steel pipe
 Chimneys made of iron pipes are popular both in the construction of industrial facilities and in the development of private homes.
Assembling such a structure is easy; it's done like assembling a metal structure, which is simpler than constructing brickwork. The joining process consists of a series of sequential steps.
Preparation of material
To make it, you will need to stock up on materials, the quantity of which must be determined in advance by calculation, and tools.
What we need:
- fitting - an adapter from the stove to the pipe;
- stainless steel pipe, 1 piece per meter of contour;
- gate valve;
- fireproof lining for arranging passage through the ceiling and roof;
- galvanized plates;
- insulating material;
- chimney cap;
- clamps that will secure the joints;
- fasteners for securing the channel to the wall;
- condensation collector;
- high temperature resistant joint sealing material;
- wire, screws and nails.
You can buy a ready-made chimney kit, which contains everything you need for its assembly.
Important! It's important to note that pipes installed indoors and outdoors must be made of different types of steel. Indoor pipes may have a lower mechanical strength coefficient than outdoor pipes, but their heat resistance must be higher.
Tool:
- drill with a set of drills;
- electric jigsaw;
- screwdriver;
- dowels;
- hammer.
You may also need other tools, depending on the chimney model.
Installation of a single structure
Chimneys can be external or internal, and any of them can be made with your own hands using a preliminary drawing.
The step-by-step process of installing a chimney after the stove is installed is as follows:
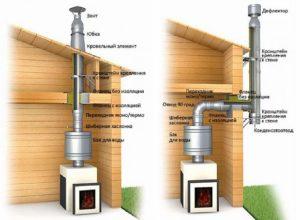
- The chimney is connected to the heating appliance's outlet using an adapter. A tight seal is crucial here. Therefore, a sealant is applied to the adapter's sagging portion, placed onto the bracket, and secured with a clamp.
- The elbow is installed at the required angle (90, 60, 45, or 30 degrees), depending on the model selected. To achieve this, a tee with a special compartment for condensate and inspection is attached to the installed element. It is secured with heat-resistant sealant and a clamp. All other segments are assembled in the same manner.
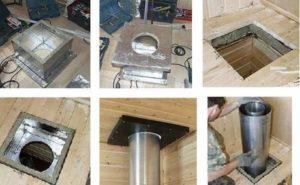
- An opening for the pipe is made in the wall or ceiling, depending on the chosen type of construction. For an internal model, it's in the ceiling; for an external model, it's in the wall. If the wall is monolithic, once the pipe is installed, it's sufficient to seal the gaps with cement mortar. For wooden partitions or any flammable material, the hole is made twice the diameter of the pipe itself. The area where it passes through the wall should be insulated with an asbestos sheet or cord, wrapped around the affected area of the flue. Additionally, the flue itself is lined with galvanized sheets or asbestos boards, and a box-like structure is constructed.
- A second branch is installed - a tee, its lower hole is intended for the installation of a condensate collector.
- The straight section of the iron chimney is assembled by connecting all the segments.
- It is fixed with brackets that are attached to the wall.
- A protective umbrella is installed on the upper end of the pipe to prevent anything from getting inside from the outside.
- Stretchers are installed if necessary.
- The stove is first fired up. All joints are checked for leaks and to see if there are any areas on the walls that become overheated.
For your information! When installing an internal chimney yourself, you should install a damper on the adapter from the boiler or stove to retain heat. Also, the beams and rafters located in the attic should be located further away from the chimney.
Installation of a sandwich channel
 A sandwich system consists of two pipes of different diameters, one inside the other, and the space between them filled with insulation.
This type of structure is more expensive, but its high performance justifies the price. Installation of this model is simpler, as its surface temperature is lower than that of single-walled units.
A distinctive feature of sandwich construction installation is that the assembly process is carried out strictly from the bottom up, by inserting the narrow end of the inner upper pipe into the assembled lower section. This allows condensate to flow through the channel and not leak out.
The rest of the installation process is similar: seal the seams with sealant and secure the chimney to the wall with clamps and brackets (at least 15 cm from the wall), and attach a TsAGI deflector to the end (it is secured with self-tapping screws).
The installation of the chimney itself looks like this:
- Construction begins at the stove and moves toward the top, where the head is located. Each section placed at the top must overlap the section below.

- A hole should be made at the base of the stove. This will be needed for cleaning the chimney. This can be a door or a removable glass.

- Joints, bends, etc. are connected with clamps and lubricated with heat-resistant sealant.


- Fastenings in vertical areas are spaced at intervals of one and a half to two meters. Horizontal distances should not exceed one meter.

- In areas where the steel chimney pipe passes through the wall and ceiling, the opening for it is made larger.

- The flue must not be located close to the roofing material or the ceiling. The gap must be covered with metal plates, and the flue pipe must be covered with insulation material and stainless steel.

- The final step is installing a rain cover. It provides excellent protection from rainwater, snow, and dirt.

Rules you need to know when installing a chimney
Building a chimney isn't difficult, but you need to follow a few important steps when constructing it:
- the location of the pipe above the roof surface - the higher it is, the better the draft, but there is no point in making it more than 2 meters above the house;
- mounting - if the model is external, then the brackets are located at a distance of 1.5 meters, and everything is attached in three places;
- connection - the end of the upper pipe must point downwards, that is, the upper one is placed on the lower one, otherwise smoke will leak out and rainwater will get into the cracks;
- A deflector or umbrella is a necessary detail that protects from precipitation.
When heating the stove for several weeks, there may be a smell and slight smoke from the heating of the sealant and oils, but this is nothing to be alarmed about.
Important to know! It is prohibited to connect pipes of different diameters into a single system, as this can cause a fire and carbon monoxide poisoning, as smoke will enter the room through the cracks. It is not allowed to extend a brick model with metal pipes. The only way to connect them is by lining the brick with a steel pipe.
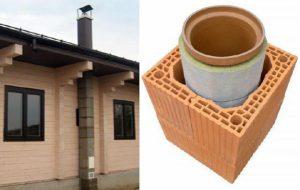
Ceramic chimney
Ceramic chimneys are gaining popularity today because they are durable, safe, and environmentally friendly. They incorporate the best features of brick and steel systems. The main drawback is the high cost of components.
Kit composition
Installing a ceramic chimney is simple and easy to do yourself. It's assembled from prefabricated parts, joined using a special compound that's impossible to make yourself.
The set consists of:
- bases with a condensate drain;
- element for connection with a branch pipe;
- inspection cell with a door;
- lightweight block for exterior finishing;
- set for processing the above-roof area;
- insulating products with non-flammable properties;
- paste-like glue.
In addition, you will need fasteners, fire-resistant facing material, plaster, natural stone, and ceramic tiles.
Assembly rule
According to technology and regulations, the chimney should be located no further than 2 meters from the generator, and as far away from walls and ceilings as possible.
The installation process requires compliance with a number of rules:
- the presence of a foundation that is covered with a fire-retardant agent;
- installation must be done from below, from the base, and move towards the roof;
- The segments should be fixed with a special adhesive compound, it is sold in a set;
- the pipe must have a diameter larger than that of the branch pipe connected to the heat generator;
- use mineral wool and plaster as thermal insulation material;
- the area where the pipe and the roof connect should be equipped with a metal apron;
- If the roofing material is flammable, a spark arrestor must be installed.
If the chimney circuit extends over a length of 4 meters without fastening, then it requires reinforcement using iron rods for which there are special holes.
Installation method
All ceramic chimney components contain fireclay, which helps resist high temperatures and significantly increases service life.
The bottom of the chimney—the base—has a hole for condensate released during combustion. The liquid collects and drains into a pre-installed sewer system.
A tee with an inspection hole is installed on the base, allowing for inspection and cleaning of the heating system. When heating the stove, it must be closed with a door. All other components are installed according to the manufacturer's instructions, making assembly straightforward.
Preparation and application of glue
To seal the joints between the elements, a special acid-resistant adhesive is used. This adhesive can be prepared independently using a dry powder.
Take 7 parts dry concentrate and 1 part water. Mix at room temperature; the consistency will be thick.
The mixture will initially appear dry, but after 7-8 minutes, it will become paste-like. It should be used within 30 minutes, after which it loses its properties. Apply to the joints, which should be moistened first. Any adhesive residue should be removed, from the outside for an aesthetic appearance and from the inside to prevent soot buildup.
If you want to make decorative finishing of the chimney, you should leave free access to the inspection window.
Brick chimney
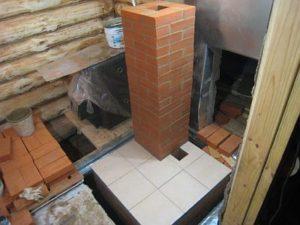 These chimneys have been around for a long time; they were used to build stoves in village houses many years ago. There are two ways to build a chimney:
- On the stove - an easy option;
- It is placed nearby and connected using an adapter.
The structure of brickwork is:
- work area - located below the ceiling;
- external part - passing through the ceiling with a flare up to the roof;
- neck with a head - a pipe passing through the roof equipped with an "otter".
This type of chimney is a heavy device and is recommended to be installed only if there is a brick oven.
Find out more about how to produce For DIY brick chimney laying instructions, see this article..
Chimney insulation
Many people may have a very reasonable question: why should you insulate your chimney? After all, it's not exactly cheap.
But insulation plays a crucial role in proper maintenance. It's a mistake to think that thermal insulation doesn't affect the room temperature.
If we compare this work with similar work carried out on walls or ceilings, it will be slightly different.
The walls are covered with insulating building material to create a protective casing that prevents warm air from escaping. The chimney is also protected from regular temperature fluctuations.
Many people are familiar with the term "dew point." This is the zone where condensation occurs. This process is natural and occurs when temperatures fluctuate.
Temperature changes occur gradually and less frequently, which significantly reduces moisture formation.
With chimneys, things are quite different. Steel flues used to remove combustion exhaust heat up and cool down quickly. As a result, the volume of condensate increases.
Video
IMPORTANT! It's important to know that condensation isn't just moisture and steam. It's also a concentration of various microelements, acids, and other combustion products. While simple condensation dries quickly and isn't absorbed as well, moisture in stove pipes quickly wreaks havoc.
This influence causes the metal chimney to rust. Moisture also drains into the center of the boiler, which is unacceptable.
Insulation options
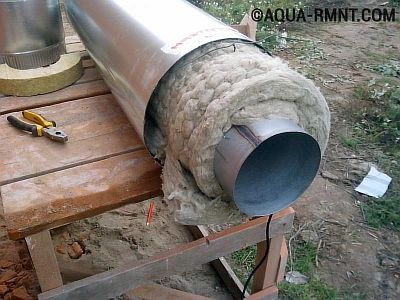
There are many products available for insulating a chimney flue. Metal flues are somewhat similar to asbestos flues, so you can do the job yourself in a short amount of time.
Pipes are often installed at gas heater outlets, thanks to their light weight and portability. Installing these products yourself is quite simple. Furthermore, it's easy to bend a steel outlet and route it as required by the specific design.
Video
The process itself is simple. The pipe is wrapped in a layer of mineral wool and secured in place. Then, the entire assembly is covered with a casing.
Compared to the asbestos version, a steel flue pipe will require thicker insulation. The methods for attaching the insulation to a steel flue pipe will also differ.

A few words about safety
There are certain requirements for safe use. It's important not only to construct such a system yourself correctly, but also to use it according to strict rules:
- Do not use flammable liquids or flammable materials for kindling. In solid fuel heaters, do not use logs longer than the firebox.
- Chimney pipes must not be used for drying clothes or other clothing items.
- Cleaning by burning off soot is not permitted, as this may result in rapid failure.
- Chlorine-containing substances must not be used for cleaning.
- Any attempt to put out the fire in the firebox with water can end in disaster.
- It is recommended to clean the chimney at least twice every six months..
- It is recommended to perform maintenance at least twice a year.
- To avoid additional problems with the flue system, strictly follow the manufacturer's instructions. Do not attempt to use heat-generating devices in any other way.
Video
IMPORTANT! The chimney's impact on safety is significant. For this reason, its proper functioning is checked by the Fire Safety Authority. Without their written approval, any self-installed steel structure will not be connected to the gas grid.
Arguments for DIY construction
A beautiful and functional homemade chimney can be easily constructed if you carefully read all the recommendations provided. This can also save you significant money.

Moreover, a DIY design, unlike a modular option, eliminates a lot of additional work. In some cases, the use of a modular chimney can be severely limited.
And if in doubt, you can always turn to professional experts for help. They'll give you expert advice or help you with expert installation.
A great, informative article. We learned a lot, especially about safety. It's easy and engaging to read, but the instructions are practical!