Attaching a cistern to a toilet is a simple process, but it's important to follow the installation instructions carefully. The installation procedure varies depending on the type of cistern. Compact models are the easiest to install, and even a novice builder can handle the installation.
Before installation, prepare the equipment and tools, then prepare the installation site. If necessary, remove the old tank and clean the surface first.
Necessary materials and tools
 Before starting installation work to attach the flush tank to the toilet, you need to prepare the tools and necessary equipment.
The required materials depend on the type of structure and should be selected based on the following characteristics:
- The method of attaching the toilet cistern - it can be a monolithic structure together with the toilet, hung on the wall or mounted in a hidden niche;
- The method of connecting the water supply to the tank can be from below or from the sides. The first option is used when pipe lining is required; its disadvantage is the difficulty of installation. The second option is the most common;
- a type of fittings design – the presence of a lever or flush button.
The following materials will be required for installation:
- a shut-off valve is installed on the pipeline; it allows you to shut off the flow of water into the tank from the water supply;
- rubber, copper and steel piping, which is mounted to the inlet pipe branch;
- drain fittings that collect and drain liquid;
- silicone sealant or tape-type sealant, which are used for additional sealing;
- a special agent that prevents corrosion damage to metal structural elements (e.g. fastening bolts).
 In most cases, the cistern is attached to the toilet using nuts and bolts; all necessary fasteners are included in the plumbing kit.
To carry out the work you will need the following tools:
- drill, drills for ceramic tiles and metal;
- dowel hammer;
- pencil/marker for marking;
- building level;
- spanner;
- core (used to prevent the drill from slipping);
- rubber spatula to remove any remaining sealant).
To attach the cistern to the compact toilet, you'll need an open-end wrench (pliers or an adjustable wrench can be substituted) and a socket wrench. To connect the overflow pipe, you'll also need an adjustable wrench with a diameter suitable for the cross-section of the corresponding coupling.
Preparatory work, dismantling the old flush tank
After preparing all the necessary tools and materials, preparatory installation work must be carried out. Specifically, the existing cistern must be removed.
If you need to remove a cast iron model, you'll likely need outside help, as doing it yourself can be quite difficult. Before disconnecting the water hose, it's a good idea to place a bucket underneath to prevent any remaining water from spilling onto the floor.

Brief instructions:
- Turn off the water supply by turning the valve.
- Rinse out any water in the container. Make sure there is no liquid left.
- Disconnect the tank from the water supply and overflow (if any) pipes.
- Unscrew the bolts securing the cistern to the toilet and other fasteners.
- Remove the old cistern. Do this with extreme care to avoid dropping the heavy structure, as this could damage the ceramic flooring and toilet bowl.
- Clean surfaces from rust, traces of corrosion, and cement mortar residue.
Once the surface is completely clean and ready for installation, it's important to inspect all structural elements. Specifically, it's recommended to pay special attention to the following:
- Correct installation of the toilet bowl. This is important even if only the cistern needs to be replaced. Before mounting, it is recommended to use a spirit level to ensure the toilet is level. If there is a slight tilt, it should be corrected. This leveling is especially important when installing compact sanitary ware, as otherwise the cistern will not function properly.
- Condition of utility systems. It's advisable to check the condition and location of the cold water pipe that will be shut off later, and also to ensure there are no problems. when connecting the toilet to the sewerTo install the new tank, you'll need to calculate the required length of flexible hose used to connect the tank to the cold water supply. At this stage, you should also determine whether a ball valve or other special water supply connections (for example, to a washing machine) are required.

- Condition of the cistern. It's advisable to check not only for obvious damage but also that the fasteners and all system components are suitable for installation. Pay particular attention to the length of the water supply hose and mounting bolts, as well as the size of the couplings and rubber gaskets used. It's also recommended to check the proper functioning of the flush valve.
IMPORTANT! Before starting installation work, turn off the water supply.
Types of flush tanks - installation instructions for different types
There are several types of flush tank fittings, each differing in design, operating principle, and mounting method. Each has its own advantages and disadvantages. The main types of flush tanks are:
- compact;
- built-in (hidden);
- wall-mounted/standalone.
It is advisable to study the installation features and the diagram for attaching the selected type of cistern to the toilet.
Compact
The advantages of this type of system include:
- ease of installation;
- affordable cost of models;
- no need for outside help.
The main drawback is the average quality of the components. However, this can be remedied by replacing them yourself.
In most cases, the design of a toilet tank of this type contains 2 main elements:
- The inlet valve (also called a float) is connected to the water pipe and provides water intake and controls its level in the tank;
- There are two types of drain valves (siphons). A single-stage siphon drains all liquid from the tank, while a two-stage siphon drains only a portion of the water. The second type is suitable for cisterns with flush buttons, which help conserve water.
The process of attaching the flush tank to the toilet is quite simple, it consists of assembling the inlet and outlet valves, and then the installation itself.

Intake valve assembly:
- Check for a built-in filter that cleans the incoming liquid. Some models may not have this feature, in which case you'll need to install it yourself. It's installed near the external outlet inside the mechanism.
- Follow the instructions included with the kit and secure the valve, making sure to use the rubber gasket as a seal. The mechanism should be attached to the bottom wall of the tank. The mechanism is secured using nuts, which are included with the other fasteners.
- After the tank is installed in place, a hose, which is part of the plumbing system, is connected to the external outlet of the valve.
The outlet valve consists of the operating mechanism itself, the flush button and the connecting bowl.
The assembly procedure for this part is not much different from the process described above:
- The lower element, shaped like a bowl, is installed into the drain hole. A sealing gasket is used and it is secured with special nuts.
- A piston-type mechanism is attached to the bowl. Connection is made by simply turning until it clicks into place.
- After the cover is installed, the button is mounted.
Instructions for attaching the cistern to the toilet:
- Assemble both valves according to the above algorithms.
- A sealing gasket is placed on the shelf. When the cistern is positioned correctly, it ensures a tight seal, but for added security, you can use silicone-based plumbing adhesive.
- The tank is installed, making sure that the seal is located directly under the drain valve and that the holes for fastening the tank and toilet are aligned.
- Special plastic washers and cone-shaped spacers are placed on one side of the bolts. The bolts are then inserted through the two holes, and the other side is also fitted with spacers and washers. After the cistern studs are fully installed, a corrosion-preventive compound is applied to them.
- The top cover and flush button are installed.
- The tank is connected to the water supply via a hose.
- The final stage is filling and draining the water, during which the tightness of all connections is checked.

When purchasing a compact model, all necessary fasteners and other parts are typically included, but these are often of rather poor quality. If possible, it's advisable to replace some of the parts with higher-quality ones.
Please note! For example, replace rubber gaskets with silicone ones, and the supplied bolts with stainless steel bolts. However, it's important to ensure that all new components are compatible with the existing plumbing fixtures.
Watch the video
Wall-mounted or freestanding
The main difference between a wall-mounted cistern and a compact model is the placement of the inlet valve mechanism on the wall and the use of a lever flush system. Because this type of cistern is located some distance from the toilet, it has a different float and a different release valve.
Today, the suspended version is rarely used. The disadvantage of this type of system is the complexity of installation and the need for a bypass pipe.
Algorithm for attaching a flush tank to a toilet:
- The future location of the tank is marked with a pencil. The length of the overflow pipe is calculated based on the height of the tank.
- Using a building level and a tape measure, the location of the fasteners is calculated.
- At the marked points, holes are made with a drill and dowels are installed.
- The assembled fittings are installed into the toilet cistern, and the overflow pipe is connected. This process must be carried out using sealing gaskets to ensure a tight seal.
- When the tank is fully assembled, it is secured to the wall by tightening the bolts.
- The overflow pipe is connected to the toilet, and the tank is connected to the water supply. When connecting, remember to install gaskets and seal the joints.
After installation, it is necessary to test the operation of the tank.

Watch the video
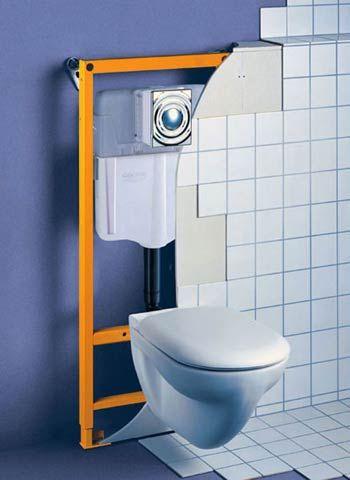
Built-in (hidden)
The main difference between this system and previous ones is that all components are installed on a frame. Installation is a fairly complex procedure and requires some construction experience.
Watch the video
[sociallocker]
Advantages of built-in models:
- suitable for almost any interior design;
- visually enlarge the room and look beautiful;
- there is no noise when draining and filling with water.
Flaws:
- installation requires time and skills;
- If there is an urgent need to repair pipes or built-in plumbing, it is necessary to completely dismantle the finish.
Installation instructions:
- The most suitable location for the installation frame, which includes the tank, is determined. This is done by connecting the elements one by one. This process must be accompanied by checking the horizontal and vertical alignment with a spirit level.
- The installation is finally aligned and secured using appropriate fasteners or a special mechanism. Then, the mounting points are marked on the floor and wall.
- Using a drill, holes are made at the marked points. Typically, separate drill bits are used, suitable for different materials (ceramics, brick walls, concrete, etc.).

- The frame is securely fixed with bolts.
- After the installation is secured, the plumbing components (sewer siphon, cistern, etc.) are installed.
- The tank is connected to the water supply.
- The interior of the installation is covered with finishing materials (decorated plasterboard or special panels). Holes are cut in the finishing sheets to connect the flush button.
- A flush button (usually double) is installed and the toilet bowl is hung.
Choosing the right type of cistern should be based on the bathroom's features and the owner's preferences. If space is limited and budget is available, a built-in system is best. However, if cost and ease of installation are a priority, a compact model is a better choice.
The installation diagrams presented are fairly general, but it's important to carefully read the instructions included with the plumbing fixture, as specific models may have some important installation considerations. Incorrect installation will require replacing the cistern-to-toilet mounting hardware.
Watch the video