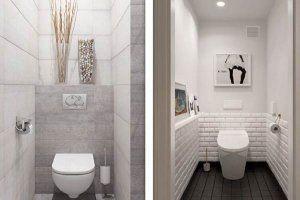
A toilet installation is a special supporting structure that supports the toilet bowl, cistern, and associated fittings. All plumbing and the cistern are concealed behind a false panel, with only the toilet bowl visible. This is aesthetically pleasing, easy to clean, and allows for the installation of underfloor heating throughout the entire room.
Toilet installation varies depending on the type of structure. Before beginning the installation, it's advisable to research the features of different types of systems to select the appropriate device. It's also recommended to determine the width and height of the toilet installation to ensure proper plumbing installation.
Typically, the depth of the structure is 15-30 cm, and the width is 50-60 cm. The height for residents of average height is usually 80 cm, but sometimes there are models that are more than 1.5 meters high.
To install the system, it must be secured to the exterior sheathing at the bottom, top, and center. The supports are connected to the profile by turning the quick-release clamps.
- What is a toilet installation?
- Width and height of the installation
- Types of installation systems
- Block
- Frame
- Corner
- Toilet installation – necessary tools
- We fasten the frame to the floor
- Setting the toilet installation height
- We attach it to the wall
- Connecting sewerage and water
- Finishing, installation of the button and toilet
- What you should know before installation
What is a toilet installation?
If the owner wants to install popular wall-hung toilets or bidets, a special installation system will also be required. It performs the following functions:
- supports sewer inlet;
- supports the entry of water pipes;
- sometimes – holds the water tank.
Using wall-hung toilets frees up space and prevents dampness under the fixtures. Another advantage is that there's no need to dismantle the toilet when changing the floor tiles.
When choosing a location for plumbing fixtures, it is advisable to take into account that the back wall will extend forward by 20-25 cm.

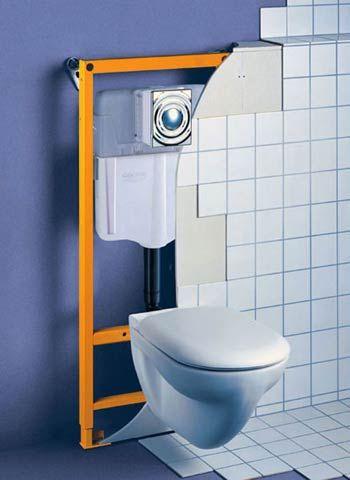
The cistern is typically made of polymer material. After installation, it will be impossible to access, as the built-in system is completely covered by exterior trim, such as ceramic tile. Once installation is complete, the owner will only be able to control the flush using the flush button.
Therefore, it's important to purchase high-quality plumbing fixtures from the start, as if a malfunction occurs, the entire process will have to be repeated: removing the tiles, dismantling the waste body, and then reinstalling the system. This will cost the apartment owner significantly more than purchasing high-quality fixtures from the start.
Width and height of the installation
Before starting construction, you need to know the dimensions of the toilet installation. The most important characteristic is the depth of the structure, as it determines the ease of use of the plumbing fixtures.

The depth varies depending on the type of system:
- block (10-15 cm);
- frame (15-30 cm).
It's advisable to leave at least 0.6 meters of free space in front of the toilet, so if you have a load-bearing wall, we recommend choosing a block-type installation. This will allow for an additional 15 centimeters of free space compared to a conventional toilet.
This type of installation will not only visually enlarge the bathroom but also make it feel larger. An additional advantage of the modular system is its lower cost compared to a framed one.
Due to the installation's slimline nature, the built-in cistern is flat and thin (approximately 0.9 m) with larger dimensions. The cistern's width is typically 0.5 m, so the overall width of the toilet installation is also 0.5-0.6 m.
Other sizes of under-toilet installation:
- height – for a block type structure 0.8-1 m, for a frame type – 1-1.4 m;
- the sewer outlet pipe where the plumbing is connected should be located approximately 22 cm from the floor;
- The stud fasteners on which the product is suspended should be located 32 cm from the floor, but this value can be changed by adjusting the legs;
- The distance between the mounting axes is 18 or 23 cm.
With this width and height, the toilet is installed 30 cm above the floor. This is generally convenient for all apartment residents.

The dimensions of a wall hung toilet bowl are fairly standard:
- width (0.3 – 0.4 m);
- height (0.3 – 0.4 m);
- The length depends on the specific model: “mini” – up to 54 cm, “standard” – 55-60 cm, “maximum” – 70 cm.
Types of installation systems
There are several types of installation systems, varying in design and size (particularly depth and height). To choose the right system, it's recommended to study the key features of each type. Installation systems for wall-hung toilets come in three types:
- block;
- frame;
- angular.
Sometimes installations are classified by purpose: there are models suitable for specific types of plumbing fixtures, as well as universal options. Corner installations for toilets are also a separate category. These aren't used very often, but they are indispensable if space is at a premium in a combined bathroom.
Block
 The design of these models consists of two elements: the toilet bowl itself and a built-in module. The toilet bowl is suspended using special fasteners or mounted to the floor, while the built-in module is installed behind a false wall. The cistern can be suspended, embedded in brick or cement, or concealed behind a plasterboard or plastic partition.
The block installation is characterized by the following features:
- a flat flush tank, additionally reinforced, having a small thickness, but a large width and height;
- unique fastening elements.
A modular installation is characterized by its shallow depth and lower cost compared to a frame system. Installation is performed on a solid wall. When choosing a standard (non-wall-hung) model of plumbing fixtures, the only difference from a standard system is the concealment of the cistern.
Due to the fact that the installation is almost completely built into the wall, it is best if it is pre-installed a small niche has been arrangedThis type is chosen when the budget is limited or when free access to the system is required.
The main drawback is that the toilet installation can only be carried out if there's a load-bearing wall. If there isn't, it's best to consider a different type of system, as the thin partition will break under the weight of a seated person.
Frame
The system's foundation is a robust steel frame coated with an anti-corrosion solution. To ensure increased installation strength, the components are sometimes welded together. The steel frame bears the entire load: the weight of the components, the body weight of the occupant, and the water.
The main advantage of this type of toilet installation is the ability to install it anywhere in the bathroom where both sewer and water supply pipes can be connected. Frame systems vary in their intended use. Some options are suitable only for a bidet or toilet, while others can be installed with various types of plumbing fixtures.

Installations of this type are free-standing; they are not secured to the wall, and the entire weight is transferred to sturdy, reinforced legs. Therefore, unlike a modular system, this type of installation can be installed even on a thin plasterboard partition.
There are several types of fastenings:
- 4-point wall mounting;
- fastening to the floor, this design has additional supports;
- Fastening at 2 points to the floor and at 2 points to the wall.
Corner
Corner toilet installation systems are used in situations where space is limited but the plumbing fixtures can be installed in a corner. These models are typically wall-mounted. They also allow for a unified bathroom design and make the space appear larger, but their installation is somewhat more expensive.
Main advantages:
- compact size, allowing models to be installed even in the smallest rooms;
- visual increase in space due to the fact that the center of the toilet is not cluttered with plumbing;
- you can place the toilet together with a sink or bidet;
- There is a 40mm space within which the height of the product can be adjusted;
- Toilet bowls are typically extremely durable and wear-resistant, preventing cracks and other damage even under heavy loads. Despite their apparent fragility, the installation can support up to 500 kg of weight.
A particular feature of the corner version is that it must be installed only in combined bathrooms. When installed in standard rooms with ample space, this model will visually make the room appear smaller.
Toilet installation – necessary tools
After selecting the appropriate installation type and marking the height, width, and other parameters, you can begin installation. Preliminary work may include leveling the floor. If you plan to install a modular installation, you will also need to level the walls. As noted above, when installing this type of installation, a load-bearing wall is necessary, as a standard partition will not support the entire weight of the unit.

The next step is choosing a location for the toilet installation. It must be suitable given the height and depth of the installation. After this, the utilities—sewage and water—need to be connected. The connections must be positioned so they are close to the installation site.
Necessary tools:
- drill with concrete drill bits;
- FUM tape;
- adjustable wrench;
- hammer;
- screwdriver;
- core;
- corrugated pipe for sewerage;
- building level;
- double plasterboard, but it must be highly water-resistant.
Let's look at the installation procedure using a frame installation as an example.
We fasten the frame to the floor
Algorithm of actions:
- Preliminary installation of the frame, checking the height and horizontal placement with a building level.
- Using a marker or pencil, mark the locations where the frame will be attached. Use the existing holes in the installation as a guide.
- Move the steel frame aside and drill holes for the mounting at the points marked in the previous step. If installing into a concrete wall, Allen key anchors are usually used.
- The frame is installed in place, and fasteners are screwed into the holes created.
Setting the toilet installation height
Typically, the installation height is adjustable. The height should be calculated from the finished floor level, i.e., the floor covering. If the floor covering has not yet been laid at the time of installation, its approximate height is taken into account and added to the height of the toilet installation.
To allow the builder to slightly adjust the height, the legs are adjustable. Once the desired height is achieved, it is secured with clamping bolts.
If adjustments are necessary, loosen the bolts. When changing the height, be sure to check the horizontal alignment of the product using a level.

We attach it to the wall
Adjustable bolts, usually included in the kit, are used to secure the frame to the wall. One end of the bolts is secured to the upper frame corners, while the other end is secured to the wall using specialized anchors.
After this, you need to ensure that the installation is positioned strictly vertically. Place a spirit level against the side posts, then adjust the frame's position relative to the wall by turning the nut on the fastening element.
This alignment procedure isn't particularly difficult, but its implementation is crucial. It's crucial to align the structure as accurately as possible, checking it in several planes.
Once the technician has verified that the toilet installation is level, the sliding element on the fastening piece must be pressed in. This will secure the screw and the product in place.
Connecting sewerage and water
 Next, you need to connect the pipe, which is fixed to the frame, to the sewer outlet. Sometimes the kit includes an elbow for connecting to the sewer line; if this is not available, you need to use a corrugated pipe designed for sewer work.
There's another connection option. This requires a plastic clamp to be located on the steel frame. The pipe outlet from the sewer line must be connected to this clamp. However, in this case, it's important to know the correct pipe diameter.
The cold water supply is connected to the cistern via a suitable fitting. This can be done with virtually any pipe, but ensuring a secure connection is crucial. This is necessary to minimize the risk of leakage and fluid leakage.
It is advisable not to use pipes made of metal-plastic, with a press fitting. Such fittings require regular tightening to ensure reliable operation, and this is quite difficult due to the hidden pipes. It is recommended to use copper, polypropylene, or polyethylene pipes, the components of which are firmly connected by soldering.
The tank inlet and adapter are connected with a flexible hose. It is recommended to use a branded hose, but if this is not possible, any stainless steel plumbing hose will do.

Finishing, installation of the button and toilet
 Once the main part of the toilet installation is complete, it's time to begin finishing work. Once the steel frame is in place, it should be covered with drywall. Typically, two sheets are required.
First, height and other dimensions are marked on the wall, then the profile is installed using these marks. After this, the drywall sheets are attached to the profile.
Before finishing, it is recommended to install a flush button box to prevent construction debris and dirt from entering. Holes are cut in the drywall for the flush button, sewer outlet, and water supply pipe, as well as for the two studs on which the toilet bowl is installed. After the drywall is installed, tiling begins.
Once the finishing is complete, trim the flush button frame so that its edges are roughly flush with the tile. The button will be mounted on two fasteners. Then, connect the cable (for a mechanical version) or hose (for a pneumatic version) to the mechanism. Then, install the button and secure it with bolts.
Attaching the toilet to the installation:
- A gasket is installed and placed on the studs.
- The holes where the sewer and water supply are connected are sealed with a silicone product intended for plumbing.
- The structure is installed on studs, then rubber gaskets are placed on them, and the fasteners are tightened.
- Excess parts of the gasket are cut off with a sharp knife.
What you should know before installation
When purchasing plumbing fixtures, it's advisable to choose only high-quality ones. However, even this won't always prevent breakdowns. The main disadvantage of concealed plumbing is the risk of leaks, which necessitates repairs.
To minimize the likelihood of such a problem, it is recommended to purchase plumbing fixtures and fasteners only from reputable manufacturers. However, quality comes at a price, as models from world-renowned manufacturers are quite expensive.
 Professionals also recommend using a pipeline without detachable joints that can become depressurized. The best choice is polypropylene pipes., the parts of which are heated and connected into a single, non-separable structure.
This approach will minimize the risk of leaks. If it is necessary to use metal-plastic plumbing, it is advisable to install press fittings. They are considered the most reliable of all fitting types.
It's also recommended to take the time to choose the flush button. There are numerous options on the market to suit any interior design. If you search, you can find one that perfectly matches the style of the room. In addition to standard mechanical flush buttons, models with a pneumatic mechanism are also available.
They differ from mechanical ones in that the drain valve is operated not by a metal rod, but by changing air pressure. The advantage of a pneumatic mechanism is that such a button can be installed anywhere.
There are also flush buttons that help save water when flushing. They come in the following types:
- Dicotyledonous – made up of two components. Pressing one half flushes only half the water, while pressing the other half drains all the water in the tank;
- A start/stop mechanism. Pressing the "start" button starts the flush, and pressing the "stop" button stops it. This approach allows the toilet user to independently control the volume of water released.
Therefore, installation can be done by yourself. The procedure is not too complicated; even a novice in construction can handle it. However, it is important to carefully follow the instructions and recommendations.
Before starting installation, it is advisable to know the height and other dimensions of the wall-hung toilet with installation in order to choose the right location for installation.