When landscaping a garden, it is often necessary to lay a pipe in a ditch leading to the site. It is built into a drainage system around the perimeter of the area from which rain or melt water must be divertedThanks to this system, access to the site becomes available at any time of year and in any weather.

- Reinforced concrete products
- Steel products
- Plastic analogues
- Installing pipes in a ditch yourself: a step-by-step procedure
- A more complex structure of entry through drainage with retaining walls
- How to arrange an entrance to a site with a slope
- Device for entering on a slope up or down from the road
- Other solutions for safe passage on uneven terrain
- Conclusion
Reinforced concrete products
The first step is to select the drainage material. In this case, it's crucial that it can withstand heavy pressure loads. Therefore, it's important to first determine which pipes are best suited for installing a driveway over a ditch.
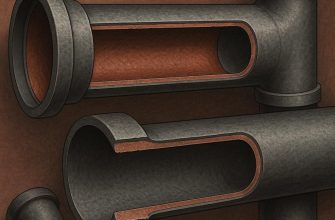
Reinforced concrete products are quite common. Their strength is undisputed. Laying them yourself is impossible. Very heavy products must be installed using specialized equipment.
 The concrete type of pipes is manufactured in two stages:
- First, a steel frame is made from reinforcement rods welded together in a circle.
- Next, the base is poured with high-grade concrete. Afterward, the blank is compacted using a centrifuge and vibration compaction.
Due to the manufacturing process, reinforced concrete products are very strong and smooth. Therefore, there's no need to worry if you decide to line the ends of the pipe with stones.
The structure of vibro-pressed material is extremely dense. Therefore, water cannot penetrate it and cause rusting of the steel frame.
Let's consider the parameters of reinforced concrete pipes:
- their cross-section can be 0.3-1.2 m;
- the wall thickness is 140-200 mm;
- length ranges from 250 to 500 cm.
Reinforced concrete pipes for drainage ditches have two classes of rigidity:
- The first category parameter means that the product can be buried no more than 6 meters in the ground. Such structures are not suitable for deeper burial.
- Class II rigidity material has a higher load-bearing capacity and can be installed at depths of up to 10 meters.
The main advantages of reinforced concrete drainage are its high strength and long service life. The main disadvantages are its high cost, large size, and weight. Concrete structures can only be installed using specialized equipment.
A separate type of such construction is asbestos-cement driveway pipes. They are lighter and more compact than their reinforced concrete counterparts.
Steel products
 Steel is another common drainage material. It's very durable, and products made from it last 30-40 years. Installing such structures will completely solve the problem of access to the property. Trucks will also be able to access the property.
Another important advantage of this material is that steel pipes for the ditch driveway can be installed by yourself. There's no need to hire professionals. This will save you money on construction costs.
The main drawback of steel pipes is their susceptibility to corrosion. However, this can be mitigated by waterproofing the pipes, for example, with a paint-based waterproofing coating. Alternatively, thick-walled alternatives can be purchased, which will automatically extend their service life.
So that you don't have any problems problems during operation of the structure, it must be newDon't use used pipe in a driveway ditch. After installation, the old material may become deformed and, as a result, burst when heavy vehicles pass over it.
Plastic analogues
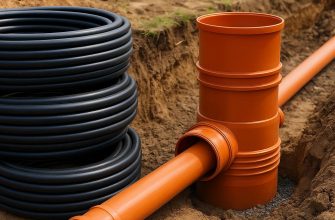
 Plastic pipes for driveway drainage are the most modern. They are lightweight and easy to install. They don't require significant physical effort or specialized equipment. Installing a drainage ditch with plastic pipes is easy.
Plastic drainage is inexpensive. Its key advantages over metal include non-corrosive properties and resistance to chemically aggressive environments. Drainage structures are made of particularly durable plastic. It can withstand increased pressure loads caused by vehicle traffic. Therefore, plastic drainage systems are even used under highways. Laying plastic pipes in driveway ditches is completely safe. The material also withstands temperatures from -60°C to +95°C.
When manufacturing polymer drainage, the following are most often used:
- polyvinyl chloride;
- polyethylene;
- polypropylene.

In most cases, PVC products are used. They can be single- or double-layered. Double-layered products are corrugated pipes, which are also ideal for access roads. Their top layer is accordion-shaped. This increases the drainage system's elasticity and helps it withstand compressive loads.
Corrugated products can have a large diameter and be anywhere from 1 to 6 meters long. Their top layer can also be a filter layer.
For installation in a ditch, it's advisable to use the most rigid plastic drainage material. This type of driveway will also withstand heavy vehicles. The best option is to choose a double-layer plastic corrugated pipe for installation. It's the most durable of the polymer alternatives.
The cross-section of such structures can range from 0.2 meters to 1 meter. It is highly undesirable to install used structures. They have reduced strength, and the service life of such drainage will be short.
Installing pipes in a ditch yourself: a step-by-step procedure
Watch the video
If the soil in the area is prone to waterlogging, it must be drained before creating a driveway through a ditch. It's important to ensure that drainage doesn't interfere with the natural flow of rainwater, meltwater, or groundwater.

First, let's talk about how to create a simple DIY approach to a property through a ditch. This work should be done when the trench is not filled with water:
- Remove the top layer of soil along the future entrance.
- Spread quartz river sand on the bottom of the trench. Level it and compact it. The sand bed should be 15-20 cm thick.
- When the driveway width is 6 meters, a structure at least 8 meters long is placed in the ditch. Its diameter is selected based on the volume of runoff. Most commonly, structures with a diameter of 30-50 cm are installed. It is assumed that water will fill them up to a quarter of their capacity. Otherwise, in the spring, meltwater could fill the yard without finding a way through the ice crust.
- After installing the pipe under the access road, it should be backfilled with a mixture of sand and crushed stone or gravel. The backfill can be done in two layers. First, fill the trench with sand, then lay geotextile on top, and then lay crushed stone.
- In the same way, areas with removed topsoil should be filled.
- All layers should be well compacted after they have been laid.
- It is recommended to complete the driveway with concrete. Without a concrete screed and side barriers, the road will begin to drift apart as vehicles move.
A more complex structure of entry through drainage with retaining walls
It's more reliable because the plastic corrugated access pipe is concreted on both sides. This limits the road to supporting piers. These can be either raised above the access surface or poured flush with it.

Here's a diagram of how to create a driveway that's not only durable but also more aesthetically pleasing:
- Once the pipe is laid in the ditch on the driveway, the formwork for the concrete head is installed on both sides of the driveway in turn.
- Then it is highly desirable to strengthen the supporting piers with a welded reinforcement cage.
- After this, high-grade concrete mortar – M-400 or M-500 – is placed into the formwork.
- The concrete must dry for at least 3-4 days. Then the formwork can be removed.
- Next, the pipe under the driveway is filled with sand and crushed stone (or gravel). The caps will prevent the crushed stone from spreading. Therefore, it is not necessary to cover it with geotextile. It is better to use granite crushed stone rather than white limestone.
- After this, the driveway can be lined with concrete screed, road slabs, paving slabs, paving stones, natural stone, etc.
How to arrange an entrance to a site with a slope
It's possible that the driveway on your property isn't level, but rather sloped. This slope can be either positive or negative—in other words, it can slope up or down from the road surface.
Watch the video
In any case, it's essential to ensure adequate traction between the road surface and the vehicle's wheels to ensure safe passage. This situation shouldn't be left to chance.
Device for entering on a slope up or down from the road
 If the terrain in front of the property has a slight slope, or you plan to build a basement garage, it's best to construct a ramp for the driveway. A slight slope (up or down from the property) is considered to be up to 25 percent. In other words, for every meter of road length, the elevation difference is up to 25 centimeters. Before the parking area, the slope should be leveled to a flat horizontal plane.
The access pipe for the site over the ditch must be laid properly. Given the existing slope, the following construction steps must be completed:
- First, excavation work begins. Markings are made, then the top layer of soil is removed in steps.
- The sides of the driveway are reinforced with retaining piers. Formwork is constructed underneath them, into which a framework of rebar is welded. Concrete is then poured into the frame.
- When the slope is small and the car does not need to be lowered into the basement, the edges of the road can be limited by a curb made of concrete slabs.
- Then a pipe for a drainage ditch for the driveway is laid on the sand cushion.
- Then the drainage is filled with crushed stone in a layer of 10-15 cm. The cushion should be well compacted.
- The rise or fall is then filled with concrete screed. Its thickness should be at least 10-12 cm. The mixture must be sufficiently dense and viscous, otherwise it will begin to slide when it sets.
- Once the screed is completely dry, the driveway can be lined with paving slabs, cobblestones or natural stone.
Other solutions for safe passage on uneven terrain
 A variation on safe access to the site could be to construct it along a curved path (spiral). This would increase the length of the path, but decrease the slope. In this case, the roadway could be routed around the main building.
This solution will allow for parking for several cars. The only limitation for constructing such a driveway is that the suburban area must be sufficiently large.
To protect the driveway from ice, you can install a canopy over it. The easiest way to construct one is from polycarbonate, bolted to a metal frame made of arched supports and trusses. Asbestos-cement slate, metal tiles, and corrugated sheeting are also suitable roofing materials. This type of protection is especially useful if you're not building a garage.
Electric heated driveway surfaces can be used as an anti-icing measure. This will keep the surface clear of snow and ice during the cold season.
Conclusion
Watch the video
Knowing how to install a pipe in a driveway ditch will help you create safe and effective drainage for your property. You can use a variety of materials, each with their own advantages and disadvantages.