Thermostat for a heating radiator will help improve the temperature in the room, and also reduce heating costs if heating bills are issued according to metering devices.
As part of the state program "Energy Saving", installation of control pipeline valves is an integral part of individual and mass constructionThermostats can be used in both single- and two-pipe heating systems in buildings of any height, age, and purpose.
The only limitation is cast iron radiators. They have thermal inertia—they take a long time to heat up and cool down. Therefore, the thermostat cannot operate as efficiently as on bimetallic or steel heating units.
- The purpose of a thermostat for a heating radiator
- Operating principle
- Technical specifications
- Materials for the manufacture of thermostats
- Design of a thermostat for a heating battery
- Types of temperature controllers
- Thermal valve: design, types, installation methods
- Thermal head: types, adjustment methods, advantages and disadvantages
- With manual adjustment
- Automatic
- Electronic
- Installation method
- Which thermostat should I choose?
- Installation on a heating radiator
- Temperature control
- Service
- Popular models from manufacturers
The purpose of a thermostat for a heating radiator
In private homes with a separate boiler room, you can increase or decrease the heating water temperature at your own discretion. Unfortunately, this is not possible in apartments with central heating.
The system circulates a heated coolant, the temperature of which is virtually independent of the residents' wishes. This is the standard value provided by combined heat and power plants and boiler houses serving several buildings or neighborhoods.
Which It is better to install heating radiators in the apartment - what aspects do we pay attention to when choosing, TOP - 17 batteries.
Heating equipment cannot react sensitively to temperature fluctuations outside, so during thaws or early spring, overheating of premises is possible. adversely affects the well-being of residents, and also leads to overspending expensive energy sources.
But it is entirely possible to make the room temperature comfortable and maintain it stable, despite changes in the weather.
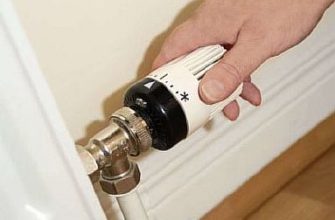
For this purpose, thermostats are installed on radiators, with the help of which the required heat output of each heating device or entire groups of batteries can be set.
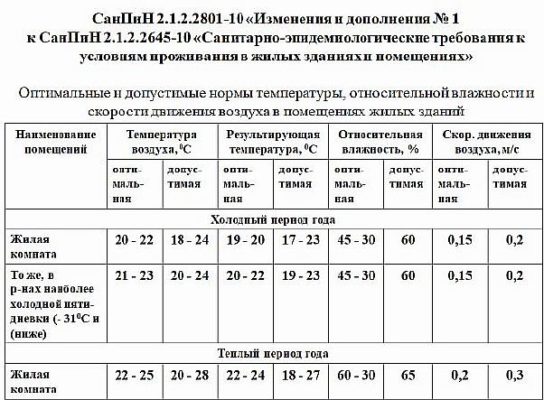
According to SanPiN 2.1.2.2645-10 standards, the following temperatures are considered comfortable:
- in living rooms - 20-22°C;
- in the kitchen - 19-21°C;
- in the bathroom and combined toilet - 22-24°C.
Setting the desired heating level with a thermostat is the easiest way to maintain a desired temperature in each room. And thanks to its independent control, this can be done without interfering with the operation of the entire heating system.
Operating principle
A radiator thermostat is a piece of pipe fittings that can control the amount of coolant passing through the pipe, providing the required heat output.
However, it can't increase heat output, only decrease it. If the radiators aren't heating well, there's no point in installing a thermostat.
Temperature regulators are typically installed on the supply side. The mode is set depending on the desired air temperature. Adjustment is being made by mechanical rotation of a handle with a graduated scale or using a software unit.
When the thermostat heats up above the set value, a sensitive temperature valve is activated. The coolant flow is reduced, and the radiator cools. When the temperature drops below the set value, the valve opens.
The coolant begins to flow more intensively into the radiator, warming the air in the room. Thus, constant comfortable conditions are maintained with virtually no human intervention.
Technical specifications
A regulatory document, GOST 30815-2002, has been developed for thermostats that do not use electricity. It establishes maximum performance limits based on the nominal parameters of heating networks adopted in our country:
- maximum coolant temperature - 120°C;
- excess pressure - 1.0 MPa;
- room air temperature - 5-45°C;
- humidity - 30-80%;
- response time - no more than 40 minutes.
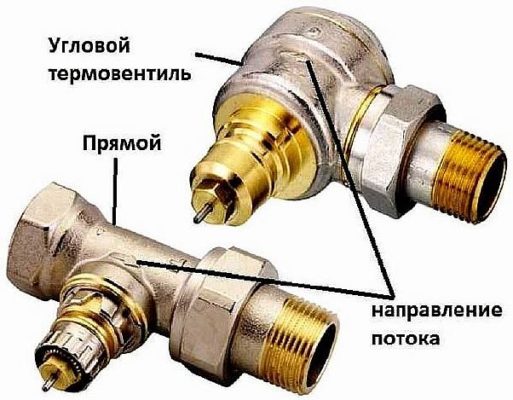
The direction of coolant flow in the radiator thermostat is indicated on the housing. Reverse installation is not permitted.
A thermostat is a device that maintains a preset temperature using a thermostatic control. It is used in refrigerators, heating appliances, and other devices.
The handle must be durable, and the stem seal must be airtight. To ensure effortless adjustment, the torque applied when turning the handle should not exceed 2.0 Nm.
In the technical documentation for its products, the manufacturer is obliged to indicate:
- Setting range;
- Minimum pressure of the coolant in the system;
- Minimum pressure drop across the valve;
- Nominal flow;
- Hydraulic characteristics of the valve;
- Functions of the protective cap.
In cases where the thermostat provides for pre-setting, the indication and the corresponding flow value must be indicated.
Materials for the manufacture of thermostats
Surfaces that come into contact with the heated coolant are subject to high destructive loads. They are made of corrosion-resistant alloys such as bronze or brass.
Steel inserts must be provided internally to ensure a secure connection to the spindle. GOST permits the use of other materials, provided their characteristics meet the necessary reliability and durability requirements.
Design of a thermostat for a heating battery
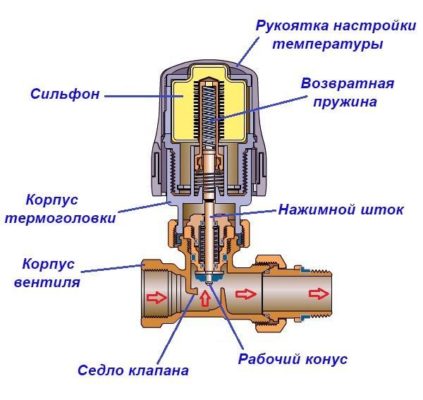
A radiator thermostat is a two-way control valve. Its advantage over a conventional ball valve is the ability to not only shut off the flow of coolant through the pipe but also smoothly adjust its flow rate. The design consists of two parts:
- removable thermostatic head;
- a thermal valve that is installed directly into the lumen of the pipe.
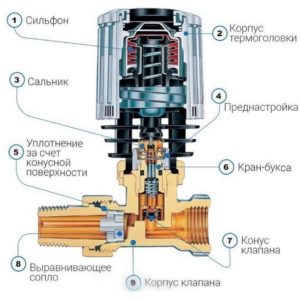
Thermostatic head A bellows is a sealed cylinder with a plastic handle and a built-in bellows—an elastic shell filled with a working fluid. This fluid can be a liquid or gas with high thermal expansion, such as acetone, toluene, or natural gas condensate. They are extremely sensitive to heat, reacting with a sharp increase in volume.
Thermal heads are made removable. Therefore, they can be installed together with various valves, which are suitable for a specific heating system. Antifreeze or specially purified water should be used as the coolant, as the devices are extremely sensitive to contamination.
Types of temperature controllers
According to GOST 30815-2002, thermostats are classified into 4 groups:
- built-in temperature sensor and controller;
- only the regulator is built-in, and the sensor is remote;
- remote control and sensor;
- The regulator is located separately, the sensor is remote.
The advantages of built-in sensors are their compact size and easy installation. A disadvantage is their impact on the valve's performance due to the surrounding environment. If the sensor is positioned vertically on a heating pipe or there's a thick curtain hanging nearby, the sensing element quickly overheats, causing the valve to operate prematurely.
The sensor may also malfunction if it and the radiator are located in a recess or near a windowsill. The proper connection instructions for a thermostat with a built-in sensor are always specified in the manufacturer's instructions, which must be strictly followed.
Remote sensors are not directly exposed to the radiator, which results in more accurate maintenance of the set mode.
The radiator temperature sensor can be fixed at a distance up to 8-10 meters For measuring temperatures anywhere in the room. It is connected to the thermostat via a capillary tube, which transmits pressure from the sensor's sensitive element to the movable rod.
Thermal valve: design, types, installation methods
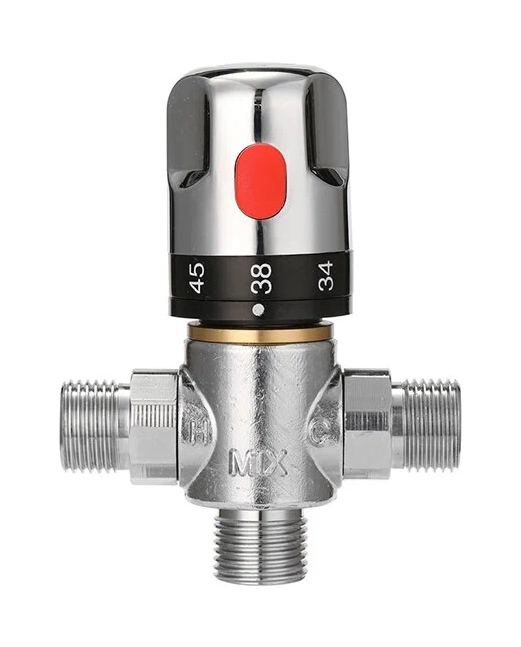
A thermostatic valve is an actuator that operates from a thermostatic head. It can be angled, straight-through, or three-axis, and can be either right- or left-handed.
Brass or bronze are used for manufacturing. Chrome or nickel plating is used for additional corrosion protection. The outside of the shut-off valve can be enameled, giving it a more aesthetically pleasing and refined appearance.
Different valves are available for single-pipe and two-pipe systems. They differ in hydraulic characteristics, as single-pipe systems require valves with a larger bore.
For single-pipe heating systems, which are gradually being replaced by more economical and comfortable two-pipe systems, the range of thermostatic valves is very limited, only about 2-3 models. Valves for two-pipe heating systems account for the majority of sales—97-99%.
Thermal head: types, adjustment methods, advantages and disadvantages
The primary function of a thermal head is to read ambient temperature and regulate the operation of a thermal valve. The first part of the task is handled by a temperature sensor, while the second part is accomplished in various ways.
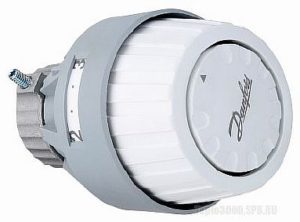
With manual adjustment
This is the simplest model, where the mode is changed by manually turning the thermostat, which is a rather slow and labor-intensive process. Every time the weather changes, you need to find the optimal temperature experimentally and wait until the room becomes comfortable.
Another drawback of manual control is the inability to set an economy mode. Without this control, the heating will run at a constant power level, which is often unjustified.
Automatic
This is a more advanced method that allows you to create optimal conditions based on the residents' preferences. The thermostatic head's dial is adjusted according to the selected mode, and no human intervention is required to adjust the microclimate.
The thermostat will automatically monitor temperature changes and perform the necessary operations to maintain it.
Compared to manual control, automatic control is more advanced. It allows for energy savings and maintains favorable indoor conditions in any weather.
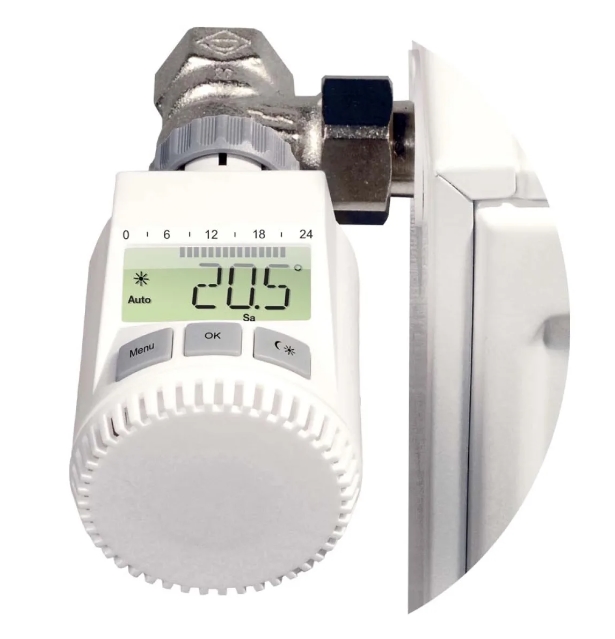
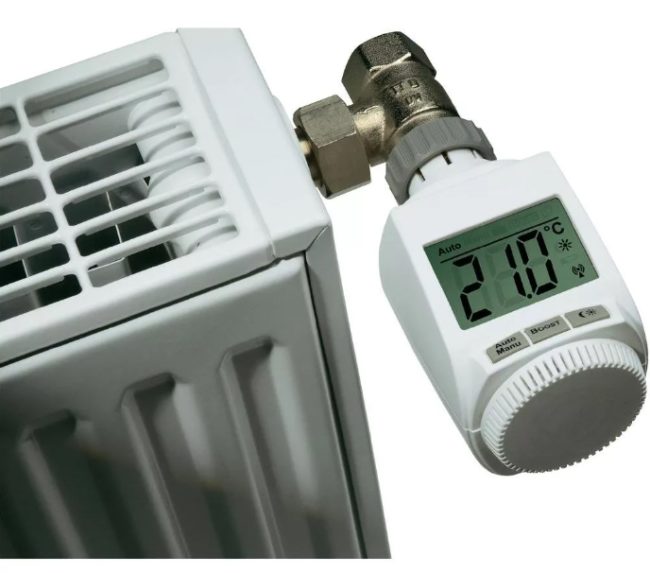
Electronic
This is the most promising type of thermostat, since it allows you to not only set the desired temperature, but literally schedule it by day or even hour.
The electronic unit with a microprocessor makes it quite easy to control the thermal valve – programming takes only a few seconds.
Electronic radiator controllers operate on batteries, which need to be replaced once or twice a year, or from the house's 220V power supply. These devices are often used in smart home systems as a key component for creating comfort.
 The economic benefit of using electronic thermostats is obvious—the heat generated is used efficiently. If the owners are at work during the day, the heating is turned on at a minimum. In the evening, when everyone is home, the program turns on more intense heating.
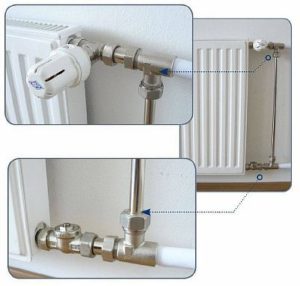
Installation method
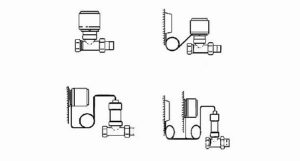
Thermostatic valves come in straight and angled designs, and are installed on a linear section of pipe or a bend, respectively. The choice of installation method depends on the pipeline configuration and the ability to reduce the radiator's impact on the sensitive thermocouple.
When installed directly, the protruding thermal head should face inward. This should be taken into account, as it can sometimes become an inconvenience or attract attention.
If the thermostatic valve is angled, the thermostatic head can be positioned vertically or along the supply axis along the wall. This option creates virtually no interference, but is not suitable for straight sections.
Which thermostat should I choose?
When choosing a temperature controller for a heating battery, you need to consider:
- Valve capacity. In a one-pipe system, it should be maximized to avoid further increases in hydrostatic pressure.
- The type of liquid filling the thermostatic head. Gas or liquid models differ in response time. Gas models are faster and respond more quickly to changes.
- Installation method. The radiator can be connected to either a straight or corner section. The valve must be designed accordingly.
- Is a remote sensor necessary? It can be placed anywhere in the room, allowing for more accurate environmental information and optimal heating settings.
- Matching the thermal valve diameter to the pipe cross-section. The thermal head can be any size, as it simply installs into the designated seat on the valve.
- Precise mode settings and programmability. If you need to maintain different temperatures throughout the day, it's better to choose thermostats with electronic components. This will also help save energy.
- The manufacturer's reputation. Well-known brands meticulously monitor product quality and provide warranties, so avoid buying no-name products without identifying marks and technical documentation.
If there are small children in the home or unauthorized persons may have access to the radiator, it is recommended to use vandal-resistant thermostats with a protective cover. This will prevent unauthorized adjustments and protect the sensitive fittings from damage.
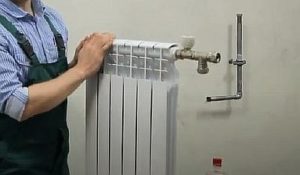
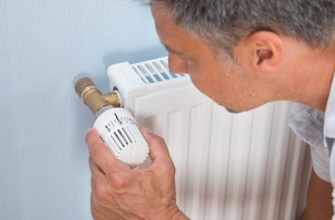
Installation on a heating radiator
To work you will need:
- thermostat;
- metal-plastic pipe with a cross-section of 20 mm;
- tee with 1/2″ thread – 2 pcs.;
- metal-plastic American fittings - 6 pcs.;
- ball valve - 2 pcs;
- wrenches;
- winding;
- silicone sealant;
- roulette;
- pencil;
- sharp knife.
Installation steps:
- Drain the water from the section of the heating system where the radiator is located. Unscrew the old connection and clean off any remaining winding so the threads are clearly visible.
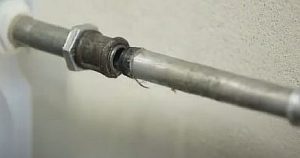
- Treat the lower connection in the same way.
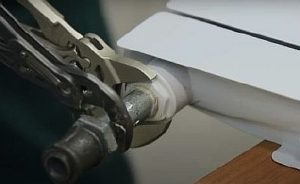
- For ease of use, it's recommended to remove the radiator and lay it horizontally. To remove the feed tube, you'll need two wrenches—one to hold the union nut and the other to loosen the connection.
- Use a screwdriver or knife to remove the old seal from the radiator threads.
- Assemble the unit from the bypass (jumper), ball valve, and thermostat. To do this, apply silicone sealant to the threads of the compression fitting, screw together two tees and two nipples, and attach the thermostat and ball valve. Install plastic-to-metal couplings into the tee. Screw the unit into the radiator.
- Twist the lower connection from a tee and a ball valve and install it in the battery.

- Measure the distance between the fittings (excluding the nuts) and cut a piece of pipe for the bypass.
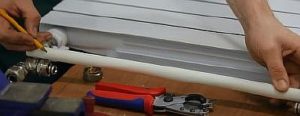
- Chamfer the pipe edges using a calibrator, install nuts and compression rings, and connect to the upper and lower units. The bypass is installed.
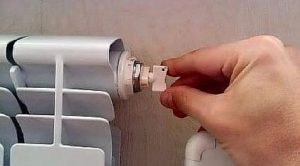
- Hang the radiator in place. When installing the thermostat, remember to ensure the handle is not positioned in an area where air circulation is limited.
Temperature control
To properly set up the thermostat, you need to:
- Mayevsky tap wrench;
- needle-nose pliers or flat-nose pliers;
- room thermometer.
Before adjusting the temperature, the heating should be turned off and the windows and doors closed to prevent heat loss. It is recommended to begin adjustments in the coldest room.
It is recommended to first bleed the air from the radiator using a Mayevsky valve, for which you will need a special key.
Procedure:
- Turn on the heating.
- Set the maximum mode, wait until the room temperature stabilizes and remember its value.
- Close the shut-off valve. When the radiator has cooled slightly and the room is comfortable, measure the temperature.
- Turn the control knob until you hear the sound of water flowing from the radiator. The surface should become warm.
Set the thermostat dial to the optimal temperature setting. The setup is almost complete. If there are other radiators in the room, all that remains is to adjust their heat output. To prevent conflicts between heating devices, use balancing (ball) valves.
Service
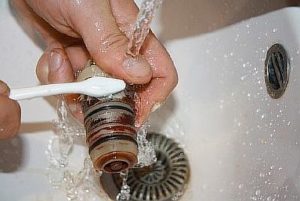
High-quality thermostats rarely fail. Failures can be caused by improper installation, untreated water, or clogs. Manufacturers provide maintenance recommendations in their operating instructions, which should be followed:
- check the temperature settings at least once a month;
- install a mesh filter in front of the regulator and clean it regularly from dirt;
- Once every 6 months, if there are metering devices, check for leaks with the valve closed and pressure losses in the heating system with the valve fully open, comparing them with the values obtained during commissioning.
If the valve boils, the sediment must be cleaned from the valve and seat. If mechanical damage to the thermocouple is the cause of the malfunction, repair is no longer possible and the regulator must be replaced.
Popular models from manufacturers
According to sales analysis in specialized stores that sell heating equipment, the following brands of thermostats are in the greatest demand:
- VALTEC, Italy;
- Oventrop, Germany;
- Danfoss, Denmark;
- IMI Heimeier RTL, Germany;
- Verol, Germany.
When installed and operated correctly, these manufacturers' products will provide years of trouble-free service. By limiting excess coolant flow, thermostats control temperature conditions and reduce energy consumption without compromising comfort.

I spent a long time thinking about which thermostat would be best for my radiator. I wanted a high-quality product with good performance characteristics. The article describes the most important characteristics, and I thank the author for that. I realized it's better to go with a more expensive one, as they're typically designed for a wider range of values. Thank you, I'm satisfied.