A heating system is essential for maintaining an optimal temperature in a home during the cold winter months. It will help maintain comfort inside the home, but it's important to know what a modern heating system is and which connection scheme to choose.
- What should be considered when choosing schemes?
- Types of heating systems and their design
- The operating principle of radiator heating systems
- What does the efficiency of a radiator depend on?
- Heating system calculation and boiler capacity selection
- Types of radiator connection diagrams for a private home
- "Spider"
- Tichelman scheme
- Diagonal top
- Bottom/saddle connection
- Side/one-sided connection
- Two-way bottom connection
- Pipe layout diagrams
- Single-pipe
- Double-pipe
- Radial (collector)
- Criteria and selection of the optimal design for a private home
- What is required for installation?
- How to connect a radiator in a private house yourself?
- How can the efficiency of radiators be improved?
What should be considered when choosing schemes?
A warm room is essential for normal human life. There are several main types of heating, designed to maintain a standard air temperature in spaces for various purposes.

The heating complex consists of the following main components:
- Heat generators are heat sources.
- Heating equipment – radiators, convectors, registers, heaters, etc.
- Communications - pipes, power cables, air ducts, etc.
Types of heating systems and their design
There are several types of heating systems available. The range available on the market is constantly being improved, with new space heating systems being added.
Below we will consider the types of heating systems.
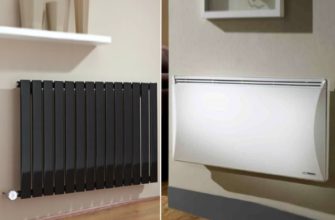
- Radiator heating. This was one of the first heating systems used by humans. After modernization, the system continues to function reliably not only in older homes but also in new buildings. A heating radiator consists of several heat-exchange sections. The more sections, the greater the power of the unit. Key features of the modern version:
- Cast iron has been replaced by aluminum, steel and bimetal.
- The temperature in each room can be adjusted to suit your taste.
- Increasing efficiency and reducing energy costs for heat generation.
- Attractive design.
- Affordable price.
- Uneven distribution of heat in the room, which is explained by the physical laws of convection circulation.
- Convection/electric heating. Heat is transferred by mixing large volumes of hot and cold air. With an electric convector, you can heat any type of room, even if you only have one energy source. Features of the modern version:
- Does not require large installation/maintenance costs.
- Provides maximum comfort.
- High efficiency.
- Large temperature difference in the room (high air temperature at the top, low at the bottom).
- The impossibility of ventilating the room without losing thermal energy.
- Air heating. This is one of the oldest heating methods using the heat of a hot stove. The walls of the firebox and air ducts are heated when coal or wood is burned. The heat is then released into the surrounding space. The primary heating is provided by the firebox's air duct. Features of the modern version:
- You can use different types of energy sources: firewood, coal, pellets, wood waste.
- Stoves can be made of clay or brick.
- The most economical heating.
- Suitable for summer cottages and country houses.
- You need to know how to use a stove, otherwise you can get carbon monoxide poisoning.
- "Warm floor". Previously used only as a supplementary heat source, today it is regularly used independently, typically in luxury apartment buildings. The system consists of a chain of thin pipes that generate heat. Features modern heated floors:
- The temperature is distributed evenly throughout the room.
- Concealed heating systems provide freedom to implement various design concepts.
- It can be made not only with electricity, but also with water.
- Safe - no risk of burns.
- High energy efficiency.

Each type has its advantages and disadvantages. But only a properly designed heating system can create an ideal indoor climate, independent of the weather outside.
The operating principle of radiator heating systems
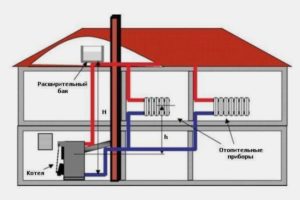
The heating system works as follows: heated liquid in the boiler passes through the system, and the heat is distributed through pipes to electrical appliances and then to the room to be heated. Since all heating elements in the system are closed, the liquid moves in a circular motion.
What instances does the liquid pass through:
- boiler;
- heating radiators - sequentially, from the one closest to the boiler to the one furthest away;
- expansion tank.
What does the efficiency of a radiator depend on?
A radiator's efficiency is measured by its heat transfer. Heat transfer, in turn, depends on the following factors:
- Atmospheric pressure - thermal conductivity decreases with decreasing air density.
- Heater color and coating composition.
- Method of installing a radiator.
- The speed of air in the room and the direction of its flow.
- The way the heating system is connected.
- The wall surface behind the radiator.
- The presence of dust on the battery significantly reduces the heat output.
When running air ducts through streets and unheated spaces, it's important to ensure proper insulation. This reduces heat loss and improves system efficiency.
Heating system calculation and boiler capacity selection
To ensure the boiler operates efficiently, it's important to correctly calculate its capacity before purchasing. This information will help you choose an electric boiler that can easily heat the entire required area without overloading or breakdowns.
The formula used for calculation is W=S*W(ud)/10 m2. The explanation is as follows:
- W is the power of the device in kilowatts.
- S – area of the room in square meters;
- W(sp) is the specific power parameter for equipment used individually in each region.
Calculate Heating boiler power in our online calculatorTo do this:
1. Enter the required values.

2. Click "Calculate".


Types of radiator connection diagrams for a private home
There are several heating device connection schemes. Each has its own advantages and disadvantages, as well as application specifics.
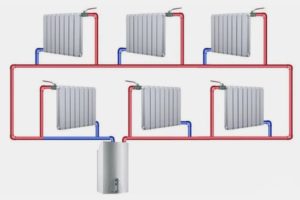
"Spider"
Another name is a multi-pipe system. The Spider is considered the most efficient gravity-fed system; it can use any pipe and radiator, and doesn't require additional pumps. This heating system has four main elements:
- Heat generator for any type of fuel.
- Expansion tank on top.
- Pipeline.
- Radiator.
The principle: the heating medium supply pipes from the boiler run to a utility room in the attic. From there, the pipes are connected to each individual heater.
The main advantage is optimal distribution of hot liquid temperature throughout the entire system. The main disadvantage is that the attic pipes need to be insulated.
The system should be used in private homes located in regions with harsh climates.
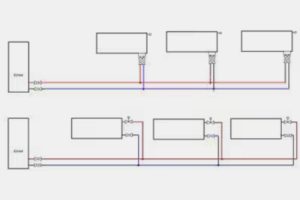
Tichelman scheme
The Tikhelman loop, also known as the "passing" system, is one of the most widely used heating systems in country houses. It is characterized by stable operation and uniform heating of all radiators, meeting the basic requirements for heating systems in private homes.
The total length of the supply and return lines, as well as the hydraulic conditions, are the same for each radiator in the system. This means that the same amount of coolant will flow through the radiators at a stable temperature, meaning their thermal output will be approximately equal.
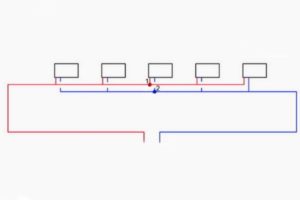
The operating modes of different radiators or those installed away from the main line can be adjusted using a balancing valve at the outlet. The power supply ends at the last radiator, and the return flow begins at the first radiator.
When using a large number of radiators (four or more), the Tichelman loop is a suitable connection method for convectors, being more energy-efficient and more stable than the radial connection. It can also be used for a single radiator, but this will not be as cost-effective.
Disadvantages of this option:
- Incorporating a large number of radiators into the Tichelman rim requires increasing the diameter of the pipes.
- Placing a large diameter around the ring increases the financial costs.
- You need to go around the building along the perimeter of the outer wall and return to the boiler, which is not easy to do in almost any place - doors, high windows, stairs, etc.
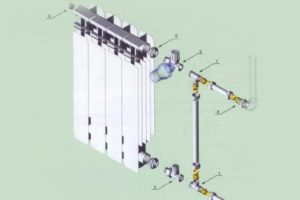
Diagonal top
Diagonal radiator connections allow for the most efficient heating of a room. Hot water enters the top pipe, is distributed among the sections, and as it cools, it descends, then flows out into the return manifold on the other side of the radiator, ending at the bottom pipe.
This design is the most efficient. The efficiency of this installation solution is very high—over 90%. Other advantages of this option:
- Radiators can have a wide variety of sections.
- High level of productivity compared to other installation methods.
Among the main disadvantages of the scheme:
- Not the best appearance.
- There is no possibility to connect additional sections later.
- Relatively high cost.
The connection is quite specific. The process of attaching radiators diagonally involves the use of special markers, the installation of Mayovsky taps, special couplings, and valves. It is typically used in private homes, not apartments.
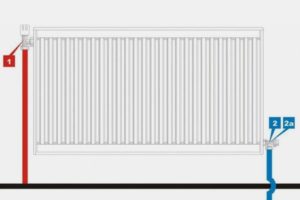
Bottom/saddle connection
The hot water line goes to the bottom outlet of one radiator segment, and the return line goes similarly to the opposite segment. The pipes themselves can be concealed in the floor, but this will result in uneven heating and a reduction in power of approximately 14%.
Advantages:
- water supply can be carried out in any direction - bottom-down, top-down, bottom-up;
- The water supply and drainage pipes are shorter.
The main drawback is that for aesthetic reasons, the pipes are hidden under baseboards or installed in the floor. This, as mentioned earlier, reduces efficiency. To compensate for heat loss, more powerful radiators are installed. Saddle connections are suitable for systems with a connected circulation pump.
Side/one-sided connection
Any heat sink (bimetallic, aluminum, steel, cast iron, copper-aluminum) can be connected from the side. This system is used in both multi-story and private homes, with the main lines running along the walls or vertically (used primarily in older panel buildings).
As the name suggests, pipes are connected from the side: in the upper and lower corners. The most common type is a single-sided side connection, which uses a 500 mm spacing between pipes.
The system can be connected from the top or bottom. The difference is that in the latter case, hot water enters the lower pipe and drains under pressure through the upper one, while in the former, it's the other way around. In both cases, the device and the coolant outlet are on the same side. This type of connection is used for 2-3-story cottages.
This design is extremely rarely used when supplying the coolant from below, since installation is much more complicated.
The main advantage of side connections is that they are more energy-efficient (regardless of the material and type of radiator). The disadvantages include an unattractive appearance—the radiators are always visible and can ruin the room's design.
Two-way bottom connection
Power is supplied to the lower inlet on one side, and the return flow is from the lower inlet on the other side of the radiator. This is less efficient, but this connection allows for maximum concealment of the pipes. This type of system is used in moderately cold homes (naturally, it is not suitable for northern regions).
Advantages:
- An adapter can be installed to direct the flow.
- Both pipes are connected directly and immediately go from the battery to the floor or wall (or into a pipe above the floor).
- There is no need to worry about purchasing a suitable temperature controller, it is already installed.
Cons:
- Air vents must be installed on each battery.
- Heating is uneven and not very efficient.
- Not suitable for use with gravity heating systems.
- The circulation pump must be used continuously.
Video about different types of radiator connection diagrams:
Pipe layout diagrams
A heating system in a private home can be installed using a single-pipe, two-pipe, or radial boiler layout. Before choosing one, it's important to thoroughly examine the specific features of each type.
Single-pipe
The simplest single-pipe system is called "Leningradka" or "gravity-flow." This is a system in which all heating elements are connected in series to a single pipe, which can be used as both a supply and return line. This means:
- the main line is looped (on the boiler of a separate heating system or on the riser of the central system);
- Radiators or other equipment are connected to the ring - either in a break or in parallel.
A low ceiling can be an obstacle for a gravity heating system, since it is stipulated that the pipes must extend 1.5 meters from the top of the boiler, plus the distance to the expansion tank.
Advantages:
- Water flows by gravity, meaning that in the case of wood-fired boilers, hot liquid enters the system without the need for a pump or any other device that requires electricity to operate.
- This option is very cost-effective, as it requires fewer cable ducts and requires less labor for installation work.
The main drawback is that the further the radiator is from the boiler, the lower its temperature. To overcome this problem and achieve approximately equal power per unit, you can increase the number of radiator sections as they move away from the boiler.
If the radiator circuit in a small house begins in the living room and ends in the utility room, this option may be the optimal choice. In larger cottages, a two-pipe heating system is better.
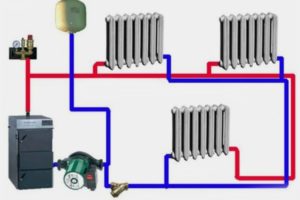
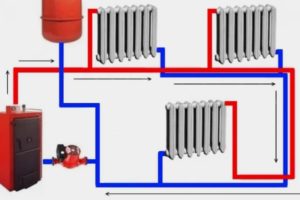
Double-pipe
In this design, coolant flows from the supply pipe to the radiator, and the cooled water is discharged through the return line. All heaters are connected in parallel, which simplifies ensuring uniform heat transfer to the equipment. A thermostatic valve is used for this purpose.
A two-pipe heating system in a small, single-story residential building should use a horizontal layout. For multi-story buildings, a vertical layout is preferred. This option allows for even heat distribution throughout the room due to easier balancing.
The advantage of this layout is that the temperature is virtually uniform at all heat exchange points. The systems are highly adjustable and provide uniform heating throughout the building.
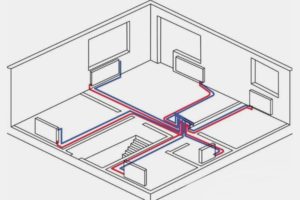
Radial (collector)
The most efficient home heating is achieved through the use of manifold systems. Each radiator is individually connected. Underfloor heating can also be operated in a similar manner.
Collector heating systems for private homes are more expensive, but their operating savings outweigh the purchase and installation costs. This is because you can fine-tune not only the entire system but also each individual radiator. As a result:
- in non-residential premises it is easy to maintain a low temperature;
- thereby significantly reducing boiler fuel consumption.
This system is used in areas where pipes need to be hidden, such as under flooring. In this case, two manifolds are installed—one for supply and one for return—with a pipe running from each radiator to the first manifold and then to the second.
Criteria and selection of the optimal design for a private home
The variety of home heating options poses a logical question for homeowners: choosing the most efficient heating system for their property.
Single-pipe and gravity-fed systems are rarely used today, as energy shortages are rare in modern cities, urban settlements, and even villages. These systems are typically recommended for areas located far from civilization.
For private homes planned for heating with radiators, the best option is to adjust the heating network by designing a two-pipe or radial system. Although these two systems differ in duct design, they offer the ability to remove and replace leaking radiators without shutting down the main heating system.
What is required for installation?
Installing any type of radiator requires equipment and consumables. The kit is almost identical, but for cast iron radiators, for example:
- the plug comes in a large size;
- Mayevsky crane is not installed;
- but somewhere at the highest point of the system an automatic valve is installed.
The installation process for aluminum and bimetallic radiators is no different.
What you may need:
- Mayevsky crane or automatic air vent. This is a small device for removing air that can accumulate in the radiator. It is located on the free upper outlet (collector). It is a must-have on any heating system.
- Shut-off valves. You will need two adjustable shut-off or ball valves. They are located at the inlet and outlet of each radiator and are necessary for isolating the radiator and removing it if necessary (for emergency repairs or winter replacement).
- Taps for heating radiators. They perform the function of a shut-off mechanism and allow you to change the intensity of the flow of hot liquid (heat carrier).
- Plug. The radiator has four outlets in the transverse direction. Two of them are occupied by the supply and return pipes, and the third houses a Mayevsky valve. The fourth inlet is closed with a special cover.
- Related materials. To hang it on the wall, you will need a hook or bracket (the quantity depends on the size of the battery), fum tape or linen spools, and adhesive paste to seal the joints.
- Tools. You'll need a drill and bits, a level (a laser level is best, but regular bubble levels will do), and a certain number of dowels. You'll also need equipment for connecting pipes and fittings.
How to connect a radiator in a private house yourself?
Let's look at the steps involved in connecting radiators to a two-pipe heating system. The process is as follows:
- Prepare and assemble the radiator. Clean all threaded holes of factory grease. You can use a special cleaner and a brush for cleaning.
- When you're finished, remove any remaining cleaning solution with a paper towel. It's important to keep the holes as clean and dry as possible.
- Install all necessary adapters (in our example these are ½ and ¾ inches).
- Install the faucet union onto the pre-installed adapter. Use a US wrench to tighten. This will create an inlet and outlet.
- Install plugs on unnecessary holes that need to be closed.
- Prepare the shanks (these are special thin tubes) and cut them. Remove the inner chamfer from the rod. It's important that there are no burrs inside.
- Place the nut, brass washer, and rubber band onto the pipe. Then use the expander tool to expand the pipe and push it in until it stops. Move the rubber band and other fittings to the expanded end to secure the adapter.
- Mark the intended radiator location on the wall. Find the center of the windowsill and measure down 10 cm—the radiator mounting brackets should be exactly at this level. Then draw a line parallel to the windowsill for the bracket installation.
The holders themselves will be secured with dowels. Other fasteners will be placed 12 cm above the floor surface along the center vertical line. - Place the radiator on the base using a spirit level. Mark the location of the grooves on the wall. Do this wherever the pipes connect to the radiator.
- Remove the radiator from the wall to make the work easier and make grooves in the previously marked areas.
- Prepare the pipeline. Mark the pipes to indicate where they will be cut.
- Connect the radiator and faucet to the flexible hose located in the wall. Tighten all connections. The inlet should be at the top and the outlet at the bottom.
Video instructions:
How can the efficiency of radiators be improved?
A heat accumulator or bypass can be used to increase the efficiency of a domestic heating system. The former is installed in a large boiler room, while the latter is installed in a smaller room containing other equipment besides the boiler.
A heat accumulator is a water-filled container that houses the pressure and return lines of the heating system. This vessel is typically installed immediately after the boiler. The following can be installed in the pressure and return lines between the heater and the accumulator:
- safety valves;
- expansion tanks;
- circulation pumps.
The pressure line heats the tank, and the return line is heated by the liquid added to the pressure accumulator. Therefore, when you turn off the boiler, the system can continue to operate independently for some time, which is very beneficial.
The regenerator's capacity is determined by the ratio 1 kW of boiler power = 50 liters of tank capacity. This means that a 10 kW heater requires a battery with a capacity of 500 liters (0.5 m³).
When the valve opens, part of the heat flow does not enter the pressure circuit, but is sent directly to the return line. As a result, the battery's heating temperature can be reduced by up to 10%, and the amount of hot liquid pumped through the radiator can be reduced by up to 30%.
It's best to entrust the calculation, design, and installation of a heating system to qualified professionals. However, every homeowner should know the basic rules for connecting radiators. Effective connection and placement of a heating device ensures a comfortable indoor climate.