Electric underfloor heating is a convenient way to heat a room. They come in a variety of types, differing in the heating element and installation technology.
It can be difficult for a non-expert to navigate the full range of options and choose the right installation method. We'll help you with this. We'll explain the advantages of each design and explain how to install electric underfloor heating yourself.
- Types of heated floors
- Cable floors
- Infrared systems
- DIY Cable Underfloor Heating Installation Techniques
- Laying diagram
- Calculation of materials
- Calculation of power and laying pitch
- Control unit
- Preparing the base
- Thermal insulation
- Laying and fastening cables
- Installing a temperature sensor
- Connection - diagrams
- Installation of screed layer
- Arrangement of the finishing coating
- Installation of heating cable in grooves
- Installing a cable on an old foundation
- Installation of thermal mat
- Installation of film flooring
- Preparatory work
- Film installation
- Connecting the system
- Laying the finishing coating
- Installation of a rod floor
- Common mistakes
- Safety requirements for operation
- Which gender should I choose and why?
Types of heated floors
Electric floors are heating systems that run on electricity. These devices come with a thermostat is included and a temperature sensor.
This type of heating evenly heats the surface, does not take up useful space in the house and does not spoil the interior.
The disadvantage of all electric heating models is the risk of electric shock, but only if installed incorrectly.
Cable floors
Cable-type devices include heating cables and heating mats. These floors use resistive or self-regulating wires.
The first one can be single or double-core:
- single-core - has one current-carrying core, is inexpensive, but has high ELM radiation, therefore it is not suitable for residential premises;
- two-core - two cores connected by one insulating sheath, the emission of electromagnetic waves is lower, which is why it is used in living rooms.
The self-regulating cable consists of two current-carrying wires connected in parallel with a semiconductor matrix. It is capable of regulating its heating level depending on the air temperature.

Types of cable heating:
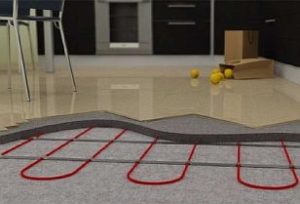
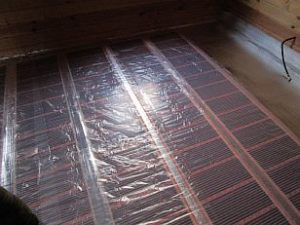
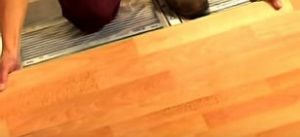
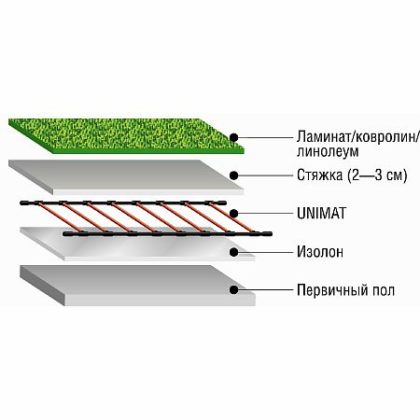
- Heating cable—this type of electric underfloor heating was one of the first to appear. It has 100% heat transfer, meaning all electrical energy is converted into heat. The device is a double-insulated cable that heats the surface. It is laid out on the base at a specific pitch.
Installation is the most labor-intensive, as this type of electric floor is most often installed under a concrete screed, although a floor-mounted installation is also possible. The "pie" consists of a base, thermal insulation, underlay, heating element, screed, and finishing coating.
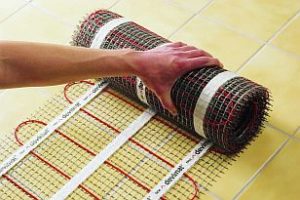
- Heating mats differ from cable heating in that the wire is already secured to a fiberglass film. This makes DIY installation much easier; you just need to roll out the mat, eliminating the need to calculate installation spacing and secure the heating element.
The layers of this electric underfloor heating are the same as when using heating mats, but instead of a concrete screed, the device can be fill with tile adhesive.
Infrared systems
This design uses infrared heating, eliminating electromagnetic radiation. It heats the objects in the room, not the air within.
Infrared systems include film floors and rod mats:
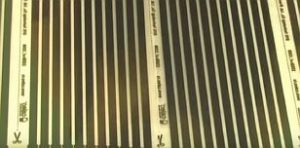
- Film flooring is a carbon-based thermal film. The heating elements are made of a copper-aluminum alloy, arranged parallel and sealed within the film, which has conductive busbars along its edges.
The advantage of this type of heating is its lightweight construction, no need for a screed, and the flooring can be any type and laid directly on the film. The film itself is only 0.3 cm thick, so it doesn't take up any ceiling height.
In section, such a floor looks like this: sub-base, foil insulation, heating film, polyethylene and floor covering.

- Rod mats are made of parallel carbon rods. Carbon is a nanostructure made of a carbon base with binding components. The standard width of such mats is 0.8 meters and the length is 25 meters. This device is self-regulating.
The disadvantages include the possibility of installation only in a screed.
"Pie" of this floor:
- base;
- heat-reflecting material;
- carbon mats;
- concrete screed or tile adhesive,
- coating.
DIY Cable Underfloor Heating Installation Techniques
Installing electric underfloor heating is easier than installing hydronic underfloor heating, but there are still some nuances. Let's look at step-by-step instructions for installing a cable-based underfloor heating system.
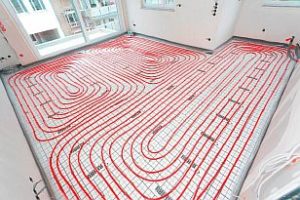
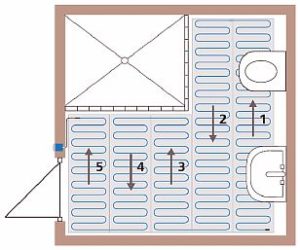
Laying diagram
Before installing electric underfloor heating, read the installation instructions and draw a diagram on paper. Remember not to install underfloor heating under furniture or appliances. This is not only inefficient, but can also lead to overheating and system failure.
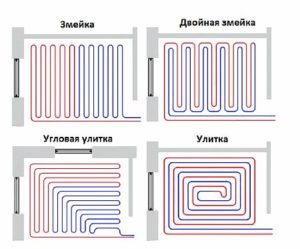
There are two main methods for laying floor heating cables: the "snail" and the "snake." When properly installing the heating element, the distance from the walls should be at least 10 cm.
Calculation of materials
The next step is to calculate the amount of material needed to install electric underfloor heating in the room. For this, it's best to use ready-made tables developed by system manufacturers or specialized calculators.
The main task is to accurately calculate heat loss. After that, the optimal installation spacing is determined and the required cable length is calculated. When calculating the length, don't forget the section that runs along the wall to the thermostat.
The length of the wire is calculated using the formula
h=S x100/L, Where:
- h — cable length;
- S — area;
- L is the total length of the wire.
In addition, you will need fasteners, a copper grounding cable, connecting wires, an RCD protection system, a regulator and a sensor.
Calculation of power and laying pitch
The required power of the device is influenced by climate conditions and the material the house is made of. It varies for different regions, but for central Russia, it's:
- In the kitchen, living room, hallway - 150 W per m2;
- In the bedroom and children's room - 120 - 150 W;
- In the glazed loggia - 200;
- In the bathroom - 180 W per m2.
In addition, the choice of power depends on the purpose of the system:
- main heating - 140 - 180 W per m2, while covering at least 70% of the area;
- additional - 140 W is enough.
Energy consumption per room is calculated, excluding areas where furniture will be placed. This means that only the heated area is taken into account, not the area indicated in the BTI documents.
Power is calculated using the formula: P1= P2*S*1.3
- P1 — power;
- P2 - heating power m2;
- 1.3 is the coefficient.
The laying step is calculated based on the following indicators:
- Number of linear meters of heating element;
- Heated surface area;
- The coefficient for this room is W per m2.
Let's look at an example calculation for a 25 m² room—a living room. 5 m² are occupied by furniture, leaving 20 m² for heating. The power rating for such rooms is 150 W. Therefore, a 3 kW heating element is required.
Cables are regulated by linear power, ranging from 12 to 24 W per linear meter. Therefore, you can purchase cables of 125 or 250 meters. This depends on the installation pitch—the distance between the loops. It is believed that the smaller the pitch, the more uniform the heating. However, the closer the branches are spaced, the more difficult and time-consuming the installation. The average standard installation pitch is 7 cm.
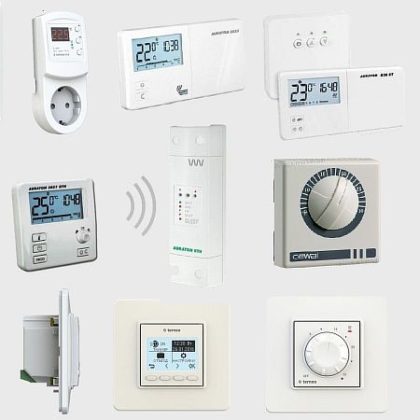
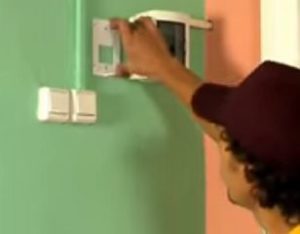
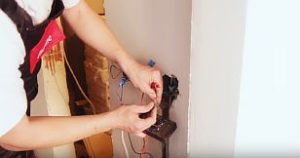
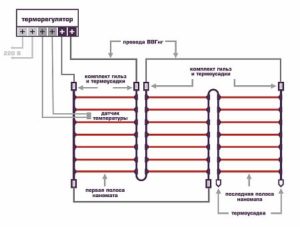
Control unit
A thermostat is required to monitor and control the temperature. It turns the floor on and off, as well as controls its operating mode.
Thermostats can be electronic or mechanical.
According to experts, the regulator should be mounted on the wall, one meter above the floor, preferably close to the electrical wiring. To install it, you need to cut a recess in the wall, from which you need to cut a groove to the floor for the wiring.
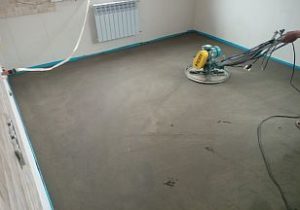
Preparing the base
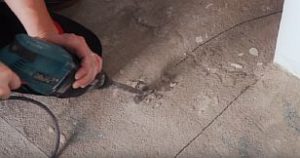
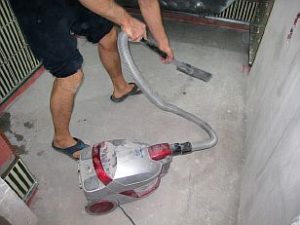
Installation of any electric underfloor heating system, including cable-based, is possible on a flat, clean surface.
If there is old finishing material, it is removed. The floor is cleaned of dirt with a broom or a construction vacuum cleaner. Then, the subfloor should be inspected for any unevenness or cracks.
Minor irregularities can be simply smoothed out. Larger differences in the base will require a thin layer of leveling screed (3-7 cm). Before pouring the self-leveling compound, the surface is primed. Only after the solution has dried can the next layer be applied.
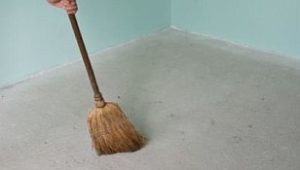
It is possible to install a warm electric floor directly on the floor slabs; they also need to be cleared of debris.
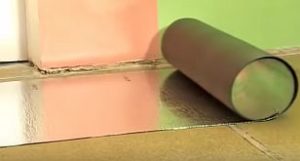
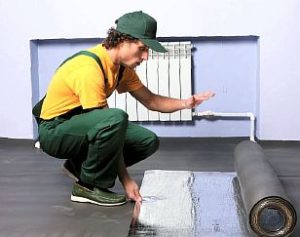
Thermal insulation
Hydro and thermal materials are laid on the subfloor; they are necessary for the efficient operation of the system.
First, a polyethylene film is laid—this will serve as a waterproofing layer. Insulation is laid on top of this—this can be foam with a foil layer. The slabs are laid end to end, overlapping the walls, and the seams are taped. Expanded polystyrene or polypropylene foam can also be used as thermal insulation.
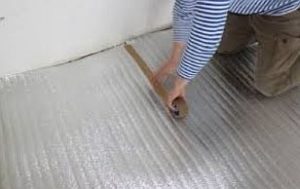
After this, the perimeter of the entire room is sealed with damper tape, which compensates for the expansion of the screed when heated.
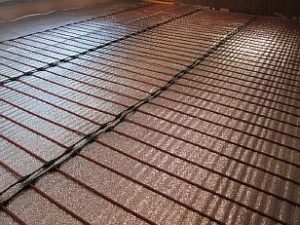
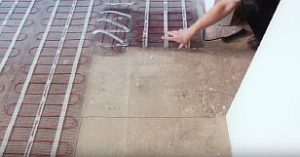
To simplify the installation of the heating element, it is recommended to lay a reinforcing mesh over the insulation. This will strengthen the structure and will also serve as the cable attachment point.
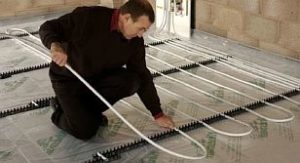
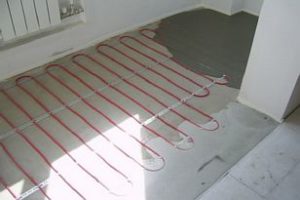
Laying and fastening cables
The wiring should be laid according to the prepared diagram, with the planned spacing. Start from the point where the cable will connect to the thermostat. If a single-core wire is used, it should also be connected back to the thermostat; if a double-core wire is used, this is not necessary.
If reinforcement is present, the heating element will be secured to it with plastic clamps. If not, a steel mounting strip is mounted to the insulation, to which the wire will be secured with dowels or screws. It may also be possible to attach it directly to the insulation boards with mounting tape.
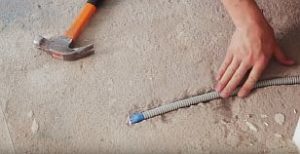
Installing a temperature sensor
The temperature sensor is placed on the floor, 1.5 meters from the wall housing the controller. To achieve this, recesses are made in the thermal insulation for the sensor and the wiring leading to the device.
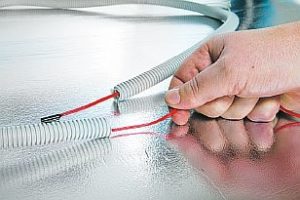
This is necessary to ensure that the sensor does not protrude above the surface. It is placed in this recess, housed in a corrugated tube with a plug at one end, and is firmly secured.
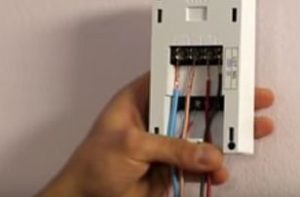
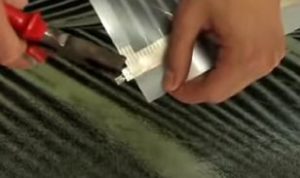
Connection - diagrams
This is the most crucial stage, determining the proper functioning of the floor. The sequence of actions is as follows:
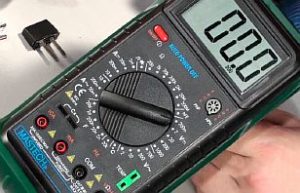
- Check the wiring—installing electric underfloor heating significantly increases the load on the entire house's electrical wiring. Using a multimeter, determine the cable cross-section in the network, then analyze whether the electric underfloor heating wire matches it. If the wire diameters don't match, the wiring must be replaced. An RCD with a circuit breaker is selected to match the new load.
- Connecting the device involves connecting the heating cable and the wire from the temperature sensor to the thermostat. After that, the thermostat is connected to the power supply.
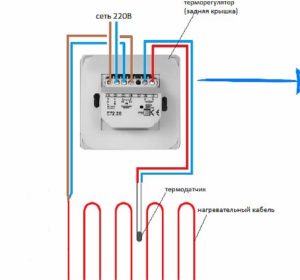
- Additional grounding of cable and power cord.
Before pouring the screed, the device is turned on for a few minutes to check its functionality.
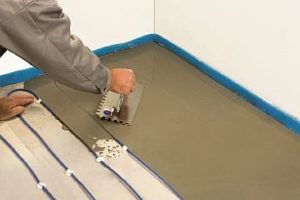
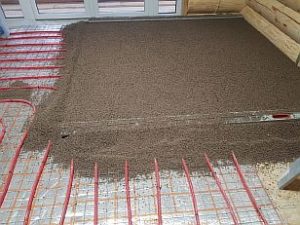
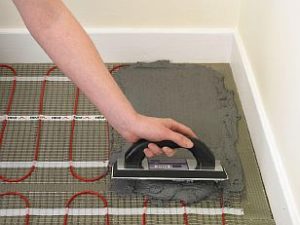
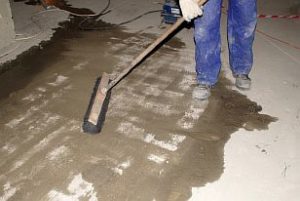
Installation of screed layer
Once the system has been tested, the next layer of the structure can be installed. There are several options:
- Pouring a wet screed. Ready-made mixes are suitable for this, but you can also make your own. The mixture is made from sand, cement, and water, with the obligatory addition of plasticizers.
The layer thickness is 3–5 cm. Apply the solution from the central corner of the room toward the door. Smooth the surface with a leveling float and leave for 28 days until completely dry.
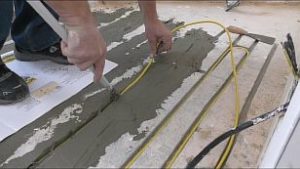
- Applying tile adhesive. Cover the cable with a 5-8 cm layer and leave it to dry.
- Laying a dry screed. Fine quartz sand or slag is used for this. This method is simpler and faster than using concrete mortar. The mixture is spread over the floor surface and should completely cover the structure. After 12 hours, further work can begin.
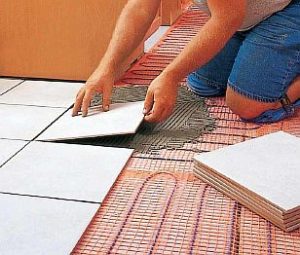
Arrangement of the finishing coating
Only after the solution has hardened, according to the instructions, can you proceed to laying the selected finishing coating. It could be laminate, linoleum, tiles, The main thing is that the proximity of the product to heating systems is permitted.
Installation of heating cable in grooves
Heating cables can be installed in grooves, but this is a complex process. It is only recommended for finished cement-sand screeds and when raising the floor level is not possible.
After cutting grooves in the concrete for the cables, the recesses are filled with tile adhesive. The cable is then pressed into the concrete, ensuring there are no air pockets.
For uniform heating, for 1 cm grooves, a wire of 10–12 W/m is used; for 2 cm, a wire of 20 W/m is used.
Installing a cable on an old foundation
When installing a heating cable on an old concrete base or tiles, heat loss amounts to 30%.
First, insulation is laid on the floor, then mounting tape is placed to which the heating element will be attached. Only then is the wire evenly coated with tile adhesive.
Installation of thermal mat
Installing a heating mat yourself is much simpler than installing a cable, as the wire is secured to the mat:
- A diagram of the mat placement is drawn on paper, it must be remembered that they are not placed under heavy furniture.
- The heating device's power and the amount of material required are calculated—this is done in the same way as with cable floors, taking into account the usable area.
- A location on the wall for the temperature sensor is determined, a recess is made for it, as well as grooves from this area to the sensor.
- The base is prepared by leveling and clearing any debris. Then, it is primed to improve the adhesion of the floor to the mortar.
- The sensor is installed—placed in a corrugated pipe and laid at least 50 cm from the wall. It should be positioned between the floor coils.

- The mats are laid directly on the subfloor, eliminating the need for additional insulation to prevent overheating. The mats are equipped with adhesive tape, so no fasteners are required. The mats should not overlap. If trimming the mats is necessary, be careful not to damage the electrical wire.
- The system is connected and tested, checking the cable resistance in the mats with a multimeter. The thermostat is installed, the floor and sensor wires are connected to it, and then it is connected to the power supply. A test run of the system is performed.
- The mats are filled with tile adhesive—an 8-10 mm layer—and allowed to dry. The grooves are also filled with this compound.
It is possible to lay mats in concrete or dry screed; this process is the same as when installing a heating cable (described above).
- The final coating is laid - when filling the mat with glue, this is most often tiles.
Turn on the electrical system only after the glue has completely dried.
Heating mats can be laid on an old foundation, similar to a heating cable.
Installation of film flooring
As mentioned above, installing a heated electric film floor is simple. However, as with any heated floor, you should begin by laying out the film layout (avoid placing it under furniture). The film should be placed at least 10 cm away from the furniture.
Next, the floor's wattage is determined. When laying laminate as the final covering, the wattage should not exceed 150 W, and if tile is used, up to 200 W. Next, the quantity of product required is calculated. This is easy with film; it should cover the entire required surface, a maximum of 8 meters.
The process of installing an electric heated film floor is similar to cable systems, the only difference being the design of the heating element.
Preparatory work
You should begin by preparing the area for the thermostat. It is installed in an accessible spot on the wall. A recess is made for it, into which the junction box is placed.
Then the subfloor is prepared - leveled and cleaned.
Lay down a polyethylene film—it's necessary for moisture protection. Place foil insulation (no more than 5 cm thick) on top of it, metallized side up, to prevent heat loss. The sheets are taped together.
The film placement locations are marked on the insulation, and a recess is made for the sensor. The temperature sensor should be placed under the second section of the infrared floor—this will allow for more accurate surface heating data.
Film installation
The floor strips are laid according to the prepared diagram. To reduce the length of the wire, the film is placed with the ends facing the wall where the thermostat will be located, spaced 15 cm from the wall, with the copper contacts facing down.
Overlapping sheets is not permitted; they must be laid end-to-end. If necessary, the film can be cut, but only along the designated lines. The maximum length is 8 meters. The product is secured to the insulation material with tape.
Connecting the system
The film is connected to the power supply using terminals. To do this, strip the insulation from the end of the wire and insert it into the clamp. One contact is inserted into the film, and the other is mounted on the copper busbar. All contacts are secured with pliers and insulated with bitumen tape. The cuts in the film should also be insulated.
After this, the temperature sensor is installed; it is attached to the black silicon strip at the bottom of the film using bitumen insulation, and the wire is pulled to the thermostat through a recess in the substrate.
The thermostat is installed. The floor cables and sensor are connected to it. Then the power supply cable is connected.
To check the functionality of the system, you need to turn it on at full power for several minutes.
Laying the finishing coating
Before laying the finishing product, the structure is covered with thick polyethylene - this will protect it from moisture.
Laminate flooring can be laid directly on the polyethylene film. If you plan to lay carpet or linoleum, place plywood sheets on top of the waterproofing.
How to properly install tiles on a heated film floor – this can be done in two ways:
- A painter's mesh is placed on the polyethylene to improve adhesion. A thin layer (1 cm) of self-leveling compound or screed is poured.
- The waterproofing is covered with gypsum fiber board, and the sheets are secured with screws. It is important not to damage the film.
The tiles are mounted using adhesive for underfloor heating.
Film electric floors can be installed on old flooring.
To do this, it is cleaned, a heat-reflecting product is placed on top, and a film is laid on top of it.
Installation of a rod floor
The technology for installing a rod-based underfloor heating system combined with cable mat installation. First, the layout of the mat is planned and the amount of material required is calculated.
Rod floors are sold as a set, but sometimes additional components may need to be purchased. The required power is calculated in the same way as for the cable mats discussed above.
Laying a core floor consists of several stages:
- Preparatory work—determining the location of the temperature sensor, cleaning and leveling the base, and installing the foil underlayment—is performed in the same way as when installing any electric floor. If the floor is to be laid in a screed, the perimeter is covered with damper tape.
- Installation of the rods: The rod roll is unrolled on the surface, with the distance between adjacent strips being 50–70 mm. The length of one strip should not exceed 25 m. The rods are secured to the substrate with tape.
- Connection: A thermostat is installed in the prepared area, to which the floor wires are connected. The sensor, housed in a corrugated pipe, is positioned in a groove in the underlayment and connected to the controller, which in turn is connected to the power source.
It is mandatory to conduct a test run of the system before the next stage of work.
- Pouring the screed - this can be concrete mortar, dry adhesive mixtures, or dry screed, layer thickness 20 - 30 cm.
- Installation of the final coating—only after the screed has completely dried is the finishing material applied. When laying tiles, no screed is required; the mats are sealed with tile adhesive.
It's possible to install rod-based underfloor heating over existing flooring. The installation principle is the same as for a heating mat.
Common mistakes
How to properly install electric floors yourself is a question that often arises for beginners who want to install this type of heating system at home.
The main mistake is installing floors under large furniture. The surface underneath doesn't cool, leading to overheating and eventual system failure.
Also, do not bend the cable, as this will impair the operation of the device. When laying cable mats, cutting the wire is not permitted, so it is important to properly calculate the size of the area to be heated.
A common mistake when installing electric floors is inadequate insulation resistance monitoring during installation. The value should not exceed the manufacturer's specification by more than 10%.
When using film-based underfloor heating, it may stop heating if the film is damaged. Its live parts must be properly insulated, otherwise, electrical leakage will occur, eventually shutting down the system.
Regarding the temperature sensor, it's not recommended to embed it in the screed. If it breaks, replacing it will be difficult. It's housed in a corrugated pipe.
Safety requirements for operation
Before using electric floors, please read the manufacturer's instructions included in the kit.
Basic safety requirements that apply to all types of electric floors:
- The heating element must not be shortened;
- It is necessary to use only a screed solution or tile adhesive intended for warm floors;
- Opening of heat-shrinkable sleeves at the junction of the heating and installation parts of the floor is prohibited;
- Avoid laying carpet on heating sections and placing furniture without legs.
Which gender should I choose and why?
When choosing an electric underfloor heating model, consider the specifics of the room, the subfloor material, and the strength of the flooring (if you plan to install the system in a concrete screed). Also important: do you need a primary or secondary heating system?
Cable flooring is suitable for installation in private homes as the primary heating system. However, it is more expensive, and the installation process requires pouring a screed, so the floors must be strong. It is recommended for installation in kitchens and bathrooms, as it adheres well to tiles.
It is better to install heating mats in an apartment, since they are most often mounted in tile adhesive.
The film system is an easy-to-install supplemental heating option. Its lightweight and thin design makes it suitable for any space and complements any flooring.
Anyone can install electric underfloor heating themselves. The key to doing it right is to strictly follow the manufacturer's instructions and adhere to the installation method for your specific type, and your heating system will meet your expectations.


