Ventilation in a private house with an exit to the roof is arranged in three types:
- for removing gases from the sewer system;
- for air exchange in rooms;
- for ventilation of the sub-roof space.
The location of the pipes and the height above the roof are regulated by SNiP standards.
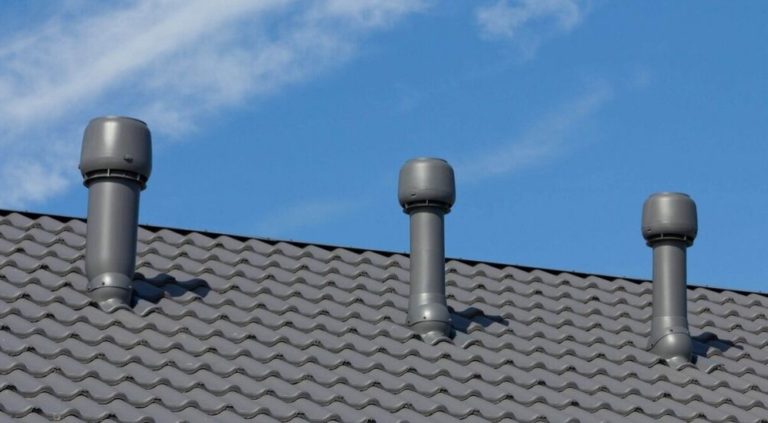
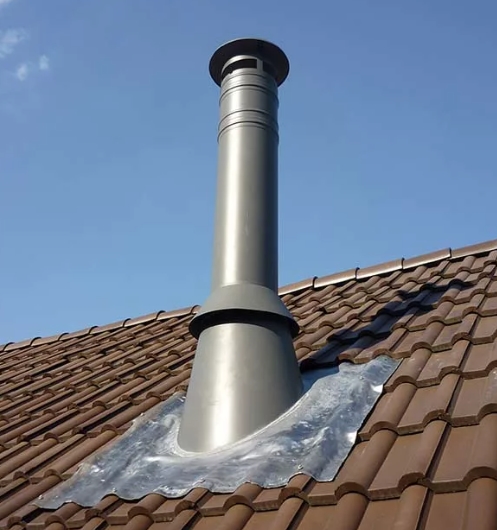
To create a ventilation outlet, install a prefabricated shaped outlet or a universal roof outlet. The finished duct can be covered with a thermally insulated box or insulated with rolled material. Ducts over 1.5 m high should be secured with guy wires or braces for stability.
- Standards governing the height and location of the pipe outlet
- Methods for ventilation through the roof
- Installation of ventilation with a shaped outlet
- Installation of ventilation with a pass-through element
- Roof space for ventilation riser outlet
- Choosing a location on a pitched roof
- Choosing a location on a flat roof
- Tools and materials
- Instructions for creating a ventilation passage through the roof
- Installation of a box on the roof
- Installation of reinforcing elements for high pipes
- Insulation of ventilation
- Checking the ventilation system
- Errors in ventilation outlet installation
- Answers to frequently asked questions
- Video materials
Standards governing the height and location of the pipe outlet
According to building codes, each type of building, depending on its intended purpose, must be equipped with a certain number of ventilation ducts. A private residential building must have at least three pipes leading to the street:
- A fan riser for removing gases from the sewer.
- The common house ventilation duct, to which all living and utility rooms and the basement are connected.
- Ventilation outlet for the under-roof space and attic space.
Ventilation from the room can be carried out through the wall, but an effective option is to have the riser exit through the roof.
One general rule applies to smoke and ventilation ducts in a private home: the higher the outlet above the roof, the better the natural draft. Designers are guided by the regulatory data in the underlying documentation:
- Standards for the rise of pipe outlets above the roof – SNiP No. 41-01-2003, clause 6-6-12;
- The old version of the design standards for hoods in a private home is SNiP No. 2.04.05-91;
- Recommendations for the design of ventilation systems – SP No. 7.13130.2009;
- Standards for the height of the ventilation outlet of a sewer waste pipe – SNiP No. 2.04.01.
The provisions of SNiP No. 2.04.01 provide the owner of a private home with a precise definition of the exit location and installation level of the sewer exhaust duct. The minimum elevation of the vent pipe from the highest point of the roof is:
- flat non-exploitable roof – 30 cm;
- pitched roof – 50 cm;
- exploitable flat roof – 3 meters.
The outlet of a private house's waste riser is being removed at least 4 meters From windows and supply ventilation valves, as the pipe exhausts fumes that are hazardous to human health. Gases from the outside air intake should not enter the building.
Following the example of the provisions of SNiP No. 2.04.01, precise indications of the height and location of the chimney outlet through the roof of a private house were developed in SNiP No. 41-01-2003.
The lack of precise regulatory specifications doesn't mean it's unnecessary to calculate the height of a ventilation stack in a private home. According to SNiP No. 41-01-2003, designers adhere to the following minimum ventilation duct outlet values from the highest point of the roof:
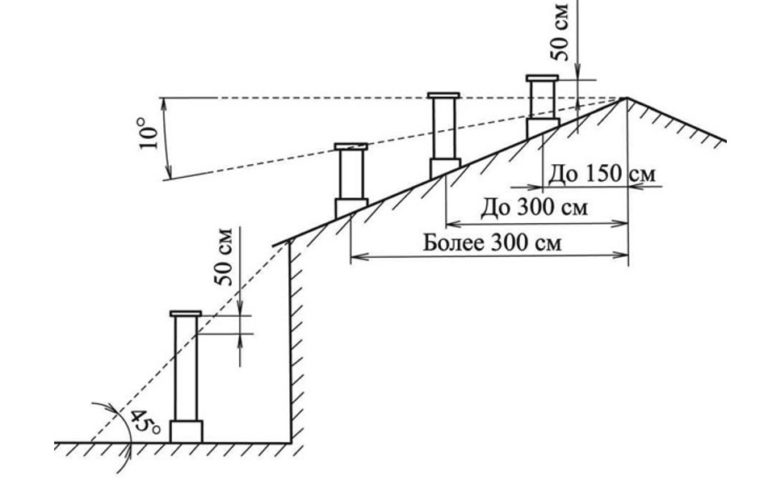
- on a flat roof – 50 cm;
- on a pitched roof - 50 cm if the pipe outlet is located up to 1.5 meters from the ridge.
The top edge of the ventilation riser can be flush with the ridge if the distance between them is up to 3 meters. If the ventilation is located more than 3 meters from the ridge purlin, the top edge of the duct should coincide with the drawn line at an angle of 10°.O down to the horizon.
 Private homes are often designed with natural ventilation. Adequate draft is achieved by installing an exhaust stack over 2 meters high. The impressive length of the vertical duct is explained by the need for exhaust through the roof.
The use of round, rectangular, and square air ducts is permitted. Ventilation is provided with shafts, boxes, and deflectors - find out what they are.
Taking into account the height of the ceilings, roof, number of floors, and the presence of a basement, the minimum total length of an exhaust duct in a private home is 5 m. The upper edge rises to the level of fast air currents.
The height of the chimney and the speed of outside air movement are not the only factors that influence ventilation performance. Air exchange rates depend on the temperature difference between the indoor and outdoor air masses.
Ventilation performance is affected by the shape and size of the exhaust duct and the structural features of the home's roof. Engineers design the ventilation system taking all of these factors into account.
Methods for ventilation through the roof
To install a ventilation unit on the roof of a private home, you can install a shaped outlet or a pass-through element for the required pipe diameter.
Use factory-made ventilation components. It is not recommended to make any DIY assemblies.
Mistakes made will lead to roof leaks, which will damage the roofing cake and wooden rafters.
We suggest you read the article: how to do it ventilation of insulated and cold metal roofs.
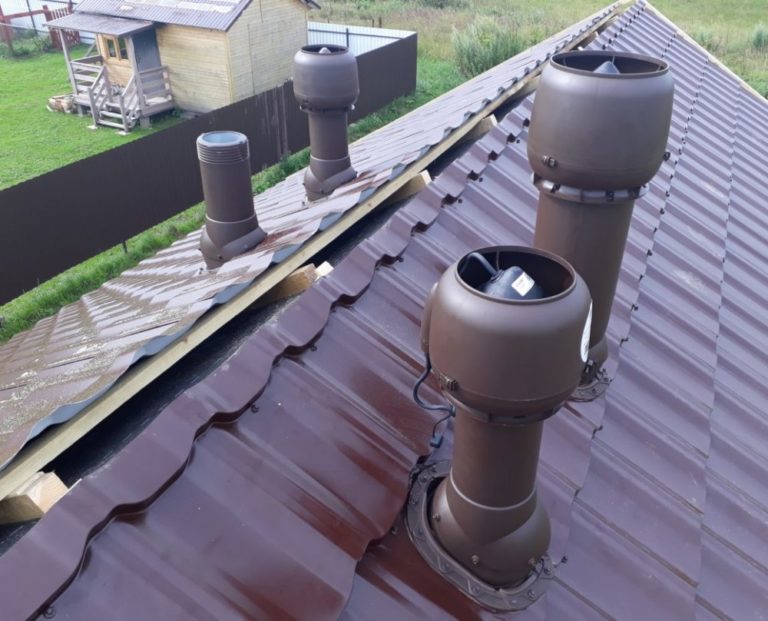
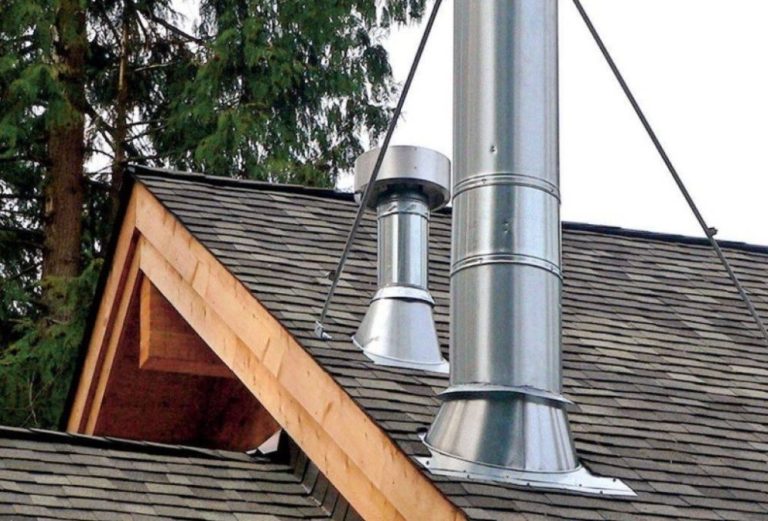
Installation of ventilation with a shaped outlet
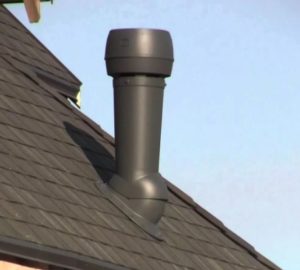
A prefabricated outlet is a prefabricated ventilation unit consisting of a section of pipe, a passage element, and a deflector. It is matched to the color of the roofing material.

Advantages of using a shaped element:
The shaped outlet has one drawback. The ventilation unit is produced in a standard, limited length of 300-700 mm.
A shaped outlet can be used if the vent is located close to the roof ridge. If the ventilation outlet is located further from the ridge purlin than required, the prefabricated unit will not work.
The pipe and the pass-through element are secured with screws, and the joints are sealed with sealant. The lower section, on the attic side, is connected to the exhaust duct of the general building ventilation system.
Installation of ventilation with a pass-through element
A pass-through element differs from a shaped outlet in that it lacks an air duct or deflector. Its design makes it a universal mounting unit.
The component is called a flash master. The unit is designed for installation on any existing roof covering and fits pipes up to 467 mm in diameter.
Advantages and disadvantages of a pass-through element.
- Lower cost of the part compared to a shaped outlet;
- Possibility of installation on any section of the roof, regardless of the distance to the ridge;
- Possibility of arranging the ventilation outlet with a pipe of suitable diameter and height.
- The pipe and deflector will have to be selected separately, which increases the cost of the overall structure compared to a shaped outlet;
- It is difficult to select a separate air duct with a deflector to match the color of the roofing, which makes the ventilation unit stand out on the roof of a private house;
- The pipe installed through the pass-through element must be additionally insulated to protect against condensation.
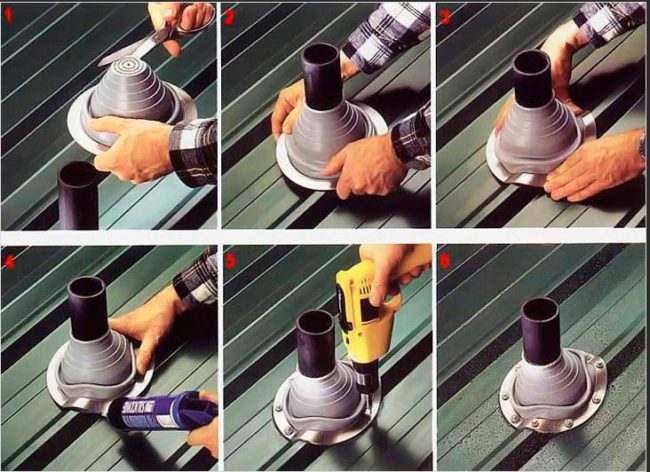
The flexible feedthrough element is made of rubber and silicone. The material is heat-resistant up to +240°C.OC. The principle of installation on the roof is similar to the technology for installing a pass-through unit of a shaped outlet.
The connection technology differs: a hole is cut in the universal duct fitting to the pipe's diameter. The joint is sealed with sealant. The flexible edges of the duct fitting adjacent to the duct walls are pressed with a clamp.
Roof space for ventilation riser outlet
To increase ventilation performance, it is necessary to reduce the resistance of the system by reducing the number of bends and turns.
Try to position the pipe outlet on the roof strictly opposite the common house exhaust duct that goes into the attic.
Taking into account the recommended SNiP standards, there are nuances in choosing a location on the flat and pitched roof of a private house.
Choosing a location on a pitched roof
On a pitched roof, try to position the ventilation outlet as close to the ridge as possible. If the location doesn't coincide with the common duct exiting into the attic, connect it to the outside pipe using a flexible aluminum corrugated pipe.
Choosing a location near the ridge has 3 advantages:
- You can install a shorter pipe facing the outside. The main portion of the ventilation duct will run through the attic, where the temperature is higher than outside in winter. You'll save money by installing a smaller layer of insulation.
- The low-mounted chimney installed at the ridge is resistant to gusts of wind. There is no need for guy wires or other reinforcements.
- You can install a factory-made shaped outlet near the ridge. The pipe will be tall enough to meet SNiP standards.
An incorrect choice of location on a pitched roof will result in the exhaust duct deflector ending up in the wind pressure zone.
In calm weather, the ventilation system will not operate. With gusts of wind, there is a risk of backdraft.
Choosing a location on a flat roof
A distinctive feature of a flat roof is the absence of a ridge purlin connecting the slopes. The ventilation outlet on a private home's roof can be located anywhere convenient.
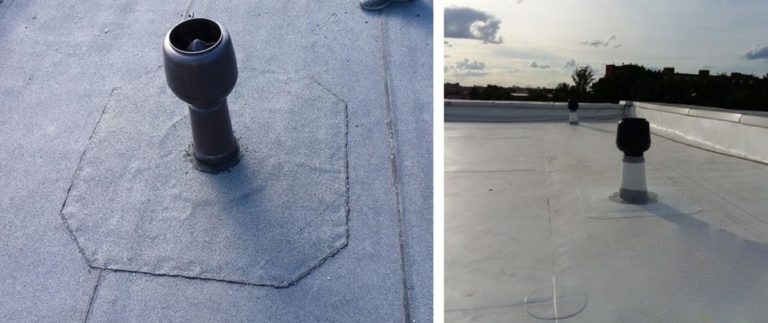
To reduce system resistance and material consumption, position the outdoor duct coaxially with the outlet of the common duct. A straight duct allows air to be exhausted from the room without obstruction.
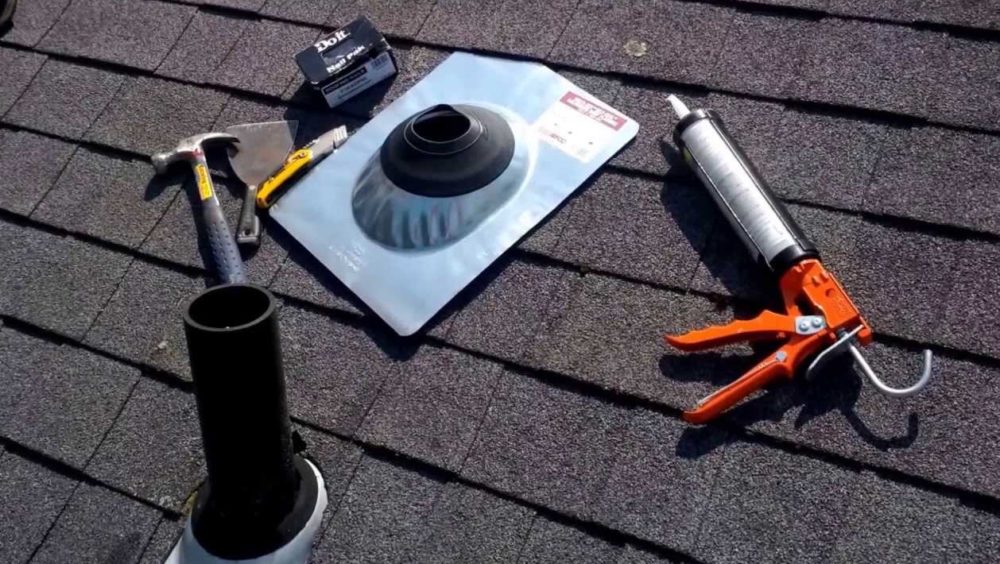
Tools and materials
Begin installing roof ventilation by purchasing materials. Prepare a shaped outlet or a pass-through element. For the latter, additionally select a pipe of the appropriate diameter and a deflector.
If the duct is tall, braces or braces will be needed to secure it to the roof. To secure the duct to the roof, prepare screws and sealant. You may also need clamps and anchors with eyelets to tighten the braces.
From the attic side, you can construct the common-house duct from PVC, galvanized, or stainless steel pipe. Connect to the outdoor outlet using shaped adapters or flexible aluminum corrugated tubing.
Prepare your tools. You'll need a drill or screwdriver with a drilling function, a jigsaw, and a sealant spray gun. A pencil or marker will be needed for marking the pipe. A level will help ensure the pipe is level.
Instructions for creating a ventilation passage through the roof
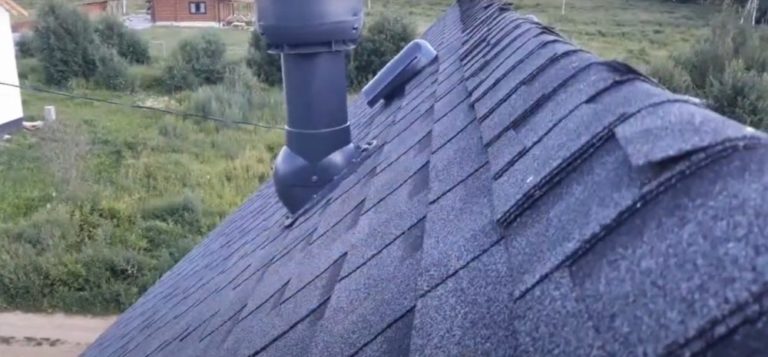
Install the roof penetration after the interior ventilation system is assembled. If possible, use a shaped element designed for the specific type of roofing material.
Roofing manufacturers are interested in ensuring that roofs made from their products last a long time and look beautiful. Shaped ventilation outlets are available for both flexible and rigid roofing, matching the color of the sheets.
Let's look at how to install a roof entry element on a private home yourself in these step-by-step instructions:
- Consider the location of the ventilation duct exiting through the roof of a private home. Based on building codes and regulations, determine the location of the outdoor pipe on the roof. Try to position it as close as possible to the duct exiting into the attic from the room to reduce the number of turns when connecting the two units.
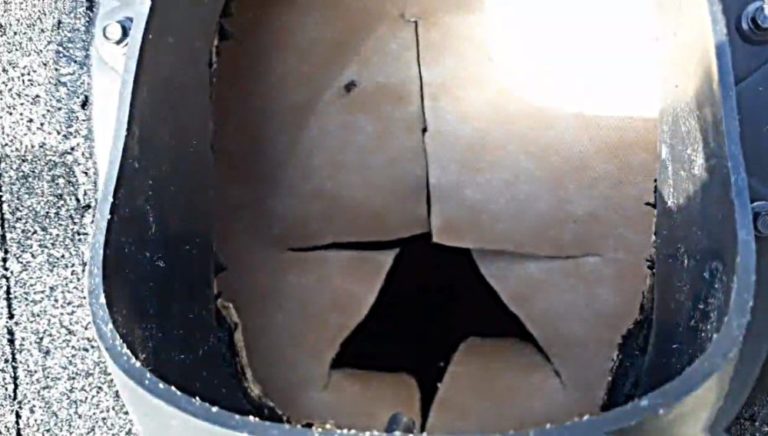
- From the attic side, find a spot on the roof that's clear of rafters and sheathing. The feedthrough can be installed between the boards.
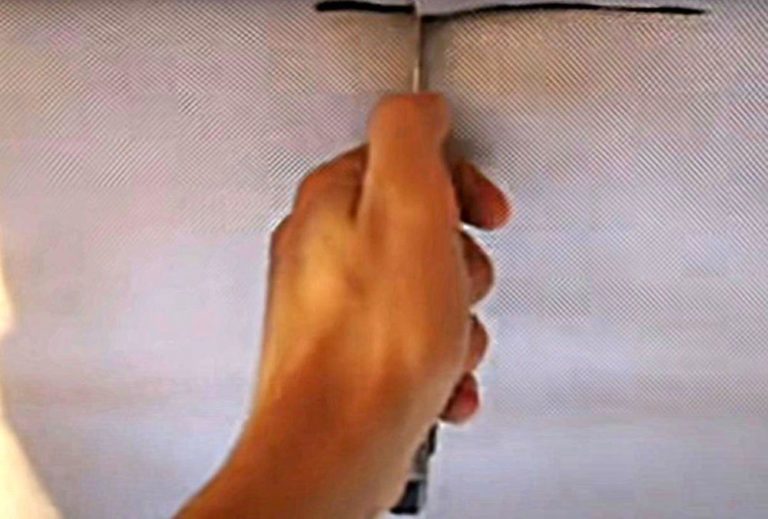
Use a knife to cut through the insulating and waterproofing materials of the roofing structure. Create access between the sheathing boards to the roof covering. Determine the center of the hole and drill through with a drill.
Do not remove the drill bit temporarily; leave it in the roofing material, releasing it from the chuck of the power tool.
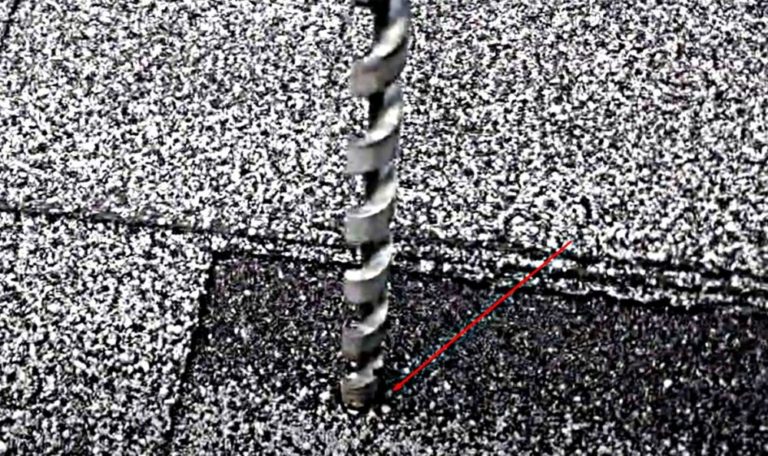
- Continue working on the roof. Find the location for the penetration using the drill bit protruding from the roof and remove it. Enlarge the hole using a 10-12 mm drill bit to accommodate the jigsaw blade.
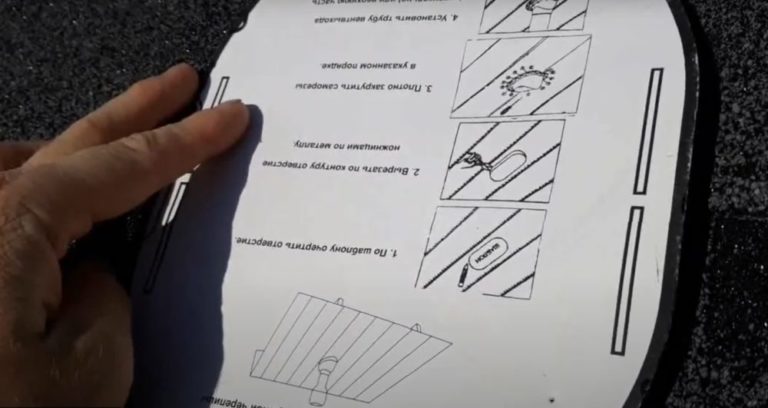
- Manufacturers include cardboard templates with the penetration elements. Place it over the pilot hole drilled in the roof, aligning it with the edge or center of the future marking. Trace the outline of the template with a marker or chalk.
- Insert the jigsaw blade into the pilot hole. Begin cutting out the roofing material along the markings. If the roof is covered with soft asphalt, you'll need to cut along with the plywood sheathing.
However, the main structural elements of the rafter system cannot be cut. Prepare a large opening for the penetration element.
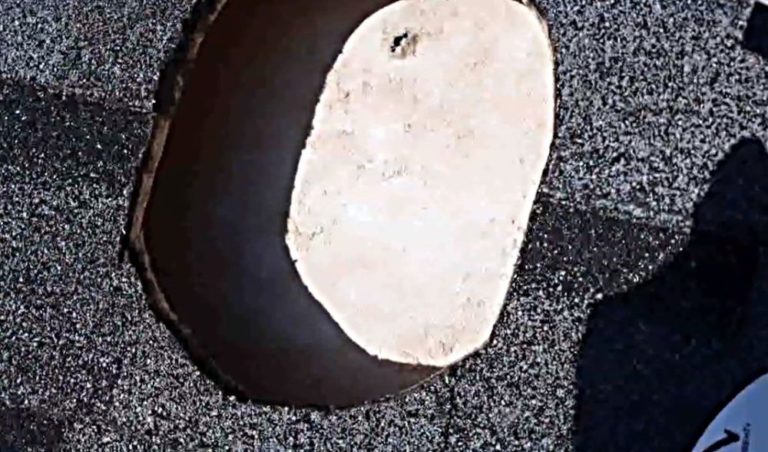
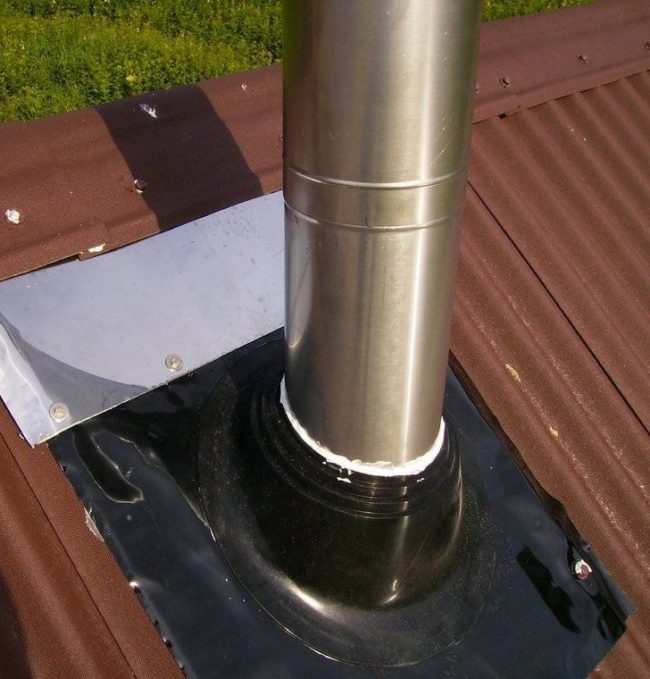
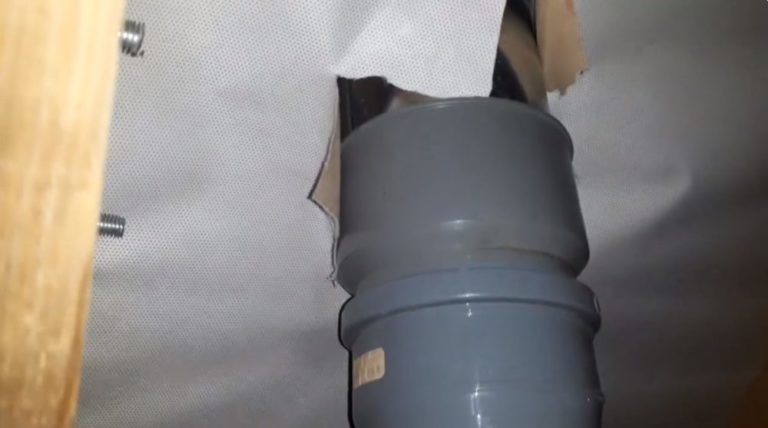
- Insert the feedthrough housing into the prepared hole. Check the tightness of the parts.
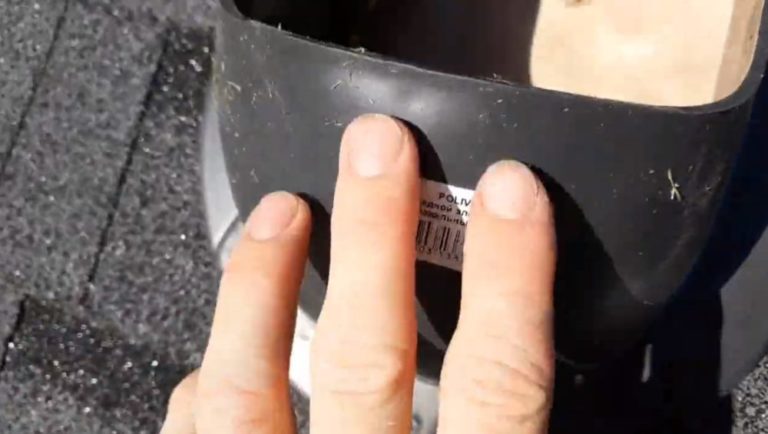
- Remove the duct housing. There's a rubber seal on the bottom. Additionally, seal the seal around the perimeter with bitumen sealant. Apply the paste around the perimeter of the hole cut in the roof.

- Install the feedthrough housing, tightly fitting it with bitumen paste. Secure the element to the roof with screws through the mounting holes. Use your finger to spread any excess sealant that appears at the joint to ensure a better seal.

- To install the pipe, widen the hole in the vapor barrier, previously cut with a knife from the attic side.
- To make it easier to connect the external pipe to the ventilation duct coming out of the house in the attic, install a shaped plastic adapter on the lower part of the pass-through duct.
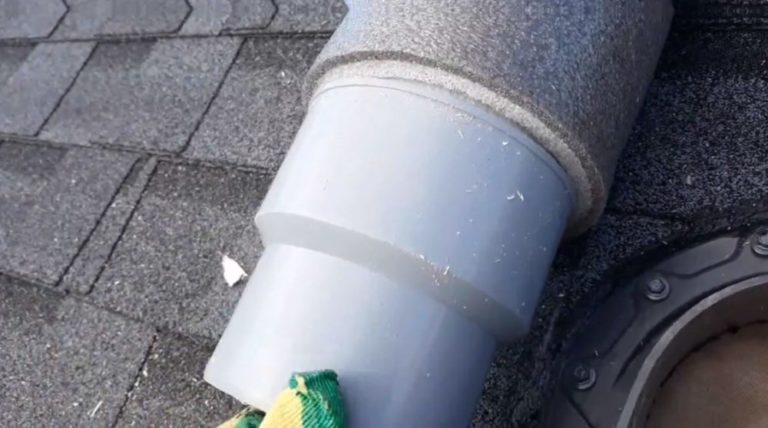
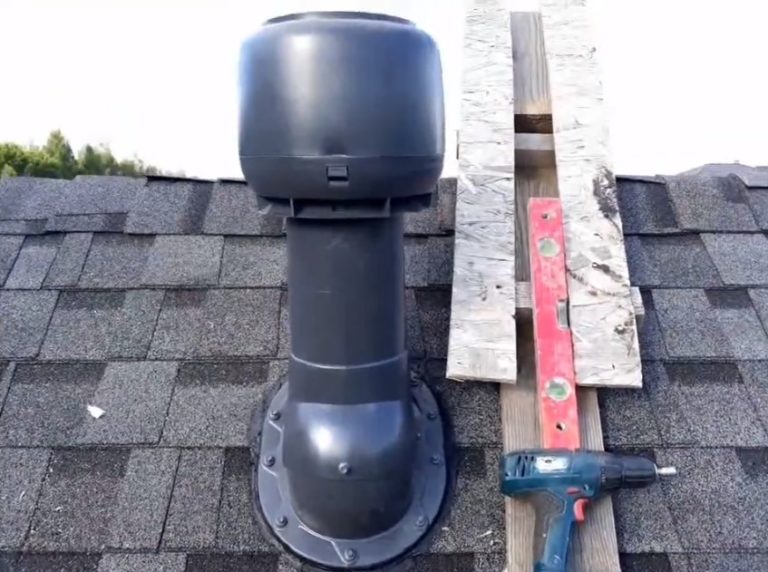
- Install the outdoor exhaust pipe with a deflector on the body of the pass-through element secured to the roof.
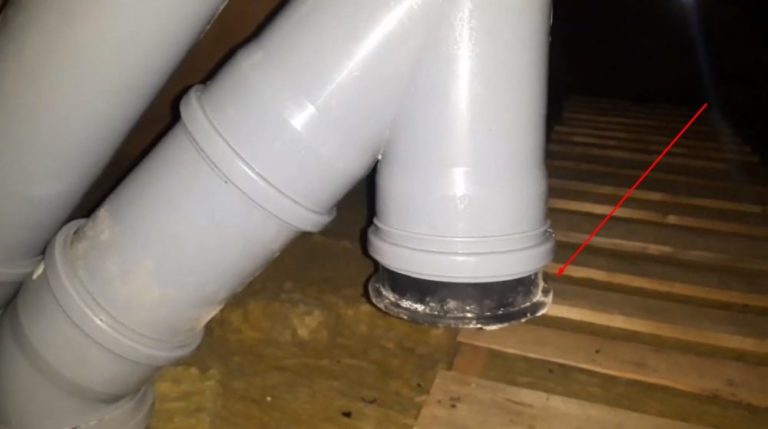
- Connect the general building ventilation duct to the shaped PVC adapter of the outdoor pipe. If there are multiple ducts coming from different rooms in the house, use tees.
To prevent condensation from entering the ventilation system due to temperature differences, install a water drainage system. Create a condensate collector by installing an additional tee. Close the bottom opening of the sump with a plug.
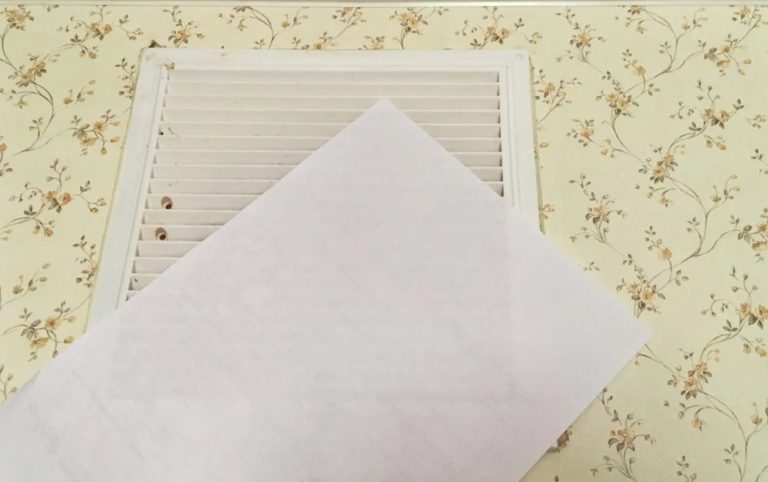
After completing the installation of the ventilation pipe on the roof of a private house, check the draft in the channel with a sheet of paper or a lighter flame.
To reduce condensation in winter, insulate the ventilation unit on the attic side. Leave the condensate collector cap easily accessible for easy periodic drainage of accumulated water.
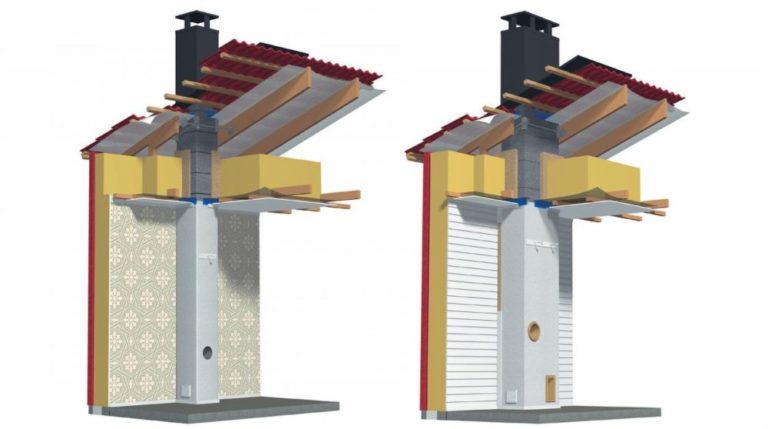
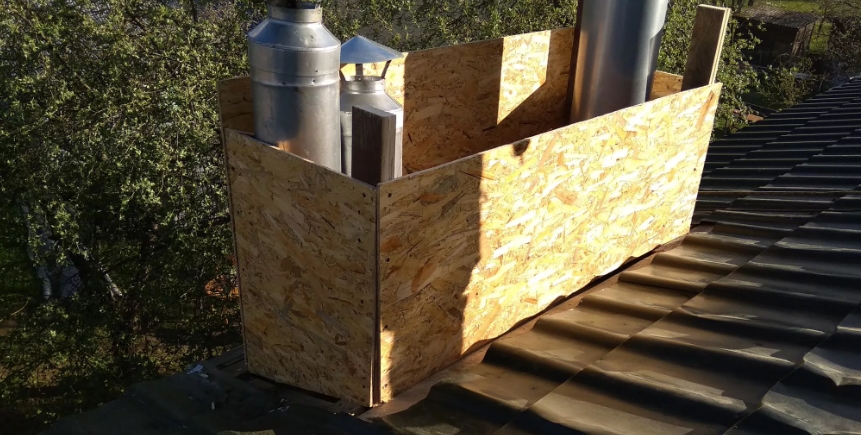
Installation of a box on the roof
On the roofs of private homes, you might see a ventilation outlet in the shape of a square or rectangular structure. This structure is a box concealing one or more pipes. This unit is installed for more than just aesthetic reasons.
The box has 2 purposes:
There are 3 options for arranging ventilation with a box:
- A separate box made of metal or decorative brick is constructed for each pipe.
- Several pipes are brought out of the attic in a group, as close to each other as possible. The air ducts are placed inside a common box and covered with thermal insulation.
- A group of pipes in the attic are connected to a single outlet using adapters. A common air duct is routed to the roof, covered with a box, and insulated.
The presence of a wide box ensures stability for high air ducts without the installation of braces.
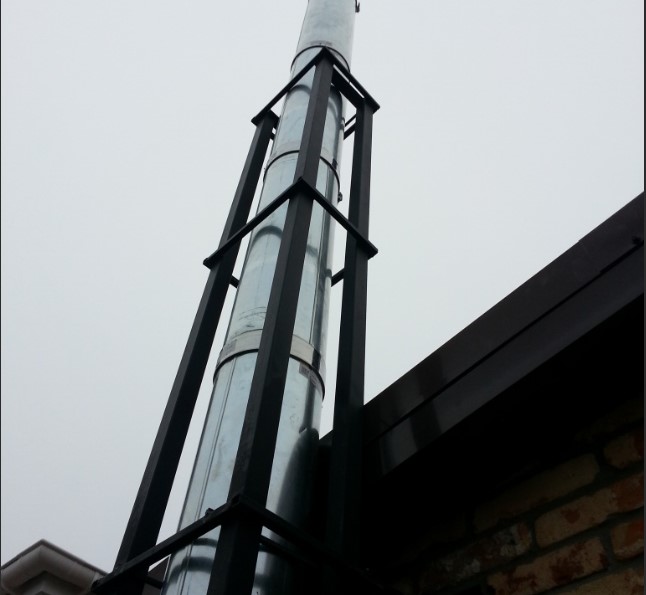
Installation of reinforcing elements for high pipes
When a rooftop ventilation duct with a height of over 1.5-2 meters is installed on a private home, the pipe must be reinforced with guy wires, braces, or metal supports. Guy wires made of galvanized cable or chains are easier to install and look more attractive.
Three fasteners are placed at the same distance from each other, forming an angle of 120OEach stretcher is attached at an angle of 45° relative to the axis of the vertical air duct.O.
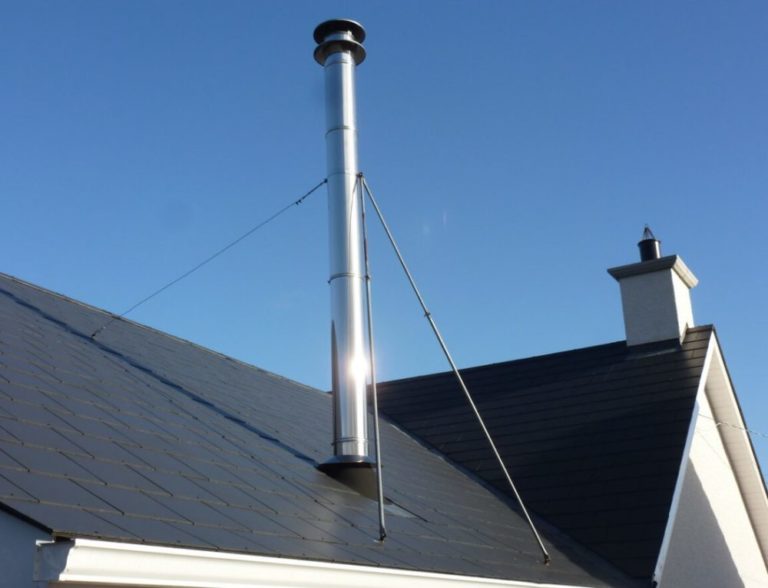
Fixed guy ropes are difficult to adjust. It's best to supplement the cable or chain with threaded tensioners. These are anchors with loops. By turning the tensioner, the guy rope can be tightened or loosened.
Braces are similar to guy wires, but rigid. These elements resist both compressive and tensile loads. Two rigid braces made of metal profile or tubing are installed for a single duct. Tension adjustment is not provided.
A metal support is used for tall ductwork that cannot be reinforced with braces or braces. The structure is welded from a metal profile around the pipe to form a box-like frame. This mounting method is rarely used for private homes. This design is popular for industrial ventilation.
Insulation of ventilation
In winter, condensation forms inside an uninsulated air duct due to temperature differences. The frozen moisture blocks the vent.
From the outside, insulation is provided in a box or a sandwich pipe. The shaped outlet does not require additional insulation. The manufacturer has provided thermal insulation for the air duct.
Checking the ventilation system
Roof ventilation is functioning properly when the roofing layer doesn't freeze and form frost in winter. In summer, the attic space should be cooler than the outside temperature.
Inside a home, proper ventilation is determined by the quality of air exchange. Fresh air should be supplied through the supply ducts, and dirty air should be removed through the exhaust ducts.
The flow of air can be easily checked by deflecting a sheet of paper held near the ventilation hole.
Errors in ventilation outlet installation
Installing a roof air duct is simple, but people often make simple mistakes. These errors impair ventilation performance and accelerate the deterioration of structural elements in a private home's roof.
Common mistakes:
- Insufficient sealing of the joint between the penetration element and the roof covering leads to roof leakage;
- the absence or poor insulation of the air duct affects the deterioration of draft, the formation of condensation with ice in winter;
- Installing a deflector without observing the distance between the edge of the air duct and the dome as recommended by the manufacturer will impair draft or create the opposite effect;
- The absence of guy wires or braces leads to the collapse of a tall pipe.
To avoid installation errors, you need to be attentive, check each fastener, and follow the technology for ventilation through the roof.
Answers to frequently asked questions
According to the recommendations of SNiP No. 41-01-2003: the air duct outlet on a flat roof is 50 cm, on a pitched roof - 50 cm if the pipe outlet is located at a distance of up to 1.5 m from the ridge.
The top edge of the pipe can be positioned flush with the ridge if the distance between them is up to 3 m. When the ventilation is located more than 3 m from the ridge purlin, the top edge of the channel should coincide with a drawn line at an angle of 10° downwards to the horizontal.
Ventilation is classified according to the operating principle: exhaust, supply, and supply-exhaust; according to the method of air flow movement: natural, mechanical, and mixed.
In a private house there are 3 types of ventilation according to their purpose: fan ventilation – for removing gases from the sewer, general house ventilation – for ventilating rooms, roof ventilation – for ventilating the sub-roof space of the roof.
According to SNiP No. 41-01-2003, the minimum projection is 500 mm.
Calculate the size of the air ducts based on the room's volume and the number of occupants. Consider the specific purpose of each room and the recommended air exchange rate. Use freely available tables and online calculators.


