Metal pipes have been obsolete for some time now. They are being replaced by plastic alternatives. Their performance characteristics are equal to, and sometimes even superior to, metal ones.
Proper connection of a metal pipe to a polypropylene pipe ensures that the system will operate without interruption and with maximum reliability.
How to connect polypropylene pipes to metal ones?
It's not that rare that you have to to connect a polypropylene product with a metal one.
To understand how to properly connect polyethylene pipes with polypropylene or metal ones watch video tutorials, posted in this article.

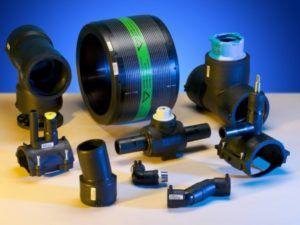
There are several ways to make a proper connection.
- Threaded. This involves using fittings that look like couplings. One end is threaded onto the metal, and the other is cut to a perfectly smooth finish.
- Flanged type. When bolts and studs hold the flange structures together. They will help you understand how to connect polypropylene pipes; videos will make the process more visual.
Seven ways connections of polypropylene pipes without soldering and DIY welding – step-by-step instructions with photos and video tutorials.
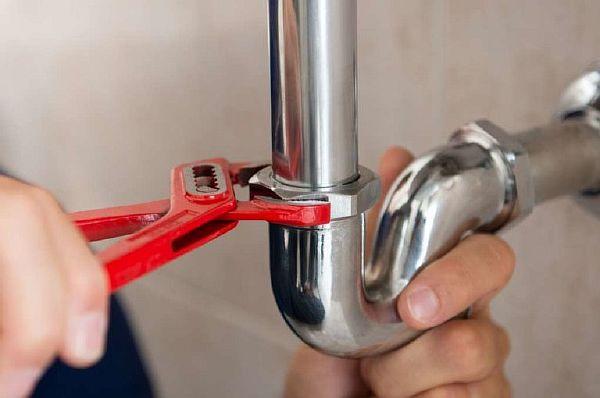
We install threaded fittings
These types of connections are suitable for connecting medium- and small-diameter pipes. Their size should not exceed 40 millimeters.
Threads on fittings are present not only on the inside but also on the outside. They are used to secure the metal sides and ends to the components. The smooth end of the coupling is located on the opposite side. This is used to solder the plastic.

The fittings are installed using simple technology.
- The workpiece is cut at a right angle where the joint is expected to be. Solid oil is used to finish the edge. Then, a thread cutter is used to finish the work.
- After this, they must be cleaned to remove any metal shavings. The future joint will require sealing, which requires the use of FUM tape or tow.
- The fitting is screwed onto the section with a pre-prepared cut. This doesn't require much force. The part may crack if too much pressure is applied with tools.
- The smooth end is screwed to the plastic pipe. It's easy to understand how to connect a polyethylene pipe to a polypropylene pipe.
The sealing material is placed along the thread so that it covers at least 1-2 turns.
Video: How to connect a pipeline
Installing flanges
This option is more suitable for those working with larger diameters. It reduces access issues during operation when cleaning is required.
The flanges look like flat discs supported by straight beams.

Installation of pipes in the system consists of several stages.
- It all starts with creating a clean cut at the ends of the workpieces. The key is to keep the inside free of dust and shavings.
- Then we move on to fitting the flanges onto the pre-prepared cuts. We place rubber spacers between the discs.
- Bolts are used to connect flanges together. It's important to tighten them evenly, without applying excessive force.
It is recommended to separately ensure that the edges of the rubber gaskets do not protrude more than 10 millimetres.
Polypropylene pipes and their connections
The ends of pipes made of this material are exposed to high temperatures to join the components, creating a joint. Gluing or special fittings can also be used.
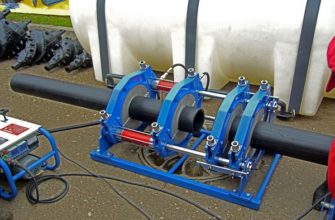
How to solder structures?
Polypropylene blanks cannot be joined without a special welding machine, known as an "iron." It operates when connected to a regular electrical outlet.
It is better to purchase the materials themselves with a small reserve, in case of possible errors.

The process consists of several steps. This will help you understand how to seal a polypropylene pipe.
- Several cuts are made where the joints will be located. The ends also require careful cleaning. Special marks are made on their surfaces with a marker. These marks indicate the depth at which the parts should be placed inside the heating device. The soldering iron temperature should be at least 270 degrees Celsius.
- Connect the tips strictly perpendicularly with a hot soldering iron. The same is done with the ends of the other connections.
- Wait 10-15 seconds until melting is complete. Then remove the attachments and reassemble the parts. Lightly press them together, but do not allow them to rotate.
- The parts to be joined must be left in one position for some time until they cool down.
Video: Learning how to solder
Socket brazing is a technique used for pipes with a diameter of 40 mm or larger. However, it's recommended to entrust this work to specialists, as only they are familiar with all the specifics.
It's best to heat connecting elements from the inside and pipes from the outside. This will make it easier to create highly durable joints. Otherwise, small bumps will form inside, reducing flow. Blowing out the structure will eliminate such problems.
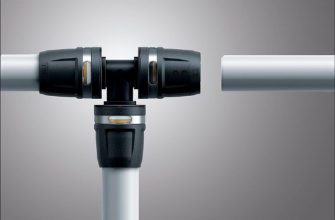
Features of the "cold" method
It's assumed that compression fittings are used in this case. A standard crimping tool is sufficient.
The installation process looks like this.
- As usual, work begins with cutting the ends. After that, check whether the edge is perpendicular. Remove burrs from the ends with wire wool or fine-grain sandpaper.
- The compression nut is placed on one end of the pipe. The threads should face the fitting. Then, the compression rings are applied. They also face the fitting, but with long bevels.
- The fitting is threaded onto the pre-prepared end face. The part is inserted into the inner surface until it stops.
- After this, the compression nut is fully tightened. The system is checked for leaks.
What points should you pay attention to when welding?
Professional soldering irons are quite expensive. It's better to buy inexpensive "hobbyist" options if your work will be inconstant. These typically come with several popular attachments. Renting tools is possible, as this won't affect the quality of the final connections.
A stable stand has become a must-have for almost all soldering irons. Even professionals can only make connections if the tool remains stable. It takes no more than 10-15 minutes for the work surfaces to heat up.
The couplings consist of only two parts: a nozzle, which is used to heat the coupling, and a sleeve, which contains a pipe with a nozzle inside.
The soldering iron's nozzle components are installed while it's still cold. Only then should the device be connected to the power supply. Work should begin only when the indicators go out.
- By type of pipe.
- Wall thickness.
- Diameter of the structure.
All these values are usually indicated in the table that comes with the soldering irons.
Sewerage systems and their connection features
When installing a sewer system, many people connect plastic pipes not only to metal ones, but also to cast iron ones.
These joints are structurally different from others. Special components will be required:
- Seals.
- Corrugation.
- Cuff.
Selecting and purchasing suitable components shouldn't be a problem. However, you can also use materials you have on hand if you can't find a suitable option.
For example, a seal is cut from microporous rubber. A long, narrow strip should be placed in the gap between the connecting elements. A blunt, wide screwdriver will help compact this material.
Chasing is unacceptable for several reasons. It can deform plastic pipes and prevent them from creating sealed joints. Even after the work is completed, the risk of leaks remains high.
Cement mortar also doesn't have a long service life. Different materials have different coefficients of thermal expansion, and this difference negatively impacts the structure.
Cracks appear too quickly in cemented joints, and such structures simply lose their integrity.
Plastic pipes are sometimes connected to copper ones, but this is extremely rare. Connecting a metal pipe to a polypropylene pipe is more common.