Linoleum is one of the most popular floor coverings because it can be laid on almost any surface: wood or concrete (learn how to lay it floor under linoleum on a concrete base) etc.
Today, traditional heating systems are often replaced with modern systems that help create a more comfortable environment in the home.
One option for such an arrangement is heated floors - under linoleum on a wooden floor; such systems can also be installed without much difficulty.
Before purchasing a finishing coating, you need to decide on a heating system—hydro or electric. A hydronic system requires pipes to transport warm water, while an electric system generates heat using electricity.
This article provides a detailed description of linoleum selection, installation of various types of heated floors on a wooden base, and video materials.
- Advantages of this type of heating
- Choosing linoleum for underfloor heating
- Choosing a heated floor system
- Preparing wooden flooring for installation
- Installation of different types of heated floors on a wooden base
- Electric floor
- Infrared floor
- Water floor
- Installation of an additional wooden base
- Pipe installation
- Connection to the heating unit
- Laying linoleum
- Video tutorial
Advantages of this type of heating
Traditional radiators transfer heat to the air, but this heat exchange is inefficient. The radiators are located above the floor, and according to the laws of physics, warm air rises, where it quickly cools. This means the upper layers of air in the room are heated, while the floor remains unheated. Therefore, achieving optimal conditions requires more energy.
Underfloor heating, however, works on a different principle. Heating elements located under the flooring primarily warm the flooring, which then transfers the heat to the air. This even warms the air layers below.
Moreover, the air below is warmer, while above it is cooler. The difference can reach 2 degrees, but this temperature, according to doctors, is the most suitable for a person to feel comfortable.
Choosing linoleum for underfloor heating
Choosing the right linoleum for underfloor heating over a wooden floor is crucial. This synthetic material, when heated, releases toxic substances, which are hazardous to health. Therefore, before purchasing the right flooring, it's important to understand its composition.
Main types of linoleum:
- Marmoleum is a high-quality material produced using natural raw materials. It is fireproof and has antistatic properties.
- Alkyd or glyphthalic are synthetic types with a fabric backing. They can warp when heated.
- Vinyl looks beautiful. However, it produces an unpleasant odor when heated, as the main raw material used in its production is PVC.
- Nitrocellulose or colloxyclin - despite its high moisture resistance, it is easily flammable.
- Relin is made from bitumen, synthetic rubber, and rubber. It reacts negatively to heat, so it is not suitable for use in living spaces.
According to the recommendations of specialists and coating manufacturers, it should be selected taking into account the type of underfloor heating:
- for water - the best option is marmoleum or vinyl;
- for film - marmoleum, vinyl or alkyd type.
Important when choosing linoleum - thermal conductivity indexMaterial with low thermal conductivity should not be placed on heated floors, as it will not give off enough heat.
The heat transfer rate of linoleum is affected by the raw material it's made from. It can be artificial (foamed PVC, polyester, fiberglass), or natural (felt, fabric, and jute). Linoleum made from jute, felt, and foamed PVC should not be installed over heated floors with a wooden base.
Furthermore, regardless of the linoleum model, there are limitations: the heating system must have a power output of no more than 180 W/m². With this heating system, the temperature does not rise above 28 degrees Celsius, thus preventing deformation of the flooring and the release of chemicals. It's worth noting that the linoleum base must be level, otherwise any unevenness will be visible.
Thicknesses suitable for residential use range from 0.7 to 4.5 mm. Thinner materials are also available, but they are not intended for apartment installation. The most common thickness is 1.5 to 3 mm; this product retains heat well and is a good sound insulator.
The durability of linoleum is determined by the thickness of its protective coating. The material comes in widths ranging from 2 to 5 meters, allowing you to purchase a product in the exact size you need.
Choosing a heated floor system
To ensure proper functioning of your heating system, it's important to choose the right model. Underfloor heating systems come in various types: hydronic, electric, and infrared.
| Types of floors | Advantages | Flaws |
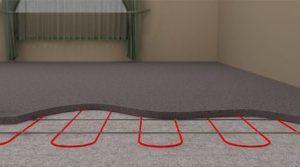
| Water - a structure made of pipes through which heated water moves. | They are reliable, affordable, and have high heat output. Suitable for private homes with separate heating boilers. | To connect a central heating system to an apartment with central heating, you must obtain permission, as its operation reduces pressure throughout the building's system. Furthermore, as the water passes through the floor pipes, it cools, leaving cooler water for subsequent circulation. Installation is complex and time-consuming, as it is laid on a concrete screed or a specially prepared wooden structure. However, there are floors that can be installed "dry" using specially designed heat-exchange plates. This option is recommended when installing underfloor heating on a wooden subfloor under linoleum. |
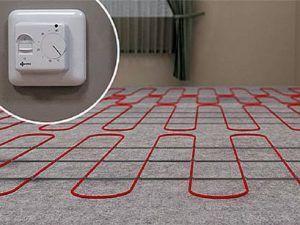
| Electric floors are a cable system powered by electricity. | The height of the screed and the weight are less than those of the water one. | Basically, the installation requires pouring a screed, which complicates the installation. |
| Infrared heated floors – carbon heating elements are placed on a special protective film. | They distribute heat evenly, have a long service life, do not require constant maintenance, do not emit electromagnetic radiation, and have a simple temperature control process. | Almost none. |
Considering all the features of heated floors, experts advise giving preference to infrared when laying on a wooden floor under linoleum.
It is lightweight and does not create additional load on the floors, and there is no need to dismantle the wooden floor.
Preparing wooden flooring for installation
Most often, underfloor heating is laid on a concrete base; it can also be installed on a wooden floor, both new and old, provided, of course, that it is prepared in advance.
Advantages of a wooden base:
- absence of heavy cement screed;
- reduction of installation time;
- the structure can be used immediately after installation;
- there is no load on the floor in the form of a concrete screed;
- The floor height remains virtually unchanged.
Any substrate has its own thermal limitations, which should be taken into account when using it with underfloor heating. The optimal surface temperature for wood floors is 25–27°C. However, since the sensor is located within the structure rather than on the floor, the thermostat will display the following readings.
| Tree | Floor thickness (mm) | Temperature limitation |
| Soft type | 7 | 32 |
| 15 | 35 | |
| 20 | 40 | |
| Solid type | 7 | 31 |
| 15 | 24 | |
| 20 | 38 |
As you can see, softwoods like pine can withstand the highest temperatures. Hardwoods like oak, however, do better with lower temperatures.
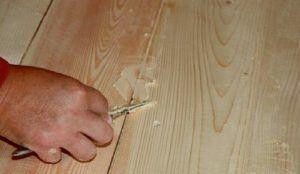
Preparing the wooden subfloor involves eliminating cracks and crevices, and ensuring the floorboards are stable. All old and rotten boards must be replaced. Neglecting these steps will prevent the heating system from functioning effectively, as heat will escape into the cracks. New flooring requires preservative and fireproofing treatments and complete drying.
Then you need to start leveling the base:
- When installing a water-heated floor, a level surface is not required; slight differences in level are acceptable, as the pipes are placed on a special wooden support equipped with recesses.
- For infrared film flooring, the base must be perfectly smooth. Therefore, any uneven areas should be leveled with a sander or plywood. The sheets must be positioned flush.
Installation of different types of heated floors on a wooden base
Before starting installation work on laying underfloor heating on a wooden floor under linoleum, you need to stock up on materials and tools.
Electric floor
When installing electric underfloor heating, the following safety regulations must be observed:
- do not allow the cable to come into contact with the auxiliary material;
- do not run wires in places where furniture or heating devices are planned to be placed;
- do not violate the insulation.
The cable system is mounted on the base only after all its defects have been eliminated.
The step-by-step process of laying the structure is as follows:
- Waterproofing: A special waterproofing material is laid out, usually sold in rolls. To secure it, the joints should be sealed with tape.
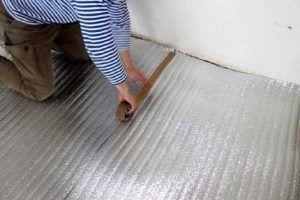
- Thermal insulation - a coating with a foil layer is used, which is laid over the waterproofing.
- Cable laying - it is laid out on a heat-insulating sheet and secured with special holders.
- Installing temperature sensors - they are located between the cable elements and connected to the thermostat.
- Pouring the screed - for this, a cement-sand mortar is used, which is spread over the entire area of the room.
- The final stage is to lay sheets of fibreboard on the dried screed.
Once these works are completed, you can begin laying the linoleum.
Electric flooring is installed under linoleum using a dry method. This method uses joists, with a heating cable running between them, parallel to the joists. Afterward, sensors are installed and the chipboard is laid.
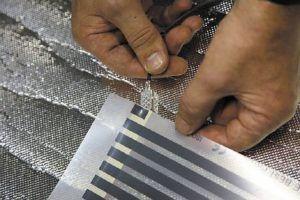
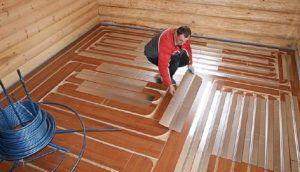
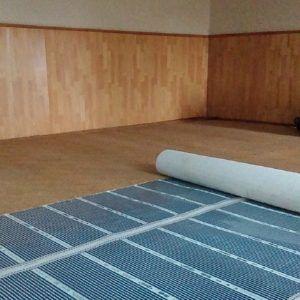
Infrared floor
When purchasing a film-based underfloor heating system, keep in mind that the film should be laid 50 cm away from the wall and not placed under heavy furniture. Furniture placed on the heating elements will block the heat from entering the room, thereby returning it to the source.
In addition, you will need clips for securing the contacts, at the rate of 2 pieces per strip, thermal insulation material, polyethylene film, a thermostat and tape.
The principle of operation is as follows:
- A layer of thermal insulation is laid on the prepared base, with the reflective side facing upward. This is essential, otherwise the generated heat will escape downward, thereby wasting it. The strips must be laid tightly together and secured with tape.
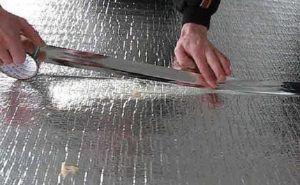
Important! When installing thermal insulation, ensure that the reflective side is not made of an aluminum base, as contact with carbon strips will cause a chemical reaction, damaging the product.
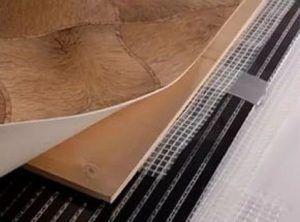
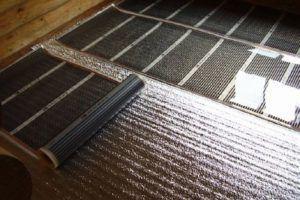
- Next, the film layer is laid. It should be laid copper-side down, 50 cm away from the walls. The film must be cut to the required size strictly along the special lines provided for this purpose, otherwise the carbon fiber elements will be damaged.
Please note! If the carbon film is accidentally damaged, it should be insulated with bitumen mastic or tape. Copper electrodes are also insulated with this material.
- The joining of strips is carried out using clamps as follows:
- on the electrode, one contact of the clamp is placed inside the film;
- the second one is placed on top of the film;
- Using pliers, connect the electrode to the clamp to create a tight contact.
After this, all the film strips are joined together into a single sheet using adhesive tape. Clamps are placed on the unused, exposed electrical wires, the contact is pressed with pliers, and insulation is applied.
Please note: To avoid pressure on the sensors and clips, special grooves should be cut into the insulation and placed there. To prevent the fabric from slipping, tape it around the entire perimeter.
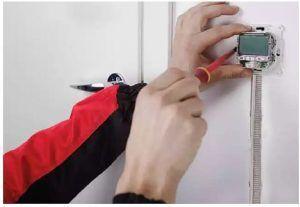
- A thermostat is installed. For the system to operate effectively, a separate thermostat is required for each room.
The temperature sensor is glued to the strip of infrared heated floor with mastic, specifically to the carbon element.
The cable from the device is led to the nearest wall and is located in a groove in the thermal insulation that was laid in advance.
The thermostat is attached to the designated spot on the wall, strictly following the manufacturer's instructions. Electrical wires are then connected to it. For the floor heating to function effectively, a separate circuit breaker is required.
- The system's functionality is checked. To do this, the device's temperature is set to 30 degrees, and the power is turned on. After activating the film system, each strip should be checked (by touch). If any problems are detected, they must be corrected immediately.
- Lay out polyethylene film around the entire perimeter of the room and secure it to the wooden base with screws. This must be done carefully to avoid accidentally damaging the heating elements.

The structure is ready, you can start laying the linoleum.
Water floor
Installing a water-heated floor on a wooden base requires the installation of an additional wooden floor with special grooves for laying the pipes. However, it is possible to lay the pipes on polystyrene foam mats designed for this purpose.
It's common practice to install underfloor heating on a concrete screed, but this method is rarely used with a wooden base. The first option is the most popular. This is how the structure is constructed:
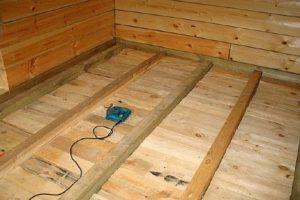
Installation of an additional wooden base
- Installing joists on the prepared base—they serve as support for the surface. Joists should be spaced 60 cm apart and be of the same height. Failure to comply with this requirement will result in unevenness of the final covering (linoleum).
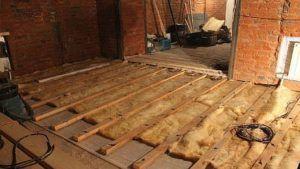
- Installing waterproofing and thermal insulation. A layer of special material is placed between the joists to protect against water, steam, and condensation. It's important not to skimp on this material, as the proper functioning of the entire system depends on it. If you install a simple film, steam will accumulate and damage all surface layers.
The next layer is mineral wool, which serves as insulation and has a density of 40 kg/m³. It should be laid evenly, distributed between the joists. A special film is laid over this entire structure to provide waterproofing.
- Laying the floorboards. The boards are laid so that there are grooves between them to accommodate the pipes. If the pipes are 16 mm in diameter, the groove should be 20 x 20 mm. The ends of the base should have round grooves, also called loops. Their purpose is to form a bend in the heating main.
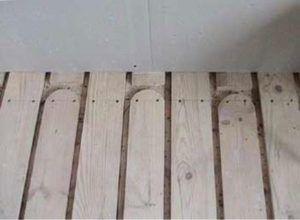
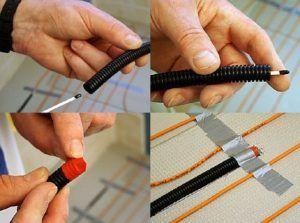
Pipe installation
An important point when laying underfloor heating pipes is to place flat foil over all longitudinal grooves. The pipe is placed on this foil and wrapped tightly. The edges are secured to the boards with a stapler.
The pipe itself is then secured to the surface using special metal plates. This will prevent the element (pipe) from slipping out of the groove. Joints within the same contour should be avoided.
When calculating the material, it's important to consider the maximum circuit size limit. Exceeding this limit may result in insufficient pressure to ensure proper coolant flow.
Please note: If the pipe diameter is 16 mm, the length should not exceed 70-80 meters, and if it is 20 mm, the length should not exceed 120 meters. If the length exceeds these limits, the system should be divided into several circuits.
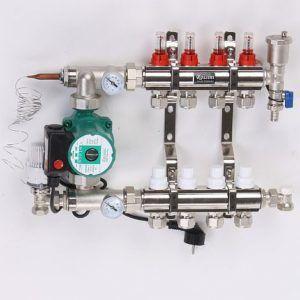
Connection to the heating unit
Connecting to the heating system is the final step in creating a water-based underfloor heating system. There are several options, and the choice is up to the owner:
- using a collector system;
- using a mixing unit;
- using manual adjustment.
After connecting all the components, the pipes are pressure tested. This procedure is mandatory to minimize the risk of leaks.
Finally, the underfloor heating system is covered with plywood, which will serve as the base for the final coating.
Laying linoleum
After installing any type of heating system and checking its functionality, you can begin laying the linoleum. The work is performed in the following sequence:
- it is necessary to keep the material in a heated room for 2 days;
- if necessary, cut the linoleum into strips of the required size using a sharp knife;
- Place the strips on the surface, but do not fix them;
- turn on the heated floor and leave the linoleum on it for another 2 days to settle;
- The final stage is to secure the coating.
There are various mounting methods, but when choosing, it's important to consider that using adhesive mastic promotes even heat distribution. Therefore, experts recommend this method, especially when installing a water-based system, but be sure to purchase high-quality, original resin. However, the most popular and simple method of fixing linoleum is using baseboards.
In summary, it should be noted that any type of underfloor heating (electric, hydronic, infrared) can be installed on a wooden surface under linoleum. However, infrared film flooring has undeniable advantages, as it is easier to install yourself, while hydronic flooring is more durable and practical.
The choice is up to the owner of the property, as any flooring system can be installed by yourself, after studying all the recommendations and manufacturer's instructions. If you don't want to bother, it's worth hiring professionals. There are no comments on this matter, so to speak!


