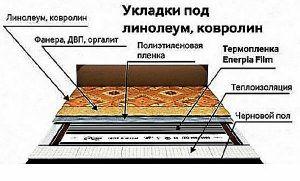
Infrared underfloor heating installed under linoleum or other flooring is a common method for heating various spaces for those who follow heating system trends.
This synthetic film material has long been used as a floor covering. It's most often used for kitchen and hallway floors. Its main advantages are its low cost and ease of installation. Installing it doesn't require much experience. An additional benefit is that it's easy to clean and waterproof.
Previously used as a finishing coat laminate was used for underfloor heating or ceramic tiles. But technological advances have made it possible to produce linoleum that performs this task perfectly. It's important to know that not every linoleum is suitable for these purposes, and you'll learn which one to choose from this article— There are special types of linoleum suitable specifically for underfloor heating.
It's also important to consider the specific underfloor heating system that will interact with the linoleum. There are specific considerations, but if carefully followed, both the underfloor heating and the linoleum will last a long time and provide trouble-free service.
- Can I lay linoleum on heated floors?
- Which film flooring should I choose under linoleum?
- Choosing linoleum
- Preparation of floor covering, calculation of materials and components
- Drawing up a laying scheme
- Step-by-step instructions for installing underfloor heating under linoleum
- Testing the underfloor heating functionality
- Laying linoleum
- Conclusion
- Video instructions
Can I lay linoleum on heated floors?
However, not all types of heated floors can be installed under linoleum. Water-based underfloor heating is one type that requires a different material as a finishing surface.
In recent years, linoleum has increasingly been used in conjunction with infrared film flooring, as the rolled synthetic material is compatible with the electric version, and only with the film version.
Common types of flooring can withstand temperatures no higher than 26–28°C. Exceeding this temperature causes the release of vapors that are harmful to human health. Hydronic heating significantly exceeds the required temperature.
However, not all types of electric heating are used. For laying linoleum over heated floors, infrared film heating is ideal. This design eliminates the need for a screed, simplifying installation and reducing the heat needed to heat the screed itself.
Which film flooring should I choose under linoleum?
There are various types of film-type heating systems on the market. Their installation is a task that anyone can do. Options with large heating elements are not suitable for DIY installation; they are designed for large commercial or industrial spaces.
The time required to carry out all the work installation of film flooring by a home craftsman – minimal. It'll be ready for use in just 2-3 days. All infrared film floors are sold in rolls of a specific length.
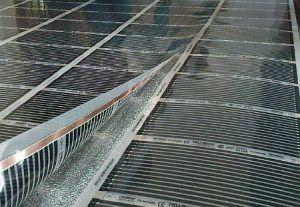
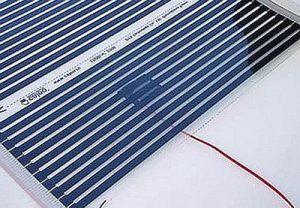
It's best to choose infrared mats with a narrow heating element. These are also called striped mats. They are ideal for small living spaces. The narrow stripes allow you to trim the film precisely to the room's edges.
Electricity is supplied to the carbon elements by two busbar-like contacts located at the edges of the strip. The contacts can be silver or copper. Silver busbars are better and more reliable, but significantly more expensive, so most people buy copper ones.
The contact strip can be positioned at the top or bottom during installation. This is very important – be sure to check the markings – this is a detail the manufacturer will always indicate.
Choosing linoleum
First, you need to find out what technology the material is made of. There are several types of linoleum.
- Polyvinyl chloride (PVC)
The most common budget option. Attractive due to its price and long service life, many choose it. The downside is that most brands cannot be heated above 28°C, as this will cause harmful emissions. Linoleum that can withstand temperatures above this level is expensive, which minimizes any savings on the flooring. When using PVC flooring, heating should be limited to 26°C using a thermostat.
- Glyphthalic
A type recommended for film heating. It is a linoleum with a fabric backing. The production technology involves coating the fabric with a glyphthalic varnish, which is highly durable and retains its elasticity after drying. This allows many types to be used at temperatures up to +35°C.
- Marmoleum
A material made from natural ingredients. Linseed oil, wood flour, lime, and resin are used in production. Jute fabric is impregnated with these ingredients. It is heat-resistant, does not emit hazardous gases, and is a durable, wear-resistant film material. However, it is fragile and very expensive compared to other types. However, marmoleum is the only covering suitable for water-based floors. Electric floors with screed are also suitable.
Not all varieties are suitable for film heating due to their high thermal insulation. Some varieties contain cork chips, but their use is prohibited.
- Rubber
An inexpensive coating, but of poor quality and unattractive appearance. Suitable for infrared film floors, it's only practical for use in hallways and bathrooms.
- Single-layer
The most budget-friendly typeJust one thin layer. Essentially a film material. It's typically installed in areas where the flooring needs to be replaced frequently due to constant dirt. In a residential building, this would likely only be the entryway. This type of flooring is unsuitable not only for underfloor heating but also for apartment renovations in general.
- Insulated
Expensive, with a layer of thick felt or foamed synthetic material on the underside that acts as insulation.
Ideal for screeds. The top layer quickly warms up from the warm air in the room, and the floors become warm without cooling down from the concrete surface below.
However, this material is not suitable for heated infrared film floors. Due to its good thermal insulation, the infrared radiation will not heat the room, or the heating will be ineffective.
When choosing linoleum, it's also important to ensure it doesn't have a thick underlying fabric layer. Such a layer also acts as thermal insulation and will conduct heat less effectively.
Be sure to check the labeling—manufacturers now specify whether the material is heat-compatible. The instructions contain all the necessary information.
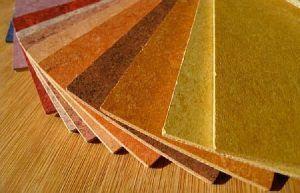
The linoleum under a film-based underfloor heating system should be of medium thickness. Linoleum that's too thin will be weak, while thick linoleum will take a long time to heat up, resulting in a slow rise in temperature in the apartment.
Preparation of floor covering, calculation of materials and components
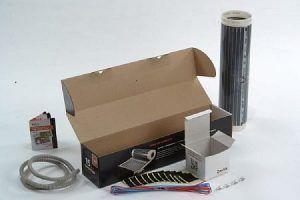
To install a film-based underfloor heating system, you'll need the following materials and tools. In addition to the linoleum itself, you'll need infrared film, electrical contacts for it, copper wire, a thermostat with a temperature sensor, 2mm thick polyethylene film, wide, strong tape, heat-reflective underlay, and thin plywood.
Equipment required: a sharp knife or large scissors, pliers, a construction stapler, and a Phillips-head screwdriver. Other accessories and equipment may also be required.
First, you need to calculate the amount of material required.
Measure the length and width of the room. Calculate how many times the width of the infrared film roll will fit. Multiply the room's length by the number of strips. Now it's time to take into account each floor element, its area, and its configuration.
Heating devices should not be placed under cabinets, sofas, or other large, permanently positioned objects. This is harmful to the furniture and is useless for heating the room. It's best to draw a diagram on a piece of paper. To be safe, increase the required length by approximately 5-10%.
You should also consider the location of the thermostat. It should be placed near an electrical outlet. Keep in mind that an infrared floor consumes approximately 200 watts per square meter. This means that a room of 16 square meters may require up to 3.2 kW. If consumption exceeds 3 kW, a separate power line must be installed.
But even if consumption is lower, it's necessary to check the wiring. It's advisable to replace the thin aluminum wire with high-quality copper. It may be necessary to replace the entire wiring in the apartment, and obtain permission to increase the power consumption from the power grid.
It's best to connect the film-based underfloor heating system with separate fuses installed on the control panel. This is done before any work on the floor begins. If the power grid refuses to increase the power, you'll have to abandon the film-based infrared floor system.
The requirements for the underlying plywood, underlayment, and film are calculated in the same way. However, keep in mind that the film will need to be overlapped, as this will increase the amount by 10-15%. The elements are laid throughout the entire room.
The required amount of plywood is calculated based on the size of the sheets. Also, create a layout plan for how it will be laid in the room. Depending on the room's configuration and the size of the plywood sheets, 10 to 20% of the waste will be lost.
Drawing up a laying scheme
An installation plan should be drawn up when calculating materials. It will show how much material and how many strips of heating film will be needed. Based on this, you can calculate the amount of wire needed.
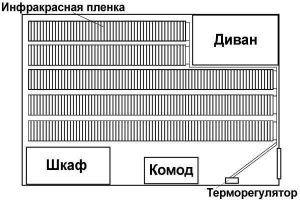
In this case, five strips of film are installed in the room. Be sure to take into account the space occupied by furniture and the location of the thermostat. It's best to allow for a 20 percent excess of wiring. Before installation, be sure to visually inspect the insulation for damage and test for internal breaks.
Step-by-step instructions for installing underfloor heating under linoleum
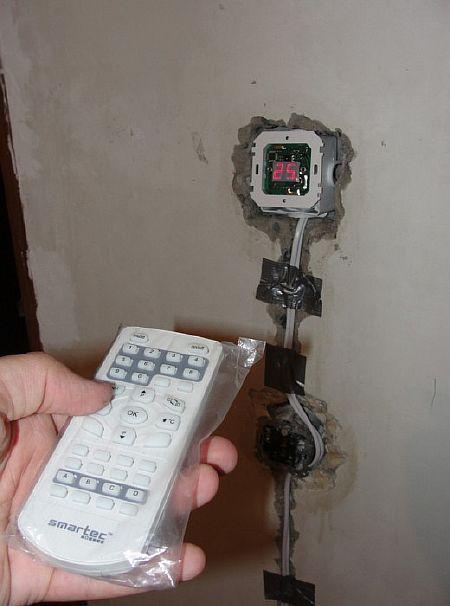
- Step 1. Install the thermostat on the wall
It's best to do this first. You'll need to use a hammer drill to drill a hole in the wall for installation. It should be at least 30 cm above the floor. If you leave this for later, you'll have to clean up any concrete or brick debris. If installation has already begun, removing it will be extremely difficult, and you might even miss something. The hole should be large enough to securely fasten the device without any wobble.
Also, immediately cut a groove in the wall down from the location where the controller is installed. You'll run the wires through this groove.
- Step 2. Preparing the floor for installation
If you plan to install infrared film flooring on a concrete surface, it must be carefully leveled. This can be done using screeds laid on guides. The composition is 3 parts sand, 1 part cement, 1 part tile adhesive. The sand must be thoroughly sifted. The screed must be as level as possible.
You can also use a screed made with self-leveling compounds. When preparing these, carefully follow the instructions.
A waterproofing layer of bitumen mastic or polyethylene film is laid over the screed. The joints between the films are sealed with wide tape.
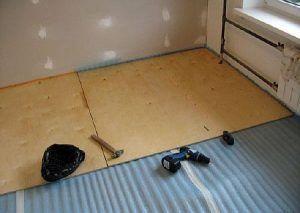
Now we lay the OSB or plywood sheets. They are secured with dowels in a staggered pattern. If the concrete base is coated with mastic, the sheets can be laid on it without additional fastening.
If you are installing underfloor heating on an existing base, you can skip step 1.
- Step 3. Laying the underlayment
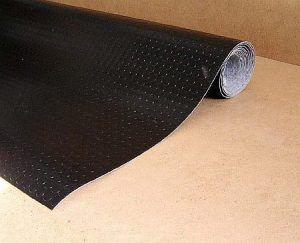
To prevent underfloor heating from wasting energy on the concrete base, an insulating underlayment should be installed. A special type with foil on one side is suitable. This is a rolled material 5-6 mm thick. The foil should reflect heat upward.
There are two underlayment options available for film flooring under linoleum: foamed polyethylene or extruded polystyrene. Polystyrene is considered superior, but polyethylene is less expensive. Most underfloor heating contractors prefer polyethylene.
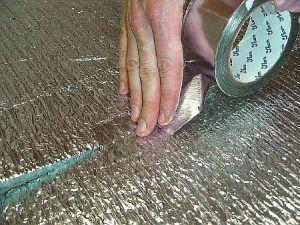
The underlayment should be laid foil-side down, edge to edge, without overlapping. All joints should be carefully sealed with wide foil tape to create a seamless surface and ensure a watertight seal.
You can attach the underlay to the plywood base using staples.
- Step 4. Installing the film-based underfloor heating
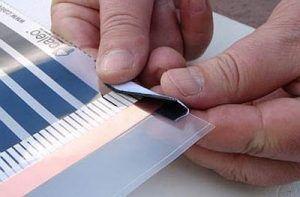
Lay out the infrared film strips according to the diagram drawn earlier. Carefully observe the markings—the film has a top and bottom. The bottom side should face the foil. Careful placement is essential; the infrared mat must be cut strictly along the lines marked by the manufacturer. These lines are every 250 mm. Cutting anywhere else, especially at an angle, is unacceptable.
To ensure that the heated floor heats up evenly, it is better to lay individual infrared strips with an overlap of about 1 cm.
Step 5. Connection, wiring, insulation
The connection must be made correctly, and the instructions must be followed scrupulously; deviation from them is not recommended. If you are unsure of your abilities, it is best to call a professional electrician for assistance.
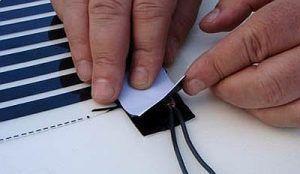
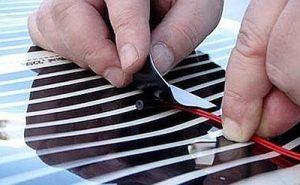
Underfloor heating under linoleum is equipped with contact clamps and special bitumen-based insulation. At the cut, the copper busbar is sealed with bitumen insulation on both sides.
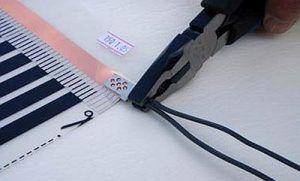
The contact clamp is connected to the infrared film strip connection side. Two contacts are installed on each section.
To install the clamp, you'll need pliers. The clamp is placed on the end of the tire so that the tire fits completely between the contact plates. Then, firmly press the contact with the pliers.

We check the correct installation of the clamps, the position of the film, and the presence of insulation at the cut sites. If everything is correct, we move on to the next step.
- Step 6. Connect the wires
The wires to the contacts are also clamped with pliers. For reliability, it is recommended to solder their ends with tin before installation.
Clamping must be done carefully, otherwise the connection points will heat up and cause a fire. After connection, the clamps must be insulated on both ends with bitumen insulation.
The wires are laid along the walls, from where they lead to the thermostat. Cuts are made in the underlayment with a knife for the clamps and wires. The wires are recessed into the cuts so that they don't protrude under the linoleum.
- Step 7. Install the heating sensor
Read the instructions. Typically, the sensor is mounted under the floor, pressed against one of the carbon heating elements and secured with electrical tape. However, there are systems where the sensor is installed above the floor in the room itself, monitoring the air temperature. I don't recommend this option, as the thermostat in this case may overheat the flooring.
You also need to cut a recess in the substrate for the sensor.
To prevent the heating system from shifting during operation, the strips of thermal film should be adhered together with tape. If the strips are spaced far apart, the film should be taped to the substrate.
- Step 8. Connecting the system
We install the thermostat into the pre-drilled hole, secure it, and connect the wires according to the wiring diagram. If the system's power exceeds 2 kW, a separate circuit breaker will be required.
Testing the underfloor heating functionality
To check if everything is working, turn the heating to 20-25°C. Wait about 5 minutes. Carefully walk around the room, checking each infrared element for functionality. You can do this by hovering your hand over the element.
Now turn off the power and check the contacts. If any of them are noticeably hotter than the film itself, they are faulty. Fix the problem.
Only if there are no complaints can the installation be considered complete and the infrared film floor is ready for use. All that remains is to lay the linoleum.
Laying linoleum
A waterproofing layer should be laid over the infrared film. Expensive waterproofing materials are available in stores, but a polyethylene film no thicker than 2 mm will do. It's just as good as mastic, but significantly cheaper.
Lay out the film with a 10 cm overlap and seal the joints with wide tape. Fold the edges of the film up the walls by 3-4 cm. The edges will be hidden by the baseboard and won't be visible. This will prevent any water from seeping under the baseboard if you spill water.
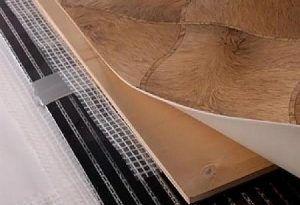
Laying linoleum directly on infrared film is not recommended. A level, solid base must be installed after the waterproofing layer on heated floors.
Plywood 1 cm thick is used for this. Plywood that is too thin may warp over time, while plywood that is too thick will not heat up as well.
Plywood installation requires special care. Cutting is essential to ensure individual sheets fit together with maximum precision. Plywood must be thoroughly dry, so it's best to dry it in a well-ventilated, warm room before installation.
The plywood sheets are secured with nails, which penetrate the underlying wooden subfloor and securely anchor all floor layers. Nailing should be done very carefully, ensuring the nails penetrate between the conductive elements. To do this, slide the plywood sheet over and mark the fastener locations on its edge with a pencil. Nails are driven in only around the perimeter of the sheet.
Now you can lay the linoleum. It should be cut so that the flooring doesn't reach the walls by approximately 1-1.5 cm. It's best to have the roll of flooring equal to or wider than the width of the room to avoid any seams.
It's best not to use mastic for bonding linoleum. It can bulge when heated, making it difficult to remove. Furthermore, the mastic can release harmful substances. It's best to simply lay the material without additional fixation. If you do decide to use mastic, choose one that's compatible with underfloor heating.
After laying, the linoleum should rest for about a couple of weeks. During this time, it will fully settle. Once the linoleum has rested, install the baseboards. The baseboards will securely fasten the flooring, preventing it from shifting or bulging.
Conclusion
- Laying underfloor heating under linoleum is possible and not a difficult task.
- You can handle it yourself without any outside help.
- It is necessary to carefully select materials and only those that are suitable for installing infrared heated floors.
- There's no need to rush or simplify the technology. Only careful work will ensure that your infrared heated floor lasts a truly long time.


