The need to heat a home is no accident, as it's vital in winter. While there are various heating methods, today's owners of private wooden homes prefer underfloor heating.
However, not every type of underfloor heating system can be installed in a house with wooden floors. We'll explore this issue. We'll examine all types of heated floors and determine which is best suited for wooden houses, explain how to install this type of heating yourself, and how to prepare the foundation for it.
- Types of underfloor heating compatible with wood subfloors
- Water floor
- Electric
- Methods of preparing the base
- In the screed
- Without screed
- What heating system should I choose for a wooden house?
- Installation of a water-heated floor in a wooden house
- Installing a water-heated floor in a wooden house yourself
- Base
- Waterproofing
- Installation of logs
- Thermal insulation
- Waterproofing
- Pipe underlay
- Installation of the circuit
- Connection
- Finishing coat base
- Finish coating
- Electric underfloor heating system
- Installing a heated infrared floor in a wooden house
Types of underfloor heating compatible with wood subfloors
There are two types of heated floors, which differ in the heat source: water and electric.
Both are capable of creating comfortable conditions in the home by evenly heating the surface. However, it's important to note that electric systems are more expensive to operate.
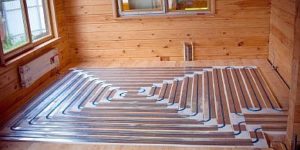
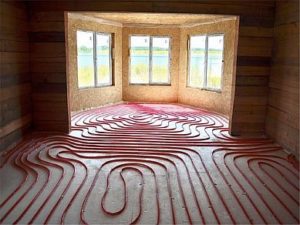
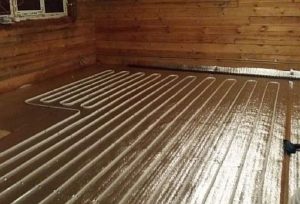
Water floor
Water heating floor structure - a structure made of polypropylene or metal-plastic tubular products, with a hot coolant (water or antifreeze) moving through them. The device operates from central heating or autonomous boiler.
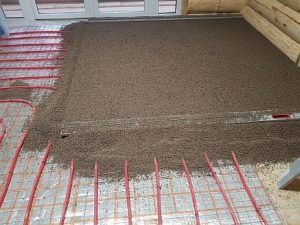
Most often, hydro floors are poured with a concrete screed, but this is a heavy structure, and wooden beams are not always able to withstand such a load. Therefore, it is recommended to use a dry screed for heated floors in such homes.
Installing a hydronic floor in a wooden house is safe, economical, and aesthetically pleasing. The downside is the risk of leaks and the labor-intensive process.
Electric
Electric floors are directly dependent on the availability of electricity. The system operates by heating the conductors under load.
Electric floors come in:
- Cables that are produced in the form of:
- regular cable - it is laid along the floor surface;
- mat - the wire is fixed to the canvas at a certain pitch.
Cable installation can be done using either dry technology or poured over a concrete screed layer. However, if the wooden floors are weak, the latter option is unsuitable, so it is recommended to avoid the cable system altogether.
If the floors are strong, then pouring concrete mortar makes the structure completely fireproof, which is important for wooden buildings.
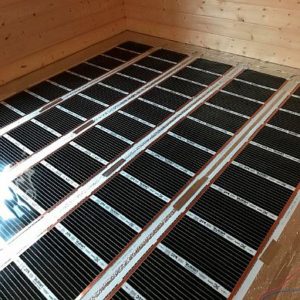
- Infrared - heat is emitted in the form of infrared waves and is divided into:
- film - two-layer film with carbon paste inside;
- rod - mats on which carbon rods are placed.
Infrared floors are easy to install. Film-based systems are portable and can be simply laid out on the surface, while rod-based systems can be installed into a layer of tile adhesive.
- Foil mats are a combination of film and cable heating. They offer the advantages of film without the disadvantages of cable heating.
Electric floors operate silently, heat the surface evenly, are easy to operate, and have a guaranteed long service life.
The disadvantages of electric systems include high electricity costs. Cable systems also emit electromagnetic radiation, although the amount is small and does not pose a risk to human health.
In addition, when installing in wooden houses, there is a risk of fire - but it is minimal if the installation is carried out correctly.
Methods of preparing the base
Before installing a heating element on a wooden surface, the base must be prepared. There are various methods for constructing a base for a heated floor.
In the screed
Installing heated floors into a screed in a log house is a labor-intensive process, but the resulting system is highly efficient and provides high heat output. There are two methods for installing a floor screed:
- Using concrete mortar (wet) requires careful preparation of the wooden floors. Since not all beams can support the weight of concrete, this method is not often used, primarily when installing hydronic underfloor heating on the first floor of a private home.
The essence of the method is that the heating elements (pipeline or electrical wire) are filled with a layer of concrete.

- Dry screeding uses a dry material such as expanded clay or perlite. The resulting structure is strong and rigid. This method is especially recommended for buildings with wooden beams as this type of screed is considered lightweight.
Without screed
The method of constructing heating structures in a wooden building without pouring concrete is called a floor screed. There are two options for installing heated floors without a screed:
- Between joists—a structured underlayment is placed between the wooden joists. Heating elements are simply placed in the recesses. When using insulation without recesses, crossbars should be installed, and the heater will be attached to them using metal clamps.
But it is not possible to use the main construction joists more often, so it is necessary to nail bars onto the black coating that will serve as joists.
It is recommended to lay the underlayment with a reflective layer, although the use of insulation with a foil surface is acceptable.
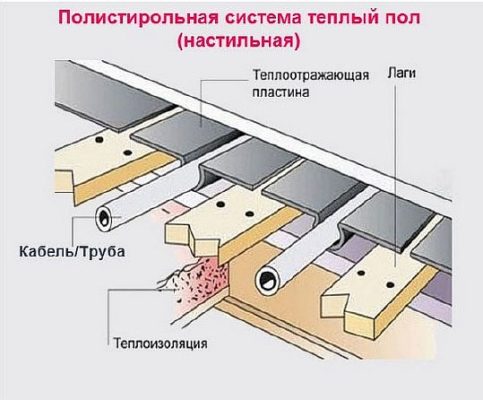
- On a subfloor – this method involves laying pipes or cables on a subfloor or old plank surface. To do this, grooves are drilled in the floor and metal plates are inserted into them. This requires skill in using a milling tool.
Another way to install a heater on a subfloor is by nailing planks onto the base. They are spaced apart so that the protrusion of the galvanized sheets can easily fit into the gap.
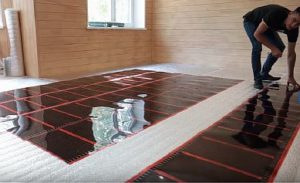
When installing film floors, it is sufficient to lay sheets of plywood, waterproofing, and heat-reflecting material on top of the old floor, on which the film is placed.
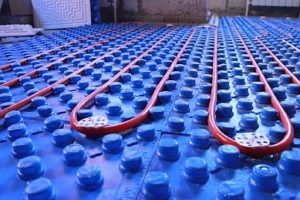
- The simplest method for installing and securing a heating element is using slabs with studs. The insulation is secured to the base, and pipes or wires are laid in its grooves according to the planned layout. Additional support for the heater is not required, as the studs hold it securely. Before laying the trim, the stud-based heated floor should be covered with gypsum fiber sheets.
To summarize, it's best to install hydronic underfloor heating into a screed. However, in a wooden house, pouring it isn't always possible, so the joist method is recommended; it's quicker and less labor-intensive.
The installation method on a subfloor is ideal for log houses, especially when using infrared film.
What heating system should I choose for a wooden house?
If we consider underfloor heating from a labor-intensive installation standpoint, electric systems are easier and quicker, especially if you choose film or mats. However, if you consider operating costs, electric underfloor heating will be more expensive, making hydronic systems more cost-effective.
How do you choose underfloor heating for a wooden house? When choosing, it's recommended to consider a number of factors:
- the condition of the ceilings and their wear and tear;
- feature of the room;
- purpose - the floor will be used as the main or additional heating.
Considering fire safety, hydronic systems are preferable in wooden houses. They are installed either in the screed (if the floors can support them) or as decking. If there is no nearby hydronic heating source, electric systems are installed.
Cable floors are recommended for use when installed in a screed (if the floors are strong); if not, infrared heating models are preferred; they are simple and pose virtually no risk of fire.
Technically, the process of installing hydronic or electric floors in a wooden house is slightly different. It's important to follow the installation procedures.
Installation of a water-heated floor in a wooden house
If you live in the house permanently, it's recommended to use water as the coolant for your underfloor heating system. However, if you're not a frequent visitor, antifreeze (Tosol) is preferable; it doesn't freeze and won't need to be constantly drained from the line.
The coolant for underfloor heating can be supplied by a central heating system or a standalone boiler—the latter is more commonly used in private homes. The fluid is circulated by a pump. The unit consists of an expansion tank, a pressure relief valve, a distribution group, a safety valve, and pipes.
The coolant is heated in the boiler, where its temperature is controlled. From the boiler, the water passes into the manifold assembly, and then into the distributor, from where it is distributed through the loops.
Installing a water-heated floor in a wooden house yourself
The installation of a water-heated floor system should begin with a project plan. This plan should include a diagram of the piping layout and the location of the manifold.
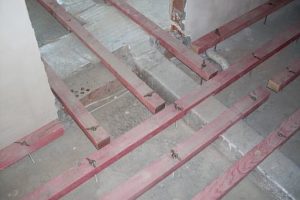
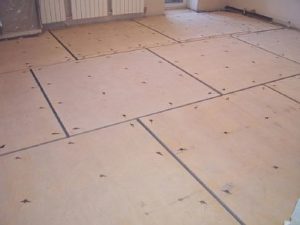
Base
Installing hydrofloors in a wooden house has its own unique challenges. These include the need to assess the foundation. This includes inspecting the beams for strength and the floor for cracks. Furthermore, the degree of unevenness is determined—the maximum acceptable level is 3 mm. If necessary, beams are reinforced or rotten ones are replaced.
When installing a heating system over an old finish, remove the paint and prime the boards. Then, seal any cracks in the floor with sealant.
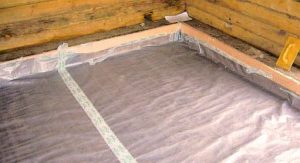
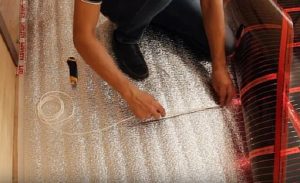
Waterproofing
For waterproofing, you need to use a vapor barrier film; polyethylene is not suitable, as it will promote condensation.
The material must be laid with the membrane surface down, overlapping, and secured with double-sided tape.
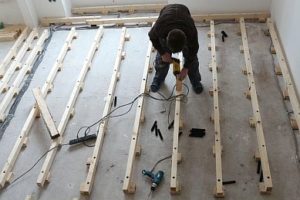
Installation of logs
Installation of the joists should begin with attaching corners to the walls, every 60 cm. Then, joists are placed on them, mounted parallel to the floor.
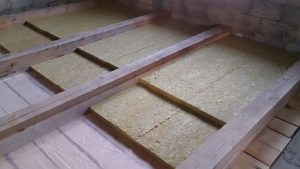
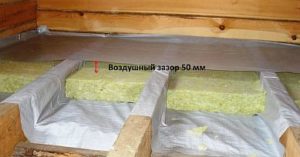
Thermal insulation
A 10 cm thick layer of mineral wool insulation is placed between the joists. The insulation should be placed 5 cm below the joists to create a ventilation gap.
Waterproofing
A polyethylene film can be used as a second waterproofing layer. It is laid taut over the joists and secured with a stapler.
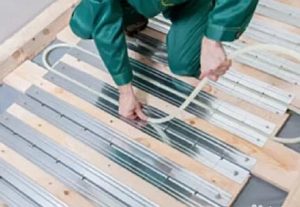
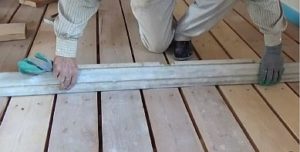
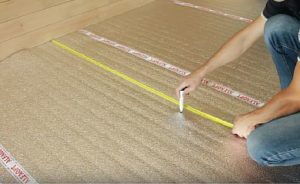
Pipe underlay
The next step is to nail 2-cm slats across the joists, spaced 30 mm from the walls. They are not laid end-to-end; there should be gaps between them. The spacing of the slats is determined by the heater's spacing, typically 20 mm. It is essential to treat the wooden slats with a water-repellent agent.
Metal-plastic plates are inserted into these grooves; the heating element will be placed in them.
Installation of the circuit
Pipes, usually 16 mm in diameter, are laid into the grooves of the profile. To allow for pipe turns, the rails should be shortened by 10–15 cm at the turning points.
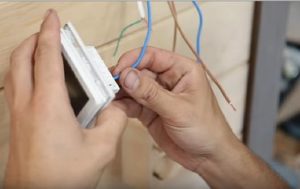
Connection
A manifold is installed on the designated section of the wall and connected to the heat source—in a private home, this is usually a stand-alone boiler. It is usually located in the boiler room.
The floor circuits are connected to the corresponding outlets of the distribution comb - one end to the supply and the other to the return.
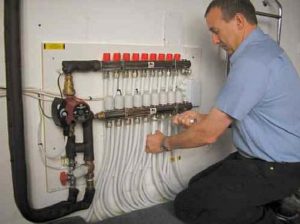
After connecting the device, you should perform a test run to check its operation and identify possible leaks.
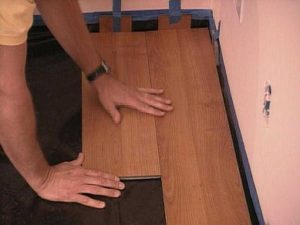
Finishing coat base
Gypsum fiberboard or chipboard sheets can serve as a base for the finishing material. They are laid across the entire floor of the room.
Finish coating
The final layer is the flooring (tile, laminate, or linoleum). You can choose any material, as long as it complements the heated floors.
At this point, the floor is ready for use.
Electric underfloor heating system
Cable-type electric heating is similar in design to hydronic floors, but uses cables instead of pipes. The power source is electricity, not a boiler with heated water.
In this case, instead of a manifold regulating the temperature of the heating medium in the main line, in electric floors the temperature is adjusted using a thermostat. A special feature of installing cable-based underfloor heating in a private log home is the need for armored wire with a metal sheath.
The structure of a film infrared floor consists of a film, a temperature sensor, and a thermostat, which regulates the temperature.
Installing a heated infrared floor in a wooden house
We decided to install an infrared electric floor heating system on a subfloor because it is less fire-hazardous—an important consideration for wooden buildings.
The sequence of work looks like this:
- Preparing the subfloor includes leveling and sealing cracks. If the floor is of poor quality, you can lay plywood sheets over it.
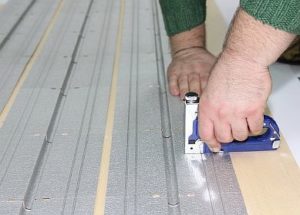
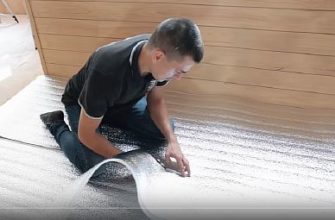
- When laying thermal insulation, the material must have a polyester coating, as it is non-conductive. It's best to choose a product with a self-adhesive layer. Additionally, secure the material to the floor with double-sided tape. Seal the joints between the strips with regular adhesive tape.
- Marking areas on the material for film placement.
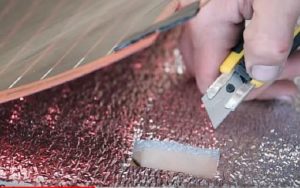
- To install the film, roll it out on the floor surface. Cut the film only along the designated lines. Tape the strips together and to the insulation.
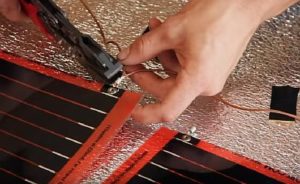
- Connecting the film: Eyelets must be attached to the edges of the product, and the wires are connected to them. The contacts must be firmly clamped and insulated with bitumen tape. All film strips are connected in parallel.
- Cut grooves in the insulation for the connecting contacts and wires so they don't protrude from the surface. They should be recessed into the recesses and secured with tape.
- Installing the temperature sensor—grooves must also be made in the insulation material for the sensor and the cable connecting it to the thermostat. The sensor is installed between the heating sections and secured with tape.
- To install a thermostat, you need to start by preparing a place for it. To do this, make a hole in the wall and run the wires from the film to it. The wires are connected to the thermostat, which is then mounted on the wall.
- System testing - Before installing the flooring, the floor should be turned on and tested in operation.
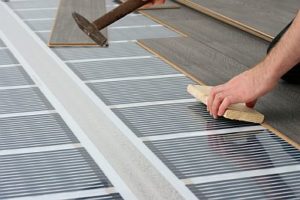
- Installation of the finishing flooring—the specifics of its installation depend on the type. When using laminate or parquet flooring, an underlayment is not required; a waterproofing layer is sufficient to protect the film from moisture. When choosing linoleum or any soft flooring, an underlayment is required. This can be plywood, onto which the linoleum is then laid.
As you can see, there are many ways to install underfloor heating in a wooden house. However, choosing the right model requires careful consideration, taking into account the specific features of the house and the ceiling capabilities. If you perform all the calculations and installation work correctly, your floor will delight you with its warmth.


When I was installing underfloor heating in my country house, I also considered various options, but ultimately decided that hydronic underfloor heating was the best option for my specific situation. I'm glad this article confirmed my decision.