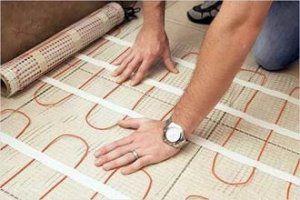
Heating mats are a type of electric underfloor heating. Currently, underfloor heating systems using heating mats as a base and ceramic tiles as a finishing surface are very popular. The main reason for their popularity is their ease of installation, as the electric cable is already laid out and attached to the reinforced base, and all that remains is to unroll it.
In addition, matte structures do not require pouring a cement screed.
Types and design of heating mats
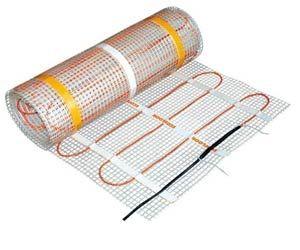
Heating mats are a system of flexible heating elements in roll form. They are based on a fiberglass mesh. It consists of cells created by interweaving fiberglass threads and fiberglass roving. Fiberglass is a durable and resistant material to aggressive environments and rust. A 3-4 mm thick cable is attached to this mesh.
The system heats up after power is applied, converting the electrical energy into heat and transferring it to the flooring. This design is practically ready for installation; it simply needs to be rolled out onto the floor.
The main advantages and disadvantages of this type of electric heated floors in the form of mats under tiles are clearly presented in the table.
| Pros | Cons |
| It has few layers, so it does not increase the floor height. | High cost of electricity |
| Installation is simple and does not require much skill, as the cable is already secured to the base. | The system can only be used after the base has completely dried, which takes about a month. |
| Easy calculation of the amount of material required | Additional load on the electrical network |
| The base is an environmentally friendly material, reinforcing mesh | |
| Quickly heats up any surface, including tiles and parquet | |
| Automatic temperature control | |
| The cable is already laid on the base | |
| No need for screed |
Infrared heated floors in the form of mats are divided into several models:
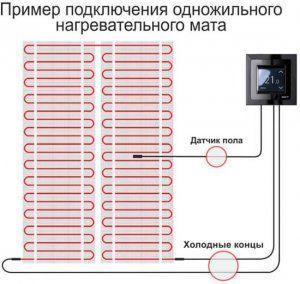
- Single-core flooring has a single heating conductor, making it significantly less expensive than dual-core flooring. It has a higher level of electromagnetic radiation, but remains within sanitary standards. Therefore, this type of flooring is recommended for spaces where people do not constantly occupy the space, such as bathrooms or hallways. Installation is more complex, as both ends must be connected to a thermostat, and a concrete screed is required. The advantage of this model is its low power consumption, despite the high heating temperature.
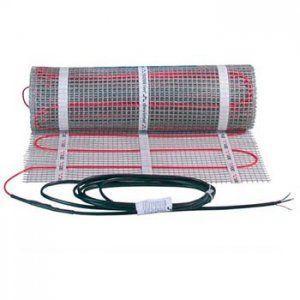
- A two-wire system consists of two conductors: a heating conductor and a conductive conductor. This simplifies floor installation, as there's no need to connect the other end of the cable to the thermostat. Furthermore, installation is possible on any flooring. This design has reduced electromagnetic radiation, making it suitable for installation in living spaces.
Features of selection, prices
As mentioned above, you should choose the type of mat for under tiles based on the intended use of the room. For living rooms, it's best to purchase double-core mats, while for installation in bathrooms, toilets, hallways, and loggias, or bathhouse - single-core.
Before you go shopping for a heated floor system, you should check out a few parameters:
- Is it suitable for flooring - ceramic tiles?
- what type of installation is planned (dry or wet);
- Is the use of mats permitted by electrical safety requirements?
The approximate price of high-quality models is:
- single-core - 2300 rubles/m2, the power of which is 150 W/m2;
- two-core - 3200 rub.
Important to know! The market price of a mat drops significantly when purchased in large quantities. The larger the area of the underfloor heating installation under the tiles, the lower the price per meter. Furthermore, the manufacturer's brand also influences the price. Products from Devi, Electrolux, Thermomat, and Ensto will cost twice as much as a system from a lesser-known manufacturer.
Brands to consider:
- Devi — a Danish manufacturer, producing high-quality products at affordable prices. 12-year warranty.
- Energy (England) — offers a wide range of heating mats. All models offer an excellent balance of price and quality.
- Teplolux — is a leader in the Russian market of manufacturers who produce high-quality heated floors.
- Rehau — a German company, known not only for its warm water floors, but also for its thermal insulation materials.
- Eltherm — German mats, durable and affordable.
When choosing underfloor heating mats for tiles, it is important to consider that they have different power ratings, depending on the manufacturer and model.
Preparatory work, installation and connection
Laying mats is carried out only on a level base, so it must be specially prepared beforehand.
Preparing the base
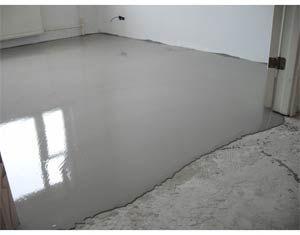
To prepare the surface for underfloor heating under the tiles, remove the old flooring and pour a concrete screed. If the surface beneath the old flooring is smooth, you can simply fill the cracks.
Once the base has dried, a thermal insulation layer is installed. Polyurethane foam boards and expanded polystyrene are suitable for this, as they are fairly rigid and resist deformation well. However, their thickness must be at least 10 mm.
Installation of thermomat
First of all, you need to make markings taking into account the following requirements:
- distance from walls is not less than 10 cm;
- from heating radiators - at least 15 cm.
In addition, it is necessary to plan the furniture arrangement, as the mats are laid under furniture with legs at least 10 cm high. If the items do not have legs, or the legs are shorter than the specified height, then the system is prohibited from being installed under them.
Installation of underfloor heating under porcelain tiles begins from the thermostat location and extends to the opposite obstacle (wall or object) under which the system will not be installed. Upon reaching the wall, the mesh is cut, the mat is rotated 90 degrees, and then laid out in the opposite direction. The number of such rotations is unlimited and is determined by the area of the room.
After laying the mats over the work area, they must be secured with a cement-sand mortar or heat-resistant adhesive. To do this, lift each heating mat and apply a screed to the insulation laid on the floor. Then, replace the mat and press it down with a block. Any excess cement mortar should be removed to the height of the cable. Then, you can begin laying the tiles immediately.
If desired, you can add another layer of screed over the heated floor. This will make the floor more monolithic and ensure more uniform heating.
Connection
The underfloor heating system is turned on and off using a thermostat, which it must be connected to. It also protects the cable from overheating and helps maintain a comfortable temperature in the room. This device operates automatically, and when the floor reaches the set temperature, the power supply is cut off.
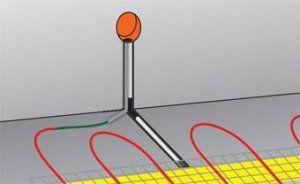
The thermostat should be connected according to the detailed diagram on the device's body. It is mounted on the wall, 30–120 cm above the floor. A cable is run to the thermostat to supply power.
The heating elements are connected to it with a coupling. If the mat is small, it can be plugged into a regular outlet. If it is longer than 10 m2, the power cable should be connected to a separate circuit breaker.
Additionally, a sensor must be connected to the thermostat; it is needed to calculate the temperature level. To install the sensor's signal cable, a channel must be made in the floor, positioned between the heating cable loops. The temperature sensor and cable are placed in a corrugated pipe, and the free end is well insulated to prevent moisture ingress.
After connecting the device and allowing the adhesive to dry, let the system run for 10-15 minutes. If the floor becomes moderately hot, reaching 60 degrees Celsius (140 degrees Fahrenheit), it is ready for use.
Laying tiles

Laying tiles on a heated floor The process is no different from laying tiles on any other surface. However, to avoid damaging the heating elements, it is recommended to seal the underfloor heating mats with a tile adhesive screed.
It's best to use an epoxy-based adhesive. It should be diluted to the consistency of thick sour cream and applied in a thick layer to the fiberglass mesh. Once the adhesive has completely dried, you can begin tiling.
Apply adhesive to the floor and tiles using a notched trowel. Then, place the tiles on the floor and press lightly. After the adhesive has dried, grout the joints.
Approximate cost of materials
When calculating the approximate cost of underfloor heating, you can use the following prices:
- insulation per m2 — 600 rubles;
- temperature sensor - from 100 rubles and up;
- non-programmed thermostat model - 600 rubles;
- programmable thermostat - 3200 rub.
If we take mats priced at 2,000 rubles as a basis, then the total cost of a 5 square meter floor will be within 14,000 rubles.
By choosing a "warm floor" heating system based on infrared or electric thin mats, you'll solve several problems at once: effectively warming your flooring, creating a comfortable atmosphere in your home, and creating a personalized interior.


