Installing heated floors under the tiles in a sauna is a popular solution, as this type of heating improves the microclimate in the sauna room and offers a number of other advantages. Although this heating system is expensive, it pays for itself in the long run. Another advantage is its ability to quickly dry all surfaces, thereby extending the lifespan of the finishes and floors.
Currently, there is a wide variety of options for types of heated floors. All of them have their positive and negative sides and installation features.In this article, we'll take a detailed look at which type of underfloor heating is best suited for a tiled sauna. To understand this, you should familiarize yourself with all the different types.
- Types of heated floors for saunas
- Preparation before installing underfloor heating
- Electric heated floors in the bathhouse
- Brief installation instructions
- Film infrared floor
- Step-by-step instructions for installing a heated film floor in a sauna
- Water-heated floor heating
- Installation of underfloor heating
- Errors during installation
- What flooring is best for a sauna?
- Related videos
Types of heated floors for saunas
Previously, the only way to heat the floors in a bathhouse was Stove heating - instructions on how to connect a water-heated floor in a sauna to a sauna stoveModern heating systems are more efficient, and despite the common belief that they pose a fire hazard, they are fireproof. There are three main types of heated floors for saunas:
- Water - is a closed system filled with water and having an electric or gas heating boiler.
| Pros | Cons |
| Uniform heating of the area | Labor-intensive installation |
| The cost of maintenance is not high | The need for expensive temperature control equipment |
| The structure may become depressurized | |
| The conditions for carrying out repair work are complex |
- Electric A heating element, either a cable or a mat, is used for heating. The operating principle is that the supplied electricity is converted into thermal energy and distributed over the entire surface.
| Pros | Cons |
| Temperature control is performed automatically | Expensive consumables |
| Any type of flooring can be installed | High cost of electricity |
| Quick installation |
- Infrared heated floor — warm electromagnetic radiation. All elements are enclosed in polyethylene film, which protects against electric shock.
| Pros | Cons |
| Durable and practical design | There are a large number of hidden connections present. |
| Can be installed under any base |
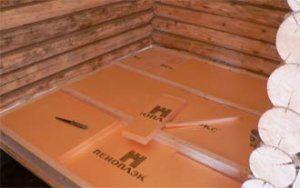
Preparation before installing underfloor heating
Wood is often used for sauna flooring, but tiles are becoming more popular these days. In this case, the base is a concrete screed, which doesn't retain heat well.
Therefore, additional floor insulation with a heat-protective layer is required. This can be done with insulation materials such as felt, expanded clay, glass wool, or foam.
The sauna floor will be warmer if you place insulation between two layers of concrete. The final layer can be thinner than the base layer, which will save space.
Important to knowSince the humidity level in the sauna is high, all subfloor components should be treated with a water-repellent and antiseptic solution and waterproofed.
Electric heated floors in the bathhouse
The sauna's electrical system is safe because there is no direct contact with water. The design is based on a cable, either single-core or twin-core.
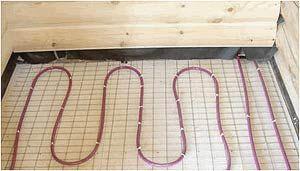
When installing underfloor heating under tiles, you need to start by choosing a layout. The most common layout is a serpentine layout, which is easier to install.
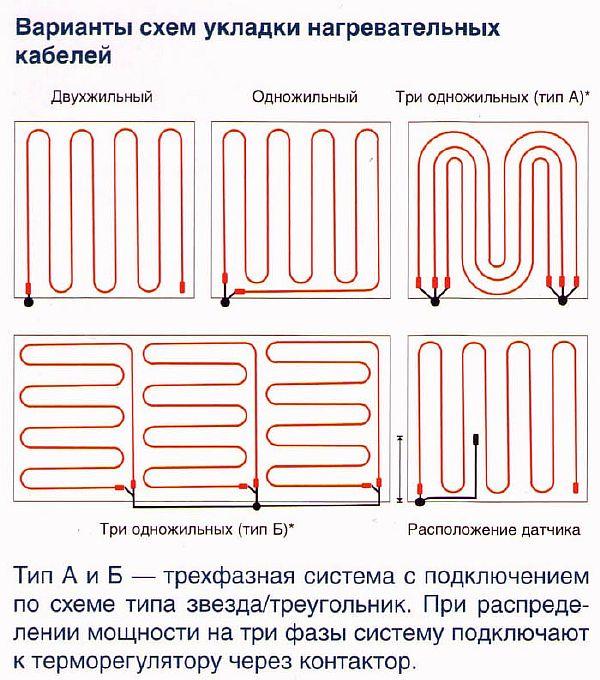
The principle of operation itself is not complicated, the main thing is to follow the following rules:
- 5 cm from all walls;
- 10 cm from heat sources;
- make a step between the turns, each manufacturer has its own, according to the instructions indicated on the packaging.
Brief installation instructions
Otherwise, the procedure for installing electric heated floors under tiles in a bathhouse is simple:
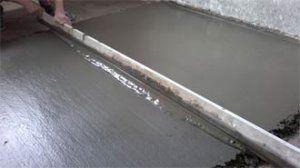
- The first step is to create a foundation. It must have a proper slope to allow water to drain. The minimum slope is 2 cm/m. It shouldn't be directed toward the center of the room, but rather toward any wall.
A sloping gutter is made along it to collect water. The easiest way to make a gutter is to take 100mm diameter PVC sewer pipes and cut them lengthwise.
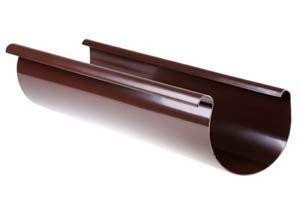
Using waterproof silicone sealant, you can join the pipe walls. The groove is covered with a grate.
The foundation consists of a clay layer and a sand and gravel cushion. Each layer should be well compacted.
- The next step is installing benchmarks, which should be done before pouring the screed. The distance between benchmarks is 1–1.5 meters. If the concrete surface is 3 meters wide, it is sufficient to install one benchmark in the center and two on each side, spaced 1 meter apart. The benchmark plays a crucial role in determining the final slope of the foundation. A damper tape should be applied along the walls; its thickness should be 10 mm and its height 200 mm.
- The surface is poured with a semi-dry screed, meaning it has a consistency similar to wet sand and does not leak when compressed. This mixture retains its shape perfectly and quickly becomes strong. However, the installation process requires time. for complete drying - if the cement layer is 5 cm, then the cycle duration will be 4 weeks.
The material consumption depends on the area of the room and the thickness of the screed. For example, if the bathhouse is 3 x 4 m and the screed is half a meter thick, 0.6 m³ of concrete will be required (3 x 4 x 0.05). The water to cement ratio is 0.45.
To secure the base, you can use a reinforced mesh; it significantly increases the strength of the surface.
- The next step involves laying a thermal insulation layer made of rigid foam polymer with a compressive strength of 2 kg/cm². Based on technical specifications, a 3 cm thick extruded type is ideal. It is installed in two layers, with the joints taped.
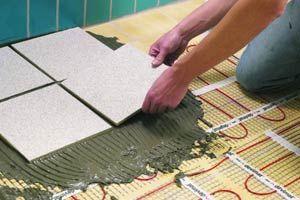
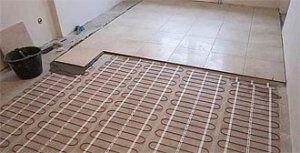
- The final step before laying ceramic tiles is installing the electric heating system (mats). The cable must be laid across the entire floor surface. It is not recommended to place it in areas where furniture will be installed.
All heating mats have the same power rating—150 W/m². Therefore, before purchasing, it's important to draw a layout diagram. If the bathhouse's electric underfloor heating system is to be divided by a partition into a washroom and a steam room, each section will require a separate circuit.
The electrical device must be covered with reinforced mesh. The sensors must be positioned, grounded, and the system must be connected according to the instructions.
Then, the design needs to be tested in action by turning it on for 10 minutes. If all the elements heat up equally, then you can start installing the tiles.
The thickness of the electric heated floor in the bathhouse under the tiles is 23 cm, from the ground to the covering.
When installing mats, it is important to follow the following requirements:
- do not cut or bend them;
- do not overlap one another;
- do not place heavy objects;
- do not walk on unauthorized mats;
- do not lay mats at temperatures below 5 degrees;
- do not install them under walls;
- Do not place under wooden floors.
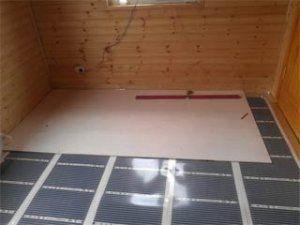
Film infrared floor
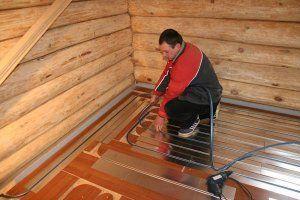
Infrared film underfloor heating under tile in a sauna is the most cost-effective option. This type of flooring is also very easy to install. The infrared mat is a transparent material with an infrared film inside.
Installation of this type of heated floors begins with the installation of thermal insulation. However, it can be laid on any type of surface.
Step-by-step instructions for installing a heated film floor in a sauna
- The amount of material is calculated and prepared; all sections of the heating elements must be insulated;
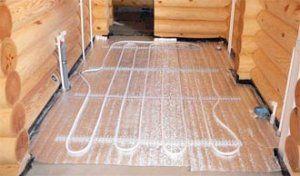
- the film is spread out according to the developed scheme, and the places where the cable will be installed are marked;
- the area is cleared of garbage;
- heat-insulating material is laid and fixed with tape;
- infrared film is laid and fixed in the same way;
- The film channels are connected to the power cable and secured with connecting clamps;
- the joints are insulated with a special impregnation;
- the working resistance is measured;
- The final stage, before installing the tiles, is to cover the film with tile adhesive.
You can install this underfloor heating system under tiles in just one day. The unique feature of this model is that there's no need to pour a screed.
Water-heated floor heating
Before installing a heated water floor in a sauna, you need to ensure the surface is level, choose the pipe material, and plan their placement (whether a coil or a serpentine). A coil is the most suitable model for a sauna, as it heats the surface evenly.
Water is most often used as a heat source, but antifreeze can be used instead. It is resistant to freezing at low temperatures, which can cause pipes to burst.
Please note! To ensure heating of the water floor, It must be connected to a heating boiler, but in a sauna, it can be replaced with a stove. For this purpose, a boiler is installed above the stove to heat the water.
This is especially appropriate if the steam room is a separate building. A pump is required regardless of the heating option chosen; it ensures water circulation in the pipes.
Installation of underfloor heating
There are two ways to install a water-heated floor under tiles in a bathhouse:
- concrete - implies the presence of a concrete screed, it is poured over the pipes;
- flooring - the heating circuit is laid on polystyrene foam boards or wooden flooring, used when the foundation is not strong enough to support a cement fill.
However, concrete is more commonly used for floors in washrooms and steam rooms. The installation procedure for this type of flooring is as follows:
- The surface is leveled; a special straightedge can be used for ease of alignment. In the case of wooden floors, openings for pipes must be made.
- To increase the efficiency of heat transfer, mineral wool is placed under the circuit.
- The mounting surface is installed using insulating material with studs, and the pipe is laid between them. However, pipe clamps can also be used to secure the pipe.
- When laying a pipe, it shouldn't have any sharp turns. The spacing can be any, but it shouldn't be too close—it will be expensive and won't change the effect.
5. The system is connected and checked for leaks.
6. The final stage is pouring the screed.
It's important to ensure there's no tilt. While the pump will still pump water in this position, the increased pressure will quickly damage the system.
Errors during installation
Carry out installation work independently Installing a heated floor in a bathhouse is not difficult, but mistakes are often made that lead to defects in the entire system.
To avoid them, you must follow these recommendations.
- When choosing a cable or mat, it is necessary to consider not the entire area, but only the space where furniture will not be located.
- It's not recommended to shorten the cable installed in the system. This increases the load on it, which can lead to its failure. The correct approach is to reduce the pitch and increase the heated area.
- It is prohibited to turn on the system until the concrete is completely dry.
- The heating cable element can only be laid on a clean surface that has been treated with a primer.
- The distance between parallel lines in the structure must be at least 5 cm.
- When laying the cable yourself, the degree of bending should be in the range of: 5 - 9 of its diameter.
- The heating device sensor must be installed in an accessible location and must be protected by a corrugated box.
- It is essential that the floor surface be in contact with the sensor's sensitive probe.
- During installation of the system, do not walk on it in shoes to avoid damage.
- Before installing a water-heated floor, you first need to prepare a diagram.
- It is necessary to carefully check the water floor for leaks.
Taking these points into account, you can install a heating system in the bathhouse yourself.
What flooring is best for a sauna?
The need for heated floors in a bathhouse under tiles is unquestionable, as they offer a number of advantages:
- The service life is extended, as a steam room is a place with high humidity. Therefore, the risk of the wooden surface rotting or becoming moldy is high. Dry air circulating upward from the heating surface helps dry the room better.
- Minimizes drafts, thereby reducing the risk of colds for sauna users. Infrared floors are the perfect solution to this problem.
- Creates a more comfortable washing process – it’s more pleasant to step on a warm tile floor.
- Maintains the sauna in good condition - regular heating of the room will protect it from destruction.
Despite all the positive aspects of such floors, they also have disadvantages: high cost, labor-intensive installation, and difficulty in repair, since it usually requires removing the floor covering.
Taking into account the design and layout of the room, it is possible to install heated floors under the tiles in the washroom, dressing room, and sauna.
The most practical option for a sauna is to install a film infrared heated floor, as it only requires an electrical connection and is fairly easy to install. A water-heated floor, on the other hand, requires a boiler, which is expensive, and a screed, which takes up to a month to fully cure.
Therefore, even with the high cost of electricity, the infrared system option still seems more practical and economical, since the system does not operate constantly.
The choice of design is entirely up to the owner. It's best to consider your preferences, budget, and, of course, the strength of the foundation and the layout of the space.


