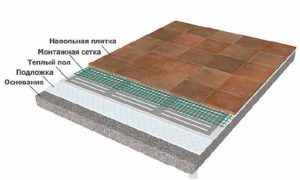
Infrared film flooring is a heating system that uses a thin heating film with a conductive carbon layer (solid or striped). The room is heated not through the screed, but by infrared radiation, which warms the surrounding objects (interior elements, walls, etc.), making it an excellent alternative to hydronic and cable underfloor heating. Its advantage is its ease and speed of installation.
The best covering for any heated floors, including film type, is considered to be tiles, especially when laying in the bathroom and kitchen (find out what type It is best to choose floors for the kitchen (And how to lay it yourself). After all, tiles are a durable, strong, moisture-resistant, and environmentally friendly material.
- What flooring is best for tiles?
- Is it possible to lay film flooring under tiles?
- Features of installing infrared floor heating under tiles
- Operating principle
- Characteristics
- Advantages of infrared flooring under tiles
- Flaws
- Materials we will need
- Installation technology
- Preparation
- Development of a laying scheme
- Waterproofing
- Thermal insulation
- Laying thermal film
- Connecting the floor
- Laying tiles
- Basics of safe use
- Video instructions
What flooring is best for tiles?
There are various models of heated floors, including water-based and electric. Electric heated floors are further subdivided into cable-based, rod-based, and film-based. Each type has its pros and cons., which you should pay attention to when choosing a floor covering.
Hydronic underfloor heating is a system with a built-in pipe through which heated coolant circulates. It is often installed in a screed.
Electric cable-based systems use a cable as the heating element. Like water-based systems, this type is usually poured over a concrete screed, although a dry installation method is also possible.
Electric infrared floors are the easiest and most inexpensive to install, especially in apartments. They consist of a thin film with carbon plates.
An advantage of tiles is that when placed over underfloor heating, they allow heat to pass through, increasing the efficiency of the heating system. Tiles are often laid on a concrete surface and secured with adhesive. They are an ideal finishing material for water-based and cable-based floors filled with screed.
Decorative finishing of infrared heated floors with porcelain stoneware presents a number of challenges and peculiarities, as the "pie" is very thin. However, in principle, there are no restrictions on this combination.
Is it possible to lay film flooring under tiles?
Before you decide to install electric infrared film underfloor heating under PVC tiles, you should understand how to do it. Therefore, experts recommend familiarizing yourself with the installation instructions for this system and its operating conditions.
The instructions for film-based underfloor heating indicate that various materials can be laid over them, including linoleum, laminate, and carpet. It's also acceptable to install this heating device under tiles. The system description includes recommendations for installing infrared floors under tiles.
Please note! Infrared heated floors can be installed under porcelain tiles outdoors, as they are moisture-resistant.
When arranging paths around the house with this type of heating, they will never become covered with people.
Features of installing infrared floor heating under tiles
The only peculiarity in constructing such a "pie" with tiles is that "dry" laying is not used, but tile adhesive is used or a self-leveling floor is made.
If preference is given to the "wet" method, when constructing film floors, a number of features should be taken into account:
- Low adhesion means that simply pouring cement mortar onto such floors is not recommended, as the resulting structure will be floating. If something heavy falls on such a surface, the screed may crack, making it difficult to repair.
Some try to improve adhesion by making notches on the product, but experts advise against this method. These areas are difficult to insulate, thus creating a risk of electrical leakage.
- The film does not tolerate alkali well—the alkali contained in the cement mortar will have a negative impact on the IR floors, leading to their rapid failure.
If you decide to install a film-based underfloor heating system under your tiles yourself, you should adhere to certain technical requirements during installation, which are described in detail below.
Operating principle
An infrared floor is a thin film with carbon plates sandwiched between its layers. These serve as the heating element, generating heat. The device operates off the mains power supply and uses infrared rays measuring 10–20 microns in diameter.
The film quickly heats the floor, and the thermostat allows it to turn off when the desired heating level is reached and turn back on when it cools down. As a result, the unit operates for approximately 20 minutes per hour.
Film floors have the highest efficiency compared to other systems. While heating quickly, energy consumption is minimal, making infrared floors more cost-effective and energy-efficient.
Moreover, it heats the objects in the room rather than the air itself, which in turn heats the air. This creates a wonderful atmosphere in the apartment, as the air doesn't become too dry, while at the same time, it's saturated with negatively charged particles.
Infrared flooring is perfect for various rooms, the ideal option is to lay it under tiles in the toilet or bathroom (we suggest you read the step-by-step instructions for installing a heating element in the bathroom).
Characteristics
As mentioned earlier, infrared floors are sold in strips ranging in width from 50 to 110 cm, with the length adjustable using notches that allow for cutting. The heating elements are carbon plates placed inside the film.
The thickness of the film “pie” also plays an important role; unlike other warm systems, it is only 5 mm without a finishing coating.
The main difference between film heating and conventional radiator heating is that it is located under a decorative covering. This allows for a comfortable atmosphere to be maintained in the home. The temperature is regulated by a thermostat; the maximum possible temperature is 50 degrees Celsius, but the recommended temperature is 21 degrees Celsius.
The floor requires 220W of power to function, and the maximum consumption is 250W/m2.
Advantages of infrared flooring under tiles
The main advantage of film heating is its easy installation, which takes just one day. Furthermore, the system requires no maintenance during operation. It's worth noting that this type of flooring doesn't freeze in winter.
The advantages of an IR floor laid under tiles include:
- wavelength - it is 5 - 20 microns, so it easily passes through the tile;
- easy temperature control - allowing you to create comfortable conditions without any difficulty;
- economical - consumes little electricity;
- absence of electromagnetic radiation - that is, it does not harm humans;
- ability to ionize air;
- not high cost;
- efficiency - it is 20% higher than other heated floors;
- functionality - if one element breaks, the entire structure continues to function;
- small thickness - which does not affect the height of the ceilings;
- moisture resistance - can be laid in rooms with high humidity (bathroom, toilet, swimming pool).
Flaws
Even with all the advantages, film floors placed under tiles also have disadvantages:
- Heating is recommended for rooms with a small area; when installing them in rooms of impressive size, costs will increase significantly;
- since the floor does not lay under heavy objects and plumbing, it is not possible to rearrange furniture in the apartment;
- Using glue or concrete screed to secure the tiles will significantly reduce their service life;
- failure may result in a short circuit;
- It is permissible to lay the film only on a perfectly smooth base;
- mechanical damage to the film is possible, since the tiles have a significant weight;
- The adhesion of the IR floor makes installation more difficult.
Please note: To improve adhesion, it is recommended to install drywall or fiberglass mesh between the heating system and the tiles.
However, this will reduce the heating capacity of the structure.
Materials we will need
If you plan to install an infrared floor with a finishing coating (tiles) yourself, you should stock up on the necessary materials and tools.
Need to buy:
- thermal film with a set of clamps;
- electrical wire;
- temperature controller;
- bitumen insulating material;
- thermal insulation;
- reinforcing product;
- polyethylene film;
- dry self-leveling mixture;
- tile adhesive;
- construction tape.
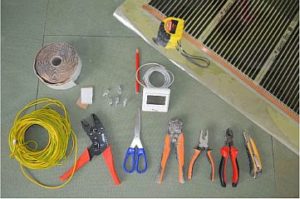
The tools you'll need when installing infrared underfloor heating under tiles include: a multimeter, tape measure, screwdriver, square, measuring tape, nippers, and a rubber mallet.
If you buy a standard film floor kit, it includes, in addition to the thermal film itself, clamps, electrical wires, and bitumen insulation material with a self-adhesive base.
Please note! It is important to select the correct cable cross-section for connecting the floor to the thermostat.
Installation technology
Once you have prepared all the components and tools, you can proceed directly to laying the film infrared heated floors under the tiles.
Watch the video installation instructions
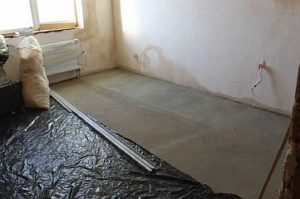
Preparation
Infrared floors are particularly sensitive to defects in the base, and its preparation should be approached seriously.
The process includes:
- Dismantling of old coating.
- Cleaning the floor from dirt and debris.
- Degreasing the surface and treating it with primer.
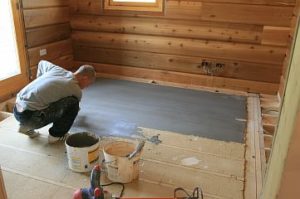
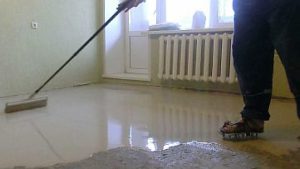
- Subfloor leveling: the "dry" method uses expanded clay sand. This method is simple, but expanded clay can damage heating elements. A concrete-cement or self-leveling compound allows for a smooth and even floor.
With a solid and level base, the preparation process is significantly simplified. Simply apply a thin layer of self-leveling mortar.
Development of a laying scheme
Before laying, it's necessary to draw a plan for the placement of the sheets. Film flooring is not suitable for laying under heavy furniture or plumbing fixtures. Therefore, it's important to plan the room layout in advance. Using this plan, mark the base where the heating element will be installed. The clearance from the walls should be at least 20 cm.
After this, determine the location for the thermostat. It should be placed on the wall, 15 cm above the floor. It is recommended to cut grooves for the wires that will run from the device to the film, where they will be placed.
Please note! It is recommended to install the thermostat before installing the floor, as this is a dirty job.
Waterproofing
A waterproofing material is laid on the prepared surface; you can use a special membrane or regular polyethylene film.
The product is laid with an overlap, and tape is used to seal the joints.
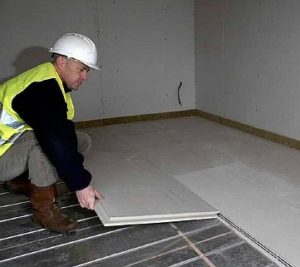
Thermal insulation
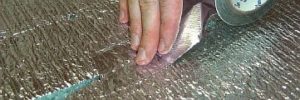
Thermal insulation material prevents heat from escaping into the floor, directing it upward. A foil-faced product such as penofol or isolon is best suited for this purpose.
Material with such a coating is capable of reflecting up to 90% of thermal energy, which makes the operation of film floors more efficient.
Laying thermal film
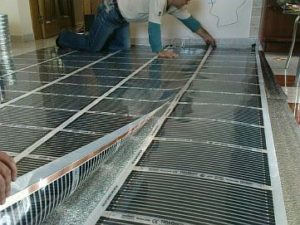
The thermal film is laid according to the developed diagram. The film must be installed carefully to avoid damaging the elements. Terminal clamps are used to connect the strips together.
The sheets are mounted in such a way that the copper contacts are located at the bottom, towards the walls, only then will the device work properly.
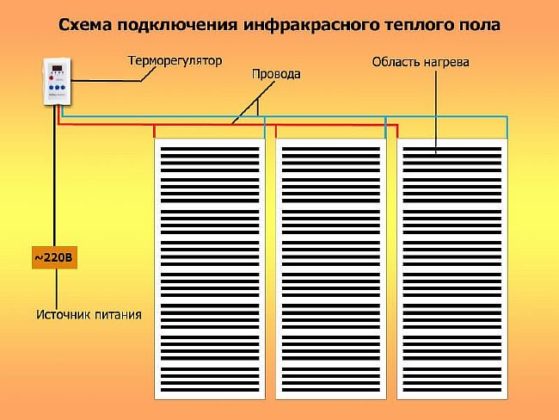
Connecting the floor
Once the floor is installed, it should be connected to the thermostat. To do this, according to the diagram, a cable should be run from the heating elements to the thermostat, which should be placed in a corrugated conduit.

To connect the cable and the IR mat, partially strip the insulation from the wire, then attach it to the heating elements using clips. Clamp the terminal with pliers gently but firmly to ensure reliable contact. Insulate the cut areas with bitumen.
Next, the temperature sensor is installed, positioned on graphite strips, and connected to the thermostat. The sensor is mounted in a special recess embedded in heat-reflective material, minimizing variations in surface height.
Once the system is connected, it must be tested. Each strip is tested separately at a temperature of 25–30 degrees Celsius.
If testing shows that the floor is functioning properly, it should be covered with polyethylene, which will serve as an additional protective layer.
Important! When connecting a film floor, the device must be grounded.
Laying tiles
You can lay tiles on top of an infrared heating structure in the following ways:
- Using reinforcing mesh:
- the mesh is laid on top of the polyethylene;
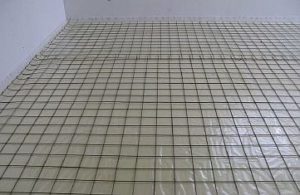
- then concrete or self-leveling mortar is poured;
- Only after the composition has completely dried are the tiles laid.
- Using plasterboard sheets, which are placed on polyethylene, and tiles are then laid on the plasterboard.
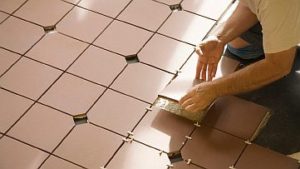
To fix the tiles to the floor, you will need glue or a special mixture.
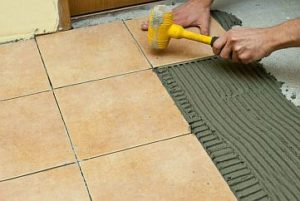
- The adhesive is applied to the back of the facing material with a notched trowel, after which the piece is secured to the substrate. To ensure even joints between tiles, it is recommended to use plastic spacers.
- To ensure good adhesion of the product to the surface and to level out any protruding areas, the tile is tapped with a rubber mallet.
- When the glue dries a little, the crosses are removed and the seams are grouted.

Please note: Using a spirit level when laying tiles will ensure a level surface.
Basics of safe use
To ensure the safety of an infrared heating system, it is important to carry out proper calculations and installation in accordance with technical recommendations:
- install the floor on a flat and dry surface;
- make gaps between sheets of the product no less than 0.5 cm;
- provide grounding;
- select a film floor and a thermostat of the same power;
- connect the heating elements directly to the machine and power them from the meter.
Please note! For more efficient operation of the floor, it is recommended to install an additional temperature sensor to monitor the temperature.
Film heating can create a comfortable home. Even non-professionals can install infrared underfloor heating under ceramic tiles, as long as you strictly follow the installation instructions.


