An important point when constructing a cable or water-based underfloor heating system is This is the correct choice of the heating element installation scheme and its installationThe efficiency of the system directly depends on this.
This article will explain the various pipe installation methods and their pros and cons. We'll walk you through the step-by-step process of installing a "snail" pipe. We'll calculate the pitch and length of the pipe loop, and review the standards and construction codes developed for underfloor heating systems.
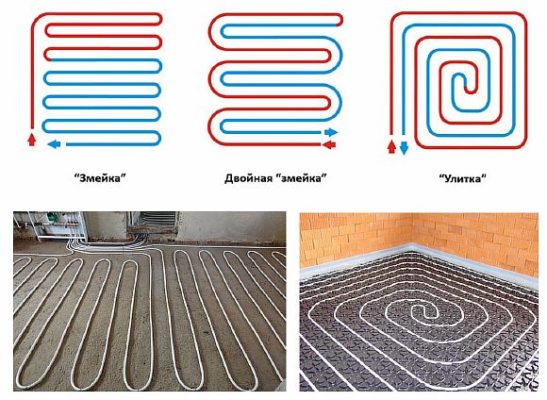
- Types of styling - snail, snake and combined method
- Which type of installation is better, advantages and disadvantages
- Installation of underfloor heating using the "snail" design
- Snail and double snail layout diagram
- Underfloor heating system with a "snail" layout
- How to calculate the pitch and length of a pipeline
- Norms, rules, SNiPs
Types of styling - snail, snake and combined method
There are several basic heating element layout schemes:
- Snake — Lay the cable parallel to the long or short wall, spaced 20–30 cm apart. Avoid sharp corners when turning the cable or pipe. Start laying the cable from the manifold or thermostat and work back toward them. This design offers low heat output, making it recommended for smaller spaces.
- "Snail" — This is a spiral heater arrangement. This design is economical and efficient. Pipe or cable installation should begin at the edge and work toward the center.
- Combined option — can combine both patterns. For example: a "snake" pattern on the edges and a "snail" pattern in the center.
Which type of installation is better, advantages and disadvantages
Each type of installation has its own advantages and disadvantages and is recommended for different models of underfloor heating.
If consider the "snake" option, it has many bends, so when used in hydronic heating systems, there may be a difference in temperature between the inlet and outlet. Furthermore, as the coolant moves through the pipes, it loses its temperature—the further it is from the heat source, the colder the surface will be.
The "Snail" design is more efficient. Heating is uniform, as hot zones alternate with cool ones.
Heat loss is minimized, but installing the heating element this way is more difficult. Furthermore, this installation method eliminates sharp bends in the heater, meaning the cable or pipe doesn't bend, allowing for smaller distances between branches.
A combination design is suitable when zoning a space is required. For example, use a "snake" design at the entrance, and a hotter "snail" design in the middle of the room.
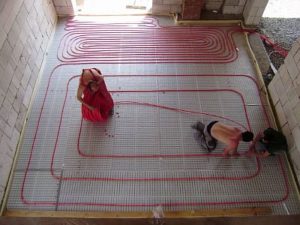
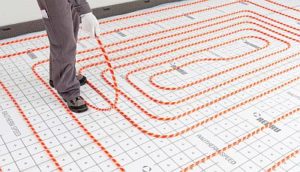
Installation of underfloor heating using the "snail" design
Any underfloor heating system must be installed in accordance with the instructions and all installation requirements, otherwise the heating system will not function effectively.
Regardless of the chosen scheme, the heating element can only be laid out on a flat base covered with hydro and thermal insulation materialThis is necessary so that the heat does not escape downwards, but is directed in the right direction.
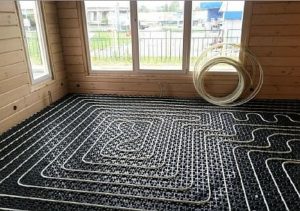
Snail and double snail layout diagram
The photo below shows the methods for laying the heater using the “snail” and “double snail” patterns.
The first photo shows a diagram of a heated floor with a two-wire cable that does not return to the connection point.

This photo shows a common "double-snail" arrangement of underfloor heating pipes. Here, the other end of the heater returns to its original position.
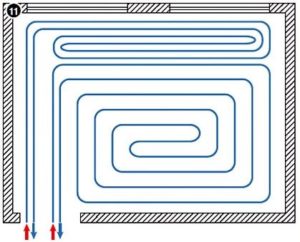
Underfloor heating system with a "snail" layout
Once the foundation is prepared, you can begin laying the heating element using a "snail" pattern. This is also called a "double snail" pattern, as the supply and return lines run parallel to each other. This method can be used for laying hydronic underfloor heating pipes or single-core cable.
The sequence of actions is as follows:
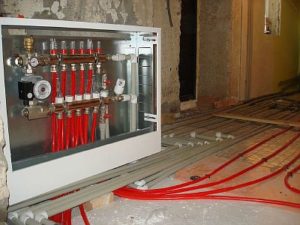
- We begin installing the heating element (pipe or cable) from the heat source. In cable systems, this is the thermostat; in hydronic systems, it's the manifold, which is connected to the boiler via pipes. The manifold is equipped with valves for connecting the hot and cold coolant.
- We lay the main line around the entire perimeter of the room; it is recommended to mark it out beforehand – this will make the installation process easier.
- If the planned distance between loops is 30 cm, the first loop should be made at a distance of 60 cm. The distance between pipes or cables throughout the room should be the same.
- We extend the pipeline in a spiral shape to the center of the room, with the radius gradually decreasing.
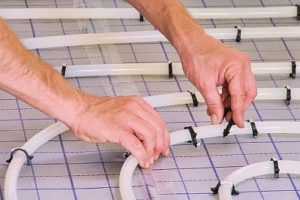
- The heater is secured to the insulation material or reinforced mesh using fasteners. When installing polystyrene foam mats with studs (used as insulation), the fastening process is simplified, as the heater is positioned in grooves and secured with studs.
- Rotate the heating element 180 degrees in the center and roll it out between the installed pipe, precisely centered. This will preserve the pattern, as the pitch will be 30 cm.
- The pipes or single-core cable must return to the place from which they were brought out - the thermostat or manifold.
After testing the system for functionality, you can pour the screed and lay the finishing coating.
If a two-wire cable is used when installing an electrical system, the process of laying it can be produce with a simple "snail"The only difference is that the other end of the wire can be brought out anywhere, and the wires can be shorted and insulated. There's no need to return the cable to its original location.
How to calculate the pitch and length of a pipeline
To ensure efficient heating, the pitch and length of the circuit should be calculated before laying the pipes.
The installation pitch is the distance between the branches of the laid heating element (it's easy to calculate). If the underfloor heating is used as supplementary heating, the standard pitch is 0.2 or 0.3 meters.
When using tiles as a finishing material, the recommended spacing is 0.2 m, as they require a long time to heat up. If laying linoleum or laminate, the recommended spacing is 0.3 m, as these materials do not like overheating.
When installing a cable floor, the pitch is affected by the cable's power. A more powerful system is needed for tiles, while a less powerful system is needed for linoleum.
To determine the length of the pipeline, the area of the room to be heated and the power of the device are taken into account. The average value is for heating 1 m.2 The area requires 10 watts of power. The pipeline length can be calculated using the formula:
L = S / N * 1.1 + k, Where:
S — area of the room;
N — laying step;
1.1 — pipe reserve for turns (10%);
k is the distance from the pipeline to the collector.
If the pipeline length is calculated incorrectly (the permissible size is exceeded), then the circulation of the coolant may be hindered, which will lead to poor operation of the device.
Norms, rules, SNiPs
If you follow the rules and regulations when installing underfloor heating, you'll create a heating system that will last for years. Furthermore, before purchasing components, you should perform calculations to determine what materials and how much to purchase.
When drawing up a circuit diagram, it is necessary to take into account the norms and rules that are prescribed in the regulatory documentation:
- When installing a cable floor, avoid placing the heater near heavy furniture. Otherwise, the system will overheat in these areas, leading to rapid failure. A hydronic underfloor heating system is installed using a "snail" pattern across the entire room.
- To maintain the required pressure in the system, the length of a single branch should not exceed 120 meters for pipes with a diameter of 20 mm. For pipes with a diameter of 16 mm, the maximum length is 100 meters.
- If you have a large room, it should be divided into several circuits of equal length, no more than 15 meters in cable floors, and no more than 60 meters in hydro floors.
- If a hydrofloor is installed, the radius of the pipe bends must be equal to at least 5 of its diameters.
- The heater must not overlap, as this may result in uneven heating of the surface.
- The acceptable laying spacing is 10–30 cm. Rolling the heater more frequently is not recommended, as the heat flow will remain unchanged, but the heating element's consumption will increase.
- Heating pipes must be located at least 15 cm from the walls.
Laying a spiral-shaped heated floor is entirely possible on your own. The key is to correctly calculate the installation pitch and the contour size, and to follow all underfloor heating installation guidelines.


Everything is described in detail about underfloor heating, installation, types, and compliance with regulations. Underfloor heating is trending today. Properly installed and insulated underfloor heating has many advantages. During the cold season, rooms are warm, comfortable, and you can walk barefoot. Using the information in this article, you can easily choose a layout, calculate everything correctly, and install it yourself.